Summary: ◀▼
Connect external MCP servers with OAuth, choose the tools you want to make available, and use them in action flows or advanced action flows to retrieve information or perform actions in third-party systems without building custom API integrations. Configure tool outputs to reuse data in later steps, and review and test flows when tools change.
The Model Context Protocol (MCP) lets admins connect Zendesk to external MCP servers, discover the tools those servers provide, and use those tools as steps in action flows and advanced action flows. This extends your Zendesk workflows to interact with third-party systems—such as project management tools, e-commerce platforms, or internal knowledge systems—without building custom API integrations.
MCP connections are created and managed in Admin Center. After you create a connection, Zendesk retrieves the available MCP tools from that server and displays them in the action builder so you can use them in workflows and, optionally, surface those flows through auto assist, AI agents, or custom agents.
This article covers Zendesk acting as an MCP client. In this role, Zendesk connects to external MCP servers, discovers the tools they expose, and uses those tools in action flows, advanced action flows, and AI agents. In this model, Zendesk sends requests to another system to retrieve information or perform actions as part of a workflow. Zendesk can also act as an MCP server in other scenarios. In that role, Zendesk exposes tools or resources that third-party AI agents can use to access Zendesk data or perform actions in Zendesk.
The following diagram shows both MCP roles.
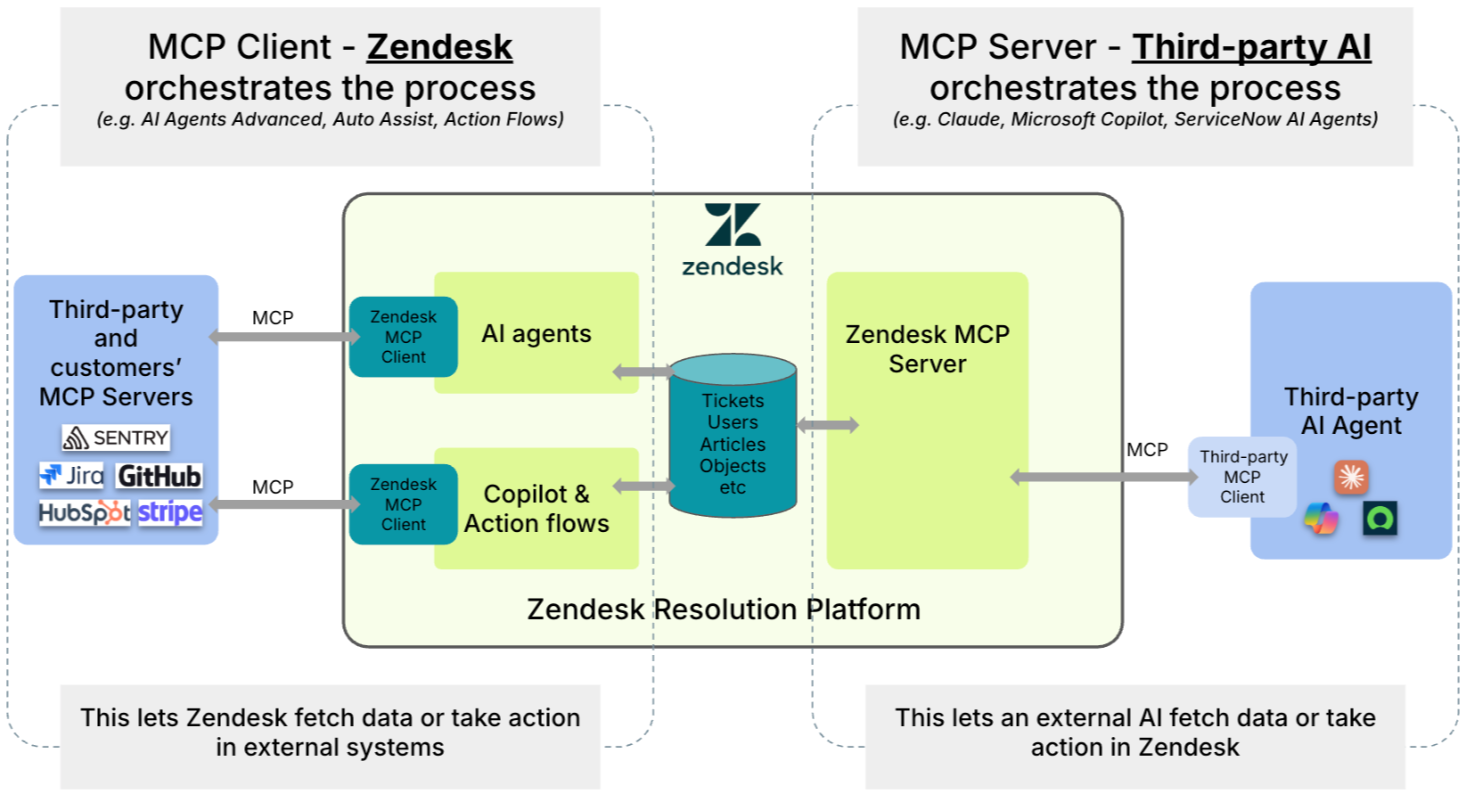
This article contains the following topics:
Considerations for using the MCP tools
Before you begin, keep the following in mind:
- Authentication
- OAuth is the only supported authentication method for MCP server connections. Only HTTP servers are supported. Stdio transport is not supported.
- Data residency and retention
- External MCP connections may transmit data outside your selected region.
- Step execution outputs are retained for seven days.
- Connection and tool limits
- There are no limits to the number of MCP servers you can connect to your Zendesk account.
- Action builder paginates and retrieves up to 250 tools returned by an MCP server.
- You can manually refresh the tools list from the Connection page to get updates to existing tools, discover new tools, or remove deprecated ones. Existing action flows continue using the previous version of an updated tool until you remove and re-add the step to the flow.
Creating an MCP server connection
Admins can add MCP server connections. Connected MCP servers appear on the MCP connections page in Admin Center. When a server is connected, Zendesk automatically discovers up to 250 tools exposed by the MCP server. After discovery, the tools are listed on the Connection page where admins can explicitly select which ones to make available in the action builder.
You must be a Zendesk admin to create an MCP server connection.
-
In Admin Center, click
 Apps and integrations in the sidebar, then select Connections >
Connections.
- Click Add connection.
- Choose Connect to an MCP server.
- Click Next.
- Under Basics, enter the connection's Name and Description.
- Click Next.
- In MCP server, enter the URL of your MCP server.
- Click Test URL to validate the connection to the MCP server.
- If prompted, enter any required OAuth client details for the MCP server, such as the client ID, client secret, authorization endpoint, or token endpoint. Required fields vary depending on your server's configuration.
- When prompted, use the MCP server's authentication popup to complete the
OAuth authentication flow for the external service.
If your MCP server requires you to create an OAuth app in an external service, such as GitHub or HubSpot, when prompted for a Redirect or Callback URL, enter
https://zis.zendesk.com/api/services/zis/connections/oauth/callback. - Click Save.
- Once saved, view the Connection page to see the list of discovered tools. Use the checkboxes to choose which discovered tools to make available for your action flows.
Refreshing an MCP connection
If an MCP connection stops working because authorization has expired or been invalidated, you can reconnect it.
Use this when:
- The connection has expired due to inactivity.
- The user’s access to the external system has changed or been revoked.
- The connection needs to be reauthorized after credentials or permissions change.
You must be a Zendesk admin to create an MCP server connection.
To refresh an MCP connection
- In Admin Center, click
Apps and integrations in the sidebar, then select Connections >
Connections.
- Select the relevant MCP connection by clicking the name or opening the overflow menu and selecting Edit connection.
- Click Reconnect.
- Complete the OAuth flow again when prompted.
Refreshing MCP server tools
You can refresh the list of tools available for an MCP connection to get updates, discover new tools, or remove deleted ones without recreating the connection.
Use this when:
- New tools are available on the MCP server.
- An existing tool's inputs, parameters, or output structure changed.
- Deleted or deprecated tools need to be removed from Zendesk.
You must be a Zendesk admin to create an MCP server connection.
To refresh MCP server tools
- In Admin Center, click
Apps and integrations in the sidebar, then select Connections >
Connections.
- Select the relevant MCP connection by clicking the name or opening the overflow menu and selecting Edit connection.
- Click Refresh tools.
- In the confirmation dialog, click Refresh tools.
Examples of MCP servers
Here are some examples of MCP servers you can connect to. Many other vendors provide MCP servers, and you can also connect to your own organization's MCP server.
- MCP server URL: https://mcp.asana.com/v2/mcp
- Client details: Follow the directions at Create your OAuth app to generate a Client ID and Secret.
- MCP server URL: https://mcp.stripe.com
- Client details: Not required. The Client ID and Secret will be detected automatically when you test the connection.
- MCP server URL: https://api.githubcopilot.com/mcp/
- Client details: Follow the directions at Creating an OAuth app to generate a Client ID and Secret.
Using MCP tools in action flows
After you create an MCP server connection, the discovered tools are available in the action builder. MCP connectors appear under External actions and are identified by the connection name you provided and an MCP tag. For more information about action flows, see Understanding the action builder and action flows.
When the action flow runs, Zendesk calls the selected MCP tool on the external server using your configured inputs and returns the tool’s output for use in later steps. You can use a custom code step later in the flow to transform or extract specific fields from the output if necessary.
To add an MCP tool as a step in an action flow
- Open the action builder and create or edit an action flow.
- In the action builder, beneath an existing step, click the Add step icon
(
 ).
- In the step sidebar, under External actions, click the menu options to select the connected MCP server and then the specific action.
- In the step sidebar, enter the required inputs for the selected action. See Providing inputs for actions and steps.
When an MCP tool's inputs or outputs change, existing action flows continue executing the previous version of the tool. To use the updated version in an action flow:
- Remove the tool step from the canvas.
- Re-add the tool step to the flow.
- Update any subsequent steps that reference the tool's variables by removing and re-adding those variable references.
If an MCP tool defines an input parameter that accepts multiple data types (a
oneOf schema), the action builder assigns the input field to
the first data type listed in the tool's definition (for example, defaulting to an
integer). Make sure the values passed into ths step match the primary data type
expected by the field.
Using MCP tools in advanced action flows
Advanced action flows can use MCP tools from cnonected MCP servers to retrieve information or perform actions in external systems.
Before creating the advanced action flow, a Zendesk admin must set up the MCP connection and make the required tool available. Then, in your prompt to create the advanced action flow, specify the MCP connection and tool by name and when and how it should be used. Make sure to include the information the tool needs and explain what the advanced action flow should do with its response.
For example, when a ticket is created with the order status tag, use the [MCP
server's name] connection and its [MCP tool name] tool to look up the order using
the order_ID from the ticket. If the order is found, add its status
and estimated delivery date as an internal note. If no order is found, add an
internal note that the order couldn't be located.
After the advanced action flow is generated, review the code and flowchart to confirm that it calls the intended MCP tool, passes the correct inputs, and handles the tool's response as expected. Always test the advanced action flow before publishing.
MCP tools and their inputs can change. If a tool is updated, review, update, and test any advanced action flows that used it.
Mapping the outputs of an MCP tool
Some MCP tools return structured data that you may want to reuse in later steps of an action flow. You can configure an output schema so the tool’s returned fields are available as mapped outputs.
If you don’t define an output schema, Zendesk treats the tool output as a single value. If the tool returns an object or array, Zendesk converts it to a string. Use a custom code step if you need to extract or transform specific fields.
You must be a Zendesk admin to create an MCP server connection.
To configure an output schema for an MCP tool
- In Admin Center, click
Apps and integrations in the sidebar, then select Connections >
Connections.
- Open the MCP connection and find the tool you want to configure.
- From the tool's overflow menu, select Configure output schema.
- Choose one of the following:
- Add sample response: Paste a sample JSON response object, then click Map outputs.
- Make API call: Enter the required argument values (or click Edit as JSON to enter arguments as raw JSON), then click Execute tool to generate the output structure.
Note: If a tool parameter accepts multiple data types (such as a string or integer), the Make API call form displays dropdown options (such as "Option 1" and "Option 2") that cannot be executed directly. To enter test values for these parameters, click Edit as JSON and provide the test payload as a JSON object. - Select the fields you want to expose as mapped outputs.
- Optionally update the field name or data type.
- Click Save.
Troubleshooting
-
Servers with restricted access: Zendesk does not support servers that
restrict access by client. However, in some cases you may be able to ask the MCP
server owner to add the Zendesk MCP client to their allowlist. In that case, the
server owner may ask for the following details:
- Zendesk IP ranges for your account: https://yoursubdomain.zendesk.com/ips
- Zendesk MCP client redirect URL: https://zis.zendesk.com/api/services/zis/connections/oauth/callback
- PKCE (Proof Key for Code Exchange): MCP servers that use PKCE with the S256 challenge method are supported. Servers that only support the plain challenge method are not supported for security reasons.
- Execution timeout and rate limits: MCP tool calls are subject to a 30-second timeout. Long-running tool operations may time out before completing. For rate limits, see Considerations for using action flows.
-
Authentication: MCP servers that require no authentication aren't
supported. Zendesk's MCP client supports servers that implement OAuth 2.0 with
auto-discovery using the standard well-known endpoints.
To troubleshoot authentication issues with public MCP servers or set up your own organization's MCP server, try the following:
-
Initiate the handshake.When the MCP client first attempts to connect, the server responds with
401 Unauthorizedand includes a reference to a Protected Resource Metadata document in theWWW-Authenticateheader.HTTP/1.1 401 Unauthorized WWW-Authenticate: Bearer realm="mcp", resource_metadata="https://your-server.com/.well-known/oauth-protected-resource"This tells the client that authorization is required and where to retrieve the information needed to begin the authorization flow.
-
Discover the protected resource metadata.
The client fetches the Protected Resource Metadata document to learn about the authorization server, supported scopes, and other resource details.
Request:
https://your-mcp-server.com/.well-known/oauth-protected-resourceExample response (200 OK):
{"resource":"https://your-mcp-server.com","authorization_servers":["https://your-auth-server.com"],"scopes_supported":["mcp:read","mcp:write"]} -
Discover the authorization server.
The client discovers the authorization server's capabilities by fetching its metadata.
Request:https://your-auth-server.com/.well-known/oauth-authorization-serverThis endpoint may be hosted on the same domain as the MCP server if your OAuth server runs there.
Example response (200 OK):
{ "issuer": "https://your-auth-server.com", "authorization_endpoint": "https://your-auth-server.com/oauth/authorize", "token_endpoint": "https://your-auth-server.com/oauth/token", "registration_endpoint": "https://your-auth-server.com/oauth/register", "code_challenge_methods_supported": ["S256"], "token_endpoint_auth_methods_supported": ["client_secret_basic", "none"], "scopes_supported": ["mcp:read", "mcp:write"] } -
Register the client.
Once discovery is complete, the Zendesk client must be registered with your server's authorization system using one of the following methods:
- Pre-registered client: The client is already registered with the authorization server. You manually provide the client details to complete the authorization flow when creating the MCP connection.
- Automatic Registration (Dynamic Client Registration): Zendesk automatically attempts to register itself using standard web protocols. If the primary protocol fails, Zendesk automatically tries an alternate format (OpenID Connect) to complete the connection without your intervention.
- Manual Configuration (Backup): If Zendesk cannot automatically register with your server using either method, admins can manually enter all the required OAuth client details to establish the connection.
-
Initiate the handshake.
Article Q&A
Click to view
How do I connect Zendesk to an MCP server and choose which tools are available?
A Zendesk admin can go to Admin Center > Apps and integrations > Connections > Connections, select Add connection > Connect to an MCP server, enter a name, description, and server URL, then test the URL and complete the OAuth flow. After saving, select the discovered tools to make available in the action builder. Zendesk supports OAuth and HTTP servers; stdio transport and servers requiring no authentication aren't supported.
How do I use an MCP tool in an action flow, and what happens if the tool changes?
In the action builder, add a step, select the MCP connection and tool under External actions, and enter the required inputs. Zendesk calls the tool when the flow runs and returns its output for later steps. Existing flows continue using the previous tool version after updates; remove and re-add the step to use the updated version, and refresh any variable references that depend on it.
How can I map MCP tool outputs so I can use individual fields in later steps?
In Admin Center, open the MCP connection, find the tool, and select Configure output schema. Add a sample JSON response or make an API call to generate the output structure, select the fields to expose, optionally change their names or data types, and save. Without an output schema, object or array output is converted to a string; use a custom code step to extract or transform specific fields.
How do I include an MCP tool in an advanced action flow?
First, a Zendesk admin must set up the MCP connection and make the tool available. In the prompt for the advanced action flow, name the connection and tool, explain when and how to use it, specify the needed inputs, and describe how to handle its response. Review the generated code and flowchart, then test the flow before publishing. Review, update, and test flows again if a tool changes.
Why might my MCP connection or tool call fail, and what limitations should I check?
Check that the server supports OAuth 2.0 with standard auto-discovery and HTTP; Zendesk does not support servers requiring no authentication or stdio transport. PKCE with the S256 challenge method is supported, but plain-only PKCE is not. MCP tool calls have a 30-second timeout. Zendesk discovers up to 250 tools per server, and step execution outputs are retained for seven days. If authorization expired or changed, reconnect the MCP connection and complete OAuth again.