This support tip demonstrates how to set up a request-only help center. That is, a help center that enables end-users to submit requests (tickets), and view existing requests only, and does not contain any self-service content.
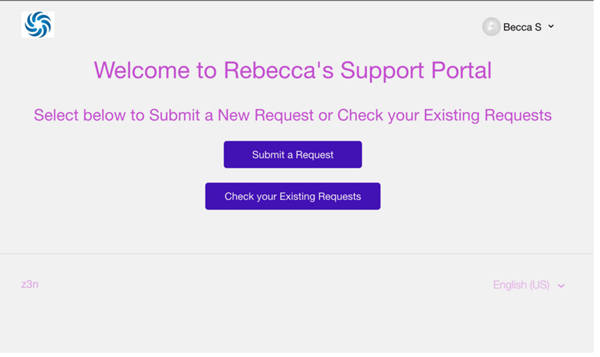
There are several ways that you can accomplish this, but in this tip we'll edit the help center home page to provide options for end-users to submit a new request or check their existing requests. The home page will not contain anything else. For example:
The benefit of this tip is that it does not use a Javascript redirect to create a request-only help center. Javascript can, and does, work as well. However it often diminishes the agent experience when using the help center by making it challenging to access due to restrictions on agents viewing the New Request page and My Activities, (the default behavior is to redirect to the Zendesk Support agent interface).
This tip avoids other challenges of JS, for example, accounting for user sign-in, having an open or closed help center, and having multiple locales enabled. Simply, this tip accounts for various desired workflows without the need of additional customizations.
Updating your home page for requests only
First, we'll edit the help center home page to provide two buttons for end-users to submit a new request and check their existing requests. We recommend that you use the Copenhagen theme for your request-only help center, as it is mobile responsive.
To edit your home page to add the new request and existing requests buttons
- In Guide, click the Customize design icon (
) in the sidebar.
- Click your theme to open it, then click Edit Code.
- Open the Home Page template.
- Comment out the existing code by wrapping it in
{{!-- ... --}}
.If you do this correctly, all of the code text will change to gray.
- Above the commented out code of the homepage add the following code.
<div id="divhomecontainer"> <h1>Welcome to Rebecca's Support Portal</h1> <h2> Select below to Submit a New Request or Check your Existing Requests<h2> <form style="display: block; text-align: center; margin: 20px;" class="submitbutton" action="{{page_path 'new_request'}}"> <input type="submit" value="Submit a Request"> </form> <form style="display: block; text-align: center; margin: 20px;"class="requestbutton" action="{{page_path 'my_activities'}}"> <input type="submit" value="Check your Existing Requests"> </form> </div>
What this code does:-
Adds a welcome message. Be sure to change the placeholder text with your own welcome message.
-
Creates two buttons: one for the new request form and one to check existing requests. Also, adds a unique class to the buttons to customize the CSS if needed.
-
Adds CSS styles to the buttons inline to enhance the appearance. (Avoids having to have customers also customize the CSS with could likely be confusing i.e. one stop copy-paste solution.)
-
Prompts users who are not signed in to do so when they click the Check your Existing Requests button.
-
- Click Save.
You can wait to publish changes until you hide unneeded elements of your help center in the next section.
Hiding unneeded elements of your help center
After you edit your home page to add the requests-only buttons, you'll want to ensure that end users do not accidentally navigate to the content sections. To do so, you'll comment out a few additional lines of code on various templates for:
- Community
- Submit a request button
- Navigation links
- Search
Additionally, you should delete all pre-existing content in categories or set the categories to draft mode, as described below, to prevent end-users from accessing the content inadvertently.
To hide unneeded elements in your help center
- Open the
header
template, then comment out the Community and Submit a Request buttons by wrapping it in
{{!-- ... --}}
.If you do this correctly, all of the code text will change to gray.
- Open the
request_page
template, then comment out the
<nav>
code at the top. - Open the
requests_page
template, then comment out the
<nav>
code at the top. - Open the
new_request_page
template, then comment out
{{search}}
. - Click Save.
To remove pre-existing help center content
- Navigate to the category, then click Edit category in the top menu bar.
- Click the Mark as draft checkbox to hide the category and its content, or click Delete category at the bottom to permanently remove the category and its contents.
- If you selected draft, click Update, and if you selected delete, click to confirm that you want to delete the category.
(Optional) Changing the default button styling and color
The help center provides pre-built templates, so the CSS styling already exists for buttons in your help center. If you are having issues overwriting the existing CSS, you will likely need to edit the default styling. You can also change the button color without editing the CSS.
- In Guide, click the Customize design icon (
) in the sidebar.
- Click your theme to open it, then click Edit Code.
- Open the style.css file.
- Search (control + F) for "Buttons".
- Make updates as you'd like, then click PSave.
- In Guide, click the Customize design icon (
) in the sidebar.
- Click your theme to open it.
- Click
Colors,
then
change
the colors as needed.
Here’s how the colors map:
- Click Save.
(Optional) Localizing your home page buttons
- Create the dynamic content in Zendesk Support, then insert in the DC placeholder
in your
help
center to make the text dynamic for users accessing in different
languages.
See Adding translated text to your help center for instructions.
<div id="divhomecontainer">
<h1 style="text-align: center;">{{dc ‘ADD_YOUR_DC'}} </h1>
<h2 style="text-align: center;"> {{dc 'ADD_YOUR_DC'}}</h2>
<form style="display: block; text-align: center; margin: 20px;" class="submitbutton"
action="{{page_path 'new_request'}}">
<input type="submit" value="Submit a Request">
</form>
<form style="display: block; text-align: center; margin: 20px;" class="requestbutton" action="{{page_path 'my_activities'}}">
<input type="submit" value="Check your Existing Requests">
</form>
</div>
34 Comments
Awesome, thanks Rebecca!
Is is possible to customize the links on the breadcrumbs (not just the CSS)? It was pretty easy to set-up a requests only Help Center, but want to optimize our navigation a bit.
For example, setting either the New Request page or Requests List page as our new "Home" page. It would also cut down on the amount of pages we need to configure and manage.
Hi Ethan-
The breadcrumbs in Help Center is added via a Curlybars helper therefore customizing default behavior of the prebuilt helper is a little more challenging. However in our Help Center developer documentation we provide the code of the breadcrumbs meaning you could grab this code, remove the {{breadcrumbs}} helper from wherever you're working in Help Center and customize the behavior as needed.
However another challenge in this process will be that Help Center provides pre-built templates, meaning the breadcrumbs helper is dynamically changing its links based on what category, section, or article you are on. Therefore to customize across multiple pages you would likely need to add multiple conditional statements.
Lastly, having the New Request or Lists pages be the homepage is likely not possible without a javascript redirect or iframing of these pages into the homepage. The {{request_form}} advanced helper for example, that renders the new request form, is only available on the new request page template.
Wow, now we need to edit kind of codes to have a Ticket portal!
Disapointed....
Hi, how to do to have the 2 buttons aligned horizontally?
Thx
Hi,
I´m having trouble with the page-path for "Submit a request"
<form style="display: block; text-align: center; margin: 20px;" class="submitbutton"
action="{{page_path 'new_request'}}">
<input type="submit" value="Submit a Request">
</form>
it takes me to an incorrect page and not to the "Submit a request" page.
I have a header on all the pages with a link that takes me to the correct page
{{link 'new_request' class='submit-a-request'}}
so I know its possible to get there. Is there something wrong with the code?
Hi Cgauguin-
I tested this and confirmed the code does work as outlined. What page are you directed to when selecting the button? This may be a result of agents not having direct access to the submit a request page.
To view the request page as an agent:
Same issue for me.
I am logged as admin (manager), I select "Previewing as end-user" but when I click "Submit a request" button then it opens my Agent Dashboard page in "old web portal".
This is my code (normally copy/paste from yours)
<form style="display: block; text-align: center; margin: 20px;" class="submitbutton"
action="{{page_path 'new_request'}}">
<input type="submit" value="Submit a Request">
</form>
<form style="display: block; text-align: center; margin: 20px;"class="requestbutton"
action="{{page_path 'my_activities'}}">
<input type="submit" value="Check your Existing Requests">
</form>
By the way, I repeat my question, how to have the 2 buttons aligned horizontally? The 2 buttons vertically aligned in middle of screen is really ugly isn't?
Nico
Hi Rebecca.
I´m looking at it as end-user. Thats why its strange that I also end up seeing Agent Dashboard page in "old web portal", just like Nico Kunzer.
I would also like the buttons to be in the same line horizontally.
Hi,
I tried to make the "Submit a request" button work, and have substituted this part:
<form style="display: block; text-align: center; margin: 20px;" class="submitbutton"
action="{{page_path 'new_request'}}">
<input type="submit" value="Submit a Request">
</form>
<form style="display: block; text-align: center; margin: 20px;"class="requestbutton"
action="{{page_path 'my_activities'}}">
<input type="submit" value="Check your Existing Requests">
</form>
with this:
<nav class="user-nav" id="user-nav">
{{link 'new_request' class='submit-a-request' role='button'}}
</nav>
<nav class="user-nav" id="user-nav">
{{link 'requests' class='check-your-existing-requests' role='button'}}
</nav>
Viewed as End-user the buttons are alligned and the button "Submit a request" now works. It looks different but it now is working.
Hi Cgauguin
It works also for me! Thanks for your help mate.
Just one detail: the 2 buttons are aligned on the left side. Do you know how to center?
Nico
All of my coding looks like this right now. I know its not pretty but for me it looks like the buttons are centered:
<div id="divhomecontainer">
<br>
<br>
<br>
<br>
<br>
<br>
<br>
<center> <h1>Welcome to Rebecca's Support Portal</h1>
<br>
<center> <h2> Select below to Submit a New Request or Check your Existing Requests<h2>
<br>
<nav class="user-nav" id="user-nav">
{{link 'new_request' class='submit-a-request' role='button'}}
</nav>
<nav class="user-nav" id="user-nav">
{{link 'requests' class='check-your-existing-requests' role='button'}}
</nav>
</div>
{{!--<section class="section hero">
<div class="hero-inner">
{{search submit=false instant=true class='search search-full'}}
</div>
</section>
<div class="container">
<section class="section knowledge-base">
<section class="categories blocks">
<ul class="blocks-list">
{{#each categories}}
<li class="blocks-item">
<a href='{{url}}' class="blocks-item-link">
<h4 class="blocks-item-title">{{name}}</h4>
<p class="blocks-item-description">{{excerpt description}}</p>
</a>
</li>
{{/each}}
</ul>
{{pagination}}
</section>
{{#if promoted_articles}}
<section class="articles">
<h3>{{t 'promoted_articles'}}</h3>
<ul class="article-list promoted-articles">
{{#each promoted_articles}}
<li class="promoted-articles-item">
<a href="{{url}}">
{{title}}
</a>
</li>
{{/each}}
</ul>
</section>
{{/if}}
</section>
{{#if help_center.community_enabled}}
<section class="section community">
<h2>{{t 'community'}}</h2>
{{#link 'community' class='community-link'}}
{{t 'join_conversation'}}
{{/link}}
<div class="community-image"></div>
</section>
{{/if}}
<section class="section activity">
{{recent_activity}}
</section>
</div>--}}.
Ok I used this <center> and now it is good.
Thx
Hi Cgauguin, your code works great! Is there a way I can change the names of the button? Instead of requests, I would like it to say my requests or current requests, etc.
Thanks for your help
Hey Nitin!
I'm checking with our Community Moderators to see if anyone can help you with this!
Hi Nitin, this code should be able to make it, please try:
You need to put this code into JS tab, just under this row:
Let us know the result! ;)
Hi Vladan,
This worked perfectly! I changed the "check-your-existing-requests.requests-link" to "my_activities" since I was using the code that Rebecca originally posted.
Thanks!!
I'm trying to add an additional link/button on the home page that links directly to the Articles page. I'm not sure what the correct page_path action is. Does anyone know?
I'm using the same code outlined in this tutorial.
<form style="display: block; text-align: center; margin: 20px;" class="submitbutton"
action="{{page_path 'UNKNOWN'}}">
<input type="submit" value="Articles">
</form>
Thank you.
Hi Scott,
There is not a location where a user can view all articles. Instead of using the page_path here, you would want to link directly to a section, category, or other similar page by just using the relative path to that page (like /hc/sections/12345) instead of using a placeholder like {{page_path 'UNKNOWN'}}.
Hope that helps!
Hello
Do anyone of you know if its possbile to bypass the default redirect for agents?
Hello Christer,
Instead of deleting all reference information to the Knowledge base, it would be easier to use User Segments to hide all articles unless the users is signed as an agent.
Otherwise you would be looking at using some placeholder reference to the role in JS that would then redirect to a different template.
First way much easier and native. Here is a good article on User Segments, https://support.zendesk.com/hc/en-us/articles/115007686307-Creating-user-segments-for-Guide-user-permissions-Guide-Professional-and-Enterprise-
Hi Patrick
im talking about the redirect the agents get when trying so submit a ticket through helpdesk
Christer,
The submit a request link is to the requests endpoint for end-users only. At this time there is no submit a request link for agents.
There is a Product Feedback post concerning this if you would like to add your vote!
https://support.zendesk.com/hc/en-us/community/posts/203447986-Add-Submit-A-Request-for-Agents
@Christer. We use the Web widget form as a workaround, for a setup that involves accepting ticket from agents. I don't know if that would work for your needs, but I thought I'd mention it.
@rebecca @Brett Is there a way to create some sort of IF statement so this affect my "end-users"... all ZD managers and administrators need access to the help center. I use it for internal content and notes to help them solve tickets.
Any way to set that up?
is it possible to customize the "submit a request" and "my tickets" to be .png pictures?
Hey Christer,
This is certainly something that can be done with some additional custom coding on your end. While this is not something we can assist with on our end, I encourage you to take a look at our Help Center customization documentation below:
Hopefully other users can jump in here and offer up some additional guidance on how to accomplish this.
Cheers!
Hi There!
Is it possible to create a "requests-only" page on Guide without turning the Help Center off?
Hi Juan -
Can you tell us more about what you mean by a "requests-only" page? Do you mean that you want users to be able to access their tickets but you don't want to have a knowledge base or community?
Is this available with Guide Lite?
Please sign in to leave a comment.