Verified AI summary ◀▼
Set up single sign-on (SSO) for Amazon Connect and Contact Center using AWS as the SAML identity provider. Configure SAML applications in AWS IAM Identity Center, ensuring they are in the same AWS account as your organization. For Amazon Connect, manage permissions with service control policies. For Contact Center, configure the Cognito UserPool and specify the identity provider for agent authentication.
You can configure Amazon Connect and Zendesk for Contact Center for SSO with AWS as the SAML-based identity provider. Amazon Connect and Contact Center each require a SAML application. The required SAML applications are created and configured in AWS IAM Identity Center.
This article assumes that AWS organizations and IAM identity center are already set up in a separate AWS account (and potentially different region) within your AWS organization. The SAML applications must be created in AWS IAM Identity Center in the same account where your AWS organization is set up. Before you start, ensure that you either have access to this environment or that someone with the required access can assist with the creation of the SAML applications.
Configuring SSO for Amazon Connect
To set up single sign-on (SSO) for Amazon Connect, you'll configure a SAML application in the IAM Identity Center, which is often in a separate AWS account and region. However, the identity provider, role, and policy must be established within the same AWS account as Amazon Connect. See the Amazon Connect documentation: configure Amazon Connect SSO with AWS as the identity provider describes in detail how to configure Amazon Connect SSO with AWS as the identity provider.
It's a good idea to use service control policies (SCPs) to manage permissions regarding what users and roles can do in Amazon Connect, protecting important resources and making your system more secure. See Security Best Practices for Amazon Connect.
The following example shows an SCP that can be used to prevent the deletion of the Amazon Connect instance and associated role:
<pre><code class="language-json">
{
  "Version": "2012-10-17",
  "Statement": [
    {
      "Sid": "AmazonConnectRoleDenyDeletion",
      "Effect": "Deny",
      "Action": [
        "iam:DeleteRole"
      ],
      "Resource": [
        "arn:aws:iam::*:role/***Amazon Connect user role***"
      ]
    },
    {
      "Sid": "AmazonConnectInstanceDenyDeletion",
      "Effect": "Deny",
      "Action": [
        "connect:DeleteInstance"
      ],
      "Resource": [
        "***Amazon Connect instance ARN***"
      ]
    }
  ]
}
</pre></code>
Configuring SSO for Contact Center
To set up single sign-on (SSO) for Contact Center, you need to configure the Cognito UserPool to use a SAML application for sign-in. The Cognito UserPool is the one that was created by the Zendesk for Contact Center CloudFormation template.
The steps in the process include:
Gathering the required Cognito UserPool details
The first step to set up single sign-on (SSO) for Zendesk for Contact Center is to gather the required Cognito UserPool details.
- Log in to the AWS account where the Zendesk for Contact Center CloudFormation stack was created.
- In the Cognito service (ensure that you are in the correct region), open the user
pool that was created when the Contact Center CloudFormation stack was created.
Take note of the user pool ID.

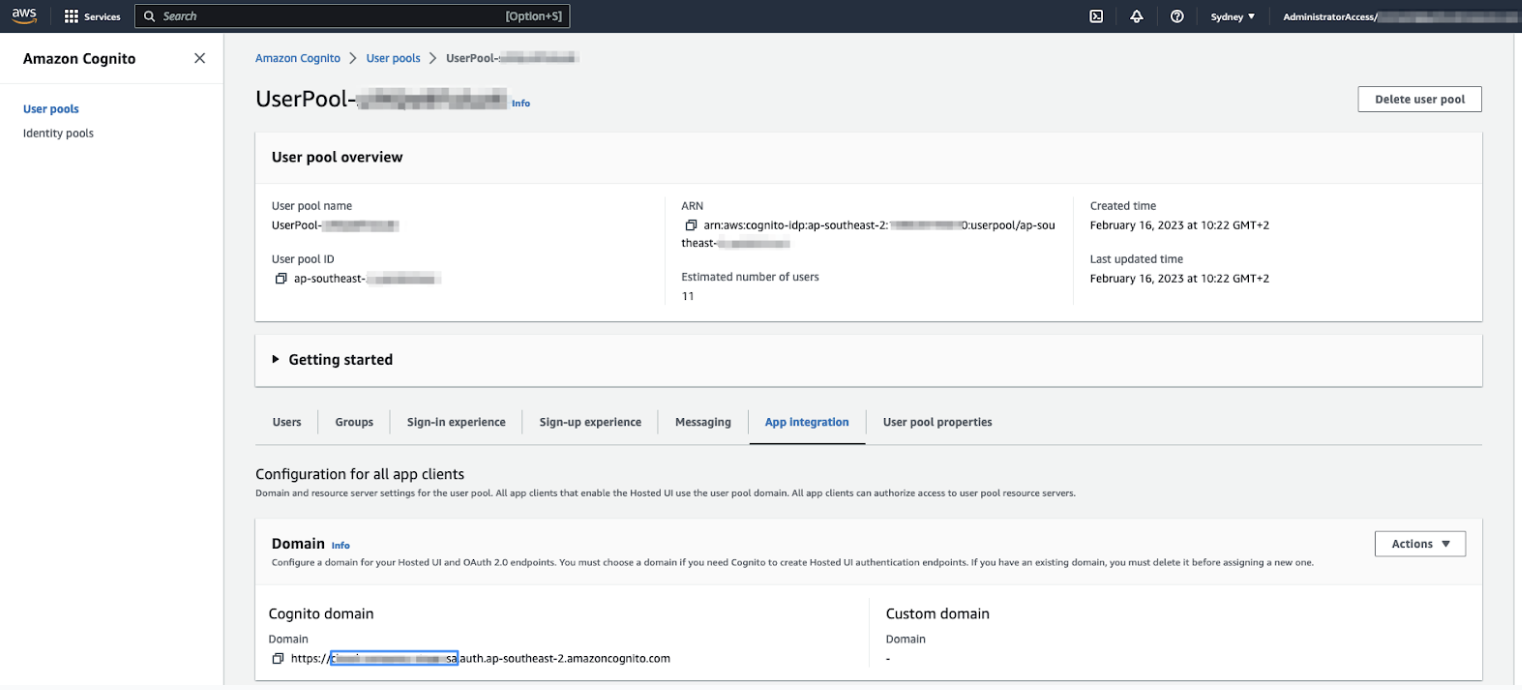
- Click the App Integration tab, then take note of the Cognito domain prefix.
This is the first part of the Cognito domain, before .auth.regionxxx. This is also the value that was specified in the CloudFormation template, so you can copy the value from the CloudFormation parameters tab if you prefer.

Creating the SAML application in AWS IAM Identity Center
The second step to set up single sign-on (SSO) for Contact Center is to create the SAML application in AWS IAM Identity Center.
- Log in to the AWS account where AWS IAM Identity Center is configured.
- Select Application assignments > Applications, then click Add application.
- Click Add custom SAML 2.0 application.
- Enter the following information:
- Display name is the name displayed on the SAML tile.
-
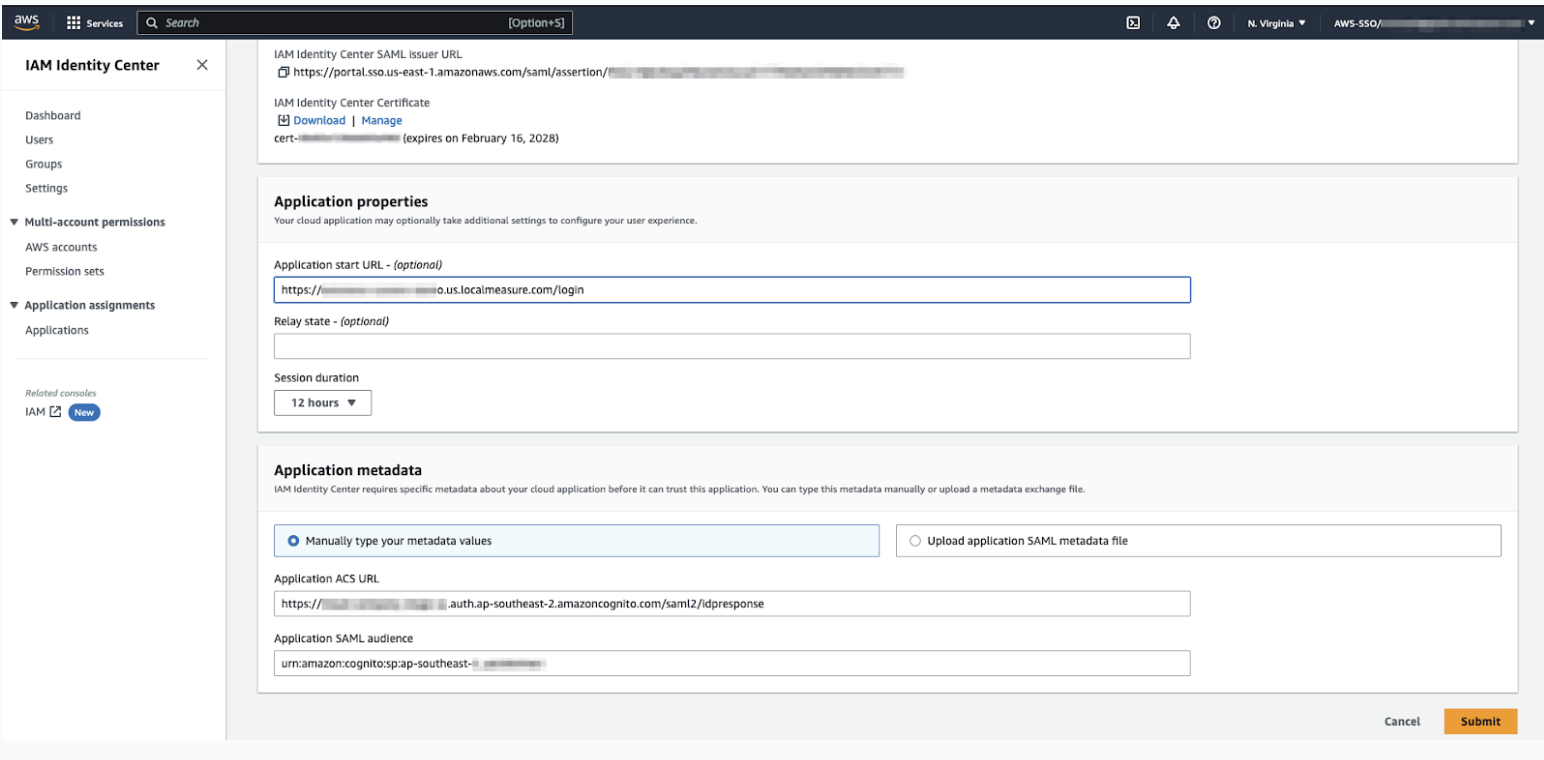
Application start URL (optional) is the URL for Contact Center. This is
the same URL that was added as an approved origin in Amazon Connect. It has the
following format:
https://${LMWorkspace}.${LMRegion}.localmeasure.com
- Relay state should be left blank.
- Under Application metadata, select Manually type your metadata
values, then specify the following:
- Application ACS url: https://${yourDomainPrefix}.auth.${region}.amazoncognito.com/saml2/idpresponse
- Application SAML audience: urn:amazon:cognito:sp:${yourUserPoolID}

- Click Submit.
- Select Actions > Edit attribute mappings.

- Enter the following attributes in the application:
Table 1. SAML attribute Maps to string value or user attribute Format Subject ${user:email} Persistent http://schemas.xmlsoap.org/ws/2005/05/identity/claims/emailaddress ${user:email} 
- Click Save changes.
- Under Assigned users, click Assign Users, then add either users or groups of users who should have access to Contact Center.
- Click Actions again, then select Edit configuration.
- Under IAM Identity Center SAML metadata file, click Download.
Save this file. You'll need it to complete the Cognito configuration.
Configuring an identity provider in the Cognito UserPool
The third step to set up Single Sign On (SSO) for Zendesk for Contact Center is to configure an identity provider in the Cognito UserPool.
- Log in to the AWS account that contains the Cognito UserPool.
- In the Cognito service, open the UserPool.
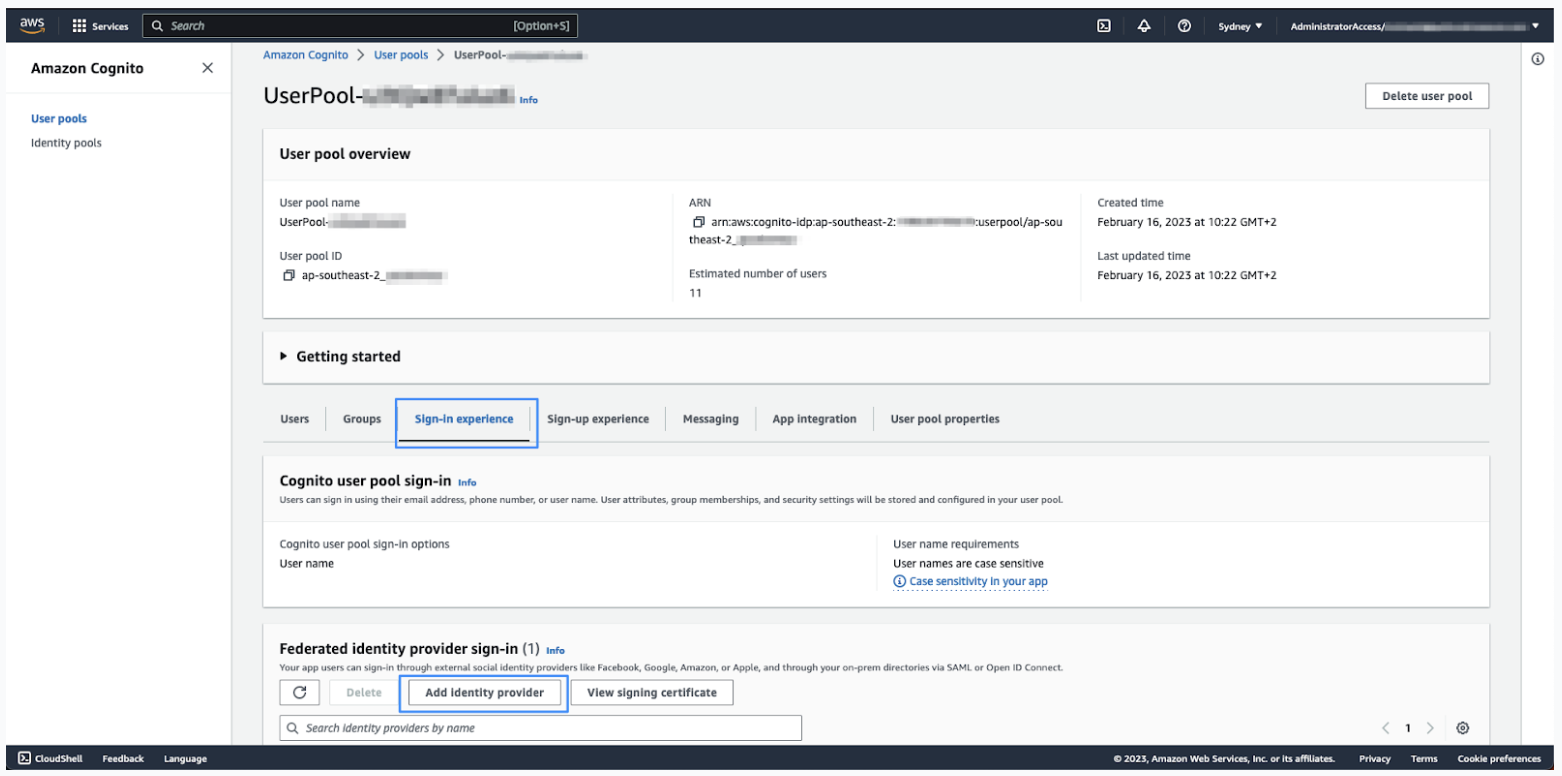
- Click the Sign-in experience tab, then click Add identity
provider.

- Click SAML.
- Under Set up SAML federation with this user pool, complete the following
options:
- Provider name: Enter a name for this identity provider. Do not use any spaces in the name.
- Metadata document source: Select Upload metadata document > choose file, then select the SAML metadata file downloaded from AWS IAM Identity center.
- Under Map attributes between your SAML provider and your user pool, set the
following attribute:
- User pool attribute: email
- SAML attribute: http://schemas.xmlsoap.org/ws/2005/05/identity/claims/emailaddress
- Click Add identity provider.
At this point the required identity provider has been created.
Specifying this identity provider to be used for agent authentication
The final step to set up single sign-on for Contact Center is to specify the identity provider to be used for agent authentication.
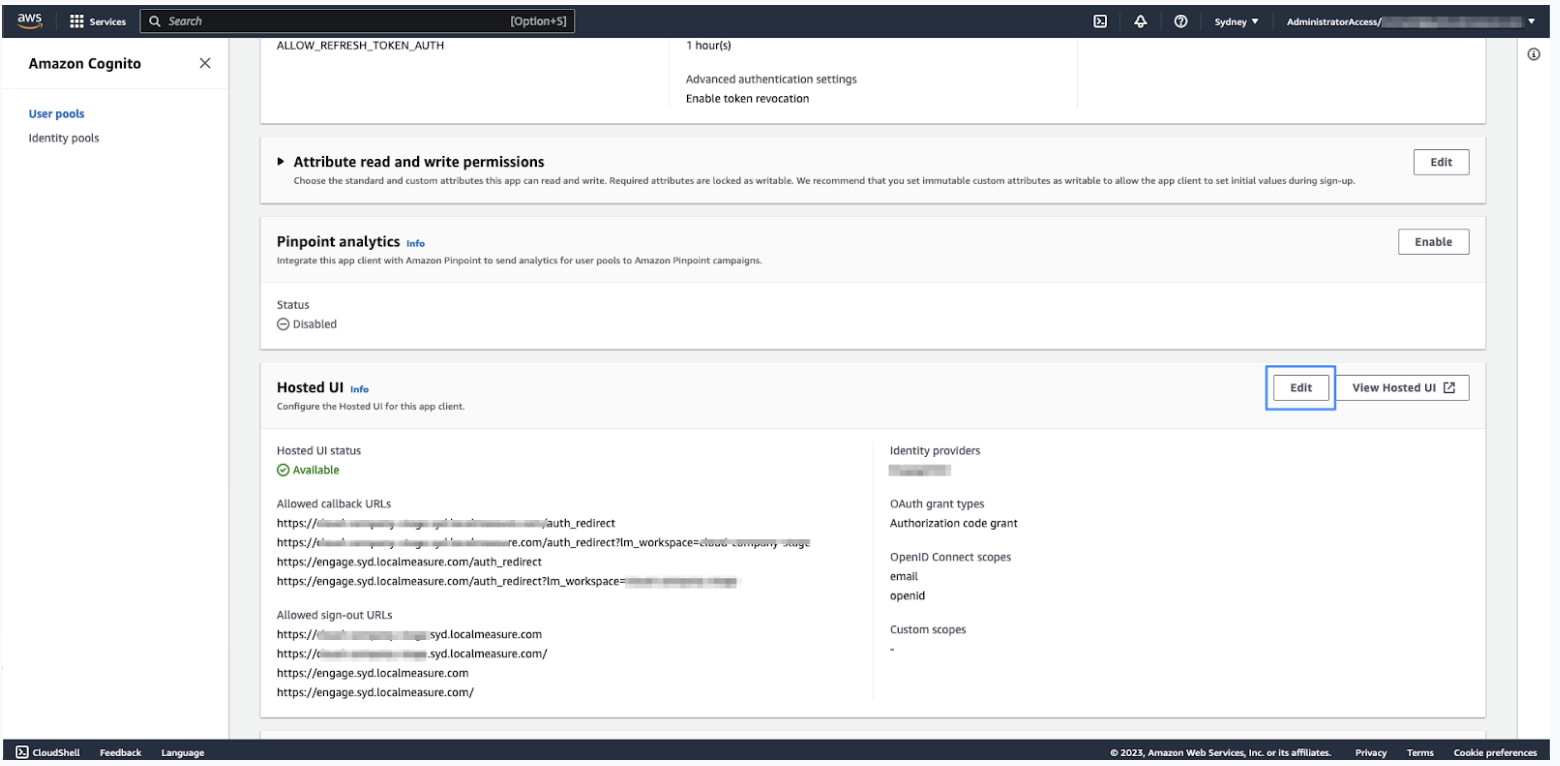
- In the tabbed view, click App integration, then click the app-client at the bottom of the page.
- In the Hosted UI section of the app-client, click Edit.

- Under Hosted sign-up and sign-in pages, click the Identity providers dropdown list, then select the identity provider you configured in Configuring an identity provider in the Cognito UserPool.
- Click Save changes.
Zendesk requires the name of the IDP (as configured under Sign-in experience) to complete the setup of your account. Include this along with the CloudFormation outputs information shared with Zendesk.