You can use a web crawler to import content into your AI agent. This gives your AI agent the ability to create AI-generated answers to customer questions based on information in external websites.
This article helps you troubleshoot issues you encounter when using a web crawler to import content for an AI agent, and contains the following topics:
The crawl failed because it timed out
If a web crawl fails after several hours, a timeout usually causes it. Crawls are limited to five hours by default. If the failure happened five hours after the import started, chances are it is a timeout.
If this happens, try these resolution steps:
- If the website doesn't rely on JavaScript, set the Crawler type to Raw HTTP client (Cheerio), a much faster crawler, and try again
- If you know the site includes content you don't actually need, see The crawl includes unnecessary pages
- Split the crawl into two or more separate crawls (using the Include URLs or Exclude URLs settings) that each scrape only parts of the website
The crawl is missing pages
If whole URLs or articles are missing from the crawl, increase the scope of your crawl using Start URLs and Include URLs. If you're sure the settings are correct but you're still missing articles, check the number of pages crawled in the import summary. If it's around the default Max pages to crawl (4,000), try increasing this setting.
The crawl includes unnecessary pages
If the crawl includes more pages or articles than necessary (for example, repetitive or inapplicable content, such as English pages when you only need Spanish, or content your AI agent doesn't need to answer customer questions), use the Exclude URLs setting.
One thing to avoid is accidentally excluding certain subpages. Start URLs define where the crawler starts. It then follows all links from that page and subsequent pages, all the way down to the specified Maximum crawling depth. However, if you exclude pages, then any pages linked only from excluded pages are never crawled unless separately specified as Start URLs.
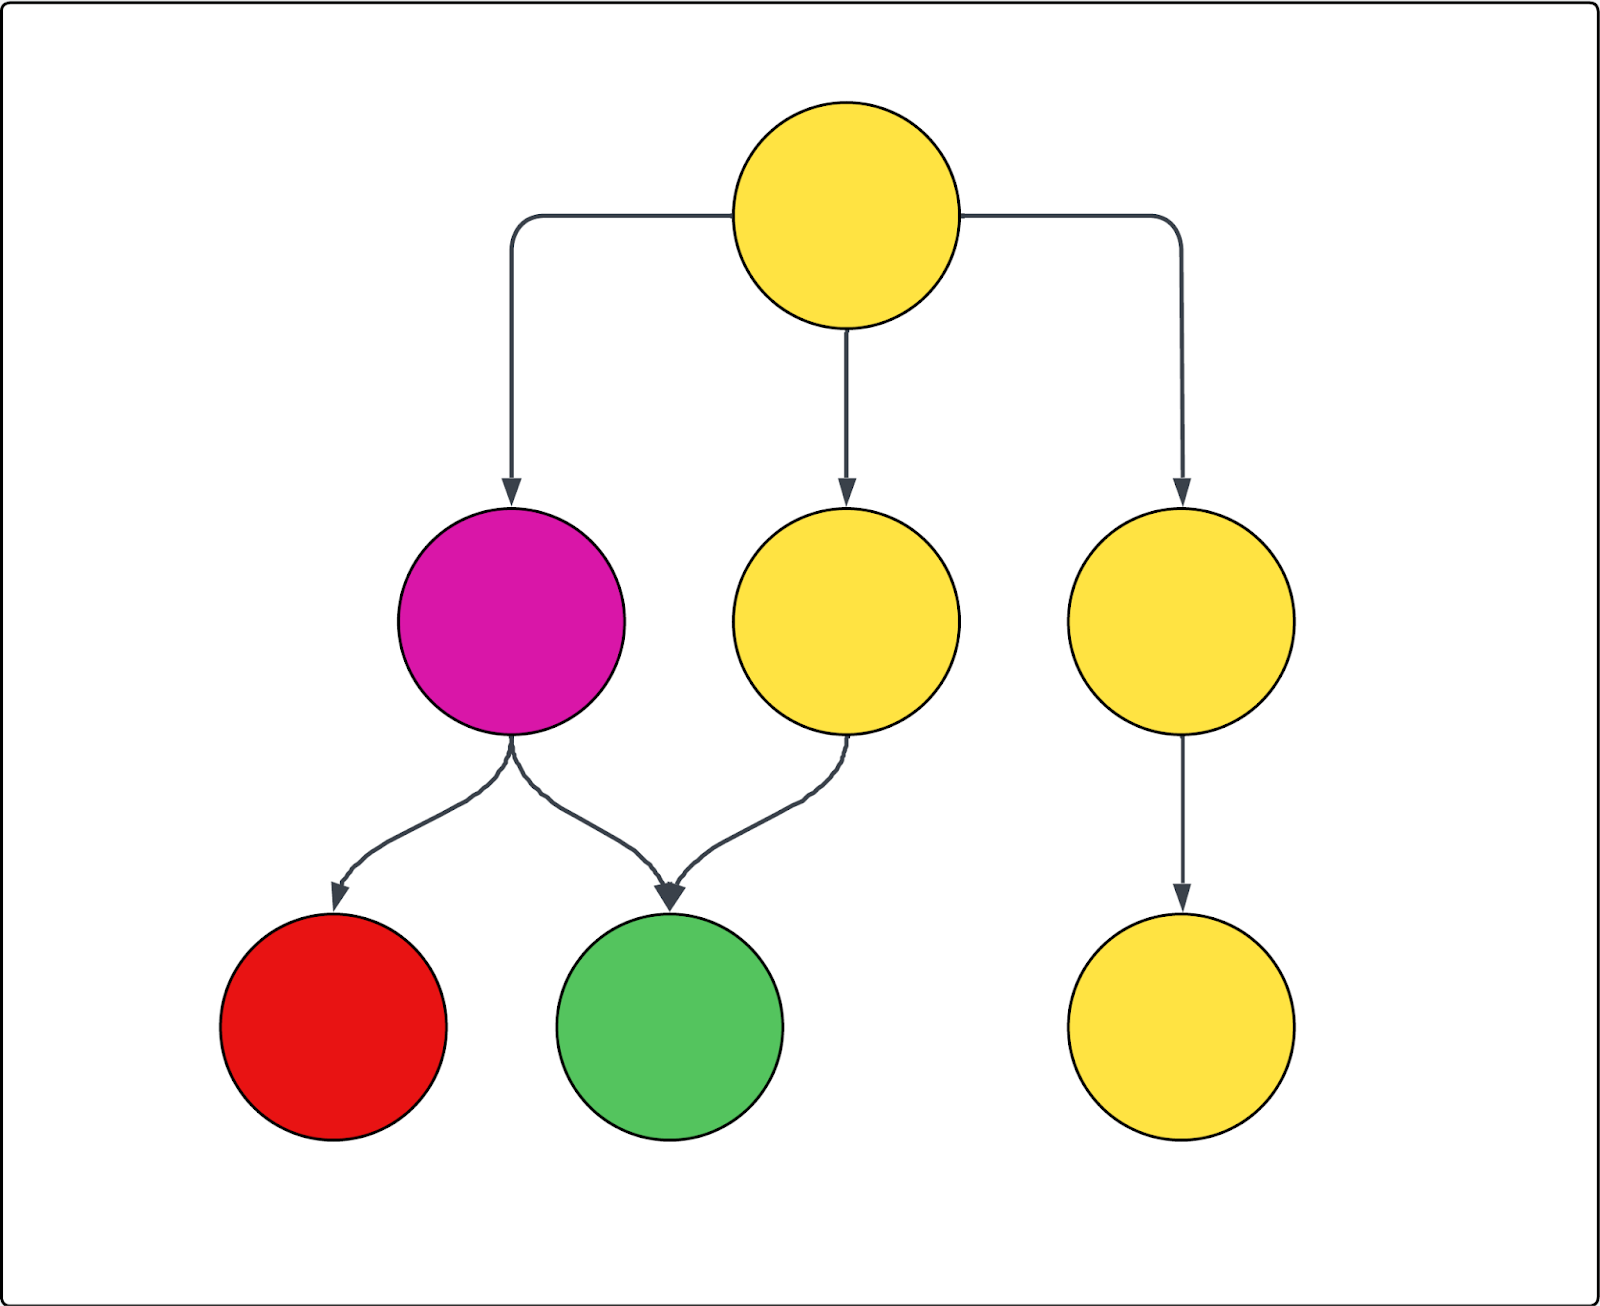
See the following diagram as an example. Each circle represents a page, and each arrow represents a link from that page. If the crawl starts at the top page (as in, it's the only Start URL) and the purple page is excluded, then the following is true:
- The red page can't be crawled
- All yellow pages are crawled
- The green page is also crawled, even though it's linked from the excluded purple page, because it's also linked from one of the included yellow pages
The crawl includes the right pages but the wrong content
If the crawl returns the correct pages, but returns the wrong content inside those pages, the advanced crawler settings include tools to find and include or exclude such content. You need to find the correct CSS selector for the element you want to include or exclude and then insert that into the right setting. To do that, it's useful to understand what a CSS selector is and how to find it.
This section contains the following topics:
Understanding and finding CSS selectors
This section introduces you to CSS selectors and walks you through finding the correct one. If you're already familiar with this information, skip to the troubleshooting sections below instead.
This section contains the following topics:
About CSS selectors
CSS selectors are patterns used to select and target specific HTML elements on a web page. They make it easier to find and extract exactly the data you need from complex web pages.
In web crawling and scraping, CSS selectors help extract data by pinpointing the exact parts of a page's structure, such as <div>, <span>, or elements with certain classes and IDs. For example, the selector .product-title targets all elements with the class "product-title". The pound sign (#) is used to select elements by their unique ID. For instance, #main-header selects the element with id="main-header".
Finding a CSS selector
First, you need to find the CSS selector you want to use. The following instructions assume you're using the Chrome web browser. However, the steps are likely similar for other browsers.
To find a CSS selector:
- Locate the text or clickable item on the webpage you want to target
-
Right-click directly on that element and select Inspect
The Chrome DevTools panel opens, and the matching piece of code is highlighted.
-
In the DevTools panel, right-click the highlighted code and select Copy > Copy selector
Now you have the CSS selector copied to your clipboard.
Verifying a CSS selector
After you find the CSS selector, it's a good idea to verify it.
To verify the CSS selector:
-
With DevTools still open, press Ctrl+F (on Windows or Linux) or Cmd+F (on Mac)
This activates a search bar inside the Elements tab of the DevTools panel.
- Paste the CSS selector you just copied into this search box
- Verify that the highlighted elements in the HTML and on the page itself (often with a colored outline) match what you expect
If only the element you wanted is highlighted, your selector is accurate. If too many or the wrong elements are highlighted, try a parent element or adjust your selection.
Optionally, you can test different selectors. Sometimes, shorter or more specific selectors work better. You can click on parent or child elements in the HTML to see their CSS classes or IDs and try copying those selectors as well.
The next two sections walk you through how to use these selectors to target content you do or don't want to crawl.
The crawl is skipping page content
If your crawl has the right pages, but is missing content from those pages, the following advanced crawler settings can help:
- HTML transformer: The crawler initially scrapes all HTML from a page and then applies an HTML transformer to remove extraneous content. Sometimes the transformer can go too far and remove content you actually want to keep. So the first thing to try when content is missing is to turn this setting to None so that no content is removed and then check the import summary
- Keep HTML elements: Keep only specific HTML elements by providing one or more CSS selectors. All other content is ignored, helping you focus on relevant information
-
Expand clickable elements: Use this option to capture the content behind accordions and dropdowns. The default setting is intended to cover webpages that follow standard web development practice and define dropdowns as
aria=false. That means, if the crawler encounters such an element, it clicks it open. Enter a CSS selector for any element that should be clicked, such as buttons or links that expand hidden content. This helps the crawler capture all the text. Make sure the selector is valid - Make containers sticky: If the expandable content closes when a different element is clicked, you can use this setting to ensure that such elements stay open after they're clicked. So again, enter a CSS selector for any element that should be clicked and then stay open even after other elements have been clicked, such as buttons or links that expand hidden content
-
Wait for selector and Soft wait for selector: If the page has dynamic content that appears only after a certain amount of time, the crawler may miss it unless it is directed to wait. There are two ways to tell the crawler to wait with a CSS selector.
- The Wait for dynamic content setting determines the amount of time the crawler waits. If the selector isn't found before the time limit, it's considered a failed request and will retry a couple times
- The Soft wait for selector determines how long the crawler waits, but also ensures the crawler continues to crawl the page if the selector isn't found, which prevents failures
- These settings don't work with the Raw HTTP client (Cheerio) crawler type because it doesn't get any JavaScript content
- Maximum scroll height: Some pages are so long that the crawler gives up before the end. If you're missing content below a certain point, you can use this setting to force the crawler to scroll a specified number of pixels
The crawl is returning too much or messy page content
If your crawl has the right pages, but has extra or unnecessary content on those pages (for example, marketing text, navigation, headers or footers, or even cookies) that you suspect is interfering with the AI agent's answers, use the following advanced crawler settings to exclude that content:
- Keep HTML elements: Keep only specific HTML elements by providing one or more CSS selectors. All other content is ignored, helping you focus on relevant information. For many help centers, this is the simplest approach to make sure main article content is targeted while avoiding navigation, related articles, and unnecessary banners and headers
- Remove HTML elements: Use CSS selectors to specify which HTML elements to remove from the crawl. This is the most precise and powerful way to exclude specified, known content
Related articles: