How to "Send Later" Using Automations

Gepostet 30. Jan. 2018
I've figured out how to schedule replies in Zendesk!!
Using a combination of triggers, tags, automations, and ticket types, it actually is possible to send with an approximate delay. Because automations run only once each hour (at the same time every hour for your own account), this won't be exact; it's accurate to within about an hour.
For example, if I'm replying on Saturday morning (but I don't work weekends!), I can delay the email 47 hours to have it sent Monday morning. Similarly, if I work Sunday afternoon, I can set the email to wait 18 hours and show up on Monday morning...and so on.
Here's how to set it up:
Step 1: Decide what your tags will be to manage this
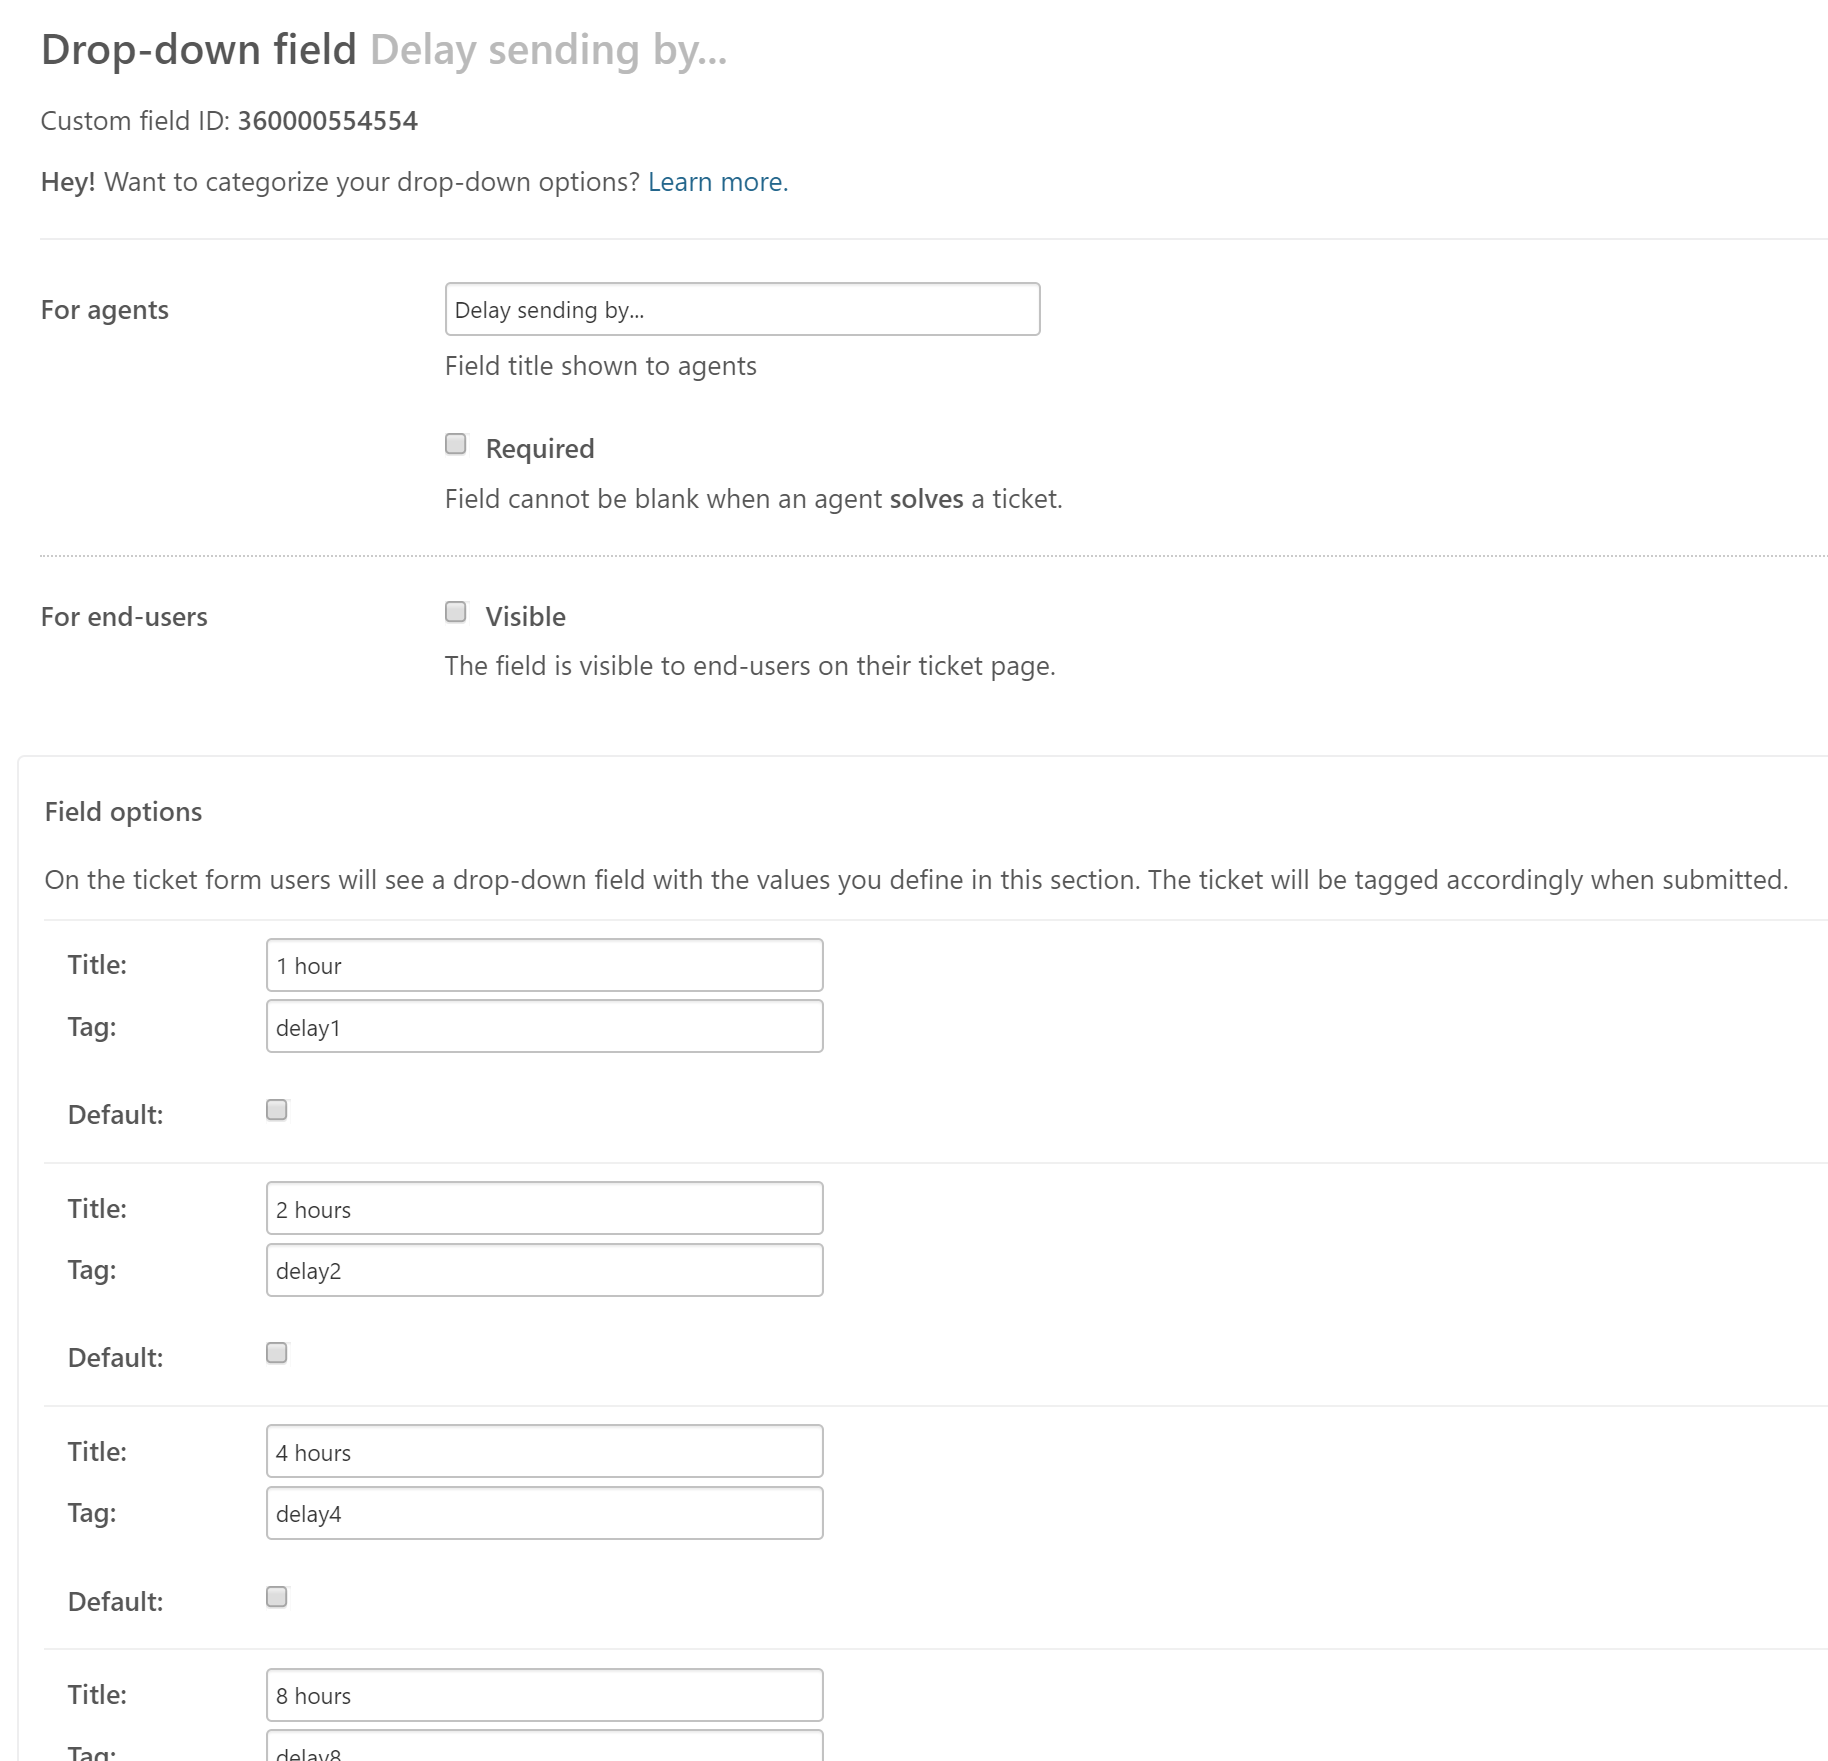
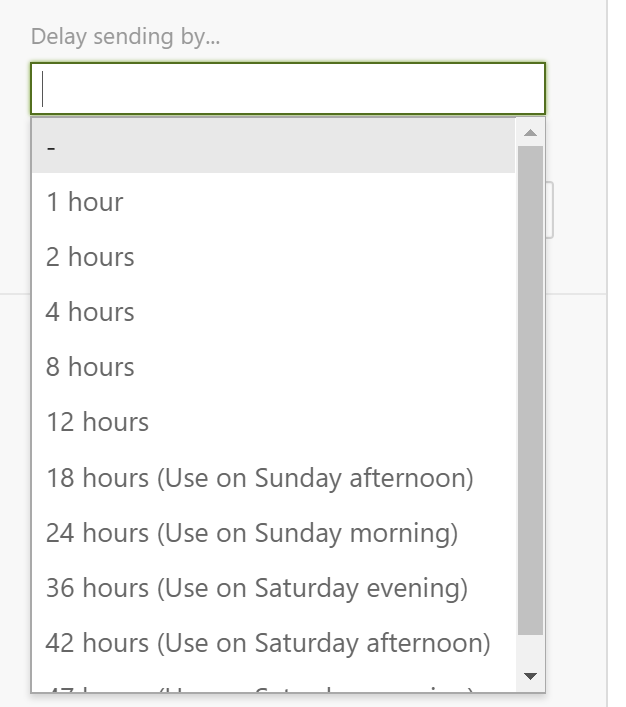
I used "delay1", "delay2", etc. Adjust these times based on when you're likely to be writing replies, and when you want the emails to be sent.
I've set up my preset delays to be 1, 2, 4, 8, 12, 18, 24, 36, 42, and 47 hours. This will allow me to work any time I want, and then have the email be sent at a time that's appropriate.
Step 2: Edit your existing client notification triggers to NOT send if they include one of those tags
Be sure to add this to all triggers that send a reply to your clients, as you may have several.
Use the Condition "Tags ... Contains none of the following" and enter all of your new tags.

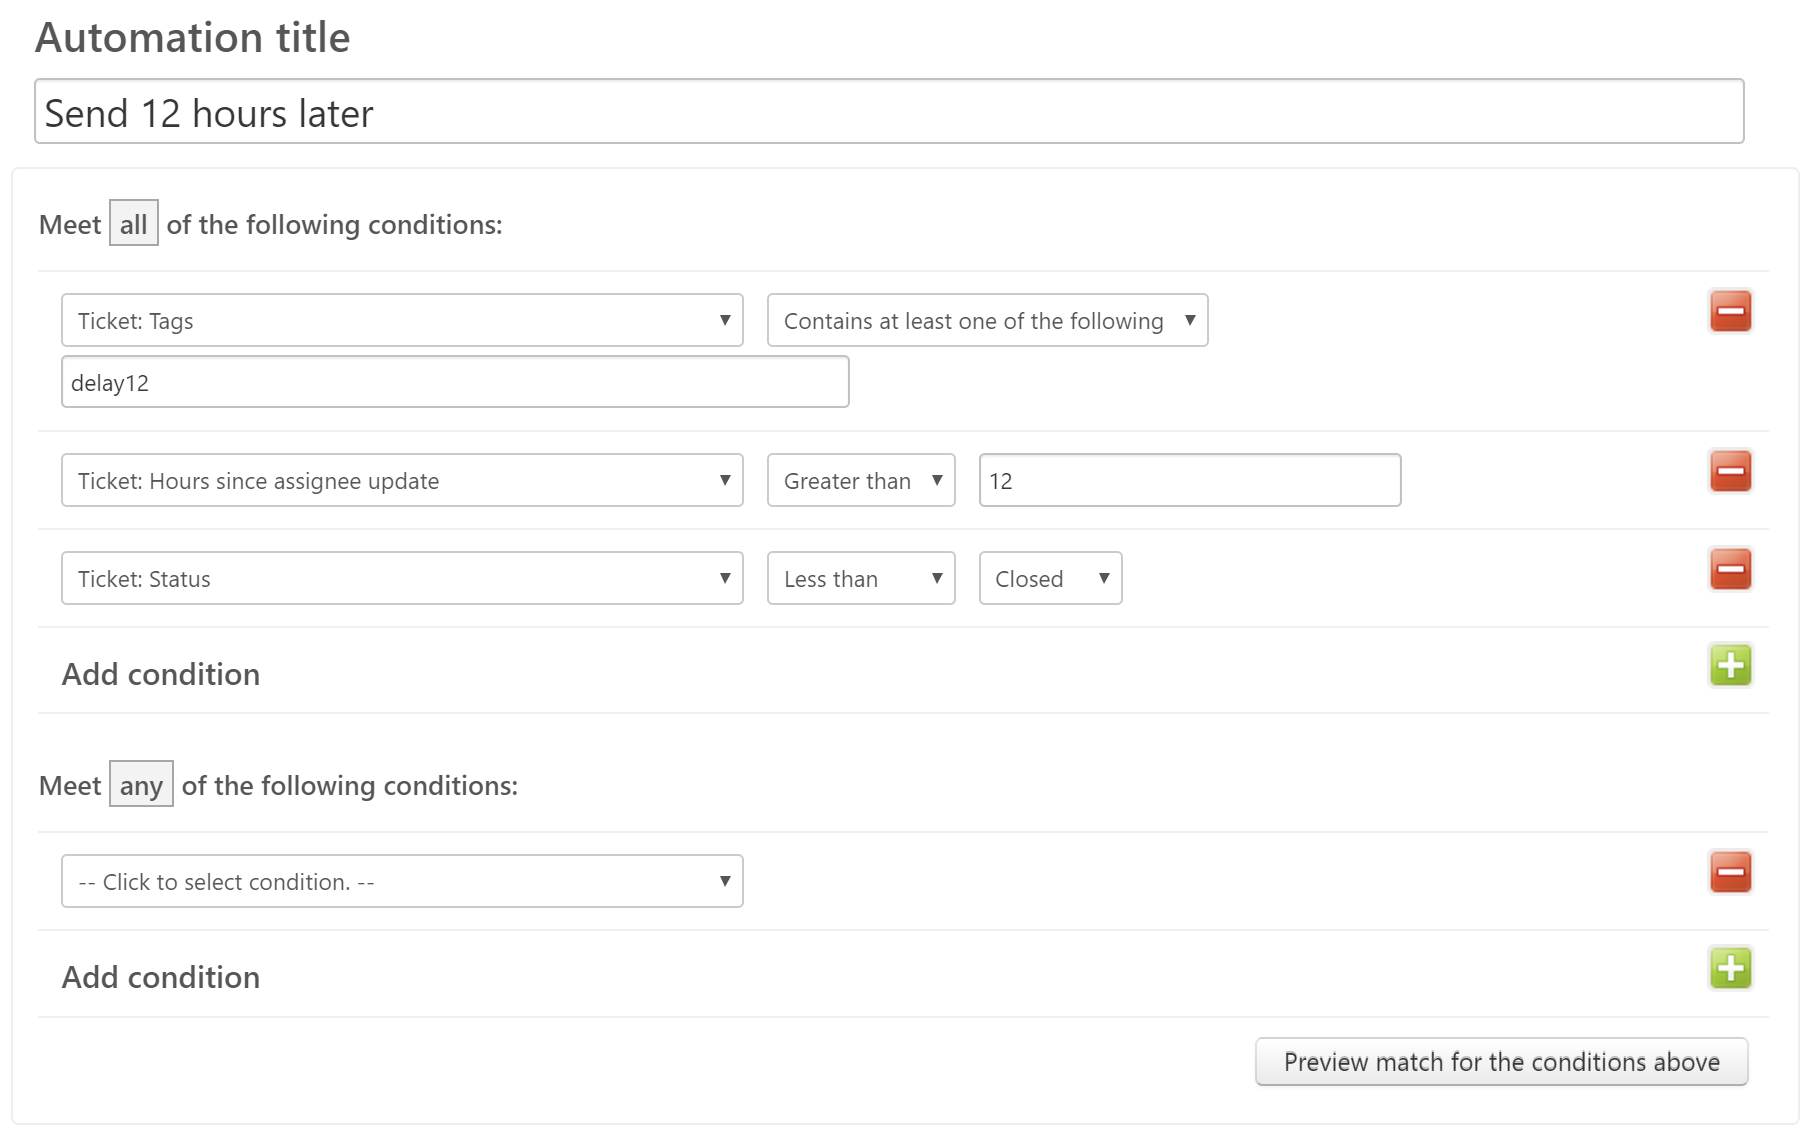
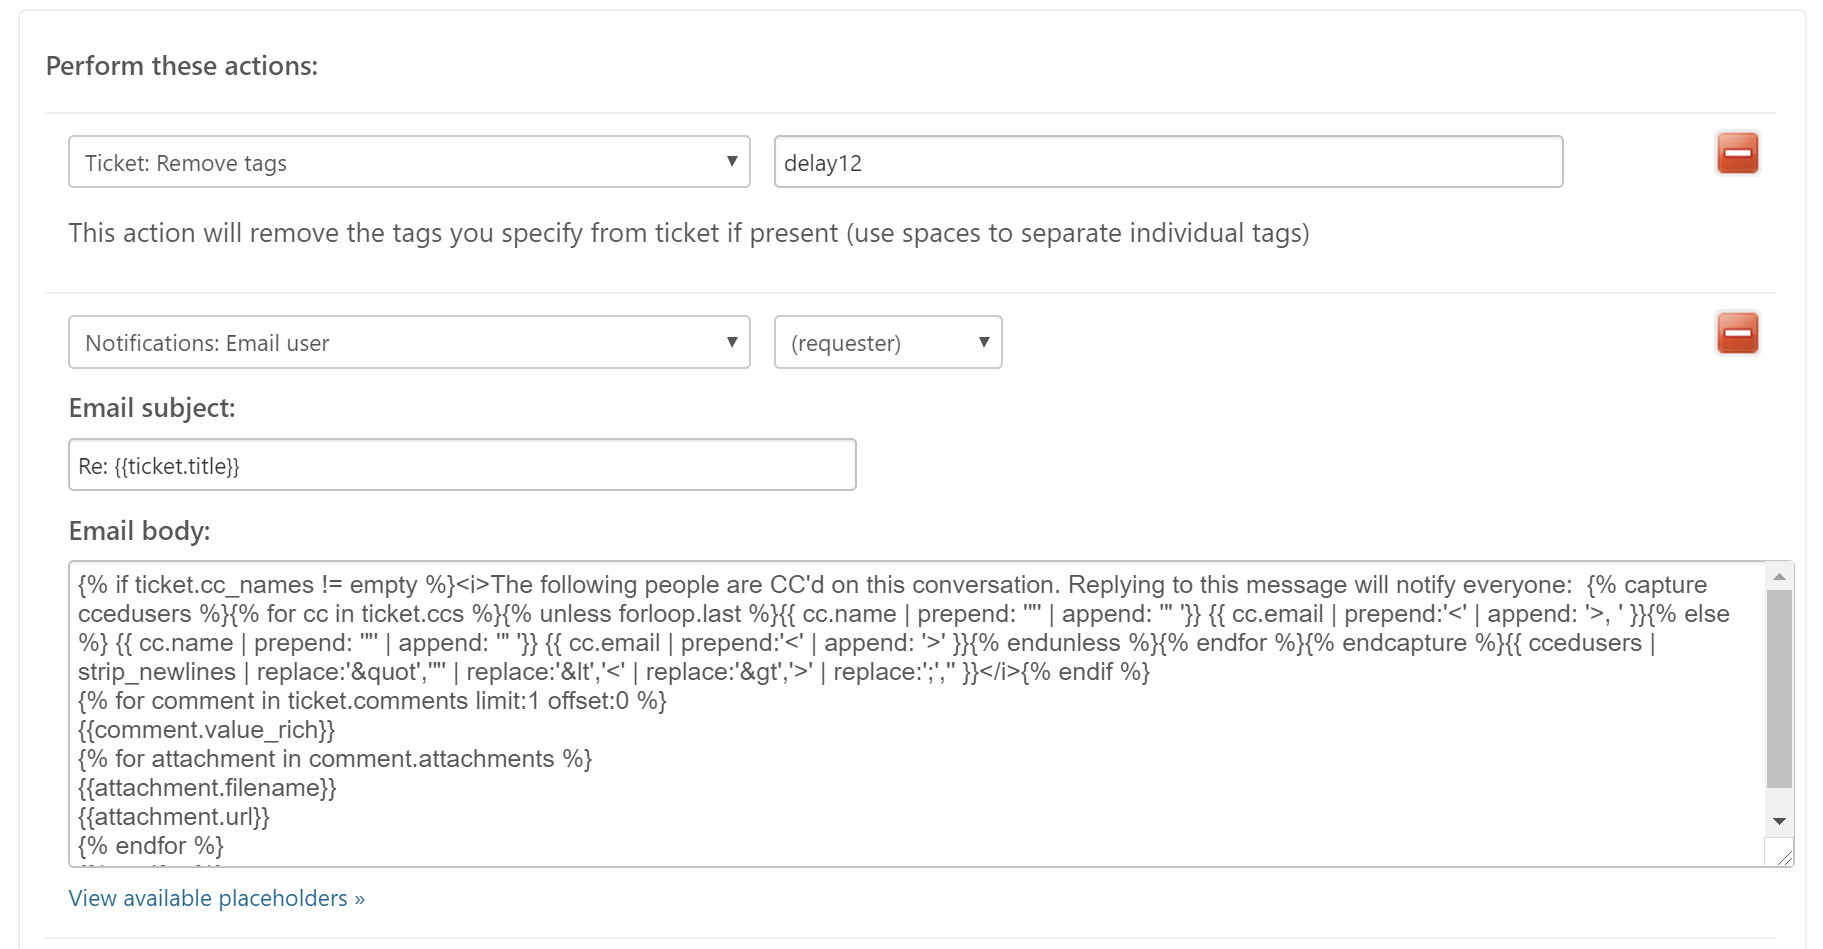
Step 3: Create a new automation for each tag/delay
This will send the email after enough time has elapsed. Here's my setup for 12 hours (for other delays, just change the numbers accordingly). Note that the Email body was copied & pasted from the original trigger that sent the notification.
Step 4 (Optional, but highly recommended): Set up a custom Ticket Field to provide a drop-down with the delay options
This will make it easier and less error-prone, as you won't have to manually type in a tag.
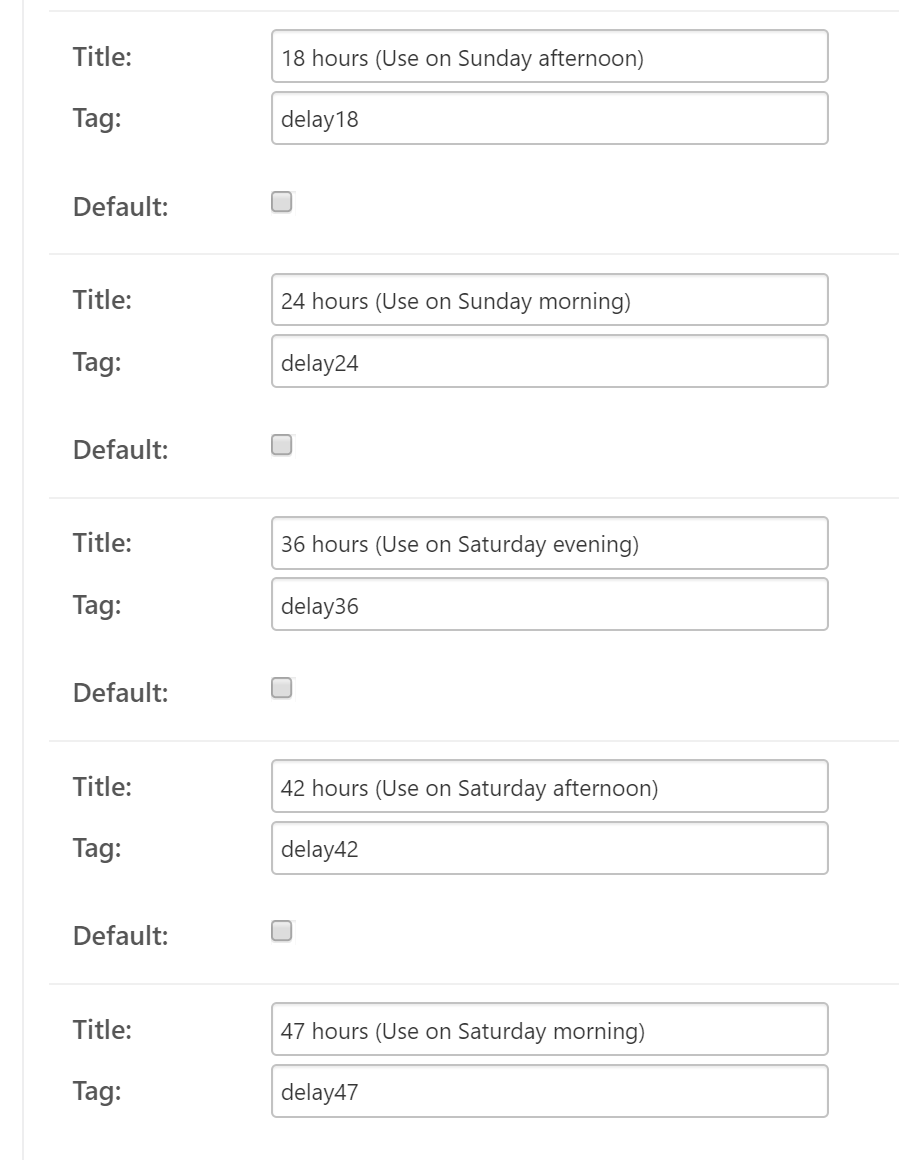
For delays over 12 hours, I also added a note to suggest when to use which delay (assuming I want the actual reply to go out Monday morning):
Step 5: Before submitting a new ticket or reply in Zendesk, simply select the delay from the drop-down
Zendesk will automatically add the tag when you submit.
If you skipped Step 4, then you'll need to manually enter the tag, such as "delay24". This also requires you to remember which tags actually exist, and which don't (entering "delay23" might not work!)... hence my suggestion of the drop-down.
Some other notes and caveats:
1. Test thoroughly!
2. Since automations only run once each hour, the actual delay will be the delay you set, plus up to 59 minutes (give or take). So if you write a reply at 8pm on Sunday evening, and set a 12 hour delay, the message will go out some time between 8am to 9am on Monday morning. You'll see pretty quickly when your automation script runs. My account happens to be around 3 minutes after the hour -- so the emails are always sent in the first ten minutes or so of the hour.
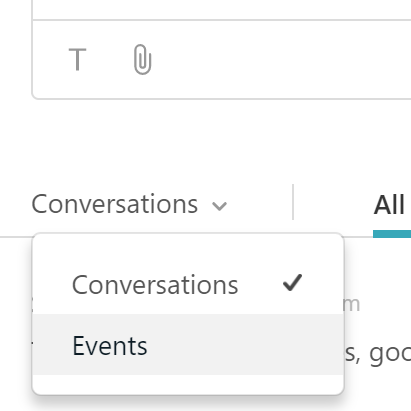
3. For troubleshooting, it's helpful to change from "Conversations" to "Events" view... then you can see the audit trail of when the automation ran and how things worked.
That's it! Hope it helps you...and if you have any other suggestions on how to improve this setup, please let us know!
5
28 Kommentare
Dane
0
Andy K.
Thanks for confirming Dane.
Where can I suggest this to the Zendesk team as a feature to built out in an upcoming release?
0
Dane
The workflow above is just a workaround for sending delayed notifications. It will not work for multiple comments for it will be dependent on the tags present on the ticket.
0
Andy K.
Hey guys! I just implemented Zendesk for our company a couple of months ago and the scheduled send is a very important feature that we use.
I just followed these steps and added all the automations to our setup, but I can't get the email to fire.
I was hoping I can set this up on a "per comment" basis. So for example; Agent types out a response to the customer, selects the type of delay they want to add to the ticket using the ticket fields on the left side, and then press "submit" but it seems like I have to pre-type the message that sends in the automation sequence on the back end and can't just add the tag to any message I want.
Please tell me there is a way around this or a way to fix this. I appreciate any help with this in advance! We are dying without this
0
Ben
1265041882370
Oh wow!!! You don't get paid for this or compensation of any kind?
0
Heather Rommel
Nope! Zendesk Moderators do not work for Zendesk. We're a collection of Zendesk experienced volunteer folks who assist other Zendesk customers here on the Community. https://support.zendesk.com/hc/en-us/articles/4408832445978-About-the-Zendesk-Community-Moderator-Program
1
Ben
Do you run Zendesk for your company or something?
Very confused... I thought moderators worked for Zendesk and thus would be able to see this type of stuff. Are you saying you are actually a Zendesk user?
0
Heather Rommel
I hear your frustration; I haven't had the experience of failures with the workaround. Sorry you're having that experience!
0
Ben
1265041882370 Yep, I've made an internal comment using that hack, but it is a super messy hack approach. It fails often, you have to convert comments into a specific format, and now I get emails about how you are shutting down that method. So I have to do a ton of work to port it over to this new hook method which isn't working so far. Does any of that sound fun :)?
I want to stress this to the community, what Heather is recommending is a super messy hack that shouldn't be needed if Zendesk would build such a key feature. It is a workaround but you pay for it with loads of management time and failures.
0
Heather Rommel
I haven't had much of a need for scheduled replies, but it makes sense that it's a feature some would want! I don't think this is too bad considering it's customizable based on your preferences.
Regarding a trigger/automation to make an internal comment 1900658853524 , you can do this by setting up an extension/target and then using it in your triggers and automations.
-2
Melden Sie sich an, um einen Kommentar zu hinterlassen.