Verified AI summary ◀▼
Use a CloudFormation stack to link your Connect instance with Contact Center. This setup integrates Amazon Connect with AWS services like Cognito and Kinesis, establishing trust between systems. Follow the provided steps to deploy the stack, which automates resource creation and configuration. Once complete, update user access and configurations, then notify the Professional Services team to activate the stack.
To link your Connect instance with Contact Center, you can use a CloudFormation stack that Zendesk provides. This stack is a pre-defined set of AWS resources and configurations that, when launched, will set up everything needed for integration. This includes linking Amazon Connect with other AWS services (for example, Amazon Cognito for user management, Amazon Kinesis for streaming contact data, and AWS Lambda functions for custom logic) as well as establishing trust between Connect and the Contact Center app.
There are three scenarios in which a CloudFormation stack must be installed:
- A new Contact Center instance that has never had a CloudFormation stack installed.
- An existing Contact Center instance that has had a CloudFormation stack installed via the legacy (non-admin app) method.
- An existing Contact Center instance that has had a CloudFormation stack installed via the current (admin app) method.
The process is similar for each scenario, with the differences being the level of automation and the amount of manual review and updates required.
The Zendesk Professional Services team will supply you with the following Contact Center account details. You'll need these to complete your configuration:
- Contact Center CloudFormation stack quick create link
To deploy your CloudFormation stack
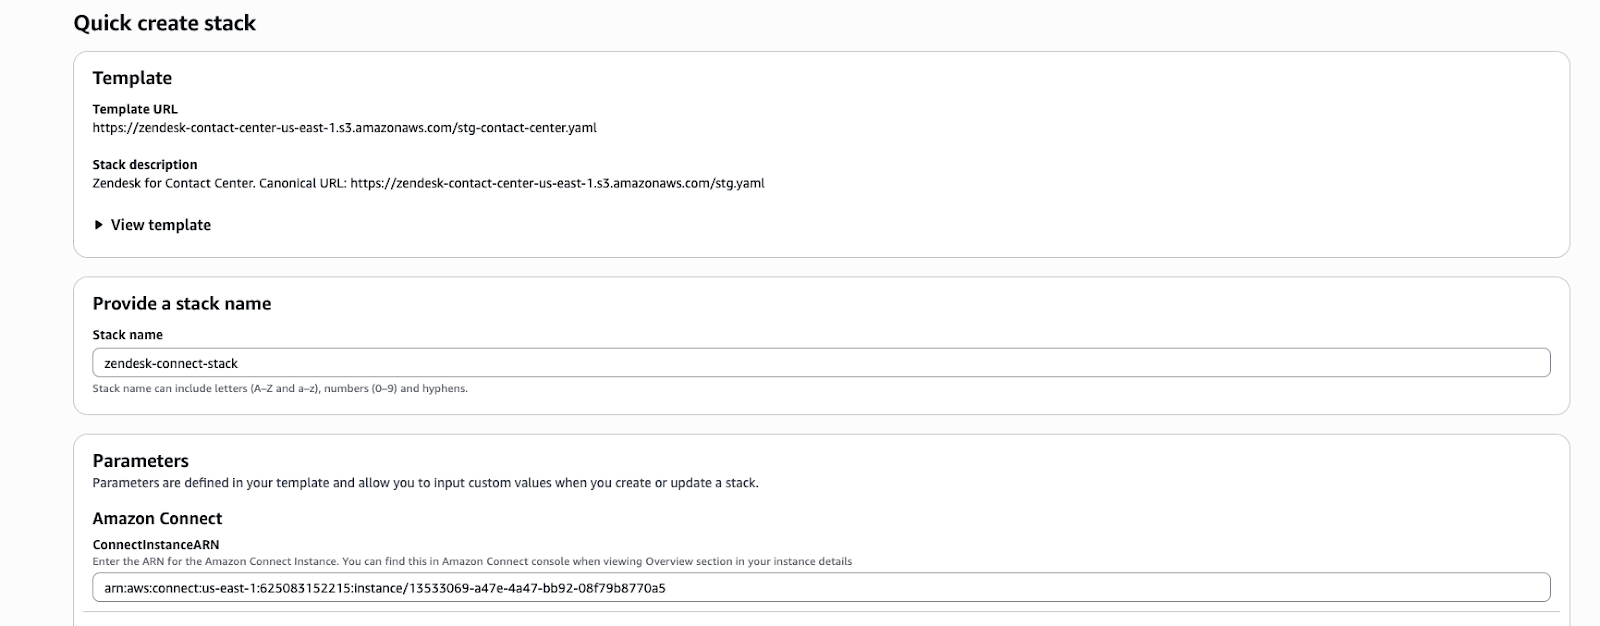
- In your web browser, enter the CloudFormation stack URL provided by the Zendesk Professional Services team.
- The AWS CloudFormation’s Quick create stack page opens with the template
already loaded. You’ll see the stack name and parameters filled in as you provided.
At the bottom of the page, in the Capabilities and transforms section, review and
check all the acknowledgments, and then click Create stack.
Once initiated, CloudFormation will start creating resources. You can watch the process in the AWS CloudFormation console.
You'll see events like “CREATE_IN_PROGRESS” for various components. This process can take a few minutes. In the background, the stack is setting up IAM roles and policies, Lambda functions, Kinesis data streams, Amazon Cognito user pool and groups, configuring Amazon Connect settings, and more. Typically, this doesn't need your intervention. When complete, the status will display CREATE_COMPLETE.
While it runs, do not close the stack page. You can refresh to see updates, but you must wait for it to complete. If the stack fails, it will roll back (you’ll see a status like ROLLBACK_COMPLETE, indicating a problem). If you have any problems, see the troubleshooting section below.

Once the CloudFormation stack shows CREATE_COMPLETE, you've connected Amazon Connect and Contact Center. At this point, the following will be in place:
- An Amazon Cognito User Pool (and associated Identity Pool, if applicable) specifically for this Contact Center instance’s users.
- An LMAdmin user group in Cognito (created by the stack) that will be used to designate admin users in Contact Center.
- AWS Lambda functions or other services for features like transcription, bots, etc., connected between Connect and Contact Center (the exact resources depend on the template’s scope). If call transcription is needed, an Amazon Kinesis stream for Contact Trace Records (CTR) might be set up to stream call events to Contact Center’s components.
- IAM Roles/Permissions that allow Zendesk’s platform to access the Connect instance (within the limits needed) and vice versa, without exposing unnecessary access.
- Further Connect configuration (if needed).
After the stack installation is completed, inform the Zendesk Professional Services team, and they will activate the new stack.
The final step involves setting up user access and some final configuration tweaks.