Summary: ◀▼
Agent presence helps you transfer calls to the right agent or queue by showing who is available, busy, or offline. You can search and filter agents, see real-time status and routing details, and use transfer controls for agents, queues, external numbers, or custom phone numbers. Admins must enable the feature, set up quick connects, and configure transfer rules to match your team’s routing needs.
Agent presence in Contact Center helps agents transfer contacts to the right person or queue by showing which agents are available. This article explains the prerequisites and setup for admins, then describes how agents use agent presence during transfers.
This article contains the following topics:
Prerequisites for agent presence
Before enabling agent presence in Contact Center, ensure the following prerequisites are met:
- CloudFormation stack upgrade: Update your Contact Center instance to version 5.99.2 or higher. Ensure that the latest CloudFormation stack is deployed.
- Feature flag activation: Contact Zendesk Customer Support to activate agent presence on your required accounts.
-
Contact flow setup: Add the following two contact flows of type
Transfer To Queue (
queueTransfer), to the Amazon Connect instance, to route the contact to a given agent or queue:
-
Quick connects setup:
- Create two Quick connects of type Queue in Amazon Connect
with the following names:
- Direct Queue Transfer: link to the direct queue transfer contact flow.
- Direct Agent Transfer: link to the direct agent transfer contact flow.
Note: These quick connects don't need to be added to queues like standard quick connects. Contact Center can still access and use them even if agents don't have direct access to them.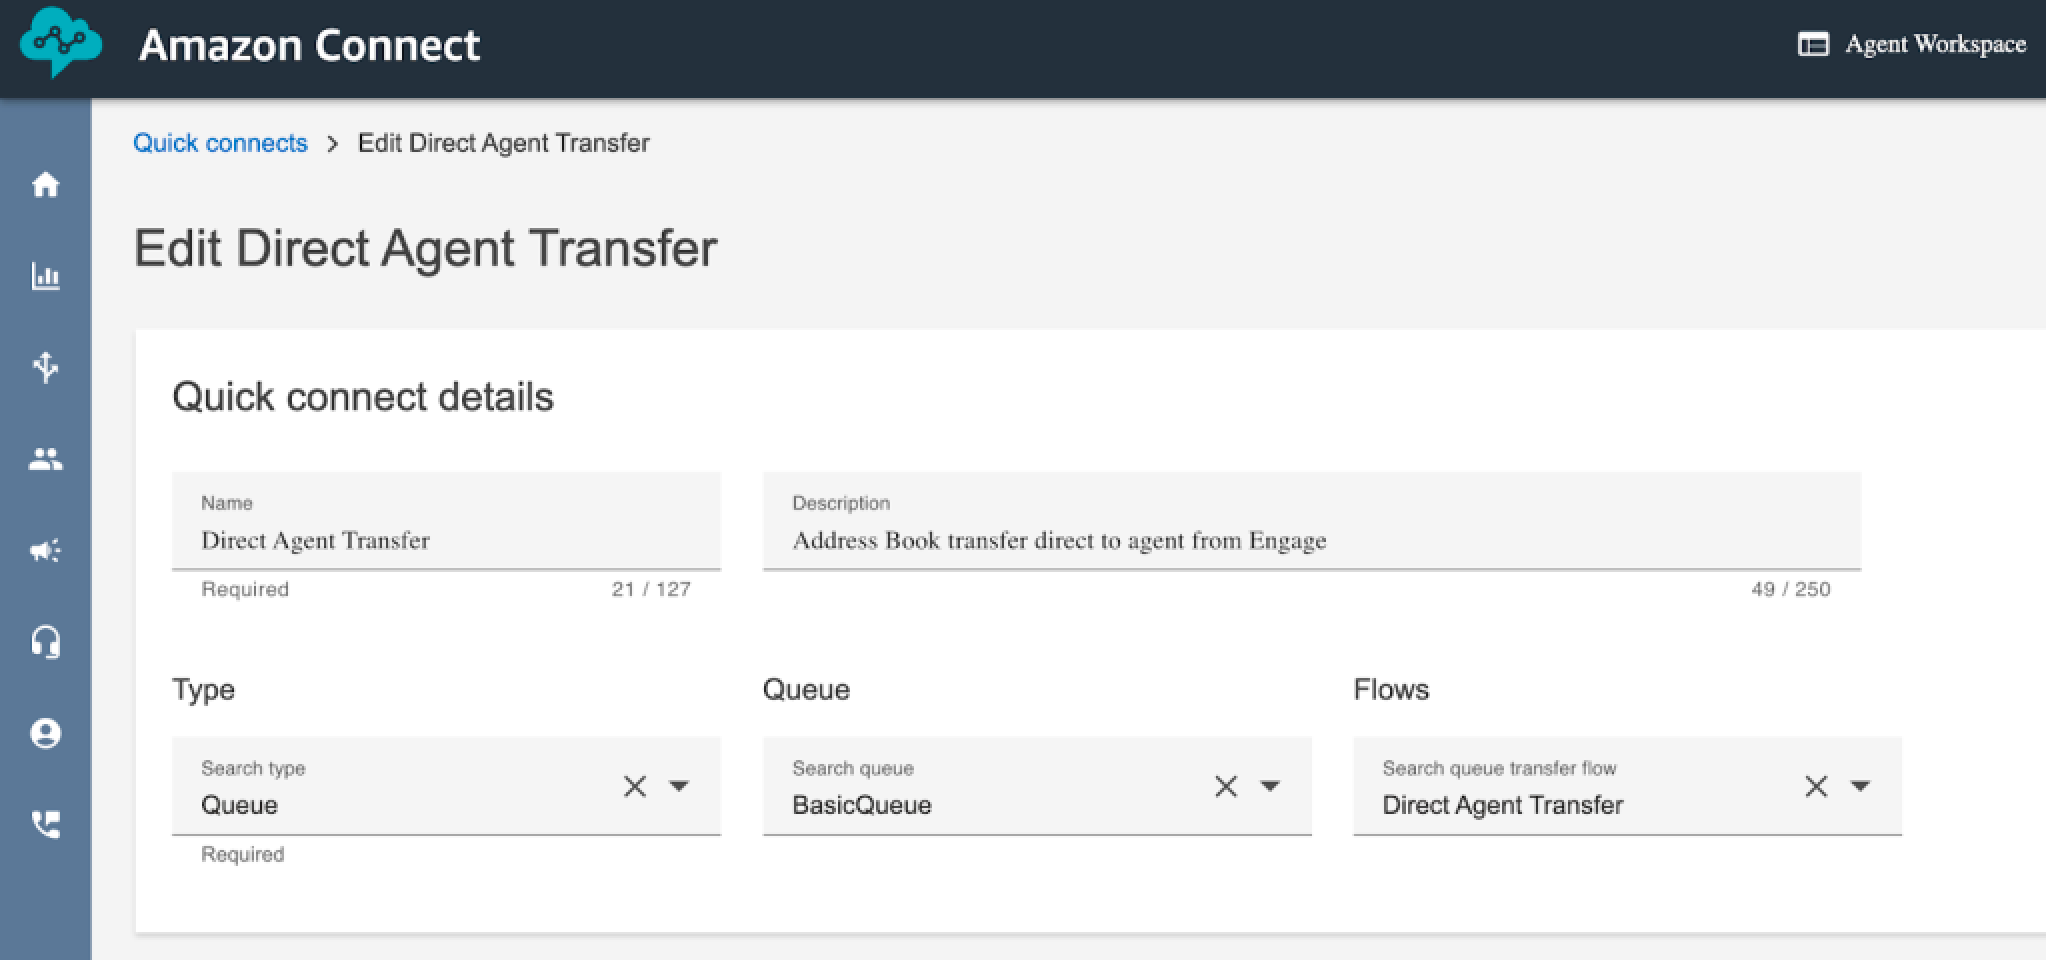
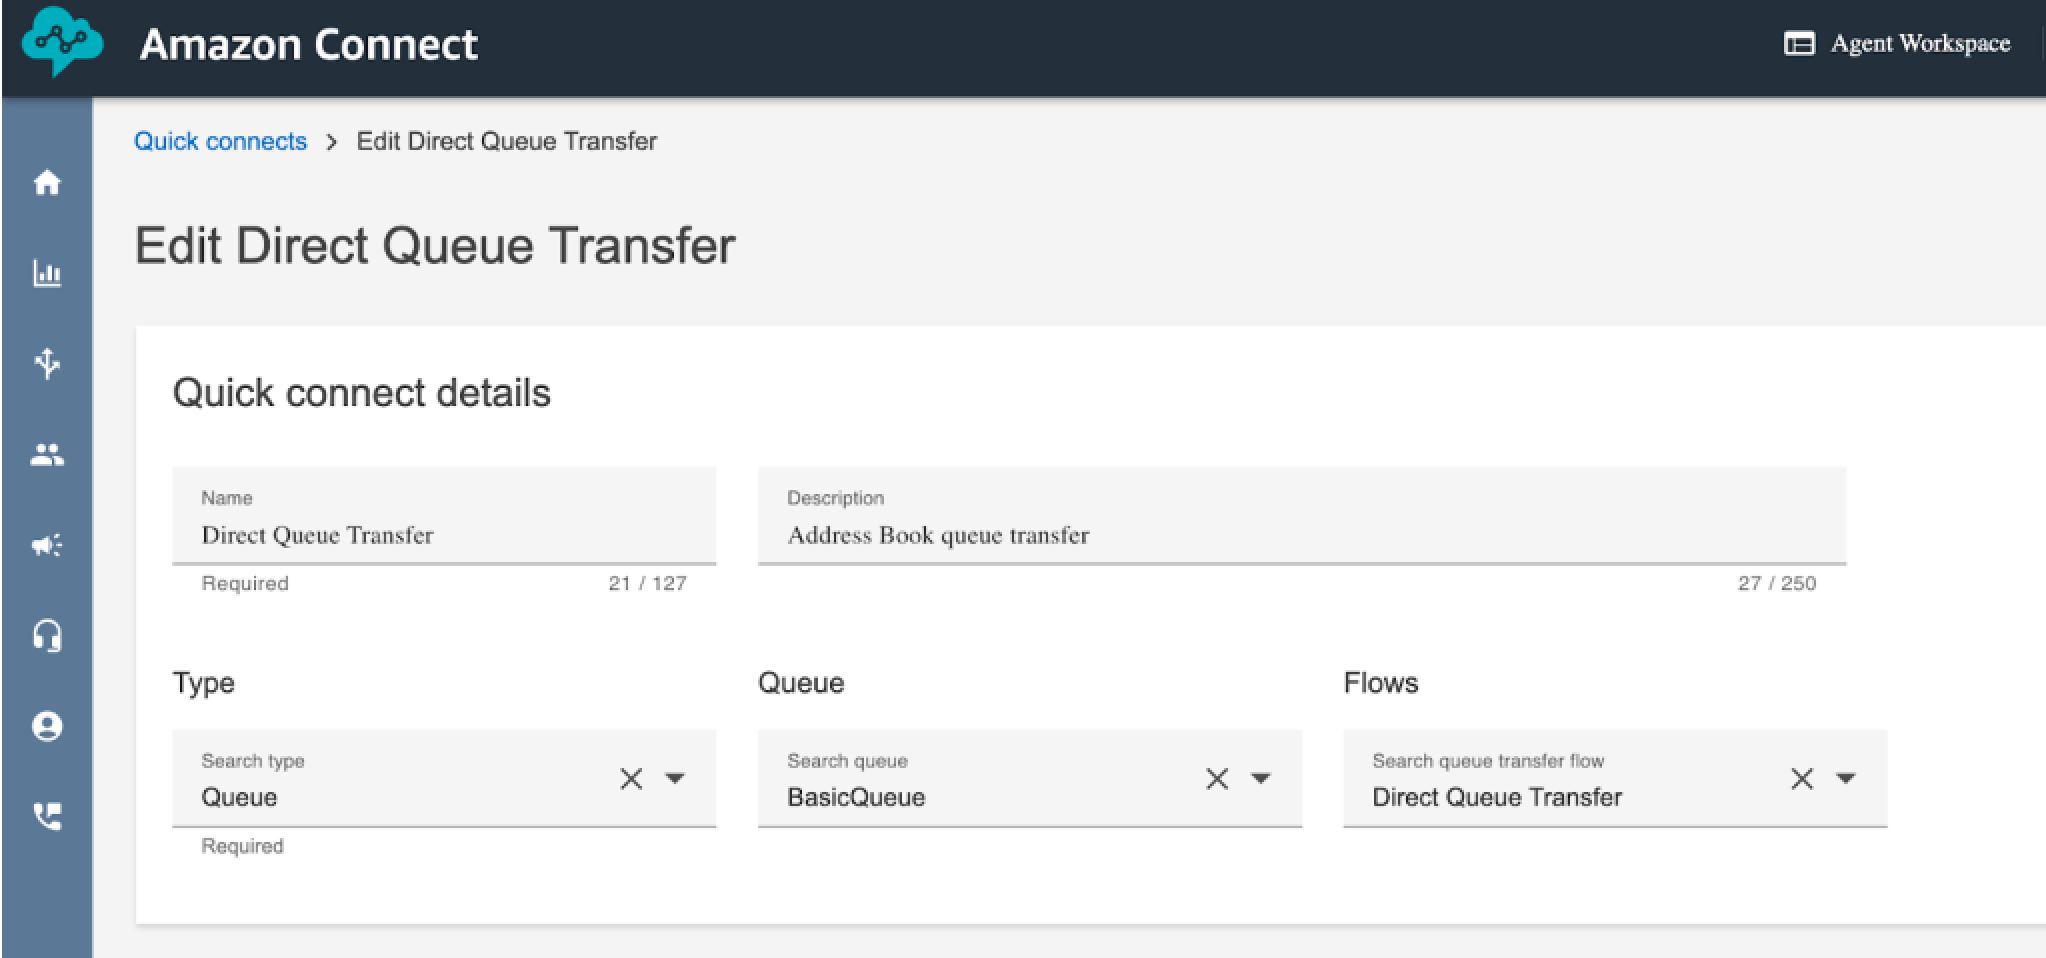
- Once the quick connects are created, configure them within the Contact
Center workflow settings to ensure proper routing. See Configuring agent presence.
- Create two Quick connects of type Queue in Amazon Connect
with the following names:
Configuring agent presence
You can update your agent presence settings from the Workflows tab.
To configure agent presence
- In Contact Center, click the profile button (
 ), then click Admin
settings.
), then click Admin
settings. - Click the Settings icon (
 ), then click the
Workflows tab.
), then click the
Workflows tab. - Select a workflow to edit and then scroll down to Transfer Targets.
- Under Quick Connect, select the transfer types to activate:
- Queues, Agents, and External.
During call transfers, agents can access only the quick connects that you select here.
- Under Dialpad / Custom numbers, select Enable External Transfers to Custom Phone Numbers to allow agents to call customers.
- Under Agent Search and Transfer, select Enable Agent Search and
Transfer to allow agents to search for agents regardless of their
availability.
Agents can now search for agents both online and offline. Additionally, configure:
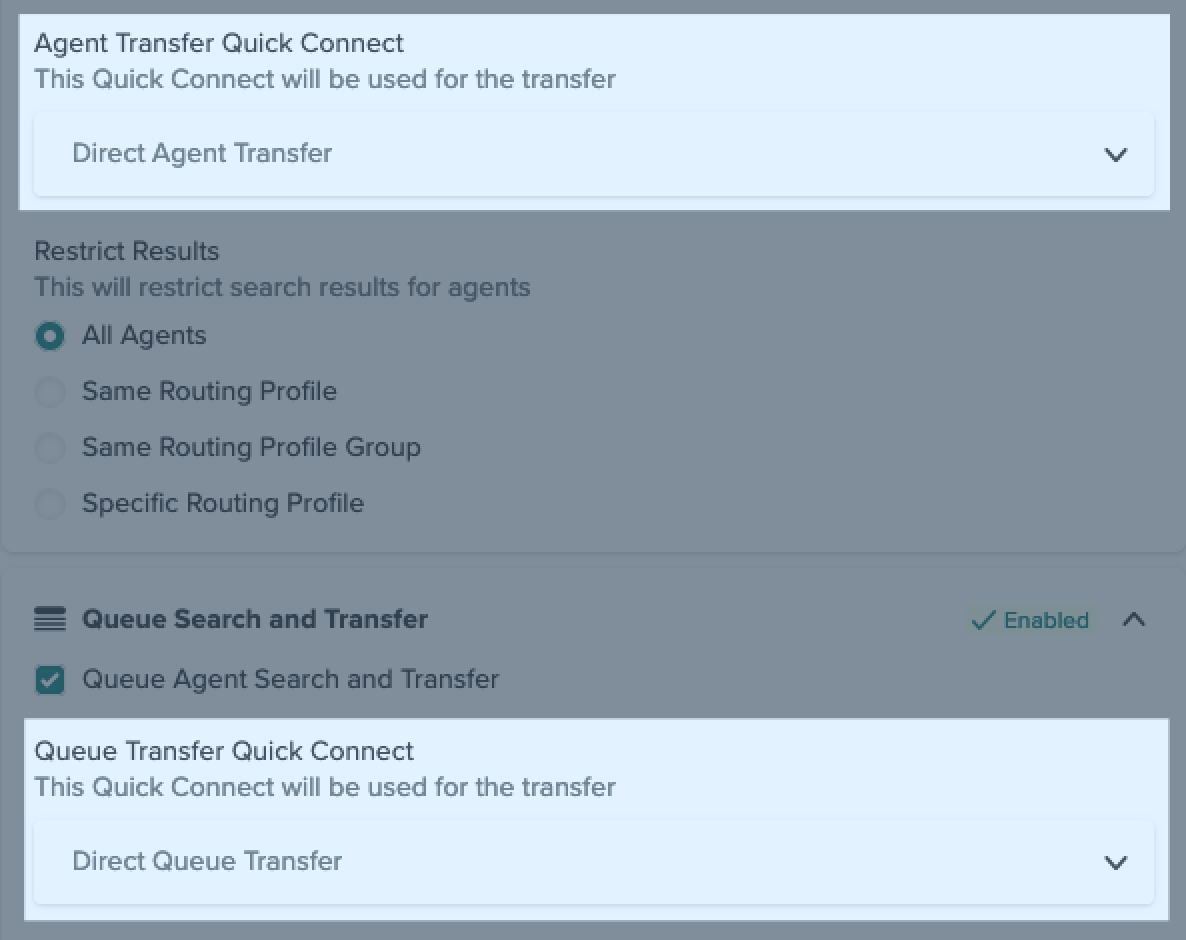
- Under Agent Transfer Quick Connect, select the quick connect that will be used for the transfer: Direct Agent Transfer, Direct Queue Transfer, or any of your quick connects. For agent presence, select Direct Agent Transfer.
- Under Restrict Results, to limit the search results within: All Agents, Same Routing Profile, Same Routing Profile Group, or Specific Routing Profile.
- Under Queue Search and Transfer, select Queue Agent Search and
Transfer to allow agents to search for any queue.
Additionally, configure:
- Under Queue Transfer Quick Connect, select the quick connect that will be used for the transfer: Direct Agent Transfer, Direct Queue Transfer, or any of your quick connects. For agent presence, select Direct Queue Transfer.
-
Under Common Settings, configure behavior for agents in a non-available status or out-of-hours queues.
This is applicable to all transfer types and can restrict search results.
If an agent or queue is offline or unavailable, transfers can remain in a queue indefinitely. You can avoid this by selecting the following options:
- Select Disable Offline Transfers to prevent transfers to offline agents or out of hours queues.
- Select Disable Unavailable for Channel Transfers to prevent transfers to agents that are available but their agent routing profile doesn't include the contact channel. For example, their agent routing profile is only for chat.
- Select Disable Custom Status Transfers to prevent transfers to agents in non-routable status such as Break or Training.
- Click Save Workflow to apply the changes.
![]()
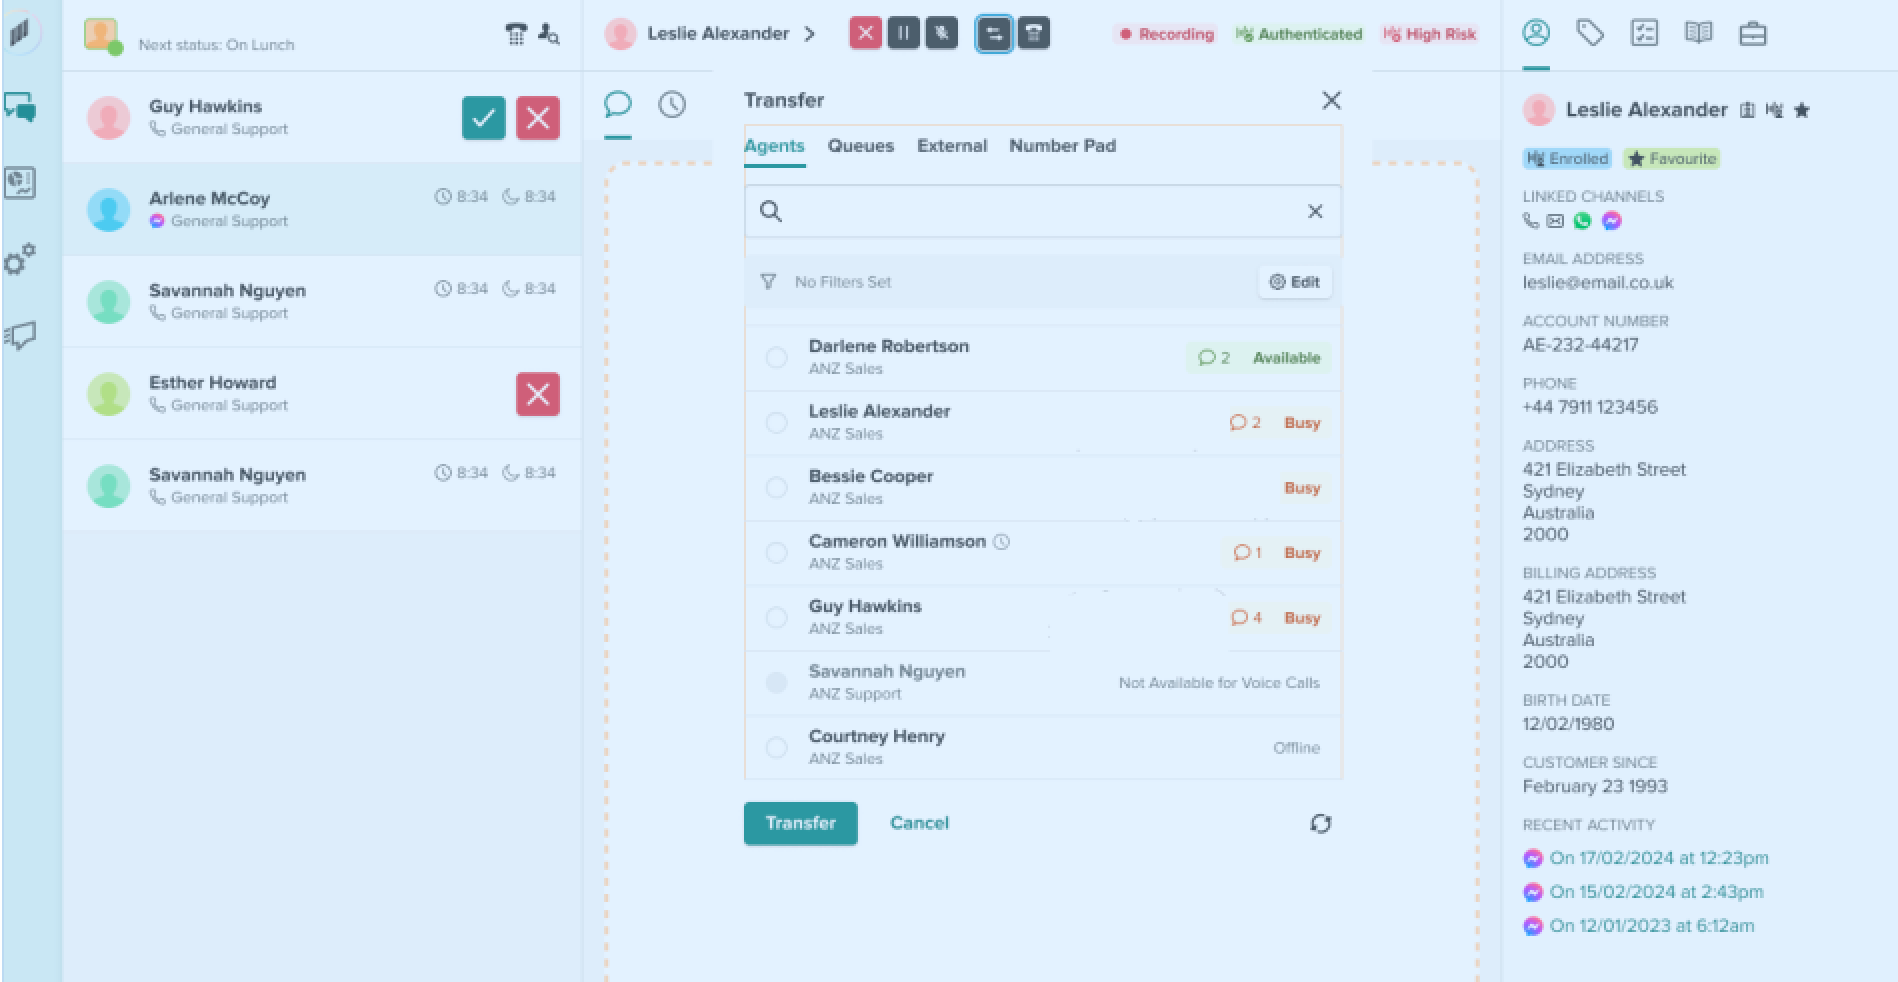
Transferring a call using agent presence
When you're on a call, you can use agent presence to find an agent or queue for the transfer.
To transfer a call
- Click Transfer to initiate the process.
- Select one of the following tabs:
- Agents: Displays a list of quick connect agents.
- Queues: Displays a list of quick connect queues.
- External: Shows a list of all the external numbers that have been configured.
- Number pad: Displays a number pad where you can manually enter a contact number.
After you choose a tab, you can transfer the call to the destination you select.
Searching and filtering agents
The transfer page allows you to search for specific agents or filter the list based on various criteria. Use the search bar to quickly find an agent by typing their name. Apply filters to narrow results by agent availability (Available, Busy, Offline) or any custom filters that have been set up in your system, for example filtering by routing profiles:
![]()
Additionally, you can filter by queues to see which agents are assigned to specific customer service queues (for example, Sales or Support). This can help you transfer the contact to the most appropriate team member.
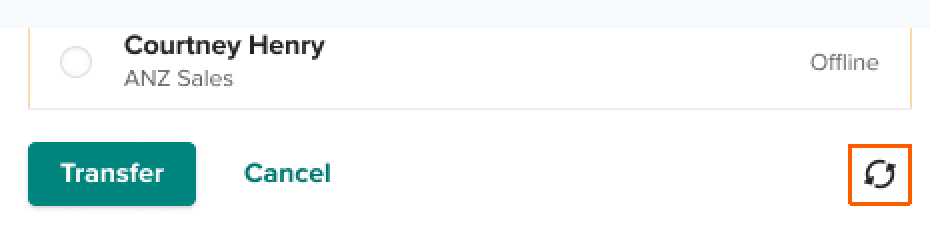
Viewing agent status and availability
When you search for agents by name, you can see real-time status information next to each agent's name and routing profile:
- Availability: Displays the agent’s current status: Available or Busy.
- Active chats or calls: Shows how many active chats the agent is handling and the duration of active calls.
- Offline or unavailable agents appear in the list only if your admin allows these transfers.
- Agent status updates automatically when you switch tabs or click the refresh icon in the bottom-right corner of the transfer tab.
Completing the transfer
When transferring contacts, you can either stay on the call or disconnect after the transfer.
- Select the agent, queue, or external number you want to transfer the
contact to, then click Transfer.
The system routes the contact to the destination you selected.
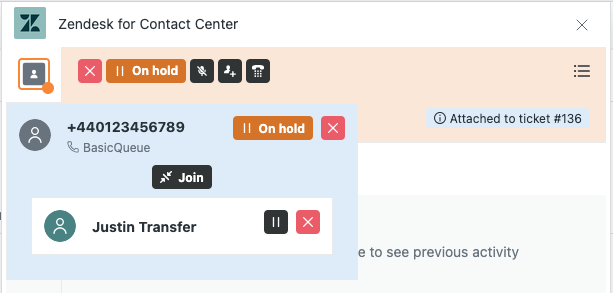
If you are transferring a chat, your interaction with the customer goes into the ACW workflow, and the chat is transferred to the selected destination.If you are transferring a call, you will have the option to join or disconnect from the call.
-
Hover over the view call icon below the profile button (
), then do
one of the following:- Click Join below the contact number, or click On
hold to the right of the contact number.
This will create a conference call with all participants.
-
Click X to the right of the contact number.
You will disconnect from the call and transition into ACW.
- Click Join below the contact number, or click On
hold to the right of the contact number.
Updating the agent list
The agent list updates by clicking on the refresh icon, or by switching between tabs, so you’ll always have the latest information on your colleagues' availability or activity.