Verified AI summary ◀▼
Configure Single Sign-On (SSO) with Azure AD for your Contact Center to streamline user access and enhance security. Set up involves creating a SAML application in Azure AD, configuring an identity provider in the Cognito Userpool, and specifying it for agent authentication. This integration simplifies login processes and centralizes user management across platforms.
Both Amazon Connect and Zendesk Contact Center can be configured for SSO with Microsoft Azure Active Directory (Azure AD) as the SAML-based identity provider. Amazon Connect and Contact Center each require a SAML application. The required SAML applications are created and configured in the Azure AD portal.
The Azure AD AWS SAML application along with an AWS IAM identity provider will enable the federation between Azure AD and your AWS IAM users.
This article contains the following topics:
Configuring SSO for Amazon Connect
You can configure Amazon Connect SSO with Azure AD as described in this Configure Single Sign-On for Amazon Connect Using Azure AD in the AWS documentation.
It's a good idea to use Service Control Policies (SCPs) to manage permissions regarding what users and roles can do in Amazon Connect, protecting important resources and making your system more secure. SeeSecurity best practices for Amazon Connect.
The following example SCP can be used to prevent the deletion of the Amazon Connect instance and associated role.
<pre><code class="language-json">
<pre><code class="language-json">
{
"Version": "2012-10-17",
"Statement": [
{
"Sid": "AmazonConnectRoleDenyDeletion",
"Effect": "Deny",
"Action": [
"iam:DeleteRole"
],
"Resource": [
"arn:aws:iam::*:role/***Amazon Connect user role***"
]
},
{
"Sid": "AmazonConnectInstanceDenyDeletion",
"Effect": "Deny",
"Action": [
"connect:DeleteInstance"
],
"Resource": [
"***Amazon Connect instance ARN***"
]
}
]
}
</pre></code>
</pre></code>
Configuring SSO for Contact Center
Single Sign On (SSO) for Contact Center is implemented by configuring the Cognito Userpool to use a SAML application for sign-in. The Cognito Userpool is the one which was created by the Contact Center CloudFormation template.
The high-level process includes:
- Gather the required Cognito Userpool details.
- Create the SAML application in the Azure AD portal.
- Configure an identity provider in the Cognito Userpool.
- Specify this identity provider to be used for agent authentication.
To gather the required Cognito Userpool details
- Log in to the AWS account where the Contact Center CloudFormation stack was created.
- Navigate to the Cognito service (ensure that you are in the correct region) and
open the Userpool which was created when the Contact Center CloudFormation stack
was created.
Take note of the Userpool ID.
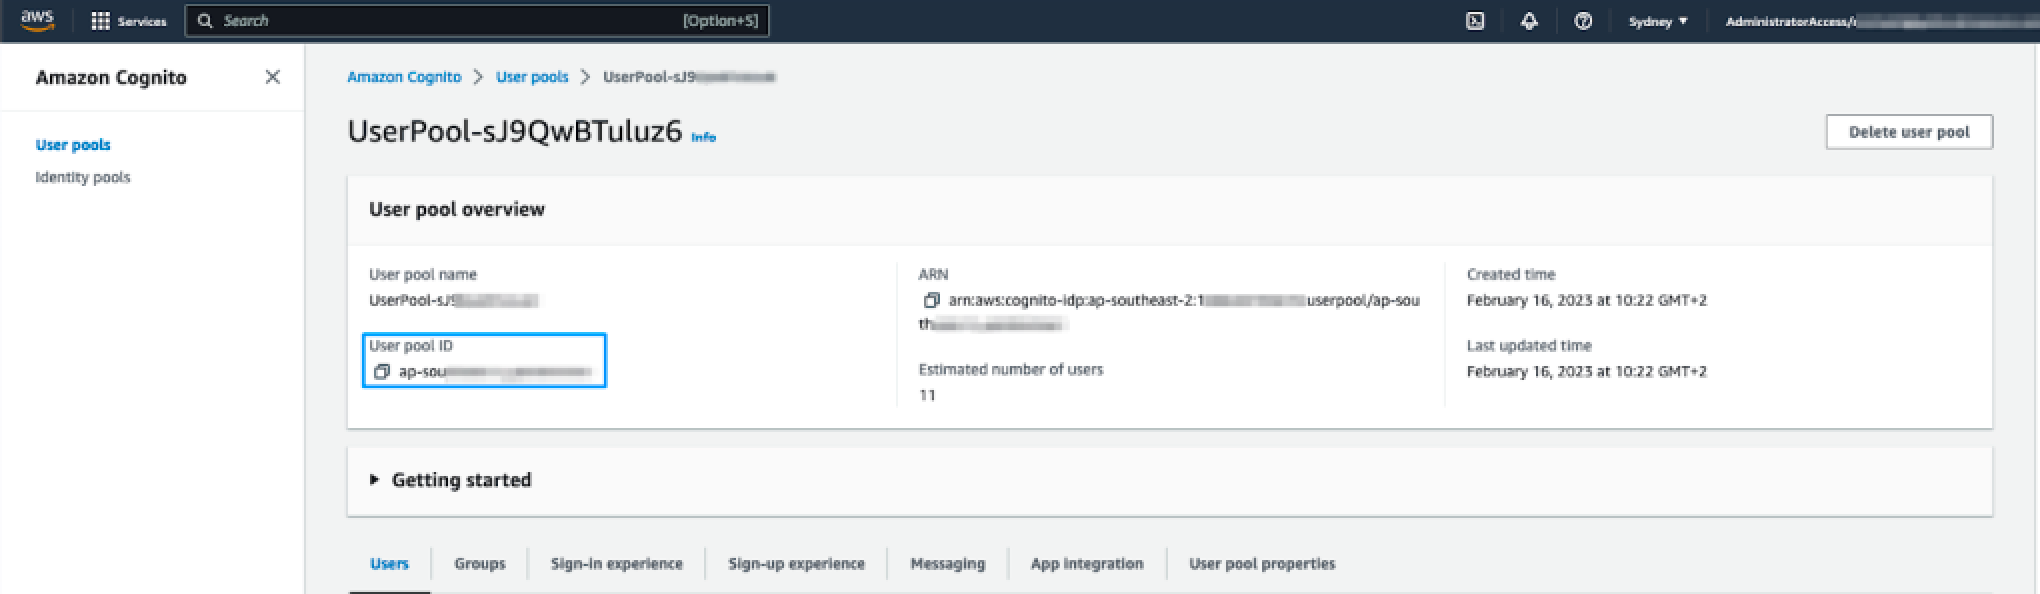
- Click the App integration tab and note down the Cognito domain prefix.
This is the first part of the Cognito domain, before the '.auth.regionxxx'. This is also the value that was specified in the CloudFormation template so can be copied from the CloudFormation parameters tab if you prefer.
To create the SAML application in the Azure AD portal
- Sign in to the Azure Portal and in the Azure Service section, select Azure Active Directory.
- In the left sidebar, select Enterprise applications.
- Click New application and then Create your own application.
- Complete the Input name field.
- Enter a name for your application. For example, Zendesk Contact Center production.
- Select Integrate any other application you don’t find in the gallery (Non-gallery).
- Click Create.

It takes a few seconds for the application to be created in Azure AD, then you're redirected to the overview page for the newly added application.
To set up Single Sign-on using SAML
- On the Getting started page, in the Set up single sign on tile, click Get
started.
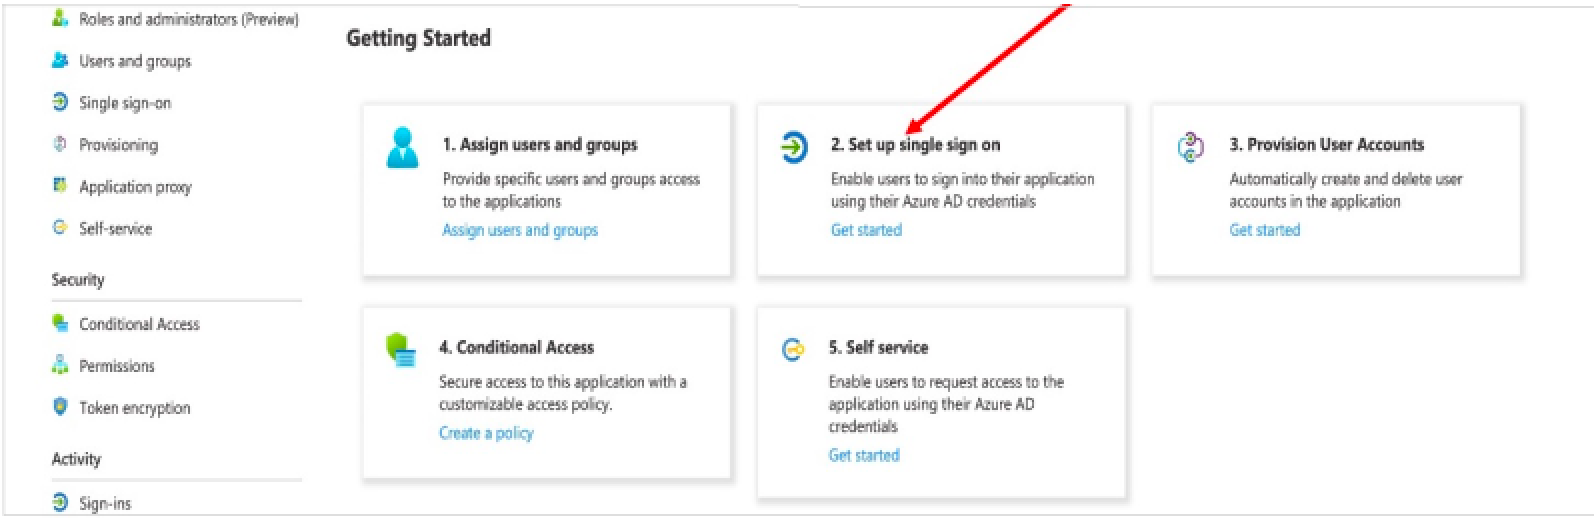
- On the next screen, select SAML.
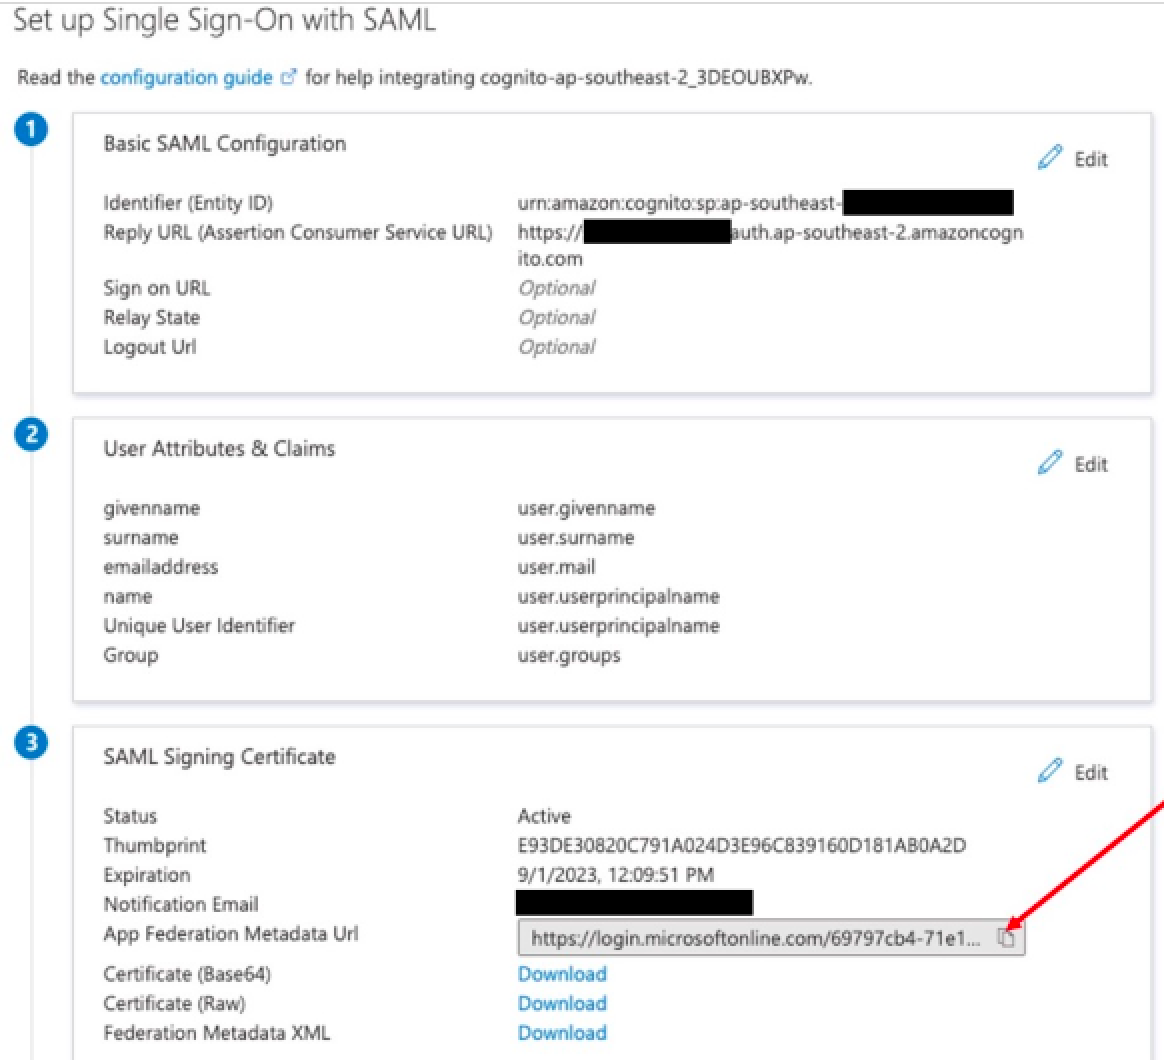
- In the middle pane, under Set up Single Sign-On with SAML, in the Basic SAML configuration section, click the edit icon.
- Navigate to the middle pane under Set up Single Sign-On with SAML.
- In the User Attributes & Claims section, click Edit.
- Enter the following field values:
- Identifier (Entity ID): urn:amazon:cognito:sp:${pool ID}
- Reply URL (Assertion Consumer Service URL): https://${DomainPrefix}.auth.${RegionID}.amazoncognito.com/saml2/idpresponse
- [.callout-primary--alert-message]
Replace the above placeholders with the values copied from the Cognito Userpool.

- Click Add a group claim.
- On the User attributes & claims page, in the right pane under Group claims,
select Groups assigned to the application.
Leave Source attribute as Group ID.
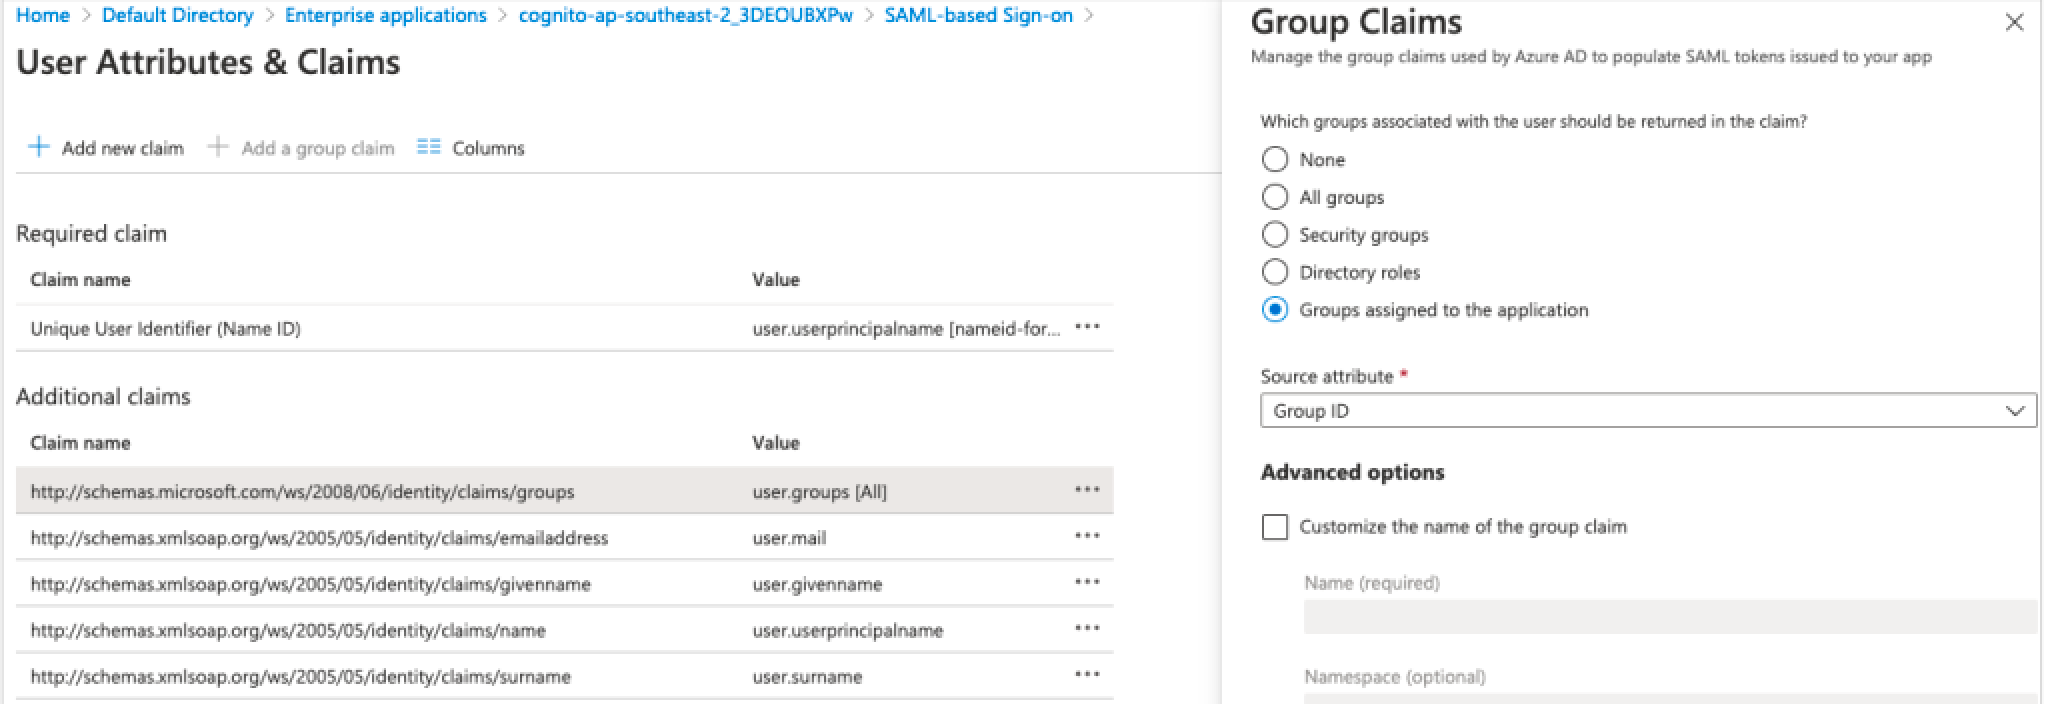
- Click Save.
- Close the User attributes & claims page.
You’re redirected to the Set up single sign-on with SAML page.
- Scroll down to the SAML signing certificate section, and copy the app federation
metadata URL by choosing the copy into clipboard icon.
Keep this URL handy as you’ll need it in the next step.
To configure an identity provider in the Cognito Userpool
- Sign into the AWS account which contains the Cognito Userpool.
- Navigate to Cognito and open the Userpool.
- Select the Sign-in experience tab and then click Add identity provider.
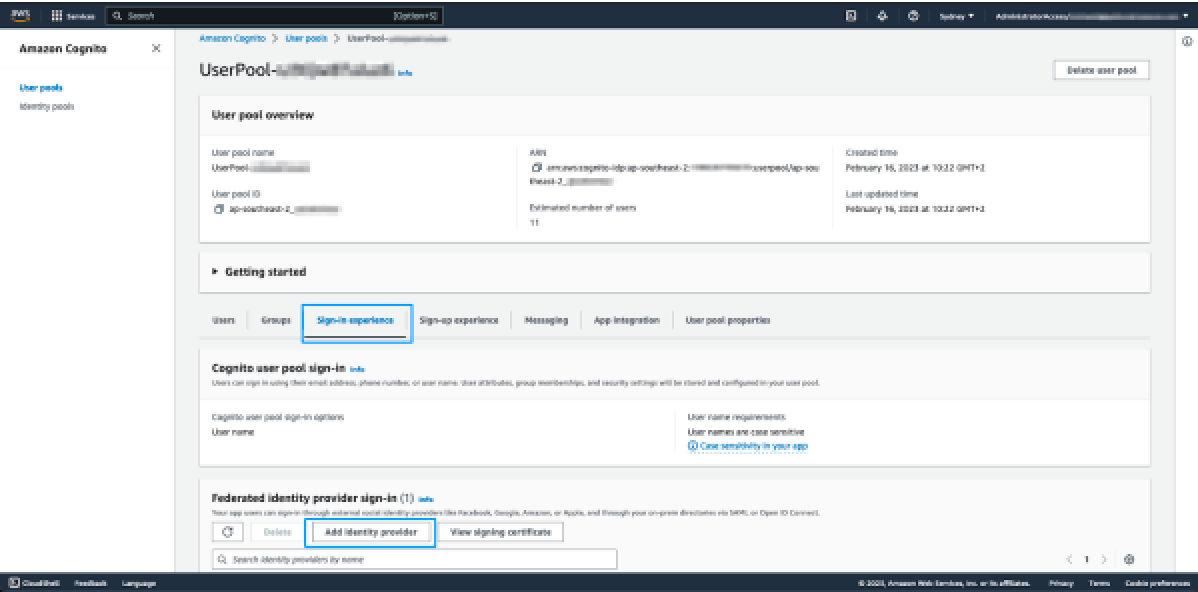
- On the next page, select SAML.
- Under Set up SAML federation with this user pool, configure the following:
- Provider name: Enter a name for this identity provider. It is recommended to not use any spaces in the name.
- Metadata document source: Paste the metadata URL, from the previous step, in the metadata endpoint URL field.
- Under Map attributes between your SAML provider and your user pool, set the
following attribute:
User pool attribute SAML attribute email http://schemas.xmlsoap.org/ws/2005/05/identity/claims/emailaddress - Click Add identity provider.
At this point the required identity provider has been created. The last step in the Cognito configuration is to specify that the app client will use this identity provider for agent authentication.
To specify the identity provider to be used for agent authentication
- Select App integration from the tabbed view, scroll to the bottom and click app-client.
- Scroll down to the Hosted UI section and click Edit.
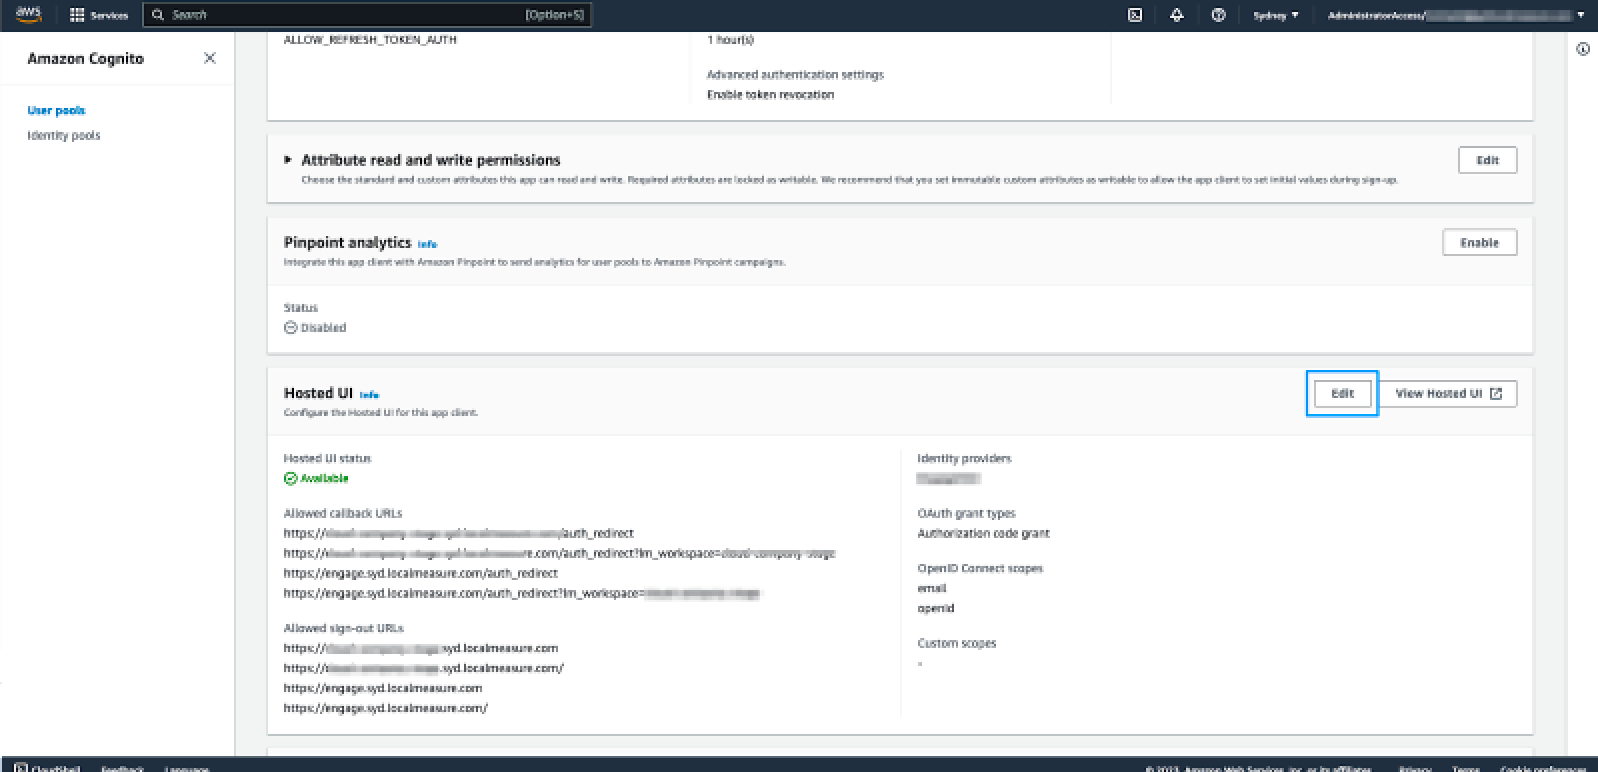
- Under Hosted sign-up and sign-in pages scroll down to the Identity providers dropdown list, then select the identity provider that was configured in the previous step.
- Click Save changes.
Zendesk requires the name of the IDP (as configured under Sign-in experience) to complete the setup of your account. Include this along with the CloudFormation outputs in the information you share with Zendesk.