Verified AI summary ◀▼
Routing profiles in Contact Center let you manage how agents handle different communication channels. You can edit profiles to adjust channels, queues, and concurrency settings. Admins can change an agent's routing profile during shifts to match contact needs. This flexibility ensures agents receive the right contacts without disrupting ongoing interactions, especially in chat scenarios.
A routing profile in Amazon Connect links agents to specific queues and channels, defining the priority and delay for each queue, the maximum concurrency for simultaneous contacts, and the default outbound queue for agent-initiated calls. Each agent is assigned to one routing profile, and a routing profile can have multiple agents assigned to it.
As an admin, you create a routing profile by configuring its channels and queues. To learn more, see Create a routing profile in Amazon Connect to link queues to agents in the AWS documentation.
You can edit a routing profile in Amazon Connect to update the settings, including channels, queues, and concurrency. You can allow agents to change routing profiles during their shift as needed, if you assign agents to a profile that is part of a group.
This article contains the following topics:
Editing a routing profile
You can edit a routing profile in Amazon Connect to customize settings, such as channels, queues, and concurrency.
To edit a routing profile
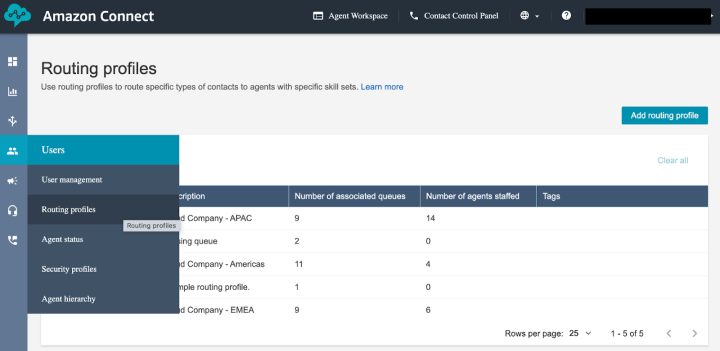
- In your Connect dashboard, click Users > Routing profiles.
- Click the name of the routing profile you want to edit.
- Update the name and description, as needed.
To group routing profiles add a prefix to the name in this format:
[Group name] Name. By grouping routing profiles, you allow agents to switch to other routing profiles in Zendesk that use the same prefix. For more information, see Changing an agent's routing profile. - Update settings, such as channels, queues, and concurrency, as needed.
- Click Save.
Changing an agent's routing profile
Agents might need to switch between routing profiles during their shift to handle
different types of contacts. As an admin, you allow agents to switch profiles in
Zendesk by assigning them a profile that is in a group of profiles. In Amazon
Connect, you group routing profiles by adding the same prefix in square brackets to
each routing profile name, in this format: <codeph>[Group name]
Name</codeph>.
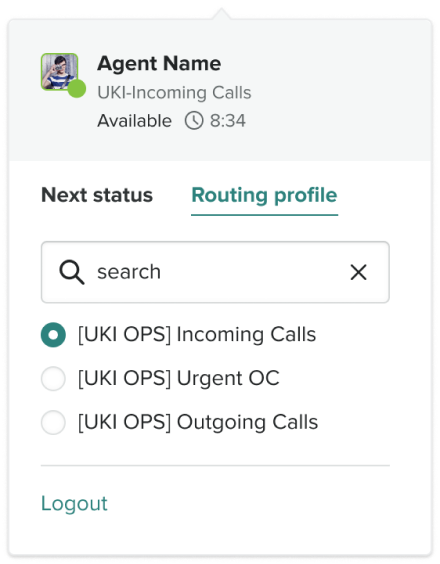
For example, you can group profiles by region and department:
-
[UKI OPS] Incoming Calls: For standard inbound customer support. -
[UKI OPS] Urgent OC: For high-priority omnichannel contacts across all platforms. -
[UKI OPS] Outgoing Calls: For dedicated time spent on outbound follow-ups or campaigns.
When you assign an agent a routing profile with a group prefix, the Routing profile tab appears in Zendesk, and the agent can select any routing profile with the same prefix. If you assign an agent a routing profile without a group prefix, then the Routing profile tab doesn't appear in Zendesk.
Switching profiles during a live contact doesn't interfere with the ongoing interaction. After switching to a new routing profile, agents stop receiving contacts from the previous routing profile. They start receiving contacts associated with the new profile, even if there’s still an open contact from the previous profile. Remember, this applies to chat contacts only, because agents can’t handle more than one call at the same time.
As an admin, you can set an agent's routing profile in Amazon Connect but not in Zendesk.
To change an agent's routing profile
- In your Amazon Connect dashboard, click Users > Users.
- In User management, find the agent and click their Login value.
- Select a profile from the Routing profile menu.
- Click Save.