To use the Chat API in Support+Chat accounts and Phase 4 Chat accounts, you need to generate an OAuth access token to authenticate API requests. Basic authentication is not supported. However, generating a token for the first time can be a bit confusing so this tutorial provides step-by-step examples of how to generate a token manually. After you're done, you should have a token that you can use in Chat API requests to read and write data.
If you're building an application, then you should build the token-generating functionality into your app to automate the process.
There are two ways to create an access token for the Chat API -- a quicker, more convenient way for testing environments (using "Implicit" grant flow), and a longer, more formal way for production environments (using "Authorization Code" grant flow). This tutorial covers both.
Conditions
This tutorial is intended for integrated Chat accounts which have had all of the changes referenced in the above article applied. This is currently being rolled out gradually, so some accounts may require it before others. If you're not sure whether your account has received all of the changes, feel free to reach out to our Support team who can confirm for you.
Note: One side effect of the account changes is that OAuth tokens will need to be recreated. If you complete this tutorial before the changes have reached your account, you'll need to run through the steps again afterwards.
Procedure
The OAuth "Implicit" grant flow has the following steps:
- Create the OAuth API client
- Complete the OAuth implicit grant flow to get the token using information from step 1
Create the OAuth API client
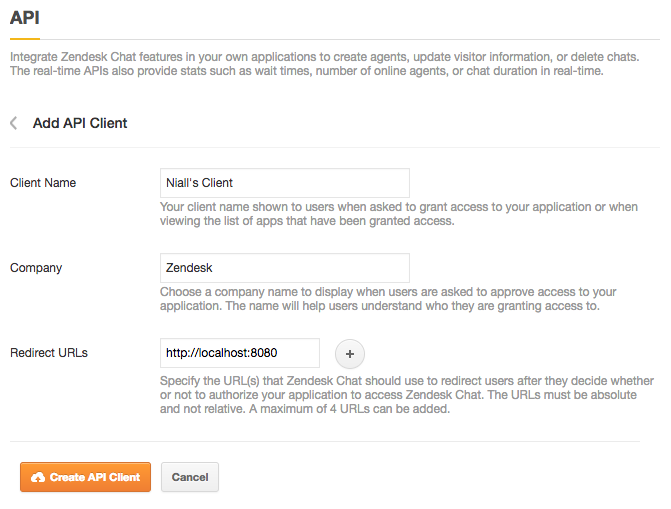
First of all, we need an API client. Go to Zendesk Chat > Account > API & SDKs and click the Add API Client button. Enter a name for the client and company of your choosing, and for the Redirect URL enter http://localhost:8080. It should look something like this:
Click on Create API Client to finish the setup. You will be shown a popup with the Client ID and secret. Very important: The client secret is shown only once, so make a note of it for later use. It will look like this:
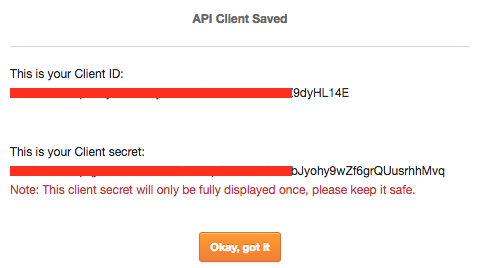
Now that our API client is ready to go, make note of your Client ID and Client Secret before clicking Okay, got it. We're now ready to complete the OAuth grant flow.
Complete the OAuth implicit grant flow to get the token
This approach uses the OAuth "Implicit" grant flow. An alternate approach is to use the OAuth "Authorization Code" grant flow (shown in the next section). If doing manually, this approach has fewer steps and is more convenient than the authorization code grant flow showed later.
1. Follow the "Creating the OAuth API client" step above
2. Collect this information from the OAuth client
- Client ID: CLIENT_ID
- Your Zendesk subdomain
3. Format the below URL with your own CLIENT_ID and SUBDOMAIN, paste it into a new browser tab, and press Enter.
https://www.zopim.com/oauth2/authorizations/new?response_type=token&client_id=CLIENT_ID&scope=read%20write&subdomain=SUBDOMAIN
NOTES:
- If the Chat OAuth client only has one Redirect URL value then passing a redirect_uri value is optional. The system will use the OAuth client's one Redirect URL value by default.
- If the OAuth client has more than one Redirect URL value then passing a redirect_uri value is required. If a redirect_uri value is passed then it needs to be URL encoded. In the above example, the optional redirect parameter would be: redirect_uri=http%3A%2F%2Flocalhost%3A8080
4. The call will be made, possibly asking you to log in and select 'Allow' to generate the token.
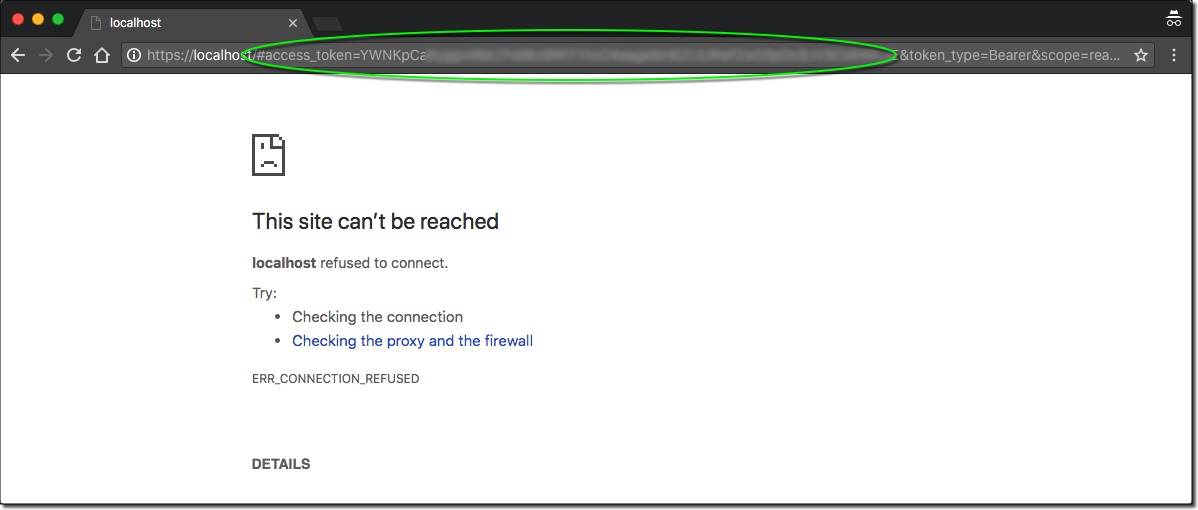
If the call succeeds, your browser's address field will contain your new OAuth token (returned as the access_token value).
Despite the seeming error message displayed in the browser's main window, if 'access_token' is returned in the browser's URL field then it worked!
Here's a demo of the workflow:

A longer, alternate way of generating the token
These steps create a token just like the previous section but demonstrates the OAuth "Authorization Code" grant flow. Make a note of your OAuth client details, which will be used below.
Placeholders will be used instead of real data - remember that your OAuth client's secret should be treated with the utmost security as it is essentially a password into your Chat account.
- Client ID:
CLIENT_ID - Client secret:
CLIENT_SECRET - Redirect URI:
http://localhost:8080 - Subdomain: your Zendesk subdomain; e.g. if your account is at
niall.zendesk.com, this value isniall - Authorization code: we don't have this yet
1. Prepare the first URL
Here we will create a URL to request an authorization code. You will need to go to https://www.zopim.com/oauth2/authorizations/new, and add some query parameters to pass some of the above information. This time we need:
-
response_type: this will always becode -
redirect_uri: where we will be redirected after granting access,http://localhost:8080for our tutorial -
client_id: specific to you, as written down earlier -
scope: what access this token will have, we will choosereadandwrite- Also include 'chat' scope if using the token against the Chat Conversations API.
- Also include 'chat' scope if using the token against the Chat Conversations API.
-
subdomain: your Zendesk subdomain
Putting this altogether and URL encoding it will give you a final URL which looks like this:
https://www.zopim.com/oauth2/authorizations/new?response_type=code&redirect_uri=http%3A%2F%2Flocalhost%3A8080&client_id=CLIENT_ID&scope=read%20write&subdomain=SUBDOMAIN
with CLIENT_ID and SUBDOMAIN being the only differences for your own URL.
2. Prepare the cURL call
Before actually visiting that URL, let's build the cURL call that we will run after. This time we will need the following:
-
grant_type: this will always beauthorization_code -
code: this will be gotten after we permit access from the URL -
client_id: your client ID -
client_secret: your client secret -
redirect_uri: same as the last step - http://localhost:8080 -
scope: same as the last step -readandwrite
When we put this all together we get a command which should look something like:
curl https://www.zopim.com/oauth2/token \
 -H "Content-Type: application/x-www-form-urlencoded" \
 -d 'grant_type=authorization_code&code=AUTH_CODE&client_id=CLIENT_ID&client_secret=CLIENT_SECRET&redirect_uri=http%3A%2F%2Flocalhost%3A8080&scope=read%20write' \
 -X POST
Remember: you should already have CLIENT_ID and CLIENT_SECRET now, but we don't have AUTH_CODE just yet.
3. Get your authorization code
Now go the URL we generated in step 1. You will see a page like this:
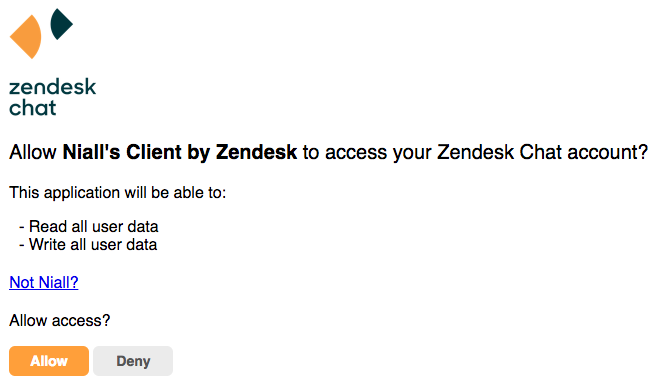
Click Allow to grant access, and you will be redirected to the redirect URL. It will look like a broken page, but the important thing is to look in the URL to see what the authorization code is, i.e. everything after ?code=
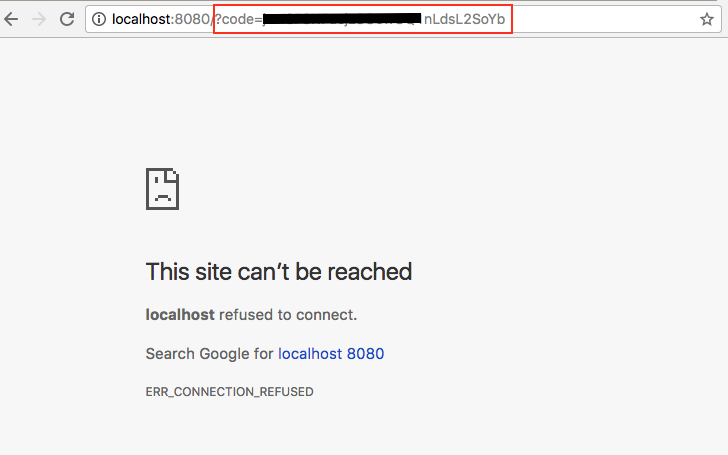
Copy that code, and let's get ready for the final step! The authorization code is only valid for a short time. If you wait more than a few minutes, you may have to re-run the above step to get a new code value.
4. Make the cURL call to get your token
Referring back to our cURL call we had constructed in step 2, which looks like this
curl https://www.zopim.com/oauth2/token \
 -H "Content-Type: application/x-www-form-urlencoded" \
 -d 'grant_type=authorization_code&code=AUTH_CODE&client_id=CLIENT_ID&client_secret=CLIENT_SECRET&redirect_uri=http%3A%2F%2Flocalhost%3A8080&scope=read%20write' \
 -X POST
replace AUTH_CODE with the code from step 3, and run the command from a terminal application. You will receive a response in the form of a JSON object like this:
{
 "access_token": "TOKEN",
 "token_type": "Bearer",
 "refresh_token": "REFRESH_TOKEN",
 "scope": "read write"
}
5. Test out the new token
It's always a good idea to test things out to confirm it worked as you expected, so we can do that now. The easiest call to make is just a simple GET to /api/v2/chats to see your account's information:
curl https://www.zopim.com/api/v2/chats -H "Authorization: Bearer TOKEN"
replacing TOKEN with that retrieved in step 4.
Additional information
Confidential client_type
The above sections demonstrated the "Implicit" grant type and "Authorization Code" grant type. There are two other supported Zendesk Chat grant types: "password" and "client_credentials". These are described more in the reference documentation under Confidential grant types.
For API calls used by admins and agents for such things as reporting metrics, getting an OAuth token with one of these grant types may be preferable. You will need to set the client_type as "confidential". By default this value is set to "public". This can only be done via the API, and can be achieved as follows:
1. Get the client ID
First we'll need the ID of your new client. You can get this using your new token, with the following call:
curl https://www.zopim.com/api/v2/oauth/clients -H "Authorization: Bearer TOKEN"
which will show you all of your clients. You may only have one, but if you do have many you should pick the one you wish to update, and note its ID.
2. Update the client_type
Now that you have the ID of the client, you can run the following cURL call to update the client_type property:
curl https://www.zopim.com/api/v2/oauth/clients/ID -d '{"client_type": "confidential"}' \
 -X PUT -H "Content-Type: application/json" -H "Authorization: Bearer TOKEN"
Once that is complete, your token can be used for restricted endpoints.