You can add interactive widgets to a dashboard, so your viewers can interact with, and customize their results. Only editors can add interactive widgets, but any viewer permitted to view a dashboard can use them.
For help using interactive widgets, see Interacting with dashboards.
Filtering results
Viewers can use filter interactive widgets to restrict results to specific attribute values, date and number ranges, or the highest and lowest results.
Data filter
A data filter enables viewers to filter results by an attribute's values. Viewers can divide data by an additional attribute without the results appearing on each query.
To add a data filter
- In the Dashboard menu, click Add > Add data filter.
- On the Choose data filter dataset panel, choose the dataset you want to filter. You'll only see this panel if you've added multiple queries that use different datasets to your dashboard.
- In the Choose data filter columns panel, select the attribute you want to use.
Before you choose a date attribute, think about how you want your viewers to be able to filter the dashboard. For example, a common filter might be the date the ticket was created, so you'd choose the Ticket created - Date attribute. The attribute you select must be part of the dataset that was used to create the query you’ve added to the dashboard.
You can either browse the available attributes in the list, or refer to Understanding Explore datasets for a full list of available values for the dataset you are using.
- Enter a Display name and Width to set a custom name and width for the attribute.
- Select a position from the Display drop-down list to set how options appear.
- Select from the following additional options:
- Multiselection enables viewers to select more than one value
- Cascade prompts applies the data filter to other filters. For example, if you are using two separate data filters for Ticket Tags and Ticket ID, you can check Cascade prompts, so when a viewer selects a tag, only the ticket IDs for that tag will be available.
- Check the Promote URL as parameter box to embed your filter in the dashboard URL. You can type a new value directly in the URL to update your filter. For more information about this option, see Customizing dashboards with URL parameters.
- If your dashboard uses multiple datasets, you can enter a common attribute in the Link with box to apply the filter across all of your dashboard's datasets.
- Check the Do not share across tab box to apply the filter to only the selected tab.
- In the Sort drop-down list, select the order of values. Values can be sorted alphabetically from A-Z or Z-A.
- When you are finished, click Apply.
Your data filter interaction will resemble the image below.
Time filter
A time filter enables users to edit the displayed time period.
- In the Dashboard menu, click Add > Add time filter.
- In the Time filter widget panel, select a date attribute to use in the filter.
- Edit how the time filter is rendered (calender by default) and the level of detail. These options are available underneath your metrics.
- When you are finished, click Apply.
Your time filter widget will resemble the image below.
Metric filter
The metric filter interactive widget is similar to the metric filter manipulation in Query Builder (see Selecting the metric result range). Viewers can use the metric filter to set a floor or ceiling to results.
- In the Dashboard menu, click Add > Add metric filter.
- On the Choose metric filter dataset panel, choose the dataset you want to filter. You'll only see this panel if you've added multiple queries that use different datasets to your dashboard.
- In the Choose metric filter dataset panel, choose a dataset.
- Select the metric you want to use as a filter.
- You can then edit the display name, width, and if blank values are filtered.
- When you are finished, click Apply.
Your metric filter will resemble the image below.
Top/bottom filter
Similar to the top/bottom filter manipulation option in Query Builder, with the top/bottom interactive widget your viewers can limit results to the highest or lowest values. For more information on the top/bottom filter in Query Builder, see Creating a top/bottom filter.
- In the Dashboard menu, click Add > Add top/bottom.
- In the Top/Bottom panel, enter your top and bottom values and set their visibility.
- Select a strategy. The strategy will determine what attribute is used to calculate results.
- Add metrics in the Metrics textbox.
- Select a Display type. You can display measures in either a drop-down or button list.
- When you are finished, click Apply.
Your top/bottom filter will resemble the image below.
Selecting new metrics and attributes
When you select these interactive widgets, your viewers can edit the initial metrics or attributes to view other possible outcomes.
The following interactive widgets that enable your viewers to edit existing metrics or attributes:
Selecting a different metric
The change metric widget enables viewers to change the initial metrics, so they can view different outcomes of the same report.
- In the Dashboard menu, click Add > Add change metric.
- In Choose change measure dataset panel, select a dataset used on the dashboard.
- Select the metric that you want to give users the option to change.
- After you select a metric, you can edit the option display name, width, and display format. You can also permit users to change measure aggregators and restrict the list of available measures.
- When you are finished, click Apply.
Your change metric widget will resemble the image below.
Selecting a different attribute
Similar to a change metric, the change attribute interactive widget enables viewers to select a new attribute.
- In the Dashboard menu, click Add > Add change attribute.
- In the Choose change attribute dataset panel, select the dataset containing the attribute you want to become a change attribute.
- Select the attribute to become a change attribute.
- After you select an attribute, you can edit the display name, width, and display format. You can also restrict the list of available attributes.
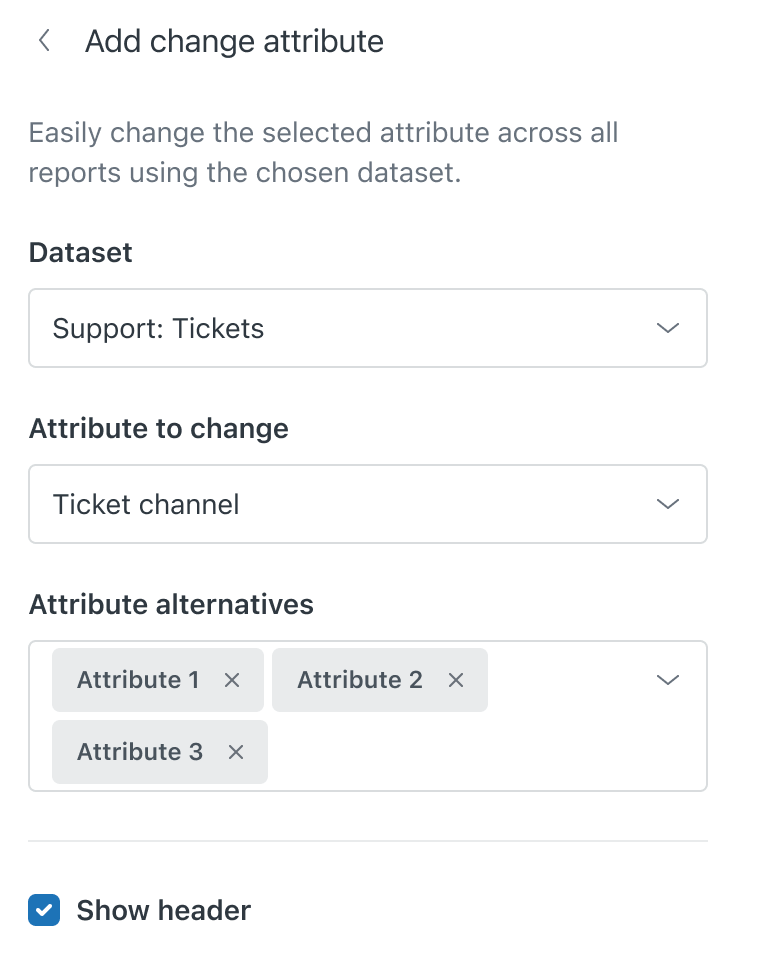
- When you are finished, click Apply.
Your change attribute widget will resemble the image below.
Editing what if variable values
If you have a what if variable added, you can enable users to change its value. You must use a what if variable in a query to add this interactive widget (see Performing analysis with what if variables).
- In the Dashboard menu, click Add > Add what if variable.
- In the Choose what if variable dataset panel, select the dataset containing the what if variable you want to use.
- Select the what if variable you want to add.
- Edit the display name and width of the option box.
- When you are finished, click Apply.
Your global variable widget will resemble the image below.
Adding reference interactivity
While other interactive widgets edit or filter data, the widgets below enable viewers to change references, such as the date, or switch between saved filtered dashboard states.
Using bookmarks to save filtered dashboard states
When you add a bookmark interactive widget, it freezes the current state of filters. Viewers can switch to different bookmarks to see different filter states.
- In the Dashboard menu, click Add Add bookmark.
- On the Bookmark page, click Create bookmark from current state.
- Enter a display name.
- You can continue changing the dashboard filter states and adding as many bookmarks as you want.
- You can delete, rearrange, or pin a bookmark (
). Pinning a bookmark makes it the default selected item in the list of bookmarks.
- If you do not want users to reset a bookmarked state click Hide reset button.
- When you are finished, click Close.
Your bookmark widget will resemble the image below.
36 Comments
When I alter the Time Filter Widget the date used won't persist and will reset when I leave and return to the page. Additionally if I have automatic sharing setup then it will use the default time of 30 days. Is there a way to have the Time Filter persist?
I'd rather not have multiple versions of the same query where the only difference is the timeframe.
Hi Patrick,
You can achieve the functionality of setting default dashboard filter results by creating and using Explore Bookmark filters on your dashboards. One of my colleagues has provided some helpful instructions on how to accomplish this in the comments of this article HERE.
For your convenience I will list them below as well:
Hope this helps with what you were looking for!
Best Regards,
Nhia Lor.
Hi,
This is a very useful feature, but imho it's missing a critical capability.
In the *filter setup*, I am looking for the option to limit the possible values. Let's say I want to set up a filter by tag, and I want to give the user a multiselect of the tags "vip_client", "new_client" and "returning_client". If I try to do this, the dashboard user will get a list of all the tags (100s of them), instead of only the 3 I care about for this specific dashboard.
Another example is - when using a recently added ticket field, many tickets show NULL or blank. I don't need those options in the dashboard filter, but I can't set up the filter without showing them.
Is there a way to limit the filter for a few specific (pre-chosen) values for the dashboard user to chose from?
Thanks!
Hey Gal! That is a good use case, you would likely find the most success in utilizing Groups or Sets. More information on Groups and Sets can be found on this document: Organizing Values by Groups and Sets
The basic route you would want to take would be to log create a group of the relevant Ticket Tags while grouping all the other tags into an 'Other' group. This will give you more control over filtering the data on your query than a Set might. That being said, a Set will accomplish the same functionality! Just be prepared to see much lower numbers, potentially, then you currently are.
What would cause a query to not update on a dashboard when updating a filter? For example, if I have a date range filter, and update it, some of my queries are not changing
Hi Justin,
Thanks for your question!
If the queries in question are not updating when you apply a time based filter to a dashboard, then it's likely the case that the dataset these queries are built from does not have the attribute you've selected to filter for.
When dashboards have queries from multiple datasets, each dataset has its own subset of attributes. Time based filters look for an attribute to key off of, and they are capable of having multiple attributes configured. If your filter is devoid of an attribute from each dataset present in your respective queries, then those queries will fail to respect the range of your filter and the data won't be manipulated.
Consider reviewing the attributes you have checked for your filter and be sure to "check the box" for (at least) one from every dataset you intend to filter so that all of your queries respond accordingly.
I hope this helps!
Has the "updated at" widget been deprecated? I'm not finding it in the widget menu.
A few comments after testing this and in line with what Patrick suggested: having the option to select default values on the filters would be a huge improvement. How Insights/GoodData currently handles this is a lot easier.
I second Colin! There is no "Add Updated At" in the Add Menu.
Hi Judd and Colin, apologies for the delay replying. I've investigated this and yes, the "updated at" widget was removed. I believe there are plans to add similar functionality in the future.
In the meantime, I've removed it from this article. Thanks to you both for pointing this out!
Why do I sometimes get this blank screen when trying to add a data filter?
Hey Justin -
Are you still seeing this issue? I checked in with Rob, and he said that sounds like a bug. If it's persisting, let us know and we'll spin up a support ticket for you.
Hello,
I believe there are a couple of issue when adding data filter widgets:
- tags are displayed instead of values for custom fields:
- Deleted organizations also appear when using data filter on organizations:
Hi Jaïs,
Thanks for your post!
So the tags are currently expected - that's the default display option for custom ticket fields in Explore. And the deleted values still displaying is expected, as well - access to archived ticket information requires that we afford customers the option to select for old, now deleted values for which they have data in their Zendesk.
We are currently running an EAP for customers to have custom field values display instead of their tag alternatives, which you can sign up for here:
https://docs.google.com/forms/d/e/1FAIpQLSfySgFup_vfeYVgypCds4r5FI4w3-iGrbrDPHD9k2-ON3VK7g/viewform
Additionally, if you don't want the deleted values to show, you can create a standard calculated attribute that only contains the values you'd like to see:
https://explore.zendesk.com/hc/en-us/articles/235948948
I appreciate you posting about this and hope the resources I've provided help out!
Thanks for your answer Joe.
I can't join the EAP, because most of my custom fields are multiselect fields :)
I still have troubles with standard calculated attributes, I haven't taken the knack I guess. For instance, I wanted to edit a clone of a the native Support dashboard in order to get stats on some groups only, and was able to do so only by using bookmarks :/ Basically I want a filter widget that proposes only some groups i've selected for a tab, not all the groups. Is that even possible?
I'll have a look at using calculated attributes though regarding the possibility not to display deleted organizations.
Hi
I also have the same issue with filters as Justin
They seem to work fine, then I edit my dashboard for a while and notice my filters have stopped working. If i check on the filters then I see there are no datasets associated with them.
If I add a new filter I can't see any datasets
They only seem to work again if i create a new dashboard. Am i doing something wrong?
Thanks
James
I've tried to use "time filter widget". I've selected "applied to" datasets and everything should be configured correctly. When I change the date in the time filter the data changes but the data seems not to be up to date.
When I go to edit the query then it updates the data for me in the dashboard. Just for a note, I've built the query very simple, adding no time frame.
This picture is taken when I go to my dashboard and simply used the time filter to check data in a different time period:
This is what I get after I went to edit the query on my dashboard (actually didn't change anything in the query, simply went there and clicked to save):
Does anyone know what I might be doing wrong?
Thanks in advance,
Mari-Liis
Hello Mari-Liis!
In order to investigate your issue further time filter widget, I'll need to take a look inside your account. Right now the Account Assumption feature is disabled, but if you change the account assumption setting to “Enabled” you can grant me temporary access to troubleshoot the issue within your account. Please note that when you change the setting of this feature, all administrators listed on your account will receive a notification email.
If you’d like to enable this, please follow these instructions to access your settings. It would be very helpful if you were able to set access to at least “one week” in the event that this ticket needs to be escalated to a higher level of support. Once enabled, please respond to this ticket and I’ll be happy to help the best I can.
If you don't want to enable Account Assumption, can we schedule a screen-share or may I request screenshots of the issue? If you have questions, please don’t hesitate to let me know.
Thank you.
Shera Esquivel | Customer Advocate, Tier1 | support@zendesk.com
I have an issue with a dashboard that has two tabs.
I added a time filter and a data filter to the first tab. They work fine. I left the "Do not share across tab" checkbox unchecked. Then, I created a new tab and added a query that uses the same data set. However, the query on the second tab remains unchanged when I apply either the time or the data filter on the first tab.
I tried added these same filters to the new tab, and then they work. So my conclusion is that the checkbox is not working right, or there is some other action I need to take to get the second tab to accept the filters. Would appreciate some help.
Hello Ellen,

→ Security → Global → Allow account assumption → Choose duration).
Could you set up account assumption so that I can try to replicate the issue? And kindly provide your subdomain, so that I can pull up your account and escalate to our Technical Support engineer if needed.
If you change the account assumption setting to “Enable” you will grant me temporary access to troubleshoot the issue within your account. It would be very helpful if you were able to set access to at least “one week” in the event that this ticket needs to be escalated to a higher level of support.
If you’d like to enable this please follow these instructions to access your settings, as shown in the image below:
First go to(Admin
Thank you,
Hi Shera, I enabled account assumption, our subdomain is "openconnect".
In the meantime, I discovered that if I added the time selector widget to every tab, the dates you select on one tab sync up with the other tabs. However, the UX is a bit odd given that I had to replicate that time selector exactly (but manually) on every tab.
Hello Ellen,
I have been trying to replicate the issue you encountered, but I will need a specific dashboard and tabs that you are referring to when you had these issues:
"I added a time filter and a data filter to the first tab. They work fine. I left the "Do not share across tab" checkbox unchecked. Then, I created a new tab and added a query that uses the same data set. However, the query on the second tab remains unchanged when I apply either the time or the data filter on the first tab."
-could you please send a screenshot of which tab are you referring to this? And the dataset?
"In the meantime, I discovered that if I added the time selector widget to every tab, the dates you select on one tab sync up with the other tabs. However, the UX is a bit odd given that I had to replicate that time selector exactly (but manually) on every tab"
-kindly provide a screenshot of which tab are you referring to and what is UX?
There is only one custom dashboard in our instance, it is called "Open Connect Dashboard". Can you not access it?
I added the time (and data) filters to the first tab ("Tickets by week"), then I had to add the same time filter widget to the other two tabs as I described. Not sure what more info you need given that you should be able to access the dashboard.
Hello Ellen,
Thank you for the clarification, I have accessed your dashboard and confirmed that by default, the filter each tab doesn't sync to another tab, this has to be done manually.
The filters are only being spread if both the filters come from the same data source (not including the linked with filters).
The workaround here, would be to put a query from that datasource of tab 1 in your second tab (even if it means hiding it afterwards) and have both the filter from both tabs coming from the same datasource and linked to the second datasource.
I hope this helps!
Kind regards.
James/Justin,
I was/am having the same issue with the blank filters. I found a solution. The height of the tab and the width of the dashboard seem to break this. If you set them all to 0 and set Fit to screen under tab options the filters come back.
I've got a similar issue to Ellen, and I don't think I understand your workaround Shera.
I want one time filter on the first tab, that applies to queries across all tabs. I'm using queries from two different data sets. I've set the time filter to link to the solved at attributes on both datasets, but it only applies to the first tab. Any ideas?
Hey Chris!
If you'd like your Time Filter to apply across tabs you'll want to make sure the last option in the Time Filter configuration for "Do not share across tab" is disabled.
If you're still not seeing that applied across tabs after saving those changes and publishing them to your live dashboards I'd recommend submitting a ticket to our Advocacy team so we can investigate or replying here so I can open one for you :)
Thanks @James, I've gone back to it today and the filters seem to be syncing up fine.
Hi
Is the any way to setup filter that can use across 2 different data set? Example i want to filter assignee name in Ticket and SLA.
Please sign in to leave a comment.