Views are about prioritizing your work. If you have created multiple brands, you need to ask a few questions about how your agents will work. Do you want your agents to prioritize within brands or regardless of brand?
This article will describe the advantages and disadvantages of two different methods, and let you choose and set up the one you like.
This article contains the following sections:
A single team, a single set of views
If you choose to go in this direction, your Zendesk account will have one set of views from which all agents draw their tickets. There may be more than one view, but views do not need to be distinguished by brand. You can still identify an individual ticket's brand by using a column in the views themselves.
For example, if your agents represent multiple brands (let's call them Brand X, Brand Y, and Brand Z), but every one of them is equally capable of answering questions about any of these brands, you may find it simplest for them to answer questions as they come, and not worry about which brand any ticket is from. This method works best when all your agents deal with all your issues.
Pros:
- Reduces the overall number of views agents need to sort through
- Enables you to see the total number of open tickets at a glance
- Easiest method to set up
Cons:
- If agents need special training to answer tickets for a brand, triage may be required
- Each view will have a higher volume of tickets
How to set it up
This method is the simplest to set up. You shouldn't need to do anything to the conditions of your existing views.
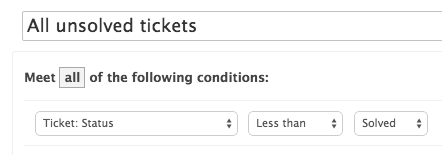
For example, this is the default All Unsolved Tickets view:

Just by adding Brand as a column header, you can bring brand into the view.

The resulting view shows you all the tickets in the order they were received, with brand clearly visible:

Multiple teams, multiple sets of views
The other major option is to set up views that are specific to individual brands. You can have one view for unsolved tickets in Brand X, another for Brand Y, and a separate set of views for unassigned tickets for Brand X and Brand Y. This means you can create different sets of views, one for each brand.
You can use groups and permissions to limit the number of views each agent sees. This is really the point of this. If your agents are only dealing with tickets from one brand, create limited views to keep them focused on what's important to them.
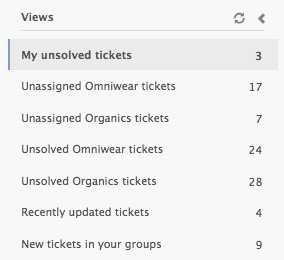
For example, if Omniwear (from the previous example) wants to limit its agents to the brand they serve, they can create some views that are branded:

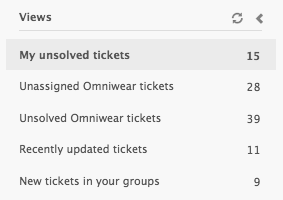
The same list of views for an agent who only serves the main Omniwear brand would include fewer. In this case, you can use group permissions to restrict agent access to certain tickets and certain views.

Pros
- Each team has an isolated view of their work
- Admins and managers can quickly see how tickets are balanced across brands
- Each view has fewer tickets in it
Cons
- Takes more time effort to set up and maintain
- Might involve switching between views for agents who serve multiple brands
How to set it up
There are a few steps to set this up.
First, you'll need to create new groups for your brands to get the most out of this. See our guide to using Group Permissions with brands.
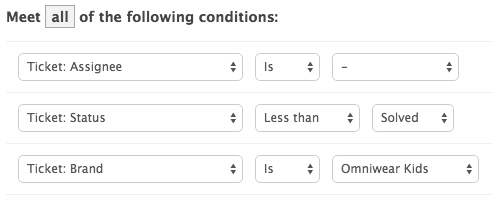
After you have groups set up, you'll need to build views with brand conditions, and set the group permission on the brand as well.
Here's an example of the added brand condition for an unassigned tickets view:

Group permissions can be added here as well:
