You can create structured message templates and insert them in conversation flows for AI agents. There are three types of structured message templates, which can be used to do the following:
- Forms: Collect a predefined set of information from a customer.
- Webviews: Present an external website to the customer within the Web Widget.
- Custom: Templates that are designed to meet your business needs.
This article contains the following topics:
- Creating a structured message template
- Adding a structured message template in a dialogue
- Viewing all structured message templates
- Editing a structured message template
- Deleting a structured message template
Related article:
Creating a structured message template
You can create three types of structured message templates:
Creating a form template
Form templates are useful for presenting a customer with a set of predefined fields that you want them to fill out, such as their contact information.
To create a form template
- In the AI agents workspace, select the AI agent you want to work with.
- Click
 Settings in the sidebar, then select CRM integration.
 - Select the Templates tab.
- Click Create your first template or, if you’ve created a template before, Create template.
- Select Forms.
The form template configuration page appears.

- In Template name, enter a name for the template.
The name can't have spaces or any special characters other than hyphens (-) and underscores (_). This name appears in the list of structured message templates and is the shorthand you’ll use to add the template in a dialogue.
- (Optional) In Description, enter a brief description of the template, such as its intended purpose.
- Select Block messaging input if you want to prevent the customer from continuing the conversation until they’ve filled out the form.
- Under Input Field, in Message type, select the type of
information you want to collect from the user: Email,
Text, or Select (which allows customers to select from
options you define).
All fields in this section are limited to 130 characters.
- In Name, enter the name of the variable that will be created based on this input field.
- In Label, enter the name of the field that will be shown to the customer in the widget.
- If you selected a message type of Select, click Add option and
fill out the following fields:
- Option name: Enter the name of the variable that will be created based on this option selection.
- Option label: Enter the name of the option that will be shown to the customer in the form. Repeat this step for any additional options you want to present to the customer.
- (Optional) Click Add field to add additional fields to the
form.
For the best user experience, keep the number of fields to five or fewer.
- Click Create.
Creating a webview template
To create a webview template
- In the AI agents workspace, select the AI agent you want to work with.
- Click
Settings in the sidebar, then select CRM integration.
- Select the Templates tab.
- Click Create your first template or, if you’ve created a template before, Create template.
- Select Webview.
The webview template configuration page appears.
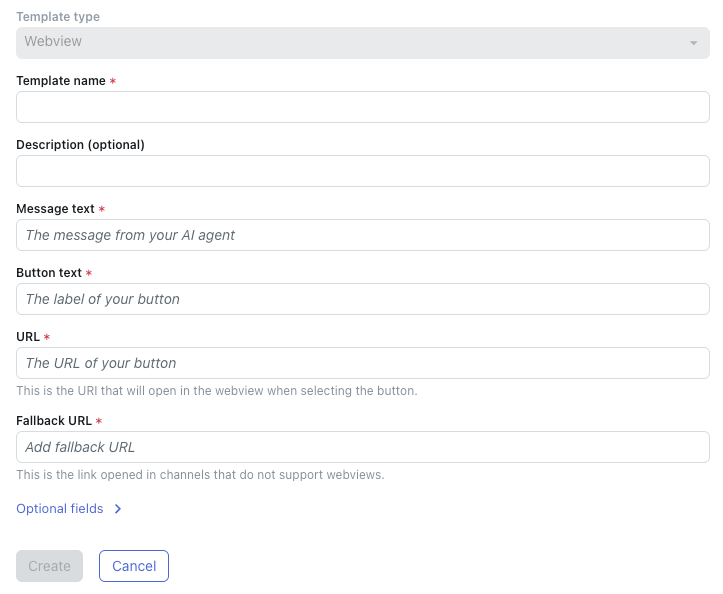
- In Template name, enter a name for the template.
The name cannot have spaces or any special characters other than hyphens (-) and underscores (_). This name appears in the list of structured message templates and is the shorthand you’ll use to add the template in a dialogue.
- (Optional) In Description, enter a brief description of the template, such as its intended purpose.
- In Message text, enter the message your AI agent will show above
the button.
For example, if you're creating a webview to present product information to the customer from your website, the message text might say, "You can check out our product page to learn more about this camera model."
- In Button text, enter the text that appears as the label on the
button.
For example: "View product details"
- In URL, enter the URL that opens when the customer clicks the
button.
This URL must allow loading in an iframe.
- In Fallback URL, enter a backup URL.
Channels that don’t support webviews open the fallback URL instead.
- (Optional) Click Optional fields to show the following additional
configuration options:
- Size: Select the size of the displayed webpage within the Web Widget. Available options are Compact, Tall, or Full.
- Default: Select this toggle to make this the default action.
- Automatically open webview: Select this toggle to automatically open the webview when this template is triggered.
- Add field: Click to add field to capture metadata based on this template. Fill out the Metadata and Value fields. Repeat as needed to add additional fields.
- Click Create.
Creating a custom (JSON) template
Custom templates are useful for presenting carousels, lists of content, NPS ratings, or location-based messages.
To create a custom (JSON) template
- In the AI agents workspace, select the AI agent you want to work with.
- Click
Settings in the sidebar, then select CRM integration.
- Select the Templates tab.
- Click Create your first template or, if you’ve created a template before, Create template.
- Select Custom (JSON).
The custom template configuration page appears.
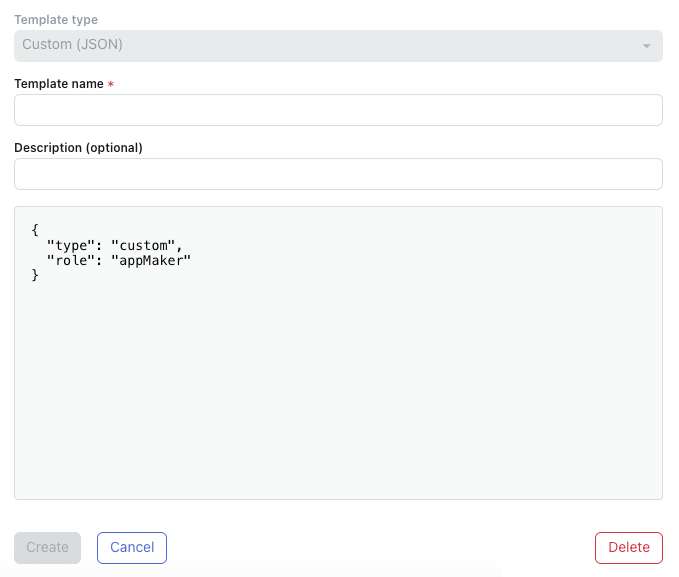
- In Template name, enter a name for the template.
The name cannot have spaces or any special characters other than hyphens (-) and underscores (_). This name appears in the list of structured message templates and is the shorthand you’ll use to add the template in a dialogue.
- (Optional) In Description, enter a brief description of the template, such as its intended purpose.
- In the code field, enter the JSON for the custom template you want to
create.
For help, see Template messages.
- Click Create.
Adding a structured message template in a dialogue
After you create a structured message template, you have to add it in a dialogue so that it’s presented to a customer at the appropriate time during a conversation with an AI agent.
To add a structured message template in a dialogue
- In the AI agents workspace, select the AI agent you want to work with.
- Click
Settings in the sidebar, then select CRM integration.
- Select the Templates tab.
- Find the template you want to add and click the entry in the Shorthand
column.
The template shorthand is copied to your clipboard.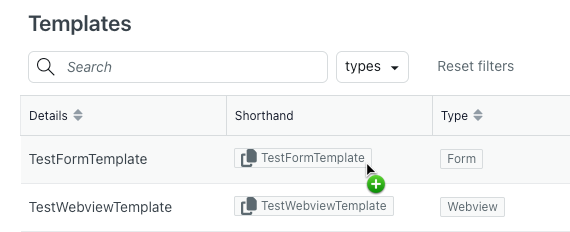
- Open the dialogue you want to add the template to.
- Select the AI agent message block where you want the AI agent to present the template to the customer.
- Paste the template shorthand you copied earlier.

Viewing all structured message templates
You can view a list of all structured message templates you’ve created.
To view all structured message templates
- In the AI agents workspace, select the AI agent you want to work with.
- Click
Settings in the sidebar, then select CRM integration.
- Select the Templates tab.
The Templates page opens.
From this page, you can see a list of all structured message templates, with information shown in the following columns: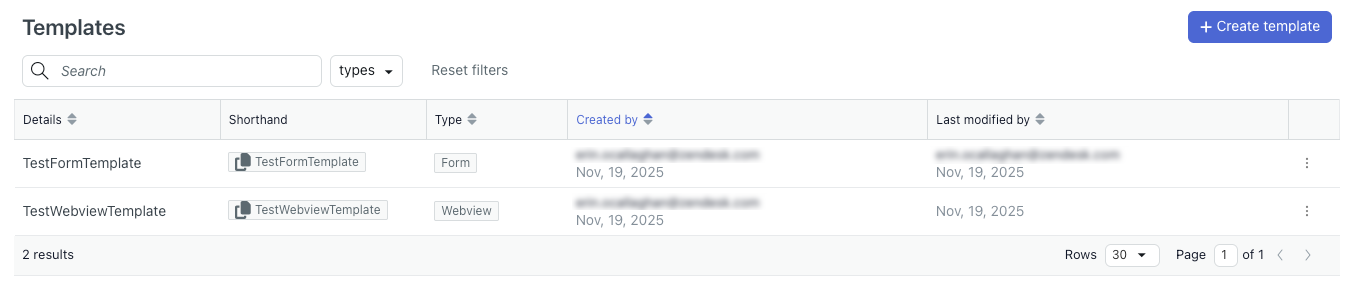
- Details: The name of the template.
- Shorthand: Click to copy the text you should enter when you add the template in a dialogue.
- Type: The type of structured message template (form, webview, or custom).
- Created by: The user who created the template.
- Last modified by: The date the template was last updated.
Editing a structured message template
After you create a structured message template, you can edit it at any time.
To edit a structured message template
- In the list of structured message templates, find the template you want to edit.
- Click the options menu (
 ) and select View information.
The template configuration page opens.
- Edit the template as needed.
For help, see Creating a structured message template.
- Click Save.
Deleting a structured message template
If you no longer need a structured message template, you can delete it.
To delete a structured message template
- In the list of structured message templates, find the template you want to delete.
- Click the options menu () and select Delete.
A confirmation dialog appears.
- Click Delete.