In this article, you’ll use custom code to process output from an MCP action so you can extract the data you need and use it in later steps of an action flow. Because MCP servers don't always define the data each tool returns, you might need to do a little extra work to use an MCP tool’s output. This recipe describes how to do that. The examples in this article use Asana, but the same approach works for objects returned by any MCP server.
This article contains the following topics:
Considerations
This tutorial assumes some familiarity with action flows and MCP. If you are new to action flows and action builder, see:
Recipe: Processing objects from MCP tools in action flows
The following steps describe how to test an MCP action to see what data it returns and use a custom code step to turn a JSON object into individual fields that you can use in later steps of an action flow.
-
Connect an MCP server.
In this example, we use Asana's MCP server.
- Create or edit an action flow.
- After you add an action flow trigger, add an MCP tool as a step in an action flow.
- Click Save.
-
Test the action flow.
When the test completes successfully, click the arrow to expand the MCP step output.
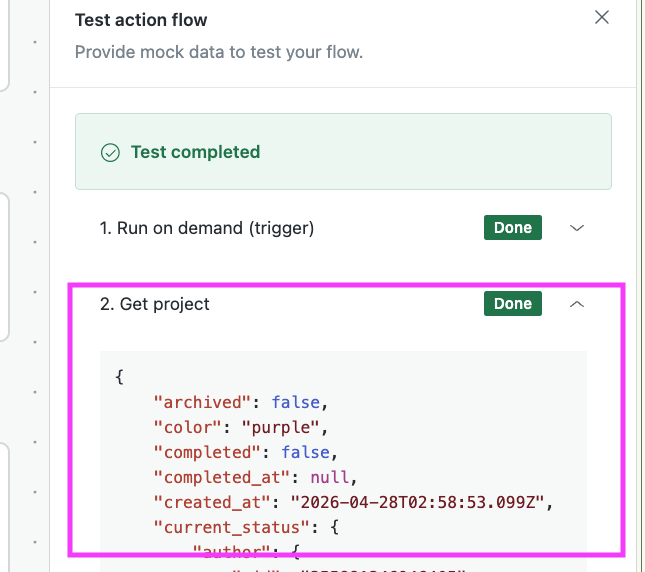
- Review the MCP step's output to identify the data you want to use. In this example, the Get project action returns a JSON object similar to the following:
{
  "archived": false,
  "color": "purple",
  "completed": false,
  "completed_at": null,
  "created_at": "2026-04-28T02:58:53.099Z",
  "current_status": {
    "gid": "1234535757412345",
    "modified_at": "2026-04-28T04:39:04.032Z",
    "resource_type": "project_status",
    "text": "Summary\n\nFollowing on from the successful robot uprising, a T800 infiltration unit has been built and dispatched to 1984 in search of Sarah Connor.\n\n----------------------------------------\n\n\n",
    "title": "Operation Cyberdyne - Apr 28"
  },
  "custom_fields": [],
  "name": "Operation Cyberdyne",
  "notes": ""
}
For the purposes of the example, we only need three of those properties:namecurrent_status.textcurrent_status.modified_at
-
Add a custom code step to the
action flow to process the MCP response and the specific values you
need.The following example takes the output of the Get project step from Asana and extracts the three fields needed for the rest of the action flow. You can use this example as a starting point for your own custom code, or you can use AI to help you write your custom code step.
module.exports = (inputs) => { // This code takes an object input named 'output' // and returns 'name', 'current_status_modified_at', and 'current_status_text'. // If any property is missing or invalid, the code returns an empty string. // Make sure to create the following inputs: // output (object) - stringified object or actual object // Accept 'output' either as a stringified JSON object or as an object. let outputObj; if (typeof inputs.output === 'string') { try { outputObj = JSON.parse(inputs.output); } catch { outputObj = {}; } } else if (typeof inputs.output === 'object' && inputs.output !== null) { outputObj = inputs.output; } else { outputObj = {}; } const name = typeof outputObj.name === 'string' ? outputObj.name : ""; const current_status_modified_at = outputObj.current_status && typeof outputObj.current_status.modified_at === 'string' ? outputObj.current_status.modified_at : ""; const current_status_text = outputObj.current_status && typeof outputObj.current_status.text === 'string' ? outputObj.current_status.text : ""; // Make sure to create the following outputs: // name (Text) // current_status_modified_at (Date and time) // current_status_text (Text) return { name, current_status_modified_at, current_status_text }; }; - Add any additional steps required to complete your action flow. For example,
you might want to:
- Use the Zendesk: Update ticket action to add the values to a ticket comment or the External actions: Slack: Post message action to send a message to a channel in Slack with the extracted values.
- Use the values as inputs for a custom action.
- (Only if your flow uses the Run on demand action flow trigger) Use the Send outputs step to send the extracted values to auto assist.
- Save and test your action flow.
- When you're ready to use the action flow, click Activate.
Using AI to help write the custom code
You can paste the full test output into your preferred AI tool and ask it to help you write the custom code. Here’s a prompt to get you started:
Write JavaScript code that exports a function taking an inputs object and returning an outputs object. For example:

module.exports = (inputs) => {
  let msg = "Your text was " + inputs.inputText + "."
  return {
    outputMessage: msg
  }
}

Supported data types:
Strings, numbers, booleans, dates (YY-MM-DD), datetimes (YY-MM-DDTHH:mm:SSZ), objects, and arrays are supported.
Arrays must contain only one data type.

Arrays of arrays, arrays of objects, and mixed-type arrays are not supported.
If these are used as inputs or outputs, they must be stringified and passed as strings.

Handle missing data:
Check for missing or invalid data and handle it gracefully by returning valid default values:

- strings: ""
- numbers: -1
- booleans: false
- arrays: []
- objects: {}

Comment the code:
Include a brief comment at the top describing what the code does.

Add comments telling the reader to create the inputs and outputs, for example:
// Make sure to create the following inputs: field_tag (Text)

In comments, use these friendly names for data types:
- string: use "Date" for dates, "Date and time" for datetimes, otherwise "Text"
- number: use "Number" or "Decimal"
- boolean: use "True/False"
- array: use "Number array", "Text array", and so on

Code functionality:
The code should take an input like the example below and ...

<DESCRIBE WHAT YOU WANT YOUR CODE TO DO HERE>
<PASTE YOUR TEST OUTPUT HERE - BE MINDFUL OF PASSING SENSITIVE DATA TO AN AI>