If you've set up your Zendesk to support multiple brands, you might want to ensure that proper branding is included in all of your outgoing messages. That might mean the voice of any statements made, different contact information or brand names, or different logos, colors, and other styling.
First, you need to remove any branded information from your email template, because you get only one email template per account. Next, use triggers to create specially branded notifications.
Removing branded content from your email templates
Your email template is the skeleton of every email sent by your Zendesk to your customers. It's the structure used to determine where the major parts of each notification are located. The default Zendesk email template doesn't show any of your brand's information, so if you want to be sure you aren't putting any branded info in notifications, you can always revert to the default template.
However, you can also add content to it. Some Zendesk accounts have created custom footers, added logos, or provided helpful text. This is obviously an advantage of an email template. But, if you are supporting multiple brands, you shouldn't put brand-specific information in the template, because that email template is applied to all messages, regardless of brand.
There are a few things to think about if you've set up an additional brand. Take a glance at your email template to see if any of these apply to you:
- Colors -- You should avoid any colors that are specific to one of your brands. The default template colors are all in gray, so they should be fairly neutral.
- The Footer -- Many people remove the Zendesk branded footer from the email template -- {{footer}}{{footer_link}} -- which is fine. However, if you've added your own footer, make sure it doesn't have brand names, phone numbers, or messaging that's inappropriate for some brands.
To edit your email templates, see Customizing your email templates.
Branding your emails using triggers
Even though your template can't be branded, you can use triggers to send different messages depending on the brand of the ticket. Triggers enable you to use conditions to create a fully branded suite of messages.
In this example, we'll set up a notify requester of comment update trigger and differentiate it for two brands.
To set up your branded triggers
- Click the Admin icon (
) in the sidebar, then select Business rules > Triggers.
- Find the Notify requester of comment update trigger, then click Edit.
- Add the condition [Brand] [Is] [Acme], then click Save.
- Hover your mouse over the trigger you just modified, then click Clone.
- Change your cloned trigger so that the brand condition matches your second brand, in this case Brand-X, then click Save.
At this point you have two functional triggers with nothing different about them. From here you can differentiate the brands. - Edit the Notify trigger action in your new trigger and update the message with whatever needs to be changed for your brand.
For example, this is the message that Acme sends to customers when they receive a notification of an updated ticket:
An update was made to your ticket by one of our Acme support reps. You can reply to this email if you need more information or reach during business hours by phone at +1-888-123-4567.
To support Brand-X, you can update the phone number and brand name to create an alternate version:
An update was made to your ticket by one of our Brand-X support reps. You can reply to this email if you need more information or reach during business hours by phone at +1-888-765-4321.
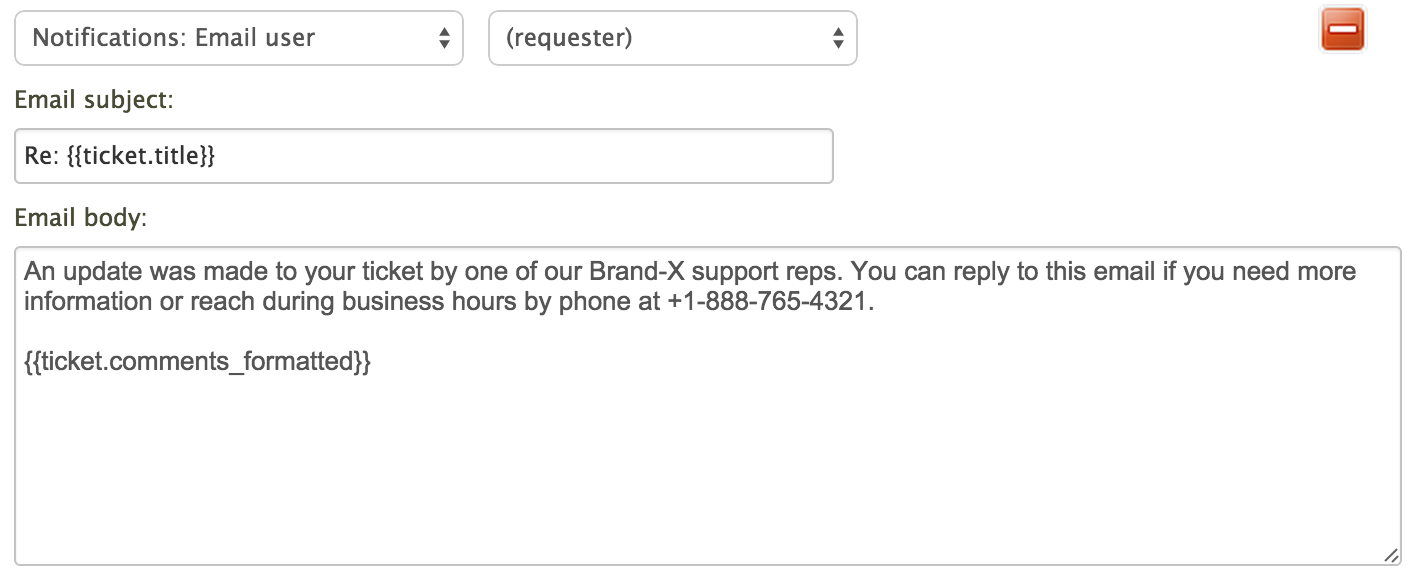
You can go a step further by adding logos using HTML. For example, Acme can add their corporate logo to their emails. Because they've created multiple triggers, they can now brand each one differently.
You can use HTML to do more than just add logos, too. With this method You can impart the correct voice, wording, information, and styles into each of your outgoing messages.
Fixing ticket links for multiple Help Centers
When you create multiple brands, you have the option to create multiple Help Centers. Each Help Center enables your customers access to the tickets they've opened and are CC'd on for that brand only. This means that each Help Center has its own unique branding, and, when viewing tickets, the branding and the ticket match.
One downside to this is it means that if a brand has no Help Center (an option you can choose if you prefer to do email only support for a brand) then email notifications with ticket links will be broken.
You can use the process above to correct for this. If you choose to have one or more brands with a Help Center and one or more without a Help Center, you need to create separate triggers for these brands. Include the {{ticket.url}} placeholder in the former but not in the latter.
For example, here's a trigger for a brand with a Help Center.
And here's a trigger for a brand without a Help Center.
37 Comments
How will Zendesk know which branding to use when we generate an internal ticket which is going to a customer?
Example:
I have Brand A and Brand B. I try to send a ticket to a requester (I create the ticket) which belongs to Brand A. How does Zendesk know this?
Regards
Brand is a field your agents can set when creating a ticket however, as I have the brand as a custom organization field, I use a trigger to copy this to the ticket when it is created.
Hey there...
We want to use the brand feature as well, and we are also hitting the limitations:
Trigger fields are limited in size, to approx. 8 kb. While that may seem like a lot for mails, for HTML emails, especially when it comes to create a working formatting for old clients (or even modern ones) using tables and lots of old <font face>-like tags, 8 kb is not that much. Our solution at the moment is to split markup into two parts; a branded one which is stored with the trigger, and a frame layout (including some CSS styles for compatability with modern clients), which is stored as the template.
When you place HTML markup in the trigger, there is no fall back to text only, because the {{content}} in the email template will be replaced by the HTML set up in the trigger, or am I mistaken?
It would be nice to be able to store seperate email bodies (both HTML and plain text) for all brands.
The multi-brand feature still seems to be in a beta state; as this 'how to work around' is from 2014, I am wondering when this feature will be usable?
Thanks and kind regards,
Jan
Hi Jan - sorry for the long delay. I have spoken with our Product Manager for this and we are still a ways out from having separate email templates for Brands, so some workarounds will still be necessary for a while.
For your second question, the email template won't be replaced by the trigger HTML. We send the HTML along in the plain text version because email processing doesn't distinguish HTML in the trigger message from text in there.
I see you also have a ticket, so if you want to go into more detail and troubleshoot any issues you are having, let's continue our conversation in the ticket.
We're looking to start using this brand feature. All of our agents will take tickets for all brands, but from what I can see, their signature remains the same (which has info about our main brand). Can a single agent have a different automatic signature depending on the brand of the ticket?
Edit: Mark me solved! I found this great app from a fellow Zendesk-er: https://support.zendesk.com/hc/en-us/articles/204108983-Setting-up-multiple-brands-in-your-Zendesk-Enterprise-?page=2#comments
Zendesk update: Adding branded signatures is now an option in the UI when you set up (or edit) a brand.
Hi Jennifer!
I'm glad you were able to find a solution! Please let me know if you have any other questions!
Are there any updates on when having more than one template in multi-brand will be working? We want to update to multi brand from hub and spoke but this issue is keeping us from doing it. It seems like a lot of work to get all these branded triggers set up. Thanks.
Discovering there were no multiple email template options for multiple brands was such a disappointment. Any updates on when this feature is coming?
Hey Mariliam!
You're definitely not the only person who's given us this feedback. I checked with our Product Team about it, and they said that they're currently working on improving this functionality but it's really complex and needs to be vetted and tested very thoroughly. This means that we're not able to give any ETA on when the feature might be available until we're much closer to it being perfect. But take heart! We're actively working on it and will definitely let everyone know when it's ready!
Hi Jessie,
Wondering about when this option might be available for multiple brands? Any updates or good news for us?
Thanks!
Welcome back, Marilliam!
As of right now, we don't have any updates to share on this. Like I mentioned before, it's a really complicated thing to implement, so it's going to take some time before we get there. Thanks for checking in!
@Jessie Any updates or ETA as to when the feature for multiple brands is coming?
Hey Ashish -
We don't have any updates on this at the moment, but we'll keep you posted!
By branding with triggers, only the requester will see the custom brand. How can I ensure both the requester and CC's receive emails with the same brand?
Hi Zac, We're very sorry, at this time that is not possible. We hope to address those concerns soon.
Any updates on this?
Hi David -
Which of the above ideas is your question in reference to?
Are there any updates on when having more than one template in multi-brand will be working?
@nicole
In regards to my post 3 yrs ago and many of the subsequent ones, those weren't so much "ideas", but rather essential feature requests for making the multi brand emails ... usable. :)
Now that I'm about to add the 4th brand to my account, I am certainly wondering if we're ever going to see this feature prioritized. Any progress or updates will be appreciated.
Hi @David! This is currently something we are looking into and working on design ideas. I will keep this article updated on where we're at and can reach out when we're ready to share some potential designs.
Hey,
Is it possible to use dynamic content or another approach within the email template to show the header and footer in multiple languages.
Thanks,
Lisa
Hi Lisa,
Dynamic content can be referenced via placeholders in triggers, automations and macros. The dynamic content wouldn't be rendered if you put them in the email template through Settings > Channels, Email > Email templates.
If you check the email templates in your settings, you'll see the content placeholder via which the email responses you specify in your triggers, automations and macros will be referenced. Your dynamic content placeholders must be placed in a trigger/automation/macro to render appropriately.
More information in our Providing multiple language support with dynamic content which I've linked for you.
Let me know if you have any other questions :
Thanks Brett - can you suggest another approach to allow for multi-language support in the email template?
Hi Lisa,
Since this functionality is not built into the system I'm afraid there would be no alternative other than use triggers/automations. If this is something you're looking for I recommend upvoting the following feedback post: Enable dynamic content in the email template and provide your use case.
Let me know if you have any other questions :)
Hi all,
I found a solution that enables us to use different html templates for different brands. In my case, the brands are completely separate with different colours, fonts and formatting.
The system placeholder {{footer}} actually returns the name of the brand used therefore, this is the variable we used to set up the brands, see logic below:
{% case footer %}
{% when 'This email is a service from BrandA.' %}
...... add your html template here....
{% when 'This email is a service from BrandB.' %}
...... add your html template here....
Bear in mind that we should only use one {{content}} and {{delimiter}} placeholder in the whole layout (otherwise it will not work). So in my case we broke down the template in three different parts to fit this constrain.
Hope this helps!
@Luiza
You reference breaking down the template into three different parts, what {% case value %} did you use for each of the three parts? Or did you just re-use {% case footer %} three times? If you could provide the structure outline of your template that would be extremely helpful. We are trying to do the same, as we have completely different layout styles for our different brands.
I've been having to load most all the email template logic into the all our triggers' email body regions because I could not find a way to get the main email template itself to know which brand was in use.
Edit: THIS IS SOLVED! See the next comment or the article linked below that.
This is a followup on Luiza Gusmão's tip on email templates for different brands
Here is how to structure the one email template that Zendesk provides in order to support multiple brands so that the emails sent out are all unique to each brand (colors, logos, fonts, formatting, etc.).
As Luiza stated, the system placeholder {{footer}} (which is part of the default email template) returns a text based sentence that contains the name of the Brand as defined in the Admin > Manage > Brands page.
This sentence will be as follows:
This email is a service from [YOUR BRAND NAME].
Where [YOUR BRAND NAME] is from each Brand's 'Brand Name*' text field.
With Liquid markup we can trigger off the value of {{footer}} to change the email template to match what you want for each of your brands. After much trial and error testing, here is the outline to follow to create an email template for any number of brands. Note I do not know the max size of HTML you can load into the Zendesk email template, but mine is already at 52KB and it works.
Instructions for the email template outlined below:
Replace all example [html/text] with your actual HTML and or text for that object.
The {{placeholder}} and {% code %} blocks remain where they are.
Anything after <!--- are my comments which should not be used in your template -->.
<!-- START Template -->
[HTML Header and beginning Body code]
{{delimiter}}
{% case footer %}
{% when 'This email is a service from [YOUR BRAND NAME A].' %}
<!--- what is missing in Luiza's example is the '.' right before the closing single quote mark. Without that you won't get a match. -->
[HTML Body Brand A specific intro code - e.g. logo]
{% when 'This email is a service from [YOUR BRAND NAME B].' %}
[HTML Body Brand B specific intro code - e.g. logo]
<!--- Repeat the {% when...} and [HTML] pairs for each additional brand you have. -->
{% else %}
[HTML Body generic intro (for agents)]
<!--- While this is optional, it does make the agent notification emails from your triggers look correct with header and footers. If you choose to omit this, also remove the {% else %} line above it. -->
{% endcase %}
{{content}}
{% case footer %}
{% when 'This email is a service from [YOUR BRAND A].' %}
[HTML Body Brand A specific footer code, including closing </html>]
<!--- This HTML block can also contain the actual {{footer}} placeholder. -->
{% when 'This email is a service from [YOUR BRAND B].' %}
[HTML Body Brand B specific footer code, including closing </html>]
<!--- This HTML block can also contain the actual {{footer}} placeholder. -->
<!--- Repeat the {% when...} and [HTML] pairs for each additional brand you have. -->
{% else %}
[HTML Body generic footer code, including closing </html>]
<--- I recommend you definitely include the {{footer}} placeholder in here as it provides additional ticket info for agents. Again this section is optional, if you remove it, also delete the {% else %} line above. -->
{% endcase %} <--- This is the last line of your email template. -->
<!-- END Template -->
The emails that are sent to CC users (as defined in Admin > Settings > Tickets > CCs) will use the HTML of the brand that is in force.
Note that emails that are sent to Full Agents, Light Agents, and Groups are not styled to each brand that you have. Agent emails will have a common look across all brands, as those emails use the HTML setup in the {% else %} sections of the template.
If you choose to not include the generic HTML in the {% else %} sections then your emails that are sent to agents will only contain what is in the {content} block from the Triggers.
So to help identify which of the brands these emails belong to that are sent to agents/groups, you have to do it in the Triggers. I add the following to the Triggers that are sent to agents/groups to solve this issue:
Email subject: [{{ticket.brand.name}}]
Email body: <strong style="font-size: 18px;">{{ticket.brand.name}}</strong>
You don't have to do this for the Triggers that send emails to your users, as your code in the email template can do that.
Assumption: My example of the email template above assumes that you can get your HTML <head> section loaded to support all your brands. If this is not the case, then you can do the same for that HTML block as you do for the other sections. Example:
<!-- START Template -->
{% case footer %}
{% when 'This email is a service from [YOUR BRAND NAME A].' %}
[HTML Header and beginning Body code for Brand A]
{% when 'This email is a service from [YOUR BRAND NAME B].’ %}
[HTML Header and beginning Body code for Brand B]
{% else %}
[HTML Header and beginning body generic code]
{% endcase %}
{{delimiter}}
Recommendations: To be fully compatible for desktop browsers, mobile browsers, and especially Microsoft Outlook for Windows/Office 365, you may need to fully test your HTML email template to be sure it renders the way you want before you carve it up into the sections for the Zendesk email template.
To render structured emails correctly, mobile browsers (iPhones, iPads, and all Android phones and tablets) will need a HTML template that is based upon CSS or a flexible CSS framework.
Warning: Microsoft Outlook for Windows/Office 365 has it's own demons that can cause major headaches (especially if you use any <table> base HTML in your template). The simpler you can make the template (and still meet your desired layout and look) is your best approach. Interestingly Microsoft Outlook for Mac does not have the HTML <table> rendering issues that the Windows version has.
Best Practice: Of course your HTML email template should absolutely be accessible (WCAG 2.1 standards compliant).
Happy Email Template building!
Hey Andrew -
Thanks for sharing all of this great info! Would you be willing to re-post this in the community in our User Tips topic so that it will show up in search?
@ Nicole. Thanks, I have done just that!
Here is the link to a more detailed article on this topic in the Support - User Tips & Tricks section:
EDIT: I made some edits so the article linked below is back 'Pending approval'. The detailed comment above has all the essentials of the article.
How to structure the Zendesk email template to use custom HTML layouts for each of your Multiple Brands
Please sign in to leave a comment.