The Select an Address app allows admins and agents to change the default support address associated with a ticket. This allows for greater personalization of outbound messages, as well as easier routing of inbound tickets to appropriate groups.
This article contains the following topics:
Installing the app
The Select an Address app is installed from the Zendesk Marketplace.
To install the app
- In Admin Center, click the Apps and integrations icon (
 ) in the sidebar, then select Apps > Zendesk Support apps.
 - Click Marketplace at the top of the page and then enter "Select an Address" in the Marketplace search bar. Or, simply follow the marketplace link above.
- Click on the Select an Address app icon, and click Install.
- In the installation section, enter a name for the app.
- Enable group and role restrictions if required.
- Click Install.
The app settings can be changed after installation by navigating to Admin > Apps > Manage, and under the Currently installed tab, click the Select an Address app dropdown options, and select Change settings.
Configuring the app
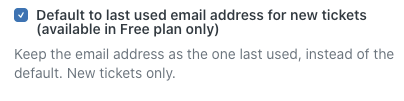
Select the checkbox to always set the email address to the one that was last used. This overrides any email address set by the brand. This is primarily intended for agents who typically create a large number of new tickets in batches so that they do not have to change the address with each ticket.
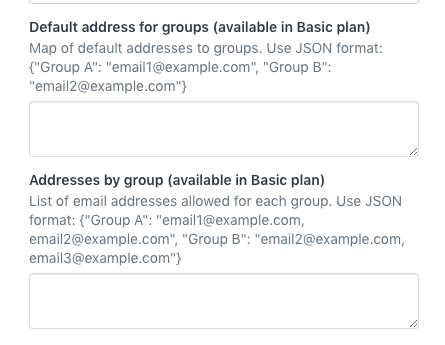
You can also set up default addresses by group, as well as allowed email addresses by group. Any addresses used here must already be listed in the support addresses for your Zendesk instance. These can be found by going to Admin Center > Channels > Email. New emails can be added by clicking Add address.
Configuring default email addresses
In the Default address for groups box, specify different default email addresses for each group in JSON format. In the following example, agents in Group A would see email1@example.com as their default email address, while agents in Group B would see email2@example.com as their default email address. Make sure to include the opening and closing curly braces, quotes around each item or set of items, and commas between each group.
{"Group A": "email1@example.com",
 "Group B": "email2@example.com"}
If an agent is part of multiple groups, the app uses the agent's default group for the mapping of the default address for new tickets created directly in Support. If no address is associated with the agent's default group, the first address, alphabetically, will be used from any of the other agent's groups.
The agent's default group will also be used if an existing ticket with a New status is opened by the agent. To apply this mapping to all open tickets, see the section: Applying default email address to all open tickets.
Configuring allowed email addresses
In the Addresses by group field, specify the allowed email addresses for each group in JSON format. In the following example, agents in Group A would see email1@example.com and email2@example.com as the email addresses available for their use in support emails. Agents in Group B would see email2@example.com and email3@example.com as the email addresses available for use. As shown in the example, the same email address can be used for more than one group. Make sure to include the opening and closing curly braces, quotes around each item or set of items, and commas between each group.
{"Group A": "email1@example.com, email2@example.com",
 "Group B": "email2@example.com, email3@example.com"}
Configuring grouping addresses by brand
To group your addresses by brand, select the Group email address by brand checkbox. When turned on, the selection box in the app first displays the brand then email addresses allowed for that brand.

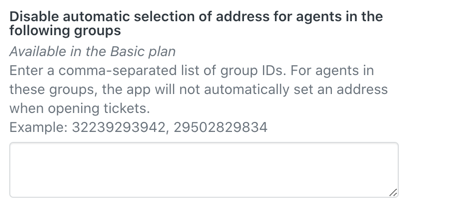
Disabling automatic selection of address for certain groups
To turn off the automatic select of addresses for agents in certain groups, enter a comma-separated list of group ids. This can be useful for Admins if they just want to go in and review a ticket set with a New status but not update the address.
Applying default email address to all open tickets
If you select the Apply to all open tickets checkbox, the mappings from the Default address for groups setting will apply when an agent views and saves any ticket with an Open status.
Note: If the group isn't defined, then the app will use the default email address for the brand and not the prior email address.

Using the app
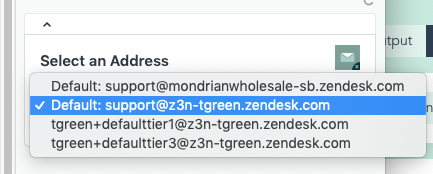
When choosing an address to appear as the "from" address on a support ticket, choose the appropriate email address in the dropdown of the app. Default email addresses are prefaced with "Default:".
Proactive tickets
The Select an Address app will satisfy the Received at condition in business rules while creating proactive tickets. For more information, see the article: Trigger conditions and actions reference.
Release notes
Version 2.6.0 - 2021-07-29
- Made the Basic plan features available to the Free plan.
Version 2.5.3 - 2021-05-04
- Bug Fixes
- Fixed an issue on the Basic plan where if Apply email to group mapping on all Open tickets is turned on, the app will set the address to the default of the primary group of the new agent only if that agent doesn’t have the current address listed as one the available addresses they can use.
Version 2.5.2 - 2021-03-26
- Bug Fixes
- Fixed an issue on the Basic plan where sometimes an incorrect default address was being set if the Addresses by group setting wasn't populated.
Version 2.5.1 - 2021-03-25
- Bug Fixes
- Fixed an issue on the Basic plan where a default address wasn't being set if the Addresses by group setting wasn't populated.
Version 2.5.0 - 2021-03-23
- New Feature
- Added a setting to allow for the mapping of default address by agent's primary group to all "Open" tickets.
- Enhancements
- Prioritize user's primary group for the mapping of the email address to group (Basic Plan)
Version 2.4.1 - 2021-03-15
- Bug Fixes
- Fixed an issue where the pulldown wasn't showing addresses till a search occurred.
- Fixed an issue where the "Default to last used email address for new tickets" setting wasn't working on Free plan.
- Fixed an issue where default email address wasn't being set when a brand hasn't been selected.
Version 2.4.0 - 2021-03-10
- Updated the App so that when a new address is chosen the ticket doesn't get updated right away, rather it waits till the ticket is submitted by the agent.
- Updates to Address input box based on Zendesk Garden components
- Bug Fixes
- Fix for loader on app.activated event
- Addressed an issue with autocomplete in the address input
Version 2.3.1 - 2020-10-06
- Fixed an issue where addresses and brands weren't sorted alphabetically
Version 2.2.1 - 2020-08-14
- Fixed an issue on the free plan where the already default address was being set again when creating new tickets.
Version 2.2.0 - 2020-08-12
- Added the ability to group email addresses by brand for better visibility and ease of use for large amounts of email addresses and brands (Basic Plan).
Version 2.1.7 - 2020-04-16
- Fixed an issue where emails sent to a wildcard email were defaulting to the first address in the list rather than the brand default.
Version 2.1.5 - 2020-04-16
-
- Fixed an issue where the Addresses by Group setting also had to be used in order for the Default Address for Groups setting to work. Now a list of defaults can be set without having to use the Addresses by Group. All emails available will be displayed.