Most support teams create and use lots of macros. As your list of macros grows, you may find it difficult to quickly locate macros when you’re trying to apply one to a ticket. You can remedy this by organizing and sorting your macros using a number of different techniques.
This article discusses the following topics related to organizing and managing macros:
- Accessing the Macros page
- Browsing and searching the macros list
- Editing, cloning, deactivating, and deleting macros
- Categorizing macros
- Sorting the list of macros
- Reordering macros manually
- Turning off the most-used macros option
Related articles:
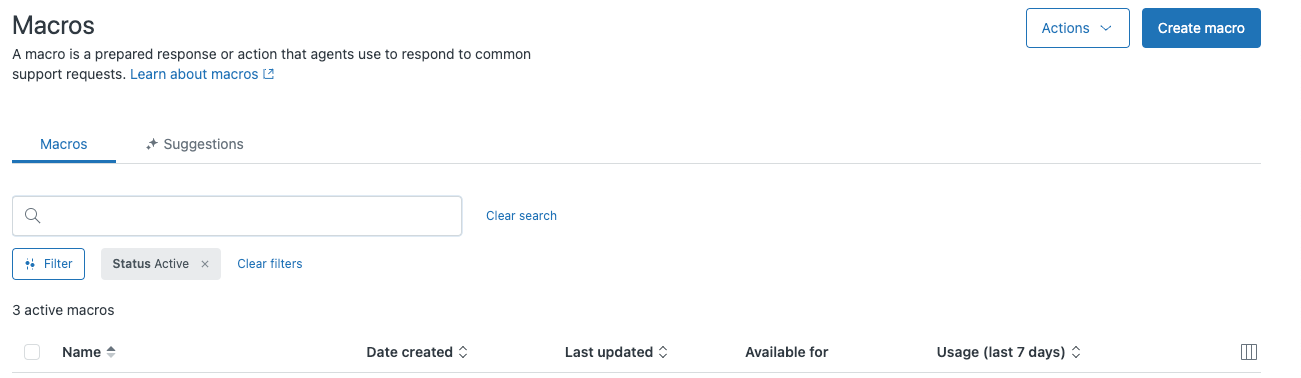
Accessing the Macros page
All of your available macros can be managed through the Macros page.
To access the Macros page
-
In Admin Center, click
 Workspaces in the sidebar, then select Agent tools > Macros.
On the Macros tab, you can browse, categorize, sort, reorder, and filter your macros. Read on for more information.
Browsing and searching the macros list
Macros are divided by activation status. The default view on the Macros page is the list of Active macros. You can view macros that have been deactivated by clearing the Active filter. For more information on activation status, see Editing, cloning, deactivating, and deleting macros.
By default, macros are listed in alphabetical order. If you have a large number of macros, the list will be paginated. You can scroll through the pages using the controls at the bottom of the page.

If you know the name, or partial name, of the macro you want to view, you can enter it into the search box at the top of the page.

All macros containing the search term appear in the list.
Click Clear search to return to the full list.
Editing, cloning, deactivating, and deleting macros
You can edit, clone, deactivate, or delete a macro by selecting the checkbox next to its name.

- Edit allows you to modify the title, actions, and permissions used.
- Clone creates a copy that you can modify and repurpose.
- Deactivate removes the macro from the Active macros list, and moves it onto the Inactive macros list, making it unavailable to Agents. Deactivated macros can be activated if needed.
- Delete permanently removes the macro. Only deactivated macros can be deleted. Deleted macros cannot be recovered.
Additionally, admins can view and clone agents' personal macros. For example, admins may want to clone an agent's personal macro so that it can be created as a shared macro for all agents to use.
- On the Macros page, locate the macro you want to edit.
- Select the checkbox next to the macro's name.
- In the action bar at the bottom of the list, click Edit.
- Modify the title and actions as needed.
- Click Save.
- On the Macros page, locate the macro you want to clone.
- Select the checkbox next to the macro's name.
- In the action bar at the bottom of the list, click Clone.
- Enter a new title for your macro and modify the actions as needed.
- Click Create.
To deactivate a macro
- On the Macros page, locate the macro you want to deactivate.
- Select the checkbox next to the macro's name.
- In the action bar at the bottom of the list, click
Deactivate. The macro's status is updated
to Inactive.Note: You cannot deactivate macros that include unavailable values in the action statements. Attempting to deactivate the macro will fail, and the macro will remain in the Active macros list, marked with a red exclamation point.
To activate a deactivated macro
- On the Macros page, clear the Active filter to include inactive macros in the list.
- Select the checkbox next to the macro's name.
- In the action bar at the bottom of the list, click Deactivate. The macro's status is updated to Active.
To delete a macro
- On the Macros page, clear the Active filter to include inactive macros in the list. If the macro is currently active, use the instructions above to deactivate it.
- Select the checkbox next to the macro's name.
- In the action bar at the bottom of the list, click Delete. The macro is permanently deleted.
Categorizing macros
Sorting your macros into categories can make locating a specific macro, or type of macro, much simpler. Categorizing allows agents to quickly apply macros when working with a ticket, and gives you an option for filtering macros on the Macros management page.
You categorize macros by including the categories in your macro titles and separating them with two colons (::), as in this example:

To create nested macro categories
- In Admin Center, click
Workspaces in the sidebar, then select Agent tools > Macros.
- Click Add Macro.
- Create a macro title that contains the top level category and
subcategories you want to use followed by the macro name,
each separated by two colon symbols as shown here:
Assign to::me::question

The macro title in this example indicates that you’re assigning the ticket to yourself and setting the Type property to Question. The top level category is 'Assign to' and the subcategory is 'me'. The macro name is 'question'. You can use any category and title naming structure that you prefer.
- Create any other macros that you want to include in this category structure or modify the titles of existing macros to follow the same pattern.
To organize your macros, you can create as many top level catgories and subcategories as you need.
Filtering the list of macros
You can filter the displayed macros based on status, who they're available for, and category.
To filter the list of macros
- At the top of the macros table, click the Filter button.
- In the Filter pane that appears, select any of
the following filtering options:
- Status: Includes Active and Inactive
-
Available for: Includes the following
options:
- All shared macros: Macros that are shared, either to the whole account or to one or more groups
- All agents: Macros available to all agents (No group-only macros)
- You: Macros available only to you
- Individual agents: Personal macros owned by all other agents (Visible to admins only)
- Group: Macros available only to agents in the group specified
- Categories: Includes any categories you've created
- Click Apply filters.

To clear your filters and return to the full list of macros, click Clear filters at the top of the macros list.
Sorting the list of macros
The Macros page includes options for viewing and sorting your macros. You can sort macros by name, creation date, and date last updated. If you're on a Suite Growth or Support Professional plan or higher, you can also sort by usage. The total number of macros in the view appears above the list of macros.
- On the Macros page, click the column header you want to sort by.
The first click sorts in ascending alphabetical (A–Z) or chronological (oldest to newest) order. You can click the column header again to reverse the sort order.
You can sort by only one column at a time.
Reordering macros manually
If you turn on the manual ordering setting, you can reorder your macros by dragging and dropping them in the list on the Macros page.
If the order of your macros isn't essential to your workflow, however, we recommend disabling manual order mode so all newly created macros will snap into place without manual intervention.
To turn on manual reordering
- In Admin Center, click
Workspaces in the sidebar, then select Agent tools > Macros.
- Click Actions > Manage settings.
- Select Turn on manual ordering.
- Click Save.

To reorder macros manually
- In Admin Center, click
Workspaces in the sidebar, then select Agent tools > Macros.
- Click Actions > Edit order.
- Click and hold the drag-and-drop handle for the macro
you want to move. Drag the macro into position and
release the handle. Repeat as needed to reorder your
macros list.

- Click Save.
Turning off the most-used macros option
By default, the three most-used macros from the past week are displayed at the top of the macros list. You can turn off this feature if it doesn't fit into your workflow.
To disable the most-used macros option
- On the Macros page, click Actions > Manage
settings.

- On the Manage settings page, deselect Display agents'
most-used macros.

- Click Save.