Verified AI summary ◀▼
Set up locations and shifts to organize agents by geographic location and manage their schedules. Create automatic shifts based on forecasted needs or fixed shifts with specific start times. Use rotation periods to vary shift start times and organize shifts in folders for easy management. Manage locations by editing or deleting them as needed.
Locations are part of your organizational structure and are used to group agents who share the same geographic location. You can also use locations to split teams in the same physical location that have different shifts and scheduling rules. For example, you might create two San Francisco locations: one for part-time agents and one for full-time agents.
You’ll define your operational hours and create shifts that apply to agents’ schedules in the locations you add.
When setting up a location’s shifts, you can create either automatic shifts, where forecasted requirements determine the shifts’ days and hours, or fixed shifts, where managers have more control.
Related articles:
Adding a location
Add locations to group agents that share the same geographic location, such as an office, country, or region. Note that agents can be assigned to only one location.
- In Workforce management, click
 Settings in the sidebar, then select Locations.
 - Click the add location (+) icon in the upper-left.
- Enter a unique Location name.
- Click the drop-down menu and select the Time zone.
By default, the time zone selected in the time zone switcher is used.
- (Optional) If you plan to use automatic shifts, choose your Operational hours. Select either Open
24/7 or select Specific hours to choose certain days of the week and
specific hours.
If you select specific hours, it's recommended to set the same length of
time for each day. Note: A location’s operational hours and automatic shift requirements only apply if you're using automatic shifts. Fixed shift logic overrules these settings.
- (Optional) If you plan to use automatic shifts, set the Automatic shift
requirements.

- Click Save.
Next, you’ll create shifts for the location and assign agents. You can create both automatic and fixed shifts for each of your locations.
Understanding a location's time zone
Here are a few things you should keep in mind when setting up a location’s time zone:
- The agent's Location time zone determines where time off and shifts are scheduled.
- The timezone set in the Location is also what determines whether or not daylight saving time (DST) applies for that shift or time off.
- The time zone in which agents see their shifts is controlled through the time zone selector in their schedule. For example, a location's time zone is in the United States during daylight saving time. Agents who have set their time zones in their agent schedule to a time zone that doesn't observe DST will see their shifts adjust when daylight saving time takes effect in the time zone to which their shifts are anchored within Locations.
Creating automatic shifts
Automatic shifts are based on your forecasted requirements. These shifts allow Zendesk WFM to automatically decide the best days and starting times for each agent. However, you do have some control over the starting times for your automatic shifts.
You can also choose to rotate shifts automatically.
To create an automatic shift
- In Workforce management, click
Settings in the sidebar, then select Locations.
- Select a location.
- Click Shifts in the top-right corner.
- Click the add shift (+) icon and select Automatic shift .
- Enter a Shift name, then click Add shift.
- Click the add Intraday variants (+) icon below the Actions menu.
- In the Settings tab, configure the following:
- Name
- Shift length
- Select either Flexible shift start time or Specific shift start
time.

Flexible shift start times allow you to choose the Max difference in shift start time (such as +2 hours). This is the window of time in which agents can be scheduled. For example, if your max difference is two hours, an agent scheduled to work at 9:00 am can only have their next shift start between 7:00 am and 11:00 am.
For Specific shift start time, enter more than one starting time. The start times for each agent will be chosen to best satisfy the forecasted staffing needs.
- Click the Intraday tab. This is when your agents' general tasks or unified agent statuses should occur. You can set only one intraday variant per automatic shift.
- Click the Task (+) icon, then select a task. This can be any task that your agents need to accomplish daily, such as a break, lunch, or a daily stand-up meeting. It can also include any workstreams they're assigned to. If you don't select any workstreams, the workstream is auto-populated for you based on what's been forecasted.
- Set the time interval in which the task can occur, counting from the start of the shift
and the duration of the task.
These values represent hours after the shift starts when the task can occur, not specific times of day. For example, if the shift runs from 8:00 am to 4:00 pm and you want to set a break between 11:00 am and 2:00 pm, enter 3:00 and 6:00 in the Can occur between hours of shift field to schedule the break 3 to 6 hours into the shift.
Overlapping tasks are highlighted in red. Make sure to correct these, as they can prevent shifts from being generated or result in shifts being generated with overlapping tasks, disrupting editing and tracking.You can also add a note to provide more context to agents when this task is selected.
The task displays a white corner and agents can see the note by hovering over it.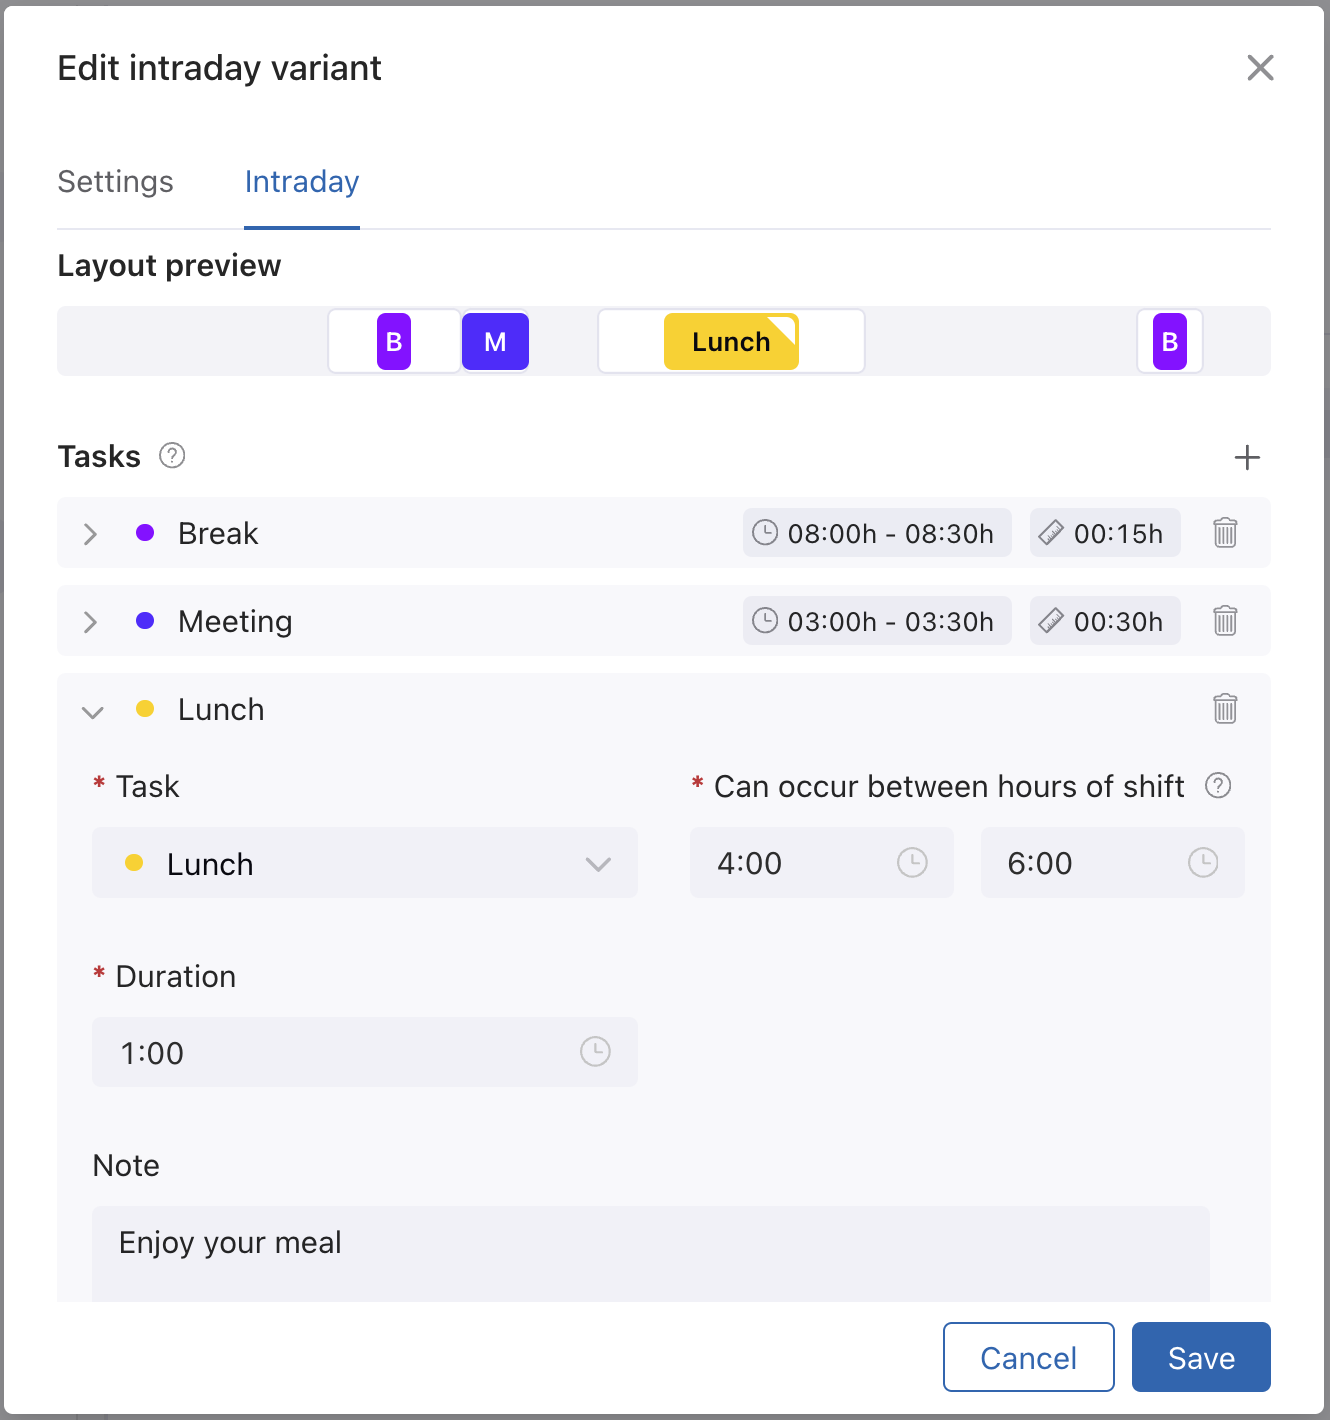

- Click Save.
- Select Agents on the top right to assign users to this shift and then click Save. By default, all users who are assigned to workstreams are displayed, but you can filter by your teams, workstreams, other locations, and your Zendesk groups.
Rotating automatic shifts
When you create or edit automatic shifts, you can define a rotation period for these shifts in either days or weeks. Rotation periods allow agents to rotate between shifts with different starting times. For example, if you define a rotation period of one week, then agents that start at 9:00 am can start at 11:00 am the following week, and so on.
By rotating agents' shift start times automatically, managers don't have to decide a specific order in which to rotate shifts.
- In Workforce management, click
Settings in the sidebar, then select Locations.
- Create or edit an existing automatic shift.
- Click the shift's Intraday variant.
- Enter a Rotation period, then select if it's in either day(s) or
week(s).
If the intraday variant has a Flexible shift start time, the best starting time for each agent is calculated according to what's forecasted and is maintained for the defined rotation period. During the next rotation period, a new starting time may be selected for agents.
If the intraday variant has a Specific shift start time, agents are randomly assigned to the different specified times and are rotated between the different starting times during each rotation period.
- Click Save.
Creating fixed shifts
Fixed shifts allow you to set specific days and times for shift start. The fixed shift logic overrides the location's operational hours and automatic shift requirements.
- You can set up multiple intraday variants for each shift.
- Each variant can be assigned to one or more day of the week (each day can only have one intraday variant)
- The covered days for the shift are displayed at the top of the intraday variants screen.
To create a fixed shift
- In Workforce management, click
Settings in the sidebar, then select Locations.
- Click your location's Shifts section in the top-right corner.
- Click the add shift or folder (+) icon and select Fixed shift from the menu.
- Enter a Shift name. For example, 9am MWF.
- Click Add shift.
- Click the add intraday variant (+) icon below the Actions menu.
- In the Settings tab, configure the following:
- Name
- Start time
- Length
- Working days. The days your agents will work. The days that appear dimmed will be
their days off.

- Click the Intraday tab.
This is when your agents' general tasks or unified agent statuses should occur.
- Click the add Task(+) icon, then select a task from the menu.
This can be any task that your agents need to have or accomplish on a daily basis such as a break, lunch, or a daily stand-up meeting. It can also include any workstreams they're assigned to.
If you don't select any workstreams, the workstream is auto-populated for you based on what's been forecasted.
- Set the time interval in which the task can occur, counting from the start of the shift
and the duration of the task.Overlapping tasks are highlighted in red. Make sure to correct these, as they can prevent shifts from being generated or result in shifts being generated with overlapping tasks, disrupting editing and tracking.
You can also add a note to provide more context to agents when this task is selected.
The task displays a white corner and agents can see the note by hovering over it.
- Click Save.
- Select Agents on the top right to assign users to this shift and then click Save. Make sure that agents are assigned to workstreams so they can be selected.
Rotating fixed shifts
You can add your fixed shifts to a rotation folder so that your agents' shifts are rotated. For example, you may want to rotate agents' shift start times every week so that agents who start at 9:00 am one week, can start at 11:00 am the following week, and so on.
- In Workforce management, click
Settings in the sidebar, then select Locations.
- Click your location's Shifts section in the top-right corner.
- Click the add shift or folder (+) icon and select Folder from the menu.
- Enter a Name and then click Add folder.
- Choose your Rotation period. For example, enter 1 week to
rotate agents' shifts every week. Note: All rotations start from Jan 01, 2022, and not from the day or week that your rotations are created. The order of the shifts will dictate the order of the rotation that week.
- Click Save.
- In the Shifts sidebar, select the shifts you want to rotate and drag them into the rotating folder.
After a shift has been added to the rotation folder, you can view the rotation period of your agents by clicking the Rotation preview tab inside of the folder. If you'd like to change the order of shifts, you can reassign agents to different shifts.

Organizing shifts
Arranging shifts in folders can help you keep all your shifts organized and help you locate shifts.
To create a shift folder
- In Workforce management, click
Settings in the sidebar, then select Locations.
- Click your location's Shifts section in the top-right corner.
- Click the add shift or folder (+) icon and select Folder from the menu.
- Enter a Name and then click Add Folder.
- Click Save.
- In the Shifts sidebar, select the shifts you want to organize and drag them into
the folder.
A blue line indicates where the shift will be reorganized
Managing locations
Manage locations by editing or deleting them.
To edit a location
- In Workforce management, click
Settings in the sidebar, then select Locations.
- Click the location you want to edit.
- Edit the location settings and shifts as needed.
- Click Save.
To delete a location
- In Workforce management, click
Settings in the sidebar, then select Locations.
- Hover over the location you want to delete.
- Click the options menu (
 ) that appears next to the location name.
 - Click Delete.
- Confirm you want to delete the location by clicking Delete location.