Verified AI summary ◀▼
Edit team member tracking settings to manage time and attendance. Use auto-tracking to automatically clock in agents with their first activity, or allow manual clock-ins by disabling it. Task lock keeps agents clocked into a single ticket while researching others. You can adjust these settings individually or in bulk, with changes taking precedence over account-level settings.
This article describes how to edit tracking settings for team members in Zendesk Workforce management (WFM) user profiles.
This article contains the following topics:
- Understanding team member tracking settings
- Editing a team member's tracking settings
- Bulk editing team members' tracking settings
Related articles:
Understanding team member tracking settings
Zendesk WFM has the following agent tracking settings:
-
Auto-tracking: With auto-tracking on, Zendesk WFM takes care of time and
attendance management for most of your agents’ workflows. The first activity that the
agent does automatically clocks them in and starts their day. This setting is activated
for everyone by default.
Deactivating auto-tracking allows agents to manually start and end their days. Moving between tabs and views in Zendesk support no longer automatically triggers a new activity event. See Starting and ending your day in the Zendesk WFM time tracker.
-
Task lock: Allows agents to remain clocked into a single ticket or task while
opening other tickets. This is helpful when an agent needs to research past tickets while
continuing to track the time for a ticket they're working on. See Using task lock.
When you use unified agent status synchronization for Zendesk WFM, task lock isn't required because when an agent isn’t actively working on a ticket, their tracked activity is represented by their unified agent status. The status remains active unless the agent changes it manually or starts working on a ticket.
Editing a team member's tracking settings
Editing the tracking settings from a team member’s WFM profile applies the changes to that team member only. If you want to manage the tracking settings of multiple team members at a time, you can edit them in bulk.
Keep in mind that editing a team member's user settings takes precedence over any account-level settings. If you edit your account-level task lock setting later, the change doesn't apply to team members who have auto-tracking and task lock set in their WFM profiles already.
To edit a team member’s tracking settings
- In Workforce management, click
 People in the sidebar, then select Team members.
 - On the Team members page, click any team member to access their
settings.

- If you don't want to track the agent's Zendesk activity automatically, deselect the
Turn on auto-tracking option.
Deselecting this option allows the agent to decide when to clock in and out.
- To allow agents to remain clocked into a single ticket or task while opening other tickets, select Turn on task lock, then click Save.
Bulk editing team members' tracking settings
You can edit the tracking settings of multiple team members at once from the Team members page. When you edit team members' tracking settings, the changes in their WFM profiles take precedence over your account-level task lock setting.
- In Workforce management, click
People in the sidebar, then select Team members.
- Select the check boxes of the team members whose tracking settings you want to
edit.

To quickly find team members, you can search or filter the list. If you already selected team members, then your selections are cleared if you search or filter.
Alternatively, you can select the checkbox at the top of the list to select all team members on the page. If you navigate to the another page in the list, team members you already selected stay selected.
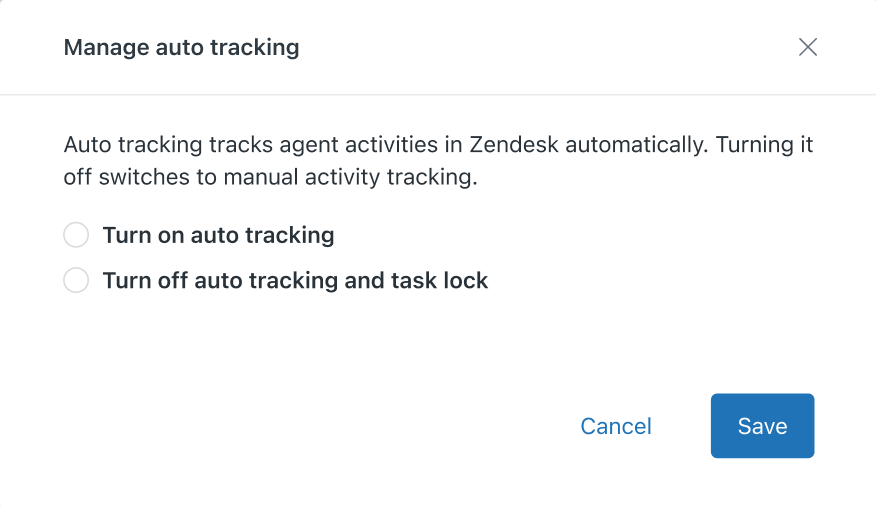
- In the footer, click either Auto tracking or Task lock.
- If you clicked Auto tracking, select one of the following:
- Turn on auto tracking: Automatically tracks the selected agents' activities in Zendesk.
-
Turn off auto tracking and task lock: Switches to manually tracking the
selected agents' activities and deactivates task lock for them. Task lock keeps
agents clocked into a single ticket or general task while browsing other
tickets.
- If you clicked Task lock, select one of the following:
- Turn on task lock and auto tracking: Activates task lock for the selected agents and automatically tracks their activities in Zendesk.
-
Turn off task lock: Deactivates task lock for the selected agents. When
agents are browsing other tickets, they'll no longer be clocked into a single ticket
or general task.

- Click Save.
The team members' tracking settings are updated and the changes are reflected in the audit log.