The custom conversational AI integration allows you to automate any text-based conversations by using the Ultimate Public API to send and receive messages to your AI agent as well as subscribe to AI agent events through webhooks.
This article contains the following topics:
- Creating and configuring a custom CRM integration
- Assigning the custom CRM integration to an AI agent
- Building an application
Creating and configuring a custom CRM integration
You can create a new custom CRM integration in AI agents.
To create and configure a custom CRM integration
- In the AI agents workspace, click Custom CRMs in the sidebar.
- Click Create custom CRM in the top-right corner.
- In Integration name, provide a name for your custom CRM integration.
The integration is added to the list of custom CRMs. However, you still need to configure additional technical information about the integration. - Click the options menu (
 ) for the integration you just created and click Edit.
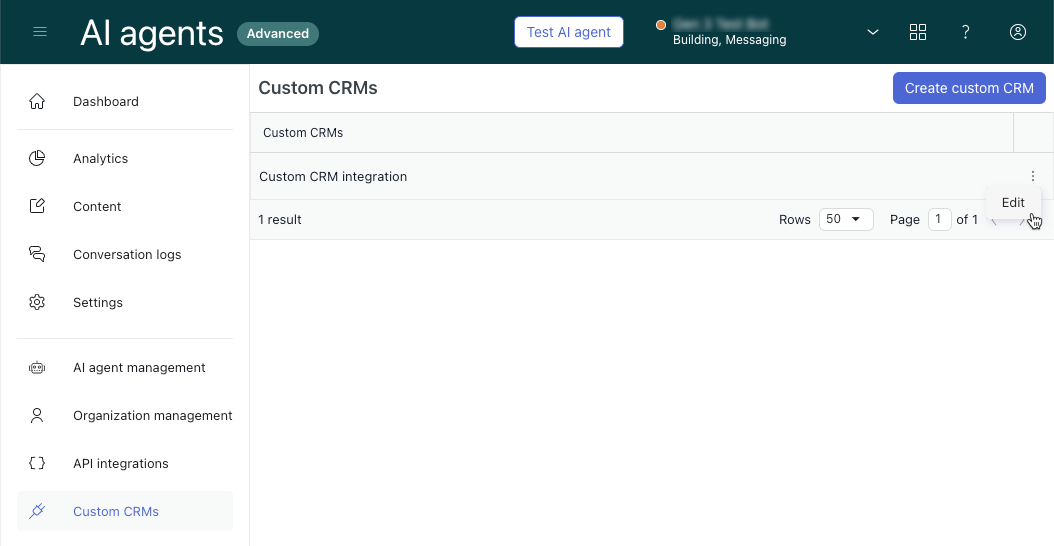
The details page for your custom CRM opens.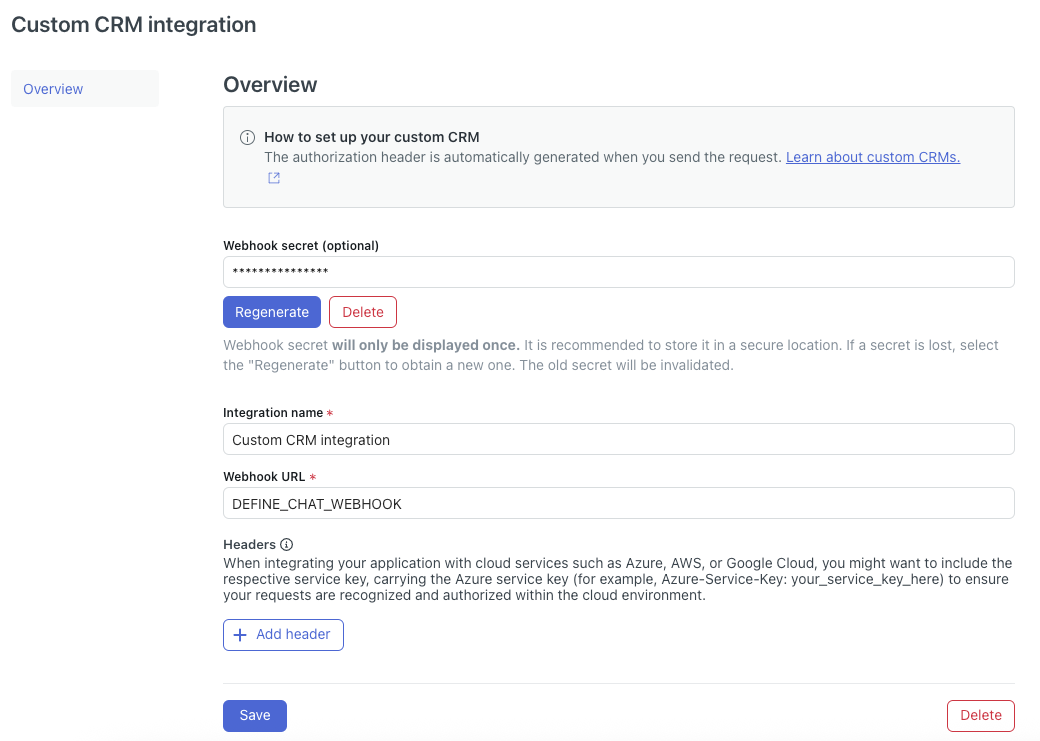
-
In Webhook URL, enter a URL starting with https.
- Under Webhook secret, click Regenerate.
Make note of this secret and store it in a secure location. This is a read-only secret that gives access to the API for only this AI agent. This token is used for any communication between your integration and this AI agent. The access token should be unique for every AI agent that is going to install this integration. - Click Save.
Assigning the custom CRM integration to an AI agent
After you create and configure a custom CRM integration, you can assign it to any AI agent that belongs to the same organization of the AI agent you have access to.
To assign and define the custom CRM integration
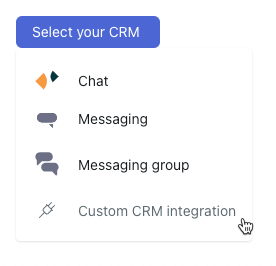
- In the AI agents workspace, click Settings in the sidebar, then select CRM integration.
- Click Select your CRM and select the custom CRM integration you created above.
The integration is assigned to your AI agent and waiting to have new conversations.
Building an application
You can build your application with any programming language that you feel comfortable with. In this section, we will explain the use cases that your application is expected to cover as well as how to cover those use cases using the Ultimate API.
Your application is responsible for:
Connecting to the source where visitors are expected to chat with the AI agent.
Linking the correct customer account on this CRM system to the correct AI agent.
Starting, ending, and routing messages between the visitor and the AI agent.
Handling events like AI agent responses, triggered actions, escalation requests.
Step 1: Connecting to the message source
Depending on the system it’ll have different requirements to authenticate, it’s important to note that if you plan to build the integration for multiple AI agent and multiple customers -which is recommended- then you need to make sure you have access to the customer-specific account on the external system + the AI agent access token on AI agents and can map them together.
The idea is that you need to take over chat conversations as the first receiver in the system of choice, depending on the system this usually involves creating an agent account that is going to be used to access the API and is set as the default first receiver of chat conversations.
Below is an example from LivePerson and their Public API documentation
Third-Party Bots — Public API | LivePerson Developer Center
Step 2: Ultimate API at a glance
Once you’re able to receive visitor messages from the source it’s now time to route those messages to the correct AI agent.
To connect to the right AI agent you need to always send the AI agent ID & the access token with every request. As the integration owner you must keep track of which AI agent is associated with which account on the system where visitor messages come from.
You will need to use the Ultimate API documentation to support you in connecting to our chat endpoints.
| The response codes you can expect are: |
| 200: OK |
| 400: Validation errors |
| 401: Unauthorized |
| 404: AI agent not found |
Metadata and public sessions
Each conversation has a session that holds the conversation history as well as any information collected during this conversation. For example, if you’ve asked the user for their email at some point, this email is stored and can be retrieved and used at any point of time during the conversation.
The meta_data object allows you to programmatically set session parameters that might help with handling the visitor conversation.
Step 3: Sending messages to AI agents and the conversation lifecycle
Once you’re able to communicate with the AI agent, it’s time to understand the conversation lifecycle as well as all the events fired for this conversation.
Starting a new conversation
When starting a new conversation you’d use this type of event when calling the API endpoint.
In order to actually start a new conversation you need to provide a unique conversation ID that is either generated from the Platform you’re using like Whatsapp or Helpscout for example or your application is generating them. conversation ID must be unique to this conversation.
In case a conversation was started with an existing conversation ID and the original conversation session is still alive the AI agent will resume the conversation instead of starting a new one.
The conversation session duration is configurable per AI agent and defaults to 2 hours from the last message sent or received.
Converse
This happens when a conversation has already started and you are routing the visitor messages to the AI agent. Conversation ID must be always passed to the body parameters.
End conversation
Use this feature when a visitor decides to end the conversation.
Note: Sending new messages to a conversation that has ended will start a new conversation under the same platform_conversation_ID
Step 4: Webhook events
Events are ways for the AI agent to interact with the conversation in an asynchronous way, once a bit has received a message it’ll respond in one of three different event types to the respective webhooks that are set up on the integration.
AI agent message
These are the messages sent by the AI agent in response to either starting the conversation like welcome messages or in response to the visitor messages.
AI agent responses can be text, buttons, or carousels. How they end up being displayed on the visitor chat window is up to you and the Platform's capabilities.
Action triggers
Actions are ways for you as an integration owner to trigger some functionalities from your integration on specific instances in the conversation lifecycle. Those are already registered during the integration setup step and can be then used during the AI agent building process to trigger certain actions when necessary.
Examples of actions could be:
- Adding tags to the conversation
- Getting account information
The actions you’ve defined when setting the integration up are available for the AI agents to trigger during the conversation at any point, for example
- On conversation start or end
- When a specific intent is triggered
- On a specific node in the dialogue
The webhook will receive the name of the action triggered as well as the data that was required by this action from the session_params
The webhook then waits for a response, you can either send an empty response or send data to be saved in the conversation session that can be used in the conversation later on.
Example action use cases
- Add a tag to a ticket
- Get user information
- Get previous ticket history
Escalation request
Escalations are a special type of action that if successful should transfer the visitor from the AI agent to a live agent.
Escalations can be defined within the AI agent dialogue based on any conditions the customer chooses, more on that here.