Sometimes an AI agent needs to transfer a query to a human agent. This can happen if the inquiry is complex, urgent, or sensitive. Before launching your AI agent, develop an escalation strategy and design the escalation flow to cover those situations. Then build the paths using escalation blocks in the dialogue builder.
You can build escalation flows in the dialogue builder for messaging and email AI agents.
This article contains the following topics:
- Deciding your escalation strategy
- Designing the escalation flow
- Building escalation paths
- Configuring the automation threshold for email AI agents
Related article:
Deciding your escalation strategy
Your escalation strategy establishes which queries should be escalated and through which channel. Typically, there are three escalation channels: messaging, ticket, and email.
Since this affects agent handling time, take the following factors into account:
- Number of agents on your team
- Agent availability and business hours
- Volume of conversations in the channel
- Complexity and urgency of the query
For example, if your team has four agents working 9am to 5pm and conducting 200–250 conversations per day, escalating too many messaging conversations will overload your agents and cause long waiting times for the customers.
In this case, reserve messaging escalations for high-impact issues such as product questions and shipping failures, which can directly affect revenue or CSAT. Offer escalation only when there's no possibility that the AI agent can guide customers to self-service resources.
Designing the escalation flow
Consider what the AI agent can do before escalation to make the handoff and ensuing conversation more efficient, such as the following:
- Gather information such as order number, name, or email
- Add tags and update fields for your specific workflow
- Identify suitable agents to take the conversation
With that information, design an escalation flow using template replies. If you need more than one escalation flow, create additional templates.
Building escalation paths
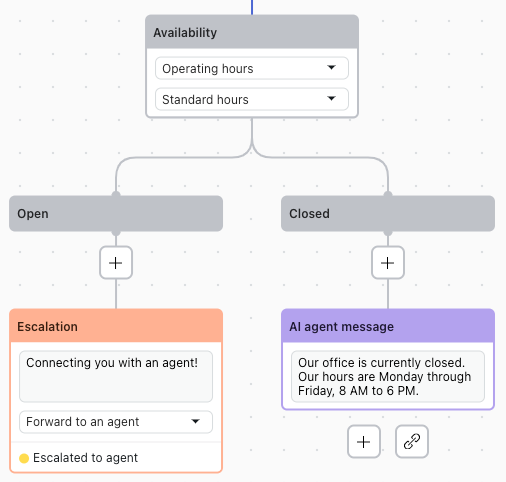
In the dialogue builder, escalation blocks allow you to specify how a customer query will be transferred if the AI agent can't resolve the issue.
You can opt to escalate by messaging only when agents are available to continue the conversation. For example, in a synchronous channel such as messaging, you can escalate by email instead if it’s outside of agent working hours. To do this, use an availability block at the start of the path to ensure you only escalate when agents are available.
- Open the dialogue builder for the dialogue you want to build an escalation into.
- Click the plus (+) icon where you want to start the escalation path.
- Add an availability block if you need the flow to consider either business hours or
agent availability.
For more information, see Checking business hours and agent availability during AI agent conversations.
- Click the plus (+) icon where you want to put an escalation block and select Escalation.
- Enter an AI agent message to communicate to the customer what’s happening.
- Select an escalation method from the following:
- Send an email: Enter the email recipient (the agent or support department where the ticket should go), email title, and (optional) email content.
-
Forward to an agent: Select where to transfer the conversation.
- By default, the escalation goes to the group you specified when you first integrated your AI agent with a CRM, but you can also specify an escalation team in the Escalate to team field in the Details panel.
- You can also specify which dialogue should be triggered if the escalation fails, such as the "Failed escalation reply" system reply, in the Escalation fallback field in the Details pane.
- (Optional) In the Details panel, click Add action to perform an action when an escalation happens.
- Click Save to save your work for later, or click Publish to make your changes live.
Configuring the automation threshold for email AI agents
For email AI agents, you can configure how many use cases the AI agent can complete during a conversation with a customer before the email automation ends.
Configuring this threshold allows you to control how long the AI agent should be active in an email conversation. Based on your business goals, you can let the AI agent handle conversations as long as there is no explicit need to escalate, or limit the number of use cases, to guarantee your customers can easily receive human assistance if they require help with complex cases.
If you configure the threshold to keep automation active indefinitely or allow multiple use cases, you should confirm that escalation blocks exist in all your dialogues at the appropriate points. Reaching an empty AI agent message block does not trigger an escalation if additional use cases are still allowed. Once a use case is triggered, customers cannot directly trigger a new use case while still in a dialogue’s conversation flow.
It’s recommended to create a use case for escalations that contains a simple dialogue with an escalation block, which can be easily linked from other dialogues or triggered during use case detection.
Additionally, you should configure your workflows to identify tickets that are in an Open status but have the escalated_by_ultimate tag (which indicates that the automation has ended). These tickets will no longer be responded to by the AI agent, meaning they might require human attention.
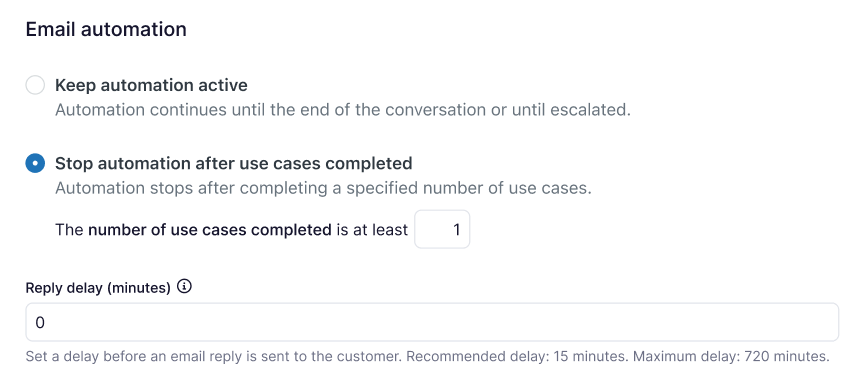
To configure the email automation threshold
- In the AI agents workspace, select the AI agent you want to work with.
- Click
 Settings in the sidebar, then select General.
 - Scroll down to the Email automation section.
- Select one of the following options:
- Keep automation active: The AI agent keeps responding to the customer until the end of the conversation or until it encounters a not-understood message, a use case with no configured replies, or an escalation block in a dialogue. The escalated_by_ultimate tag is then applied to the conversation.
-
Stop automation after use cases completed: The AI agent stops responding to
the customer after a certain number of use cases have been completed. The
escalated_by_ultimate tag is applied following the logic described in Understanding email conversation flows or
else at the end of the specified number of use cases.
- Underneath this setting, specify the number of use cases that can be completed
before the email automation ends.
For example, if you set this to 2, a customer’s first question might trigger the AI agent to send a generative system reply, reaching the end of the first use case. Then, based on this reply, the customer asks a follow-up question, triggering a second use case, which is resolved in three conversational turns. After this second use case is completed, the AI agent stops responding.
- In Reply delay (minutes), specify the number of minutes that must pass
before the last use case is completed before the AI agent sends a reply to the
customer.
The recommended delay is 15 minutes.
- Underneath this setting, specify the number of use cases that can be completed
before the email automation ends.
- Click Save.