Summary: ◀▼
You can use data masking to hide personally identifiable information like names, emails, and phone numbers from agents in custom or light roles. This helps protect sensitive data by restricting access based on roles. You can also update messaging ticket subjects to show user IDs instead of names. Be sure to review roles and permissions carefully before enabling or disabling data masking to maintain proper access control.
As described in About data masking, customers with the Advanced Data Privacy and Protection add-on can hide personally identifiable information (PII) from agents in custom and light agent roles. The data masking feature allows you to mask end-user names, phone numbers, and email addresses.
Considerations before turning on data masking
- Define which roles require data masking. Configure masking permissions based on the principle of least privilege, ensuring only those who truly need access to PII can see it. You may want to create dedicated roles specifically designed to restrict access to PII.
- Data masking can affect an agent’s ability to access and interact with end-user information. Before turning on data masking for a custom or light agent role, carefully evaluate the tasks and responsibilities of the agents assigned to that role, and ensure agents are assigned to the correct roles when toggling data masking on or off.
- Carefully select which fields and data types (names, email addresses, or phone numbers) should be masked. Regularly review and update the list to reflect any changes in data collection or business processes.
- Before rolling out changes, test in a sandbox environment to verify that masking rules are working as intended across all relevant areas.
-
Provide clear guidance or documentation so admins and agents understand what is masked and why.
Turning on data masking
Zendesk admins can turn on data masking for agents in custom roles.
To turn on data masking
- In Admin Center, click
 People in the sidebar, then select Team > Roles.
 - On the role you want to turn data masking on for, click the options icon (
 ) and select Edit.
 - In the Data masking section, select the Mask checkbox for each
end-user field you want to mask for agents in this role.
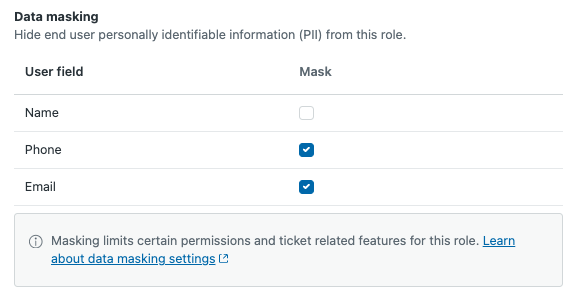
- Click Save.
An acknowledgment page appears with a link to more information, notifying you that certain permission changes will take effect after you click Save. These changes are required to prevent agents in this role from accessing the selected end-user fields, and include the following:
- Explore permissions will be set to No access for roles with data masking turned on to prevent agents from accessing sensitive data in reports.
- Account assumption and deletion will be turned off for agents with permission to manage end users.
- The subject line in the messaging ticket template may include end-user names. To secure the PII there, set the messaging template subject line to Conversation with {end user ID}. See Removing end-user names from the subject line of messaging tickets.
- Click Save on the acknowledgment page.
- Repeat these steps for any other roles you wish to turn on data masking for.
Removing end-user names from the subject line of messaging tickets
By default, new messaging tickets include the end user's name in the subject line (for example, "Conversation with Jane Smith"). If you turned on data masking to hide end-user names, you may want to update the subject line to display the end-user ID instead (for example, "Conversation with 5083543234201"). This option is available when data masking is turned on for at least one role and applies to new tickets only.
You can change the subject line back to show the user name instead of the ID. However, doing so only applies to new messaging tickets. The subject line on existing tickets won't change.
When you update the messaging subject line, it applies to all agents. The subject line can't be updated for specific roles.
To remove end-user names from the subject line of messaging tickets
- In Admin Center, click
 Channels in the sidebar, then select Messaging and social >
Messaging.
Channels in the sidebar, then select Messaging and social >
Messaging. - Click Manage settings.
- In the Tickets section, expand the Ticket subject line when data is masked option.
- Select Conversation with {end user ID}.
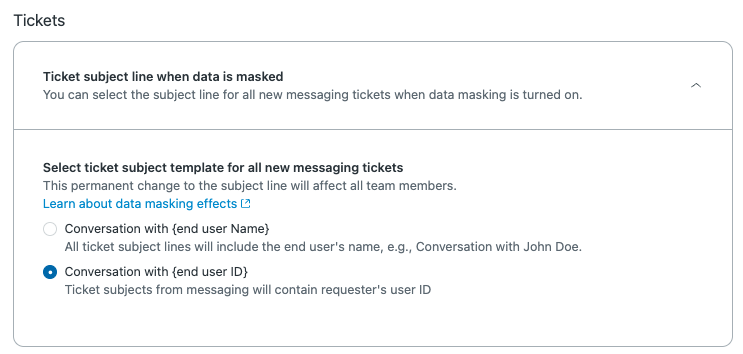
- Click Save settings.
Turning off data masking
After you turn off data masking for a custom or light agent role, team members assigned to that role can view previously masked PII. In addition, permissions that were previously locked to protect PII become editable again.
To turn off data masking
- In Admin Center, click
People in the sidebar, then select Team > Roles.
- On the role you want to turn data masking off for, click the options icon
() and select Edit.
- In the Data masking section, deselect the Mask checkbox for all user fields.
- Click Save.