In an AI agent, a reply contains the dialogue (or scripted conversation flow) that’s presented to customers during a conversation when a specific use case is detected.
This article contains the following topics:
- Creating a reply
- Activating a reply
- Editing a reply's settings
- Viewing the change log for a reply
- Copying a reply to another AI agent
- Deactivating a reply
- Deleting a reply
Related article:
Creating a reply
When you configure a use case to use a dialogue as its reply method, you need to create an associated reply. The reply, in turn, contains the dialogue that dictates what messages an AI agent will send and what actions it will take during a conversation with a customer.
To create a reply
- In the AI agents workspace, select the AI agent you want to work with.
- Click
 Content in the sidebar, then select Use cases.
 - Select the use case you want to create a reply for.
- Select the Replies tab.

- Click Add reply.
The Create automation reply window appears.
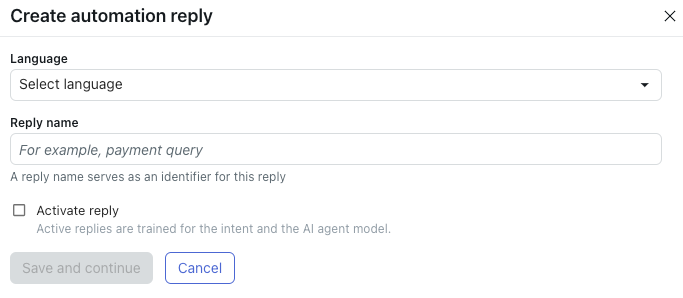
- In Language, select the language you want to create a reply for.
If you don’t see the language you want, add a supported language first.
- In Reply name, enter a short name for the reply.
This name doesn't appear to customers.
- If you want the AI agent to immediately begin using the reply’s associated
dialogue in conversations with customers, select Activate reply.Note: It’s recommended to wait to activate the reply until you’ve built and tested the dialogue associated with the reply first.
- Click Save and continue.
The dialogue builder opens. From here, you create the dialogue (or conversation flow) that’s associated with this reply.
Activating a reply
A reply must be activated before the AI agent can use its associated dialogue in conversations with customers.
To activate a reply
- In the AI agents workspace, select the AI agent you want to work with.
- Click
Content in the sidebar, then select Use cases.
- Select the use case that contains the reply you want to activate.
- Select the Replies tab.
- Find the reply you want to activate, click the options menu (
 ), and select Activate.
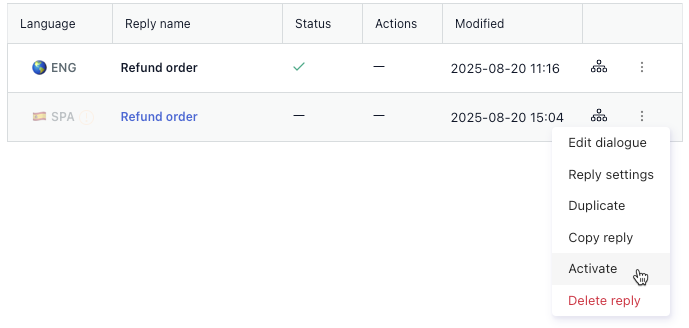
Editing a reply's settings
You can edit a reply’s settings, including the language and use case it’s associated with.
To edit a reply’s settings
- In the AI agents workspace, select the AI agent you want to work with.
- Click
Content in the sidebar, then select Use cases.
- Select the use case that contains the reply you want to edit.
- Select the Replies tab.
- Click the reply you want to edit the settings for.
- On the Details tab, click Advanced settings.
- From here, you can edit the following settings for the reply:
- Language: The language the reply is associated with.
-
Intent: The use case the reply is associated with.
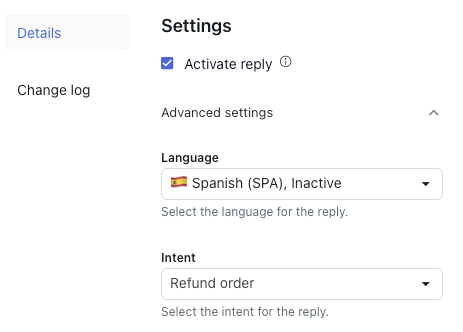
- Click Save.
Viewing the change log for a reply
You can view the change log for a reply to see what changes have been made to it, by whom, and when.
To view the change log for a reply
- In the AI agents workspace, select the AI agent you want to work with.
- Click
Content in the sidebar, then select Use cases.
- Select the use case that contains the reply you want to view the change log for.
- Select the Replies tab.
- Click the reply you want to view the change log for.
- Select the Change log tab.
- Review the details in the following columns:
- Last update: The timestamp of the change.
- Action: What change was made to the reply and which user made the change.
-
User: The user who made the change.

Copying a reply to another AI agent
If you've already created a reply, you can copy it to another AI agent to speed up the process of building multiple AI agents. Copying a reply also copies its associated dialogue.
Before you copy a reply, make sure any linked replies, templates, segments, or entities in the reply's dialogue also exist in the AI agent you're copying to. These objects aren't copied automatically and must be created or copied manually.
To copy a reply to another AI agent
- In the AI agents workspace, select the AI agent you want to work with.
- Click
Content in the sidebar, then select Use cases.
- Select the use case that contains the reply you want to copy.
- Select the Replies tab.
- Find the reply you want to copy, click the options menu (), and select Copy reply.
The Copy reply to another AI agent window appears.
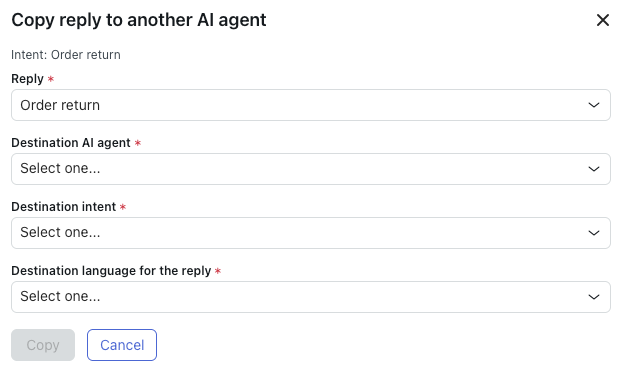
- In Reply, confirm the reply you want to copy is selected.
If not, select the desired reply.
- In Destination AI agent, select the AI agent you want to copy the
reply to.Note: The destination AI agent must be on the same channel type (messaging or email) as the source AI agent.
- In Destination intent, select the use case the copied reply should be
associated with.
If you don't see the use case you want, create it in the destination agent first.
- In Destination language for the reply, select the language the copied
reply should be associated with.
If you don't see the language you want, add it as a supported language in the destination agent first.
- Click Copy.
The reply and its associated dialogue are copied to the specified AI agent.
Deactivating a reply
You can deactivate a reply so that an AI agent no longer uses its associated dialogue in conversations with customers. Neither the reply nor its associated dialogue are deleted, and deactivated replies can be reactivated at any time.
To deactivate a reply
- In the AI agents workspace, select the AI agent you want to work with.
- Click
Content in the sidebar, then select Use cases.
- Select the use case that contains the reply you want to deactivate.
- Select the Replies tab.
- Find the reply you want to deactivate, click the options menu (), and select Deactivate.
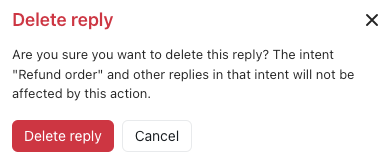
Deleting a reply
If you’re sure you no longer need a reply, you can delete it. Deleting a reply also deletes the dialogue associated with it. This action cannot be undone.
To delete a reply
- In the AI agents workspace, select the AI agent you want to work with.
- Click
Content in the sidebar, then select Use cases.
- Select the use case that contains the reply you want to delete.
- Select the Replies tab.
- Find the reply you want to delete, click the options menu (), and select Delete reply.
- In the confirmation dialog, click Delete reply.