Verified AI summary ◀▼
Synchronize ticket statuses with linked Jira issues using automation rules. Set triggers for status changes, add conditions for linked issues, and configure actions to update ticket statuses. This integration requires admin access to both platforms. Test and troubleshoot using audit logs to ensure seamless operation. Enhance issue tracking and resolution by automating status updates between the two systems.
This guide describes how to use Jira automation rules to synchronize the status of tickets in Zendesk with the status of linked issues in Jira. For example, if the status of a linked issue in Jira changes to Done, then the status of the ticket in Zendesk is automatically updated to Solved.
You'll need the following permissions to create this integration:
- Admin access to Zendesk to generate an API token
- Admin access to Jira to create and configure automation rules
Topics covered in this article:
Getting your Zendesk credentials
To get your Zendesk credentials
- Get a Zendesk API token from the Admin Center in your Zendesk account. See Generating API tokens.
- Combine the API token with your email address by replacing the placeholders in
the following
string:
{zendesk_email}/token:{copied_api_token}Example:
jdoe@company.com/token:abc123def456ghi789 - Encode your credentials using Base64.
Base64 is an encoding scheme. You can search online for Base64 encoding tools. One option is to use https://www.base64encode.org/.
The credentials in the example in step 2 look as follows after being encoded using Base64:
amRvZUBjb21wYW55LmNvbS90b2tlbjphYmMxMjNkZWY0NTZnaGk3ODk= - Save your encoded credentials to use later in the Jira automation rule.
Creating a Jira automation rule to sync ticket statuses
Jira automation rules allow you to automate actions in Jira based on criteria that you set. Automation rules are made up of three parts:
- triggers that kick off the rule
- conditions that determine when the trigger runs
- actions that perform tasks in Jira when the trigger runs
- Refer to Create and edit Jira automation
rules in the Jira documentation for the detailed procedure.
Jira may change how this feature works over time. Always refer to the official Jira documentation for the latest information.
- Select Global automation under System to create the rule.
- Give your rule a descriptive name such as "Sync to Zendesk - Escalation".
- Refer to the following sections to configure the rule to create the integration with Zendesk:
- Turn on the rule.
Define the trigger for the automation rule
Define the trigger so that the automation rule runs when the status of an issue changes, or transitions, to another status.
To define the trigger for the automation rule
- Select the Issue transitioned trigger.
- In the From status field, enter the starting status, such as "In Progress".
- In the To status field, enter the new status, such as "Done".
Adding a condition for linked issues
You can add a condition to the trigger so that it only runs when the issue is linked to a Zendesk ticket.
To define this condition, you can use the jira_escalated label that's added automatically to an issue when the issue is linked to a Zendesk ticket.
To add a condition for linked issues
- Click Add component to add a condition.
- Select the JQL condition.
- In the JQL field, enter
labels = jira_escalated.
Adding an action to update ticket statuses
When a linked issue transitions from one status to another in Jira, the status of the ticket in Zendesk should be updated. To accomplish this, add an action to the automation rule that makes an API request to Zendesk to update the ticket status.
To add an action to update ticket statuses
- Click Add component to add an action.
- Select the Send Web Request action.
- Configure the Send Web Request action as outlined in the next section.
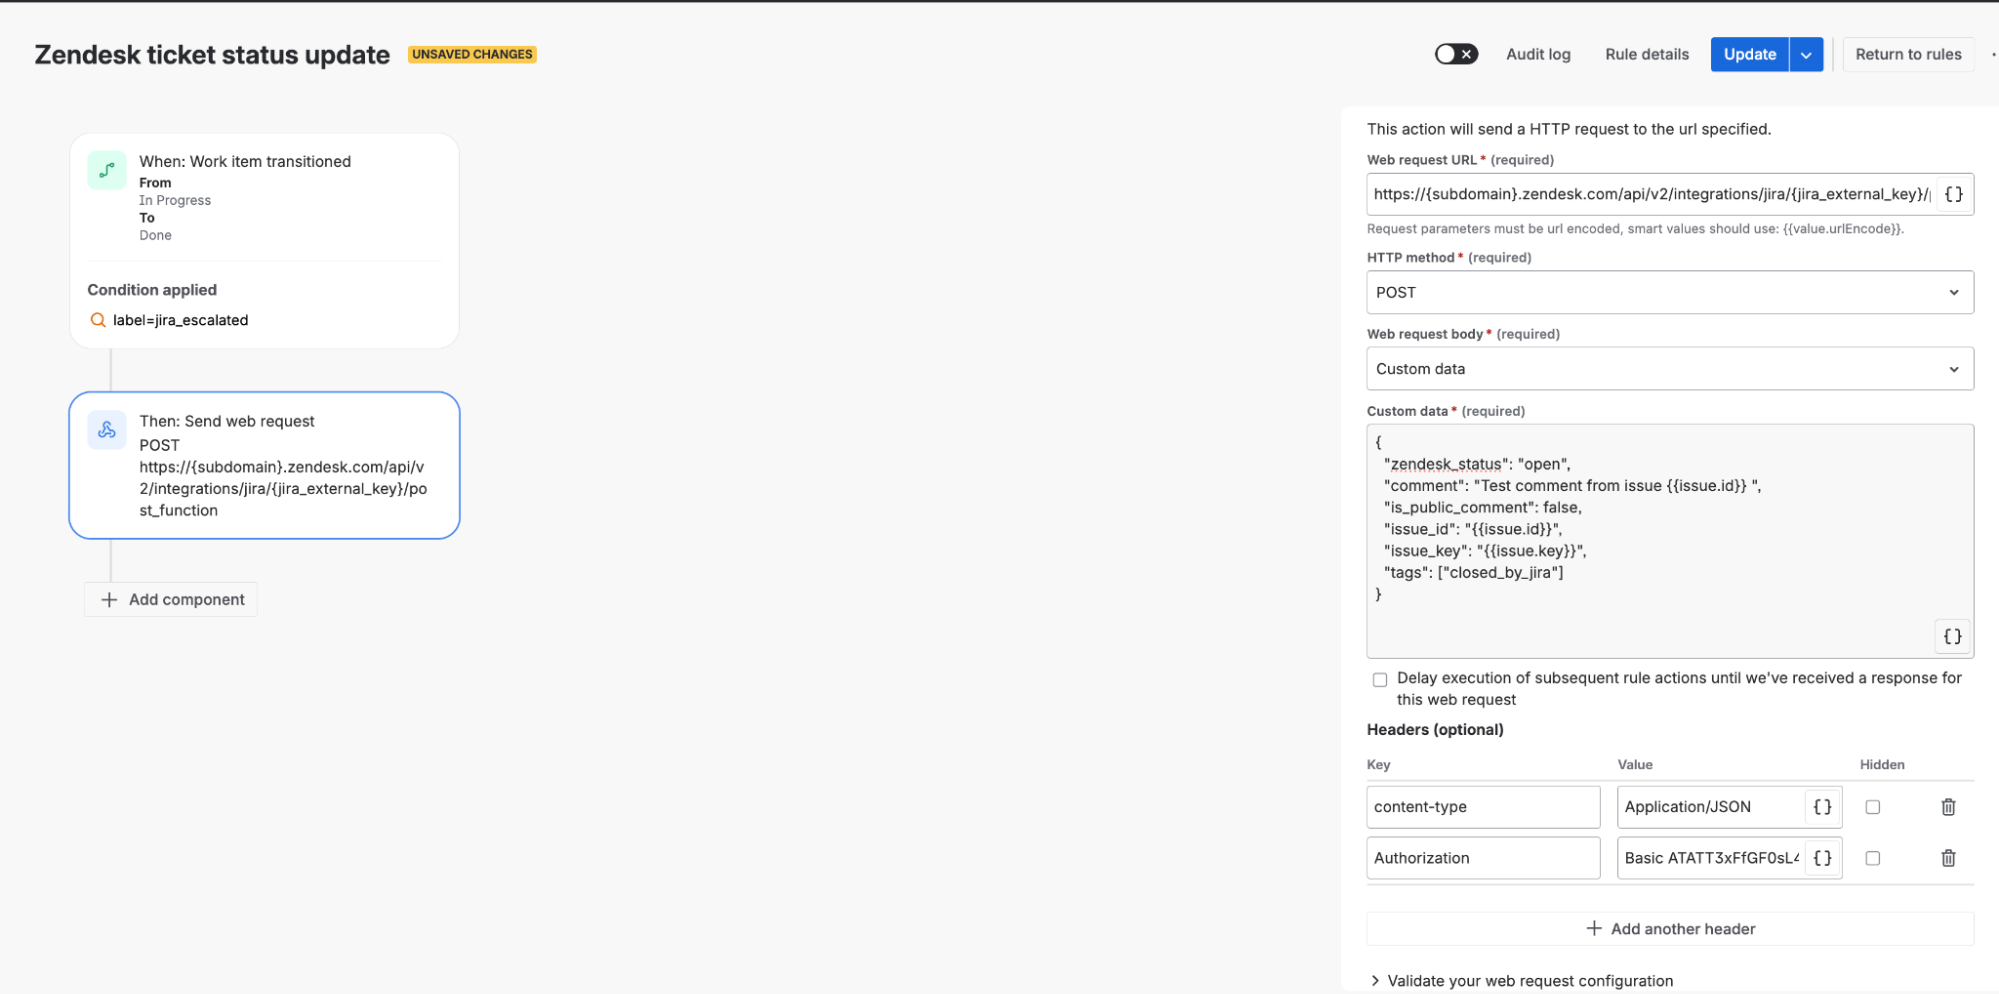
Configuring the Send Web Request action
Configure the Send Web Request action as follows:
-
Web request URL: Enter the following Zendesk API endpoint:
https://{subdomain}.zendesk.com/api/v2/integrations/jira/{jira_external_key}/post_function
Replace the subdomain placeholder with your Zendesk subdomain.
To get the
jira_external_keyvalue, go to the Zendesk Admin Center, then select Apps and integrations > Integrations > Jira > Edit. -
HTTP method: Specify POST
-
Web request body: Select Custom data.
-
Custom data: The custom data for the action is represented as a JSON object with the following JSON format:
Name Type Mandatory Description zendesk_status string false The target status in Zendesk: "open", "pending", or "solved". You can specify a custom status but make sure the string exactly matches the string in Zendesk comment string true Comment to add to the Zendesk ticket. Supports HTML comments is_public_comment boolean false Whether the comment is visible to end users issue_id string true Specify the Jira smart value {{issue.id}}, which dynamically provides the issue id at runtimeissue_key string true Specify the Jira smart value {{issue.key}}, which dynamically provides the issue key at runtimetags array false Tags to add to the Zendesk ticket Example
{ "zendesk_status": "solved", "comment": "Issue has been resolved", "is_public_comment": false, "issue_id": "{{issue.id}}", "issue_key": "{{issue.key}}", "tags": ["in-assist", "resolved-jira"] } - Delay execution option: Select the option: "Delay execution of subsequent rule actions until we've received a response for this web request".
-
Headers: Specify the following headers.
Key Value Hidden checkbox Authorization Basic {your_base64_encoded_credentials} Checked Content-Type application/json Unchecked
The action should look as follows when you're done:
Testing the automation rule
This test assumes you configured the automation rule as follows:
- the Jira issue transitions from "In progress" to "Pending"
- the issue has a jira_escalated label
You can modify the test to reflect how your rule is configured.
To test the automation rule
- Create a test ticket in Zendesk.
- Use the Jira app in the ticket interface to create a Jira issue from the
ticket.
The app automatically adds the jira_escalated label to the new issue in Jira.
- In Jira, change the status of the linked issue from "In Progress" to "Pending".
- Open the linked Zendesk ticket and verify the following:
- The status has been updated
- The comment has been added
- The tags have been applied
You can also check the results in the audit logs.
To check the results in the audit logs
- Go to the automation rule in Jira.
- Click Audit log in the toolbar.
- Review the execution history.
Troubleshooting
You may encounter the following problems when testing.
401 Unauthorized Error
- Verify your Base64 encoded credentials are correct
- Ensure the API token is still valid in Zendesk
- Check that the
Authorizationheader format is as follows:Basic {base64_string}
404 Not Found Error
- Verify the endpoint URL is correct
- Check that the external ID in the URL is valid
400 Bad Request Error
- Validate the JSON payload structure
- Ensure all required fields are present
- Check that the
zendesk_statusvalue is valid
Automation not triggering
- Verify the conditions match your issue's state
- Check that the label jira_escalated is present
- Review the audit log for the automation rule
Examples
The following examples show how to update the status of tickets in Zendesk when the status of issues in Jira changes to a specific status.
Jira issue status changes to Escalated
Automation rule trigger
- Issue transitioned to "Escalated"
{
  "zendesk_status": "open",
  "comment": "Issue has been escalated",
  "is_public_comment": false,
  "issue_id": "{{issue.id}}",
  "issue_key": "{{issue.key}}",
  "tags": ["escalated"]
}
Jira issue status changes to Done
Automation rule trigger
- Issue transitioned to "Done"
{
  "zendesk_status": "solved",
  "comment": "Issue has been resolved",
  "is_public_comment": true,
  "issue_id": "{{issue.id}}",
  "issue_key": "{{issue.key}}",
  "tags": ["resolved"]
}
Jira issue status changes to Waiting for Customer
Automation rule trigger
- Issue transitioned to "Waiting for Customer"
{
  "zendesk_status": "pending",
  "comment": "Waiting for customer response",
  "is_public_comment": false,
  "issue_id": "{{issue.id}}",
  "issue_key": "{{issue.key}}",
  "tags": ["awaiting-response"]
}