Verified AI summary ◀▼
Split view, available in an closed Early Access Program, helps agents manage tickets directly from Agent Home. Agents can view ticket lists and conversations side-by-side, switch between tickets, and manage ticket properties. Admins can enable or disable split list for all agents.
Agent Home includes a split view layout that enables agents to work on tickets directly from Agent Home without having to navigate back and forth between Agent Home and the Support ticket interface. This saves agents time by allowing them to quickly interact with customers while still maintaining visibility into other tickets and priorities.
This article includes these sections:
- About the split view layout
- Working with a ticket in split view
- Switching between tickets and work lists
- Filtering your work in split view
- Sorting your work in split view
- Split view limitations
- Turning split view on and off
Related articles
About the split view layout
When turned on by an admin, the split view layout shows your ticket list and other work assignments on the left side of the page while also showing the conversation portion of an active ticket on the right. You can view the ticket conversation and manage ticket properties directly from Agent Home.
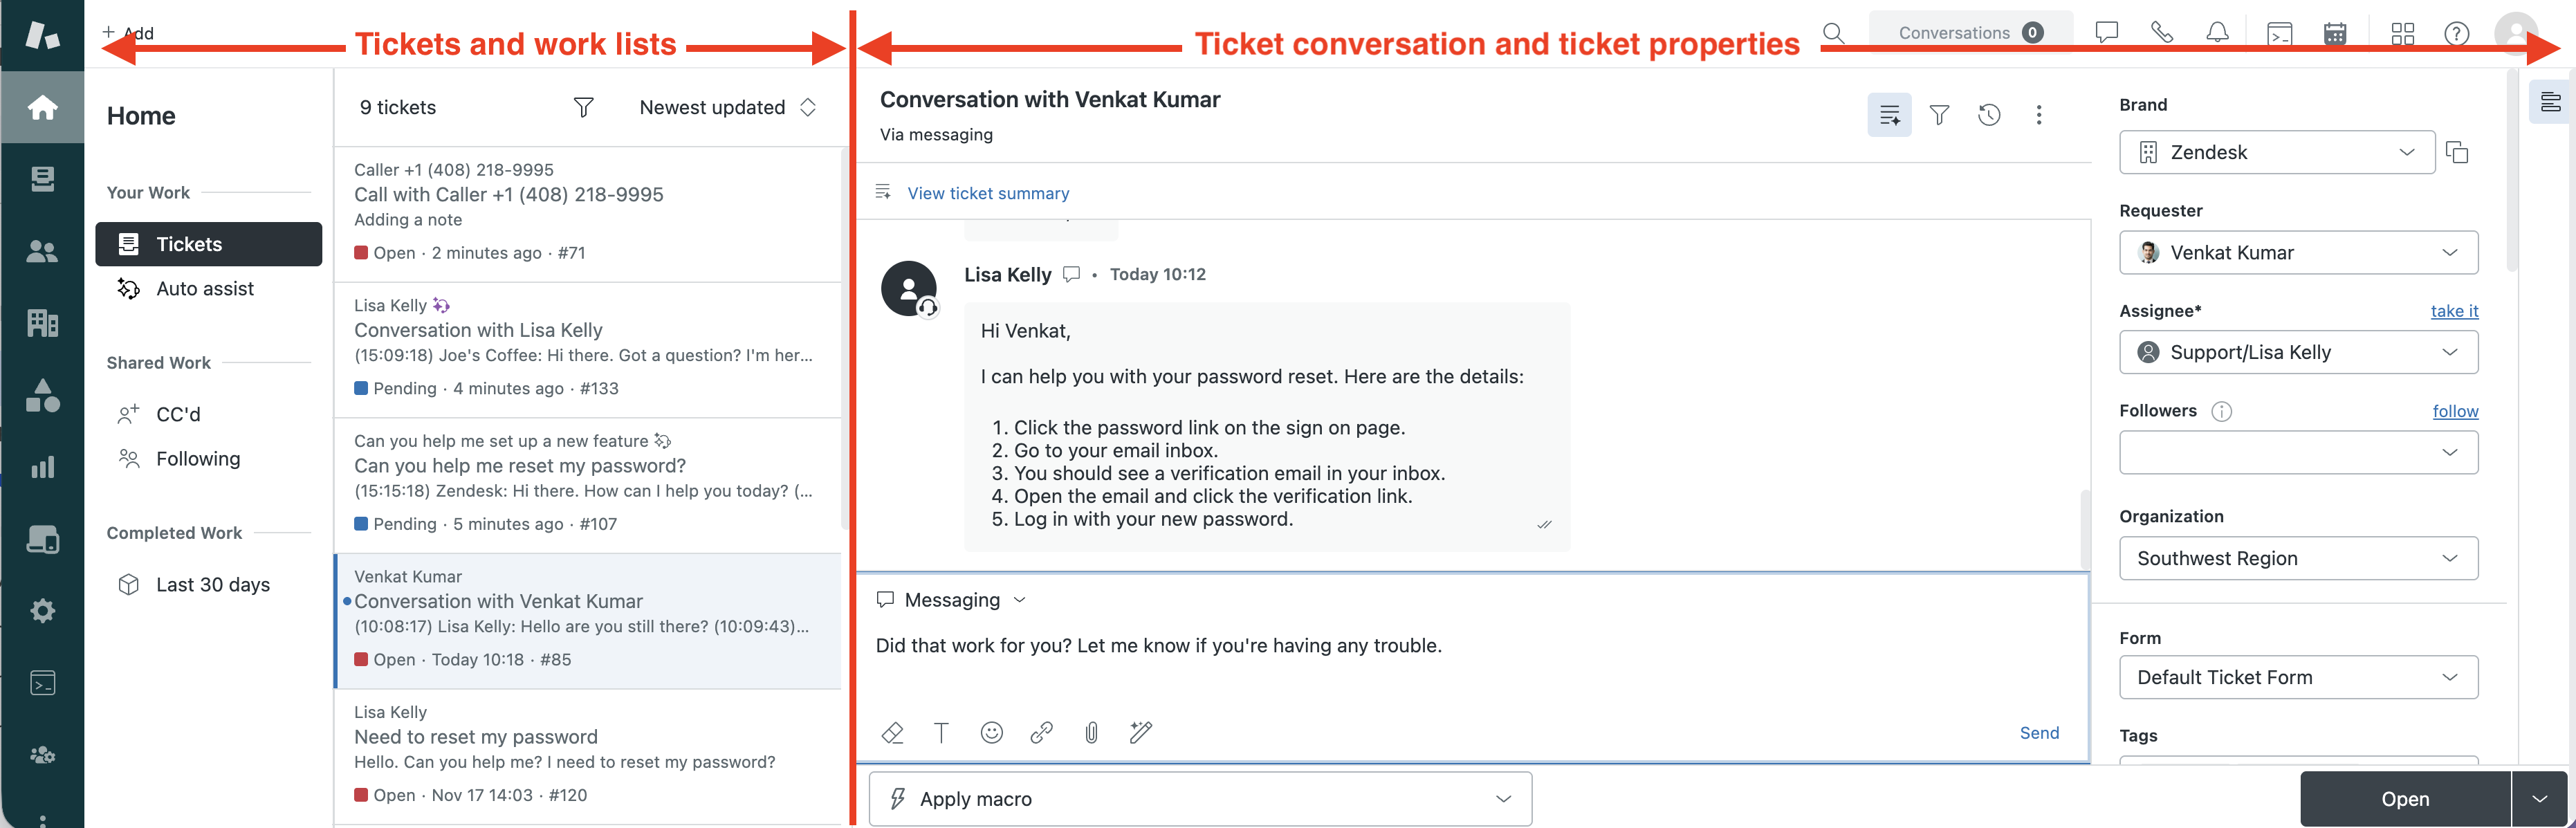
- Tickets list and work: A list showing your assigned work, organized by priority. You can switch between Tickets, CC’s and Followers, and Approvals.
- Ticket conversation and ticket properties: The active ticket's conversation, composer, and ticket properties. When you select a ticket from the list, its details show here. You can also show or hide the ticket’s properties.
Working with a ticket in split view
In split view, you can open a ticket, review customer replies, compose messages, and manage ticket properties.
To open a ticket
-
In Support, click Home
(
 ) in the sidebar.
Agent Home displays.
-
Click a ticket in your work list.
The ticket opens in split view. You can use the split view to reply to customers, update ticket fields, or change the ticket status.
The ticket you’re actively working on is highlighted in the ticket list.
- When you’ve finished working on the ticket, select another ticket from the list.
- Open a ticket in split view.
-
Click the Ticket fields icon
(
 )
to open the ticket
properties panel.
)
to open the ticket
properties panel.
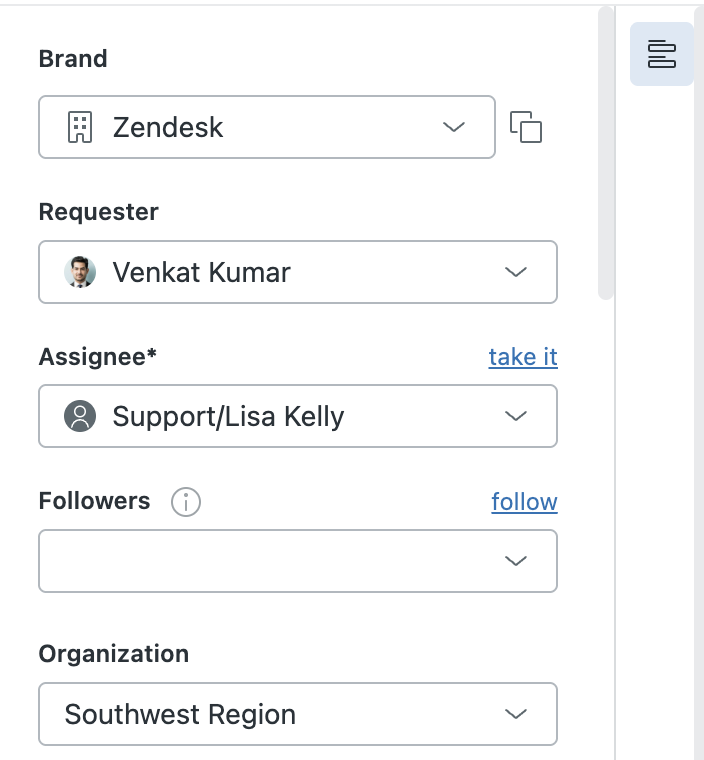
The ticket properties panel appears beside the ticket conversation. This panel shows all the fields associated with the ticket, including the ticket requester and the ticket assignee.
-
Click the Ticket fields icon
()
again to hide the
ticket properties panel.
To open a full view of a ticket
In some cases, you may need to open a full view of the ticket in the Support interface instead of working on it from Agent Home.
-
In Support, click Home
() in the sidebar.
Agent Home displays.
-
Click the options menu icon (
 )
in the ticket's
conversation header.
)
in the ticket's
conversation header.
-
Select Open in new tab from the
menu.
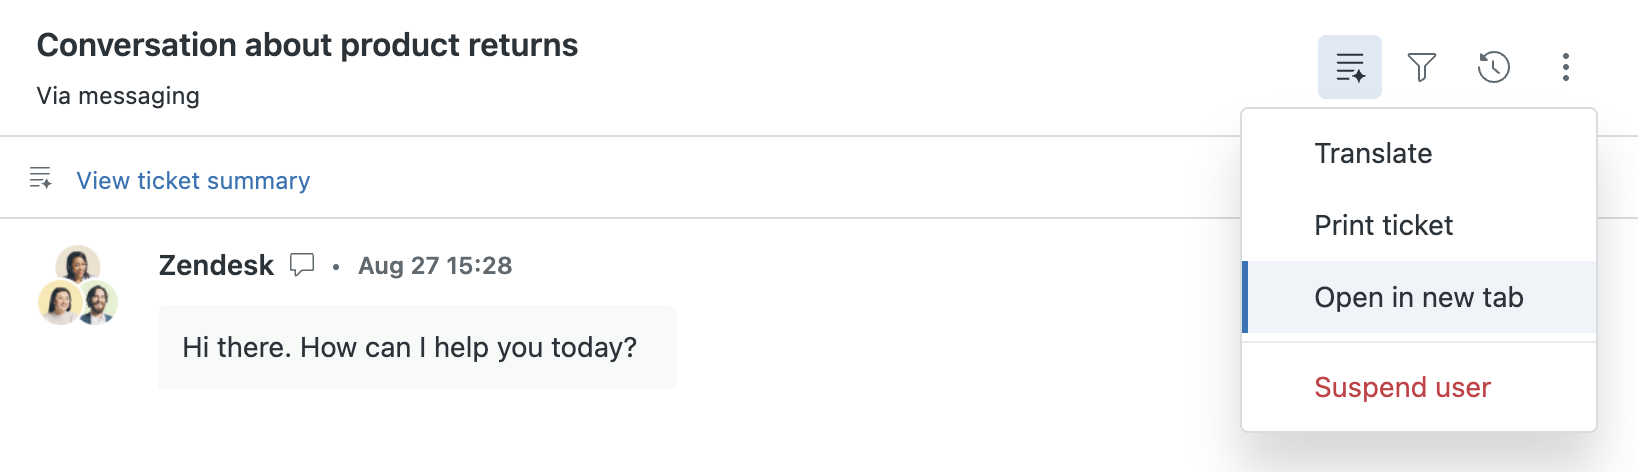
The ticket opens as a ticket tab in the Support ticket interface.
Switching between tickets and work lists
You can switch between tickets and switch to other work lists in split view.
To switch to another ticket
-
To switch to another ticket in split view, click a ticket in the work list.
When you switch tickets, your existing ticket closes and the new ticket opens. Any unsubmitted changes in your existing ticket are saved. You can switch back at any time and resume your updates.
To switch to another work list
-
To switch between work lists, click a work list in the left
sidebar.
A new list of tickets appears.
- Click a ticket to open it from the work list.
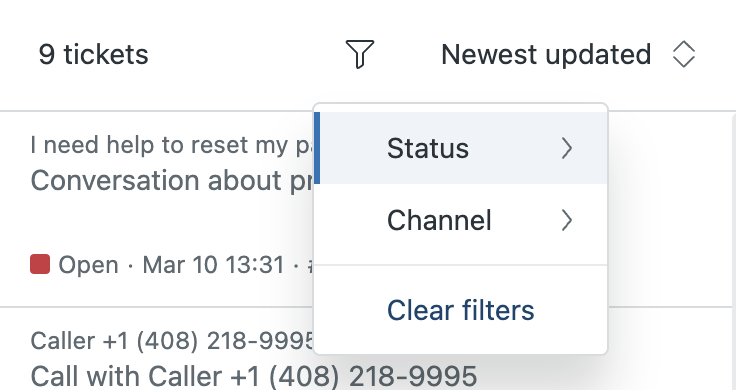
Filtering your work in split view
You can filter tickets on Agent Home to get the exact view you need to manage your work. You can filter tickets by status or by channel.
To filter your tickets
-
In
Support,
click the Home
()
icon in the sidebar.
-
Click the filter icon (
 )
at the top of your tickets
list, then select Channel or
Status.
)
at the top of your tickets
list, then select Channel or
Status.
-
Select a status or channel from the menu.
For Channel, you can choose any channel currently shown in your tickets list.
For Status, you can choose Open, Pending, or On-hold (if activated). You can also sort by custom ticket statuses if an admin has activated them in your account.
When you filter your tickets, you’ll see a blue dot to show you’re looking at a filtered list. The number inside the dot shows how many filtering options you’ve set.
- To see all tickets regardless of channel or status, click Clear filters.
Sorting your work in split view
To help you manage your priorities, you can sort your tickets to show what’s most important to you.
To sort your tickets
-
In
Support,
click the Home
()
icon in the sidebar.
-
Open the sort menu at the top of your tickets list and select
a sort
option.
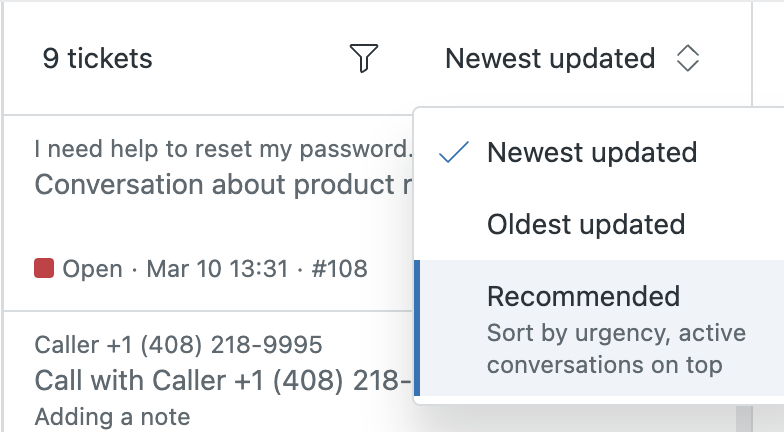
Sorting options include:
- Recommended: Provides suggestions on which tickets to address first. The recommended list groups live messaging conversations at the top of your work list, and sorts the rest of your tickets by next SLA breach.
- Oldest updated: Your least-recently updated tickets are listed first.
- Newest updated: Your most-recently updated tickets are listed first.
Split view limitations
The split view EAP has the following limitations. Zendesk will address these in future updates.
- Zendesk apps installed in ticket_sidebar and ticket_editor locations are not supported in the conversation panel.
- The context panel is not available in split view.
- Contextual workspaces are not supported.
- Custom layouts are not supported.
- Approval requests cannot be acted on in the conversation panel
- Channel framework integrations are not supported.
- Keyboard shortcuts are not available.
- Agent collision detection is not active in split view.
- The ticket list shows a maximum of 30 tickets.
- Some interface elements may not display correctly in some languages.
Turning split view on and off
Admins have an account-wide setting that turns the split view layout on or off for all agents. You won't see this setting until your account has been approved for the EAP.
Turning on split view
Split view is not activated by default. You must have Admin Home turned on to use split view.
To turn on split view
-
In Admin Center, click
 Workspaces in the sidebar, then select Agent tools > Agent interface.
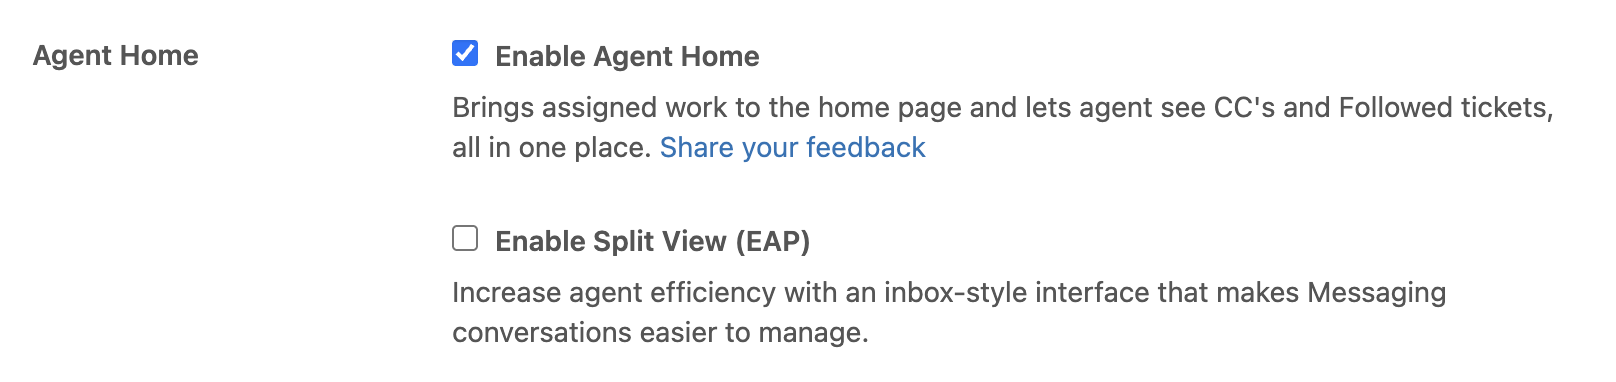
- Make sure Enable Agent Home is selected.
-
Select Enable split view (EAP).
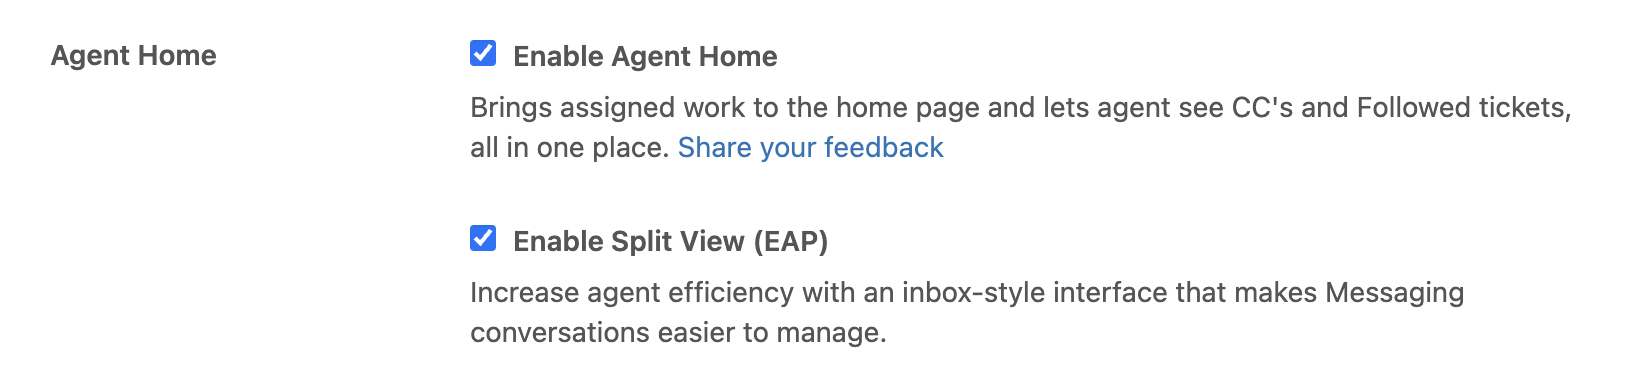
An EAP agreement for split view appears.
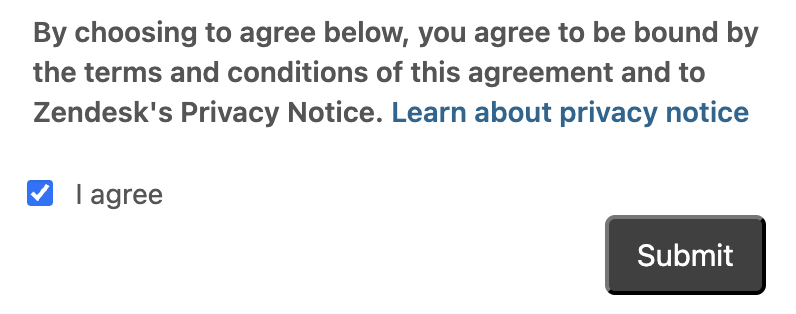
- Accept the EAP agreement and click Submit.
- Click Save.
Turning off split view
If you don’t want your agents to work in split view, you can turn it off for your account. You can turn off split view without turning off Agent Home.
To turn off split view
-
In Admin Center, click
Workspaces in the sidebar, then select Agent tools > Agent interface.
- Make sure Enable Agent Home is selected.
-
Deselect Enable split view (EAP).
-
Click Save.
Agent Home returns to its default layout.