

Placeholders are references to ticket and user data that you include in the subject and body of email notifications. Without them it would be impossible to create automated messages. When you specify placeholders, remember they are case sensitive. For the complete list of placeholders see Zendesk Support placeholders reference.
Support includes system ticket rules that suppress placeholders in triggers in certain situations. System ticket rules are predefined rules that you cannot change, modify, or override, which dictate the standard behavior of Support. These rules may sometimes make it seem like placeholders in triggers failed to work, but this isn’t a mistake. These rules protect you because they prevent spammers from using your account to distribute spam messages. See Understanding placeholder suppression rules.
Related articles:
Using placeholders in business rules
Placeholders can be used in some, but not all, business rule actions. When placeholders are supported, a View available placeholders button is visible beneath the field. Placeholders are formatted within matched double curly brackets. Usually they are used in notification messages and reference ticket properties. If a placeholder references a field that doesn't have a value, the placeholder is blank in the automation, trigger, or macro.
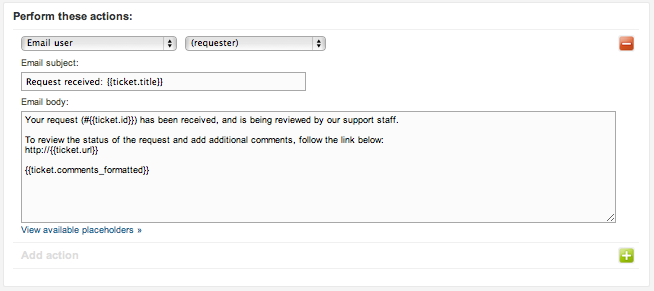
Here’s an example of how placeholders are used in an email notification:
For the complete list of placeholders, and where they can be used, see Zendesk Support placeholders reference. If you want more control on how placeholder data is selected and displayed, see Understanding Liquid markup.
Using placeholders in macros
When you apply a macro containing a placeholder to a ticket, the placeholder is evaluated according to what is currently true about the ticket. If the output of the evaluation returns any information, it is added as a ticket comment. For example, if a macro that returns the ticket ID is run on a ticket that has not been saved (and therefore has no ticket number yet), the ticket comments aren't updated. The macro is not re-evaluated when the ticket is saved. You could manually add the placeholder to the ticket using the placeholder {{ticket.id}}. This would allow it to be evaluated when you submit the ticket, and the value returned by the placeholder would be added to the ticket comments.
When using macros with problem and incident tickets, you often need use a backward slash (\) to escape the placeholder so that it populates the appropriate value within the related incident tickets. For example: Hello
\{{ticket.requester.first_name}}
Using placeholders for custom fields
Placeholders are generated automatically, based on the ticket and current user properties. These are referred to as system placeholders.
When you add custom fields for tickets, users, or organizations, they are also available as placeholders. You can use placeholders for your custom fields as you would any other system placeholder.
Every custom field has a unique ID or key. When you create a custom ticket field, the ID is automatically generated for you. When you create a custom user or custom org field, you enter a unique key that cannot be edited once it is set.
Custom fields are not included in the list of available placeholders, but they follow this simple naming pattern that references their unique ID or key.
| Ticket custom fields | {{ticket.ticket_field_<field ID number>}} |
| User custom fields | {{ticket.requester.custom_fields.<field_key>}} |
| Organization custom fields | {{ticket.organization.custom_fields.<field_key>}} |
For example, a custom ticket field like this has the following placeholder:
![]()
{{ticket.ticket_field_505156}}
The placeholder name for the options in a custom drop-down list follows a different pattern. There's only one placeholder for all three drop-down list options because this is a reference to the option that was selected. The ID is for the custom drop-down list because options do not have IDs. Again, this is a reference to the single option that was selected.
| Ticket custom drop-down fields
Ticket custom multi-select fields |
{{ticket.ticket_field_option_title_<field ID number>}}
{{ticket.ticket_field_<field ID number>}}
Note: The {{ticket.ticket_field_option_title_<field ID number>}} placeholder displays the text of the selected options while {{ticket.ticket_field_<field ID number>}} displays the tags associated with the selected options.
|
| User custom drop-down fields | {{ticket.requester.custom_fields.<field_key>.title}} |
| Organization custom drop-down fields | {{ticket.organization.custom_fields.<field_key>.title}} |
For example, the placeholder for a drop-down list for a custom ticket field would look like this:
{{ticket.ticket_field_option_title_515416}}
To find the ID for a custom ticket field
-
In Admin Center, click
 Objects and rules in the sidebar, then select Tickets > Fields.
Locate your field in the list. The ID is displayed in the Field ID column.

To find the key for a custom user field or a custom organization field
- Open the configuration for User fields or Organization fields.
- In Admin Center, click
 People in the sidebar, then select Configuration > User fields.
 - In Admin Center, click People in the sidebar, then select Configuration > Organization fields.
- In Admin Center, click
- Click the name of a custom field.
The field key appears in the properties panel on the right.

Using placeholders for a checkbox custom field
You can use placeholders in combination with Liquid markup to verify if a checkbox (custom field) has been selected on a ticket and provide customized output based on the checkbox status (checked, or not checked).
When you use Liquid markup if/else/case statements for checkbox custom ticket fields, remember that the checkbox field has a value of 0 or 1, not false or true. For example:
{% if ticket.ticket_field_<insert field_id here> contains 1 %}
checkbox is checked
{% else %}
checkbox is unchecked (or null)
{% endif %}