

By default, the address of your help center is a Zendesk subdomain, such as "mycompany" in mycompany.zendesk.com. However, you can map a subdomain of your own domain (such as support.mycompany.com) to your default Zendesk address. This feature is called host mapping (see About host mapping).
The workflow for changing the address consists of the following steps:
- Getting a domain name and subdomain (if you don't already have one)
- Making the subdomain an alias of your default address
- Specifying the new address
- Setting up a hosted SSL
After setting up a host-mapped, SSL-enabled domain, you can perform any of the following management tasks:
About host mapping
By default, the address of your help center is a Zendesk subdomain, such as "mycompany" in mycompany.zendesk.com. However, you can map a subdomain of your own domain (such as support.mycompany.com) to your default Zendesk address. This feature is called host mapping.
A host-mapped help center address looks as follows:

For example, suppose your company is called Mondo Cameras, and the address of your main website is mondocam.com. After the company signs up for Zendesk Support, the initial address of your help center might be something like mondocam.zendesk.com/hc. You can change the help center's address to a subdomain of your company's domain, such as support.mondocam.com/hc. You can't modify your support address to direct to a specific page within your subdomain, such as mondocam.com/community/hc.
Keep in mind that host mapping doesn't affect the URL of the agent interface. It only affects the external-facing URL of your help center. In the example, your agents will continue to see the default Zendesk URL mondocam.zendesk.com in the agent interface. If an agent tries to use the host-mapped URL in the agent interface (such as to get to a ticket page like support.mondocam.com/agent/tickets/52), the agent will be redirected to the default URL such as mondocam.zendesk.com/agent/tickets/52.
You can use host mapping for subdomains such as the "support" subdomain in support.mondocam.com. You cannot use host mapping for so-called "second level" domains, such as mondocam.com or mondocam.co.uk. In particular, you cannot use the name if it contains a DNS SOA (start of authority) record. To determine whether an SOA record exists, visit http://www.zoneedit.com/lookup.html. In the "DNS Lookup" box, enter the name and select the SOA record type. You can also use a command-line tool such as "dig" on Linux.
Getting a domain name and subdomain
If not already done, register a domain name and add a support-related subdomain to it. Consult your system administrator, if you have one, before proceeding.
Here are the steps:
- Purchase and register a domain name with a domain registrar.
For example, if your company is called Mondo Cameras, you might register a domain name called mondocam.com. You can purchase and register a domain name from any domain registrar, including GoDaddy, Yahoo! Domains, Namecheap, 1&1, Netregistry, or Register.com. For instructions, see the Help section on the registrar's website. For more information, see How to Register Your Own Domain Name by Christopher Heng on thesitewizard.com.
- After registering the domain name, use the registrar's tools to add a
support-related subdomain such as "support" or "help" or something along those
lines, for example, support.mondocam.com. You'll make the subdomain an alias of
your default Zendesk address in the next section.
See the Help section on the registrar's website for instructions on adding a subdomain.
Making the subdomain an alias of your default address
The next step is to make your subdomain an alias of your default Zendesk address. An alias is simply an alternate address for a website. For example, you can make the addresses "support.mondocam.com" and "mondocam.zendesk.com" interchangeable as far as web browsers are concerned.
To make your subdomain an alias of your default Zendesk address:
- Sign in to your domain registrar's control panel.
Use the login name and password that you created when you registered the domain name. If you don't have a domain name and a subdomain yet, see Getting a domain name and a subdomain.
- Look for the option to change DNS records.
The option might be called something such as DNS Management, Name Server Management, or Advanced Settings.
- Locate the CNAME records for your domain.
A CNAME record, or Canonical Name record, is a type of alias used by the Domain Name System (DNS). Among other things, you can use a CNAME record to make a subdomain an alias of an external website (see CNAME records on Wikipedia).
- Do one of the following:
- If you don't have a CNAME record for your subdomain yet, look for an option to add a new record.
- If you already have a CNAME record for your subdomain, look for an option to edit the record.
- Point the CNAME record from your subdomain (shown in the Host Record
field in the example below) to your Zendesk subdomain (shown in the Points
To field).

The UI and terminology may vary depending on your registrar, but the concepts are the same.
To configure a CNAME in the Cloudflare dashboard (only applies if you are using Cloudflare DNS)
- Log in to https://dash.cloudflare.com
- Choose the targeted website.
- Select DNS.
- Click Add record.
- From the Type dropdown menu, choose CNAME.
- In the Name field, enter the subdomain you want to configure (for example, <support> if you want to use support.mondocam.com).
- In the Target field, enter your Zendesk account or brand subdomain (for example, mondocam.zendesk.com).
- From the TTL dropdown menu, ensure it is set to Auto.
- Under Proxy status, ensure it is set to DNS only. If you need
to change it, click the icon beneath Proxy status.

Specifying the new address
After making your subdomain an alias of your default Zendesk address, you need to specify the new address in your instance of Zendesk Support. If you omit this step, your new address will point to a Zendesk error page.
The instructions in this section apply if you only have one brand. If you added multiple brands, specify your addresses in Admin Center > Account > Brand management > Brands instead of Admin Center > Account > Appearance > Branding. See Adding multiple brands.
- In Admin Center, click
 Account in the sidebar, then select Appearance > Branding.
 - Scroll down to Host Mapping and enter your subdomain and domain name.
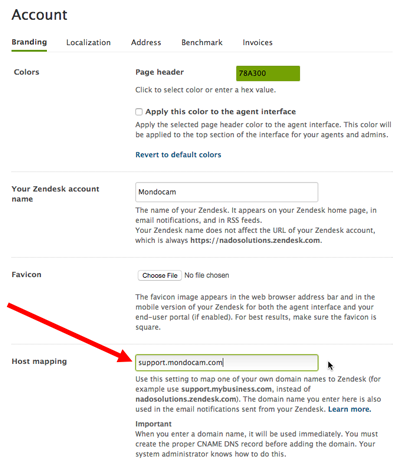
- Click Save Tab.
Setting up a hosted SSL
SSL (Secure Socket Layer) is an encryption protocol that ensures secure communications with your website. You must configure an SNI-based SSL certificate for a host-mapped domain using one of the two methods below:
- Use the free SNI-based SSL certificate from Zendesk (recommended)
- Use your own SNI-based certificate
- Your host mapping must be set up correctly before you start. Because of potentially long lead times, consider your SSL options early when setting up Zendesk Support.
- If you use a Certification Authority Authorization (CAA) record to restrict which certificate authorities can issue certificates containing your domain names, you must add your certificate service to this record. Otherwise, the certificate service may deny the SSL certificate.
- Only one SSL certificate can be uploaded and used for all brands.
- There's no expected downtime if you change from a Let's Encrypt certificate to your own or vice versa. As a best practice, you should make these types of changes during periods of low traffic to account for the occasionally unanticipated delays in replacing records of this kind.
Getting a Zendesk-provisioned SSL certificate
- The SSL certificate covers up to 100 host-mapped domains. If you have more than 100 host-mapped brands, you'll need to provide your own certificate.
- Zendesk automatically renews the SSL certificate before it expires.
- When you add, update, or delete a host-mapped domain, Zendesk removes your current certificate and replaces it with a new certificate that covers the new host-mapped routes.
To get a Zendesk-provisioned SSL certificate
- In Admin Center, click
Account in the sidebar, then select Security > More settings.
- Click the SSL tab at the top of the Security page.
- In Hosted SSL, click Enable Zendesk-provisioned SSL.
- Click Save.
It can take up to an hour to complete the request. If you have any issues, contact Zendesk Customer Support.
Providing your own SSL certificate
If you prefer not to use a Zendesk-provisioned SSL, you can get and upload your own SNI-based SSL certificate as described in this section. If you use your own certificate, Zendesk will not automatically renew it when it expires.
Getting your own SSL certificate
If you already have an SNI-based certificate for your host-mapped address, skip to Uploading the certificate below.
You can purchase an SSL certificate from a certificate authority such as DigiCert or Symantec, or from resellers such as Namecheap. You need to give the certificate authority a certificate signing request file (CSR) to create the certificate. You can generate the CSR, as described below.
If you have multiple host-mapped brands, you only need one certificate for all of them -- you don't need an SSL certificate for each brand. However, if you add a host-mapped brand, you must replace your existing certificate with a new one. Generate the new certificate as described in the procedure below. For more information on host-mapped brands, see Generating an SSL certificate for host-mapped brands.
To get your own SSL certificate
- In Admin Center, click
Account in the sidebar, then select Security > More settings.
- Click the SSL tab at the top of the Security page.
- In the Hosted SSL section of the page, click I do not have a
certificate, and then Generate a request. A certificate
signing request file (CSR) is created and downloaded to your computer.

- Provide the CSR file to the certificate authority.
The certificate authority generates an SSL certificate and gives it to you so that it can be installed on our servers.
Certificate authorities charge a fee for each request, so keep the following tips in mind:
- Before you buy, make sure your certificate authority supports SHA-2 encryption and that the CSR file generated uses SHA-2 encryption.
- Make sure the certificate supports Server Name Indication (SNI) technology.
- If prompted, specify "Nginx," "Apache," or "Apache + mod_ssl" as the desired web server.
- After the certificate authority generates the certificate file, save it so you don't have to make another request.
Note: We strongly discourage using wildcard certificates. If your certificate is compromised anywhere on any of the services you use, the information on all your services is at risk. It means you will also have to replace the certificate everywhere it's used.
Once you have an SSL certificate, the next step is to upload it as described below.
Uploading the certificate
After purchasing the SSL certificate, the certificate authority will send you an email or direct you to a page where you can download the certificate. The instructions are often unclear about what files you really need or if you should prepare them before uploading them. For guidance, see Preparing your SSL certificate for upload to Zendesk.
After obtaining or preparing the SSL certificate as a PEM file as described above, upload it to our servers as follows.
- In Admin Center, click
Account in the sidebar, then select Security > More settings.
- Click the SSL tab at the top of the Security page.
- In the Hosted SSL section of the page, click I have a
certificate, then Upload certificate.

- Navigate to the PEM file and select it.
- If you have a private key associated with the certificate, click Upload private key and enter your passphrase, if any. You don't need a key if you generated the CSR file in Zendesk Support (see Getting a key file for upload).
- Click Save.
The certificate will be installed on our servers.
Updating the CNAME record
For either SSL option – you provide your own SSL certificate, or you use a Zendesk-provisioned SSL – Zendesk requires that the DNS record be a CNAME record that points to yoursubdomain.zendesk.com. DNS "A" records are not supported (see Making the subdomain an alias of your default Zendesk address above).
Reviewing the SSL status of a certificate
You can review the SSL status (CNAME check) of your host-mapped, SSL-enabled brands in the Zendesk Support interface.
- In Admin Center, click
Account in the sidebar, then select Security > More settings.
- Click the SSL tab at the top of the Security page.
The SSL page displays information about your certificates:
 Note: This view of the SSL page is only displayed if you have a host-mapped, SSL-enabled domain.
 - Refresh the page to run the SSL status check again.
Replacing a certificate
You can replace a certificate installed on Zendesk Support.
Zendesk will notify you when the certificate you provided is about to expire. If it expires before you can replace it, Zendesk will automatically replace it with a free, SNI-based SSL certificate from Let's Encrypt, a third-party certificate service (see Getting a Zendesk-provisioned SSL certificate). You can keep the certificate or replace it with your own.
- In Admin Center, click
Account in the sidebar, then select Security > More settings.
- Click the SSL tab at the top of the Security page.
- Click I already have a certificate and follow the steps in Uploading the
certificate above.
 Note: This view of the SSL page only displays if you have a host-mapped, SSL-enabled domain.
 - If you don't have a replacement certificate yet, click I do not have a certificate and follow the steps in Getting a SSL certificate, above.
Extending HTTP Strict Transport Security (HSTS) to one year
HTTP Strict Transport Security (HSTS) is enabled by default for host-mapped, SSL-enabled domains in Zendesk Support. HSTS instructs the user's browser to access your host-mapped domain only over SSL.
When a user types "http://shop.example.com" or just "shop.example.com" to access an SSL-enabled site that doesn't have HSTS, the user's browser briefly accesses the non-encrypted version of the site before being redirected to the encrypted HTTPS version. The redirect makes the user vulnerable to a man-in-the-middle attack, where a hacker could exploit the redirect to redirect the user to a malicious site.
When HSTS is enabled, the site instructs the user's browser never to load the site using HTTP. The browser automatically converts all such attempts to HTTPS requests, skipping the redirect that hackers can exploit for man-in-the-middle attacks. As long as the user accessed the site once using HTTPS, the user's browser will know to only use HTTPS when accessing it.
The browser remembers the site only for a specified period. By default, for Zendesk SSL-enabled domains, the period is one day. You can increase the period to one year.
To extend the period that the browser remembers your site to one year
- In Admin Center, click
Account in the sidebar, then select Security > More settings.
- Click the SSL tab at the top of the Security page.
- Choose HSTS to instruct browsers to remember the site for up to one year.
- Click Save.