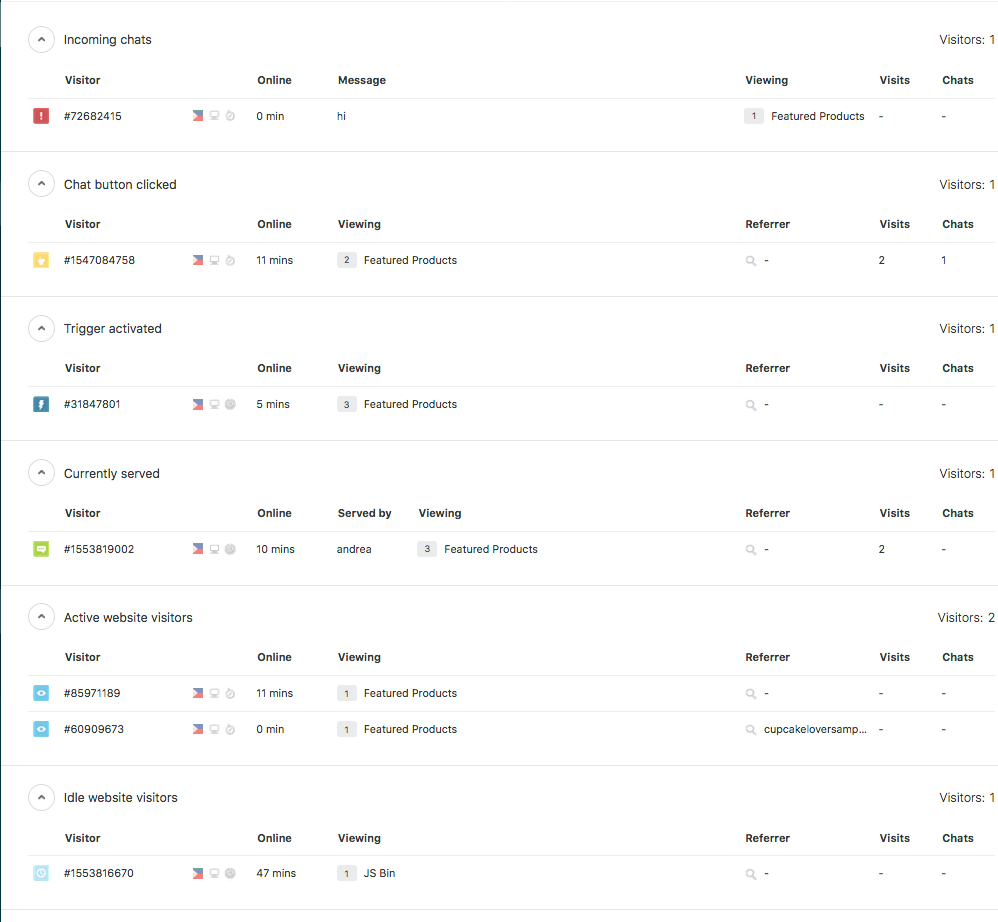
With the Visitors activity, you can see a real-time list of all the visitors currently on your website. It helps summarize all visitor information at a glance, including information about their browser, operating system, location, pages visited, and referral page. This visitor information is only available for websites with the widget embedded. You cannot view a visitor's path on websites that do not have your widget added.
This article contains the following sections:
Monitoring your website visitors
The Visitors activity gives you a birds-eye view of all the visitors on your website. You can view the Visitors activity in the following ways:
- List view, which shows visitors in a list that is divided into categories.
- Visual view, which shows visitors in a heat-map style display.
| List view | Visual view |
|---|---|
 |
 |
Each visitor is placed into a category, represented by an icon (for the List view) or a color-coded dot (for the Visual view). The table below shows the icons, and the category each represents:
| List icon/Visual color | Category name | Category description |
|---|---|---|

|
Incoming chats | Visitors who have clicked the chat button and asked a question.Note: This only includes visitors that are in a currently signed-in agent's department. See Creating agents and departments. |

|
Assigned | Visitors whose chats have been assigned to an agent. |

|
Chat button clicked | Visitors who have clicked the chat button but have yet to start a chat. |

|
Trigger activated | Visitors who have activated a trigger. Note: if a visitor is already in the Incoming chats category, activating a trigger will not put them in the Trigger activated category. The Incoming chats category takes precedence. |

|
Currently served | Visitors who are being currently served by other agents or yourself. |

|
Active website visitors | Visitors who are moving around the website and clicking on links. |

|
Idle website visitors | Visitors who are currently on the site, but not interacting with it. |
 |
Offline visitors (Visual view only) | Visitors who have recently signed off. Reload the view to remove from the visual. |
In the List view, Each category includes a combination of the following columns, containing information about the visitor:
- Visitor: The visitor's ID.
- Online: How long the visitor has been on the website.
- Message: The most recent message left by the visitor in a chat.
- Viewing: The number of pages with the widget script the customer has visited during this session.
- Visits: How many times the visitor has been on the website in the past year.
- Chats: How many times the visitor has initiated a chat.
- Referrer: URL where the visitor's current session originated.
- Served by: Chat agent currently serving the visitor.
Grouping visitors
This is the primary view of the Visitor List, but you can also monitor them in a number of different ways:

- Activity: This is the default page and breaks down visitors based on the actions they have taken on your website.
- Page Title: Groups visitors based on the page they are on.
- Page URL: Groups visitors based on the URL/link they are on. This is normally different from the Page Title.
- Country: Groups visitors based on the country they are from. The visitor's IP address tells us which country they are from.
- Serving Agent: Groups visitors based on the agent who is serving them.
- Department: Groups visitors based on department.
- Browser: Groups visitors based on the browser they are using to access your website.
- Search Engine: If the visitors arrived at your website through a search engine (e.g. Google), they will be grouped under this category.
- Search Term: If the visitors typed in a search term to get to your website, they will be grouped in this section based on the term they used.
Using the High-Load Dashboard
If you experience higher traffic (5000 or more concurrent visitors), you can switch to the High Load Dashboard.
Unlike the standard Visitor List, the High Load Dashboard only shows Incoming and Currently Served chats.
The High Load Dashboard is available to all customers on paid plans.
To enable the High Load Dashboard
- From the dashboard, go to Settings > Account > Visitor List tab.
- Select the High Load Dashboardcheck box.

- Click Save Changes.
- Return to the dashboard and verify that only Incoming and Currently served chats appear.