Summary: ◀▼
You can create and link Jira issues directly from support tickets to track product team progress on bugs or feature requests. The integration lets you view issue details, add comments from either platform, and notify watchers of updates. Customize views, add labels, and search Jira issues to prioritize work. Comment sharing helps keep agents and developers informed across both systems.
The Jira integration encourages collaboration between product teams and the support team. For example, after a customer reports a bug in a ticket, the agent can file a bug in Jira directly from your Zendesk. After fixing the bug, a developer can add a comment to the ticket directly from Jira.
This article covers the following topics:
- Using the integration in Zendesk Support
- Using the integration in Jira
- Commenting and comment sharing
Related articles:
Using the integration in Zendesk Support
As an agent, you can create a new Jira issue from a ticket, or link to an existing Jira issue from a ticket. You can then use the link to track the progress made by the product team on addressing the issue. For example, within Zendesk Support you can view details about a bug you filed in Jira to see if the engineering team fixed it.
A single Jira issue can be linked to up to 200 Zendesk Support tickets.
Topics covered in this section:
You can also automatically notify an agent or a customer when somebody changes the status of an issue in Jira. See Updating a ticket when the status of a Jira issue changes.
Creating a Jira issue from a ticket
You can create a Jira issue from a ticket in Support, for example, when the ticket is a feature request or a bug report from a customer.
To create a Jira issue from a ticket
- In Zendesk Support, go to the ticket you want to use as a basis for a new Jira issue.
- Click Create Issue in the Jira app next to the ticket.

Note: If the Jira app is not displayed on the right side of the agent interface, click Apps.
- Click the Project drop-down options to display available Jira projects. If you
start typing the name of the Jira project for the issue, the list of suggested projects
is filtered to match.

- Enter the details about the issue.
-
If you’ve selected the option to transfer information from your ticket, this information is already entered.
- You can click Copy fields from this ticket (see below) to populate the
fields, then select the Always copy checkbox to make this the default
behavior.
Note that Copy fields from this ticket only copies the subject and most recent comment. It does not copy any additional custom fields.
- Select the reporter for the issue. By default, the reporter is set to the last reporter that was selected when an issue was created in this browser. If the assignee or reporter you're looking for doesn't appear in the suggested user list, enter the exact Jira username.
The default fields are displayed in the image below. Administrators can add additional fields to this form. For information, see Adding fields to the Jira app in Zendesk Support.

-
- (Optional) Click Add reporter as a watcher to include the reporter as a watcher to the newly-created issue. See Commenting and comment sharing for more information.
- Click Create issue.
A new issue is created in Jira and the ticket is linked to it. In Zendesk Support, the Jira app in the sidebar displays the Jira issue name, summary, and description.
For more information, see Customizing the summary and details views.
Creating a link to an existing Jira issue from a ticket
If you know that an issue is tracked in Jira and you receive a support request that's related to it, you can link the ticket to the issue. You can also link the same ticket to other issues in Jira.
You can keep track of the number of tickets linked to Jira issues, and use that metadata to prioritize your work. See Jira: Linked tickets reporting for more information.
To link to an existing Jira issue
- In Zendesk, go to the ticket you'd like to link to a Jira issue.
The ticket must be an existing ticket. If you are creating a new ticket, you'll need to save it first.
- Click Link Issue in the Jira panel.

Note: If the Jira app is not displayed on the right side of the agent interface, click Apps.
- Enter your issue key (XXX-000) or paste a link to the issue.

If you do not know your issue key, you can search Jira issues.
- Click Link issue.
The ticket is linked to the existing issue in Jira. In Zendesk Support, the Jira app in the sidebar displays the Jira issue name, summary, description, and comments.
Tracking a Jira issue from a ticket
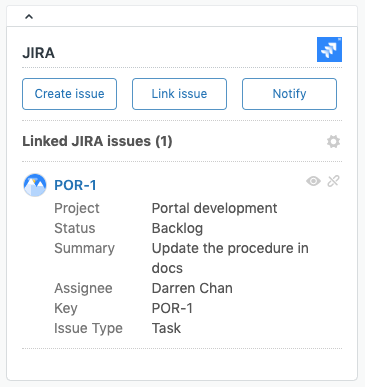
The Jira app in the sidebar displays a summary of any issue linked to the ticket, as well as any comments associated with it:
Click the Show More Details (eye) icon next to the issue name to view more details about the issue:

The details view opens in a new window:

You can customize the information displayed in both the summary and details views. See Customizing the summary and details views below.
If you're a Jira user too, you can open the issue in Jira by clicking the issue name in the summary view. A new browser tab opens and displays the issue.
Customizing the summary and details views
You can customize the information that's displayed in both the summary and details views. For details about the views, see Tracking a Jira issue from a ticket above.
To customize the summary and details views
- Click the Admin icon in the upper-right side of the Jira app next to the
ticket.

- Select the information you want to display in the summary and details views.
You can add pre-existing or custom Jira fields to these views. See Jira custom field type compatibility for a list of custom Jira fields that are compatible with the Jira app.

- Click Close to save your choices.
Adding a label to a Jira issue from a ticket
When creating or linking to a Jira issue from a ticket, a jira_escalated tag is added by default to the ticket, and an identical jira_escalated label is added to the issue in Jira. You can add more labels to a linked issue in Jira at any time. Any ticket tag with a jira_ prefix is added as a matching label to any Jira issue linked to the ticket.
If the escalating agent has a custom agent role in the Enterprise plan, the role must allow the agent to edit tags. See Creating custom roles and assigning agents.
To add a label to a Jira issue
- Add a tag with a jira_ prefix in the Tags field in the ticket's left
sidebar:

- Update the ticket by clicking Submit.
The new label appears in the Details section of the issue in Jira when the issue is accessed through a browser, and the Zendesk app is expanded. The label shows as being added by the Jira user who opened the issue in the browser.

Unlinking a Jira issue from a ticket
- Click the Unlink (x) icon in the Jira app next to the ticket.

Searching Jira issues
When linking a ticket to a Jira issue, you can search for Jira issues by keyword, or using the Jira Query Language (JQL). Starting your search with the project name in capital letters will limit the results to that project.
To search Jira issues by keyword
- In the Link Issue search field, enter your search terms. You can limit
results to a specific project by starting the search with the project name in capital
letters, or you can use JQL.

- As you're typing, ticket suggestions are made. You can select a suggested ticket, or continue typing to narrow down the results.
Using the integration in Jira
As a Jira user, you can view details about tickets linked to your issues, and add comments to linked tickets. You can also automatically notify an agent or a customer when you change the status of an issue in Jira. See Updating a ticket when the status of a Jira issue changes.
This section describes how to view the details of a linked Support ticket in your Jira issue. For information on adding comments to linked tickets, see Commenting and comment sharing below.
To view the details of a linked Zendesk Support ticket
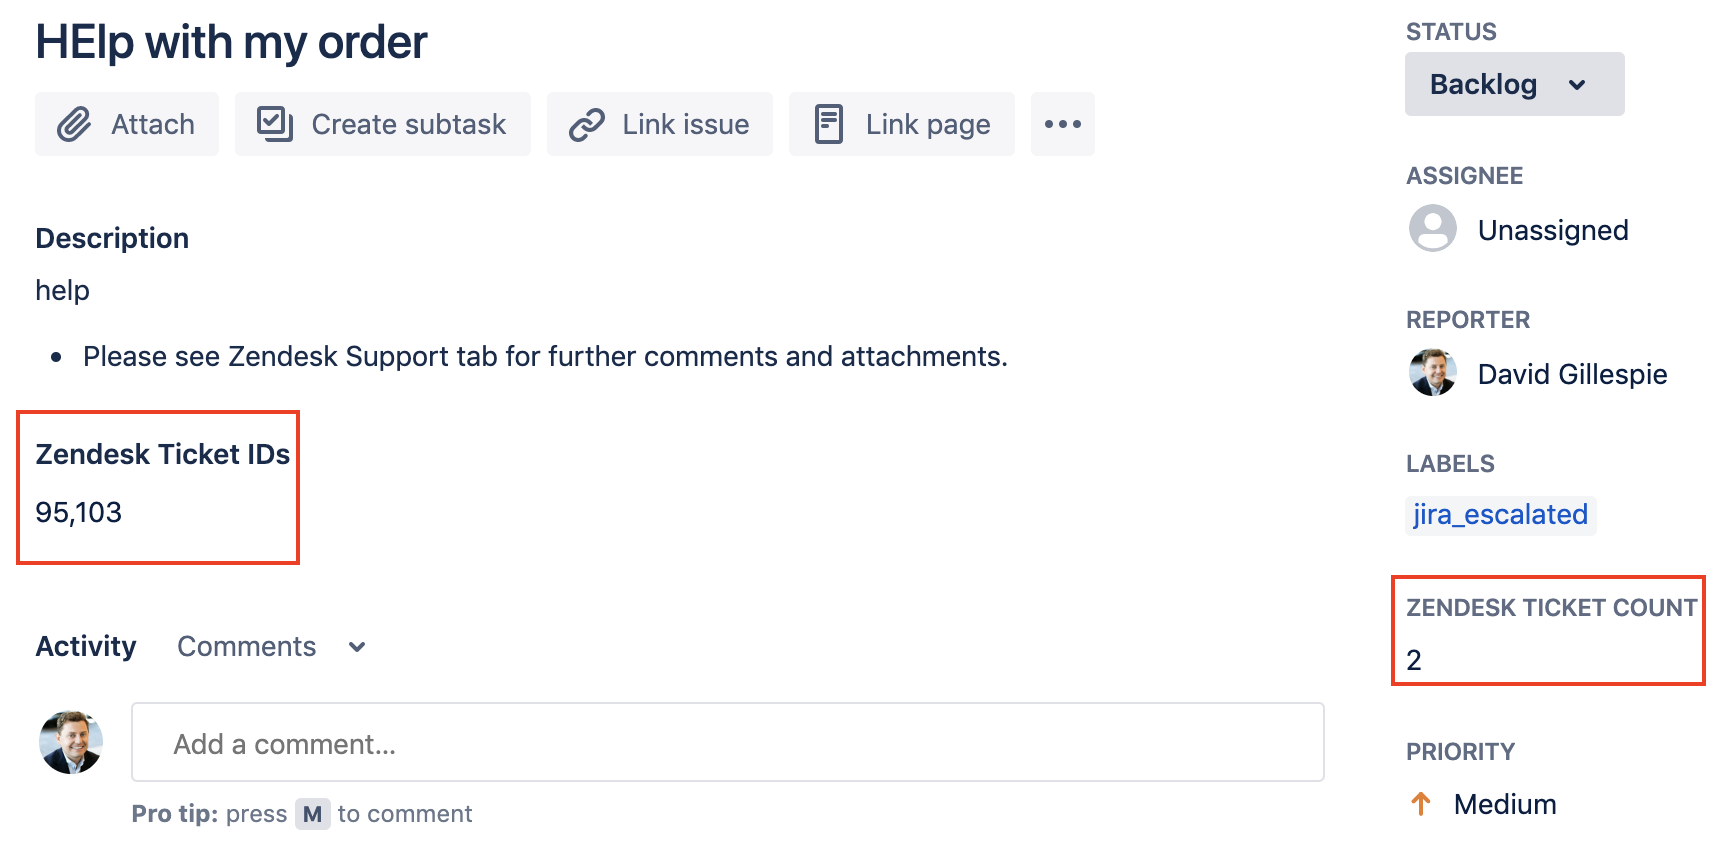
- Navigate to the issue in Jira. In the sidebar under Zendesk Support, the number
of linked tickets is displayed.
- Double-click on Linked Tickets to open the linked tickets page.
- If more than one ticket is linked to the issue, click the accordion to expand the
ticket details.

- To view the ticket in Support, click the linked ticket heading.
Commenting and comment sharing
When you link Zendesk Support tickets and Jira issues, you can also share some commenting functionality between the two platforms.
While the commenting functionality doesn't fully integrate the commenting systems in Zendesk Support and Jira, it does allow you to perform the following tasks, which are described in this section:
-
Adding a comment to linked Zendesk Support tickets from a Jira issue
-
Notifying Jira issue watchers when there are new comments on linked Zendesk tickets
-
Adding the reporter as a watcher when creating a new Jira issue
-
Adding the current agent as a watcher when linking Jira issues
-
Displaying when the most recent comment was added to either account
However, you cannot perform some expected comment-related tasks, such as:
- Automatically notify Zendesk collaborators when there are new comments on linked Jira issue, unless they are also watching the Jira issue.
- Mark a comment as having been read by another user.
Adding a comment to a Jira issue from a ticket
If a Support ticket is linked to a Jira issue, you can add comments to the Jira issue from the ticket. This is useful for providing additional information from customers to the product team.
Both public and private comments added to a Support ticket are shared with any connected Jira issues.
To add a comment to a Jira issue
- Click the Notify button in the Jira app next to the ticket.
- Enter the comment you want to add to the issue in Jira.

- To save typing, you can transfer the last comment made on the ticket by clicking Copy the last comment.
- Any attachments in ticket comments are shown under Attachments. Click on the attachment to add it to the note.
- Click Notify issues. The note is added to the Activity section in the Jira issue.
- In the Show drop-down list, select Comments to view the comment.
Adding a comment to linked Zendesk Support tickets from a Jira issue
You can notify a Zendesk agent or a customer when you add a comment to the linked Jira issue.
When you add a comment to a Jira issue, it adds that comment to the linked Support ticket. When the comment is added to the Zendesk ticket, an email containing your comment is sent to the agent and any other agent who is copied on the Support ticket. If the comment is public, an email is also sent to the customer who submitted the ticket and any other end user who is copied on the ticket. Be mindful that a customer will read your message when you add a public comment. If in doubt, leave the comment private.
You can comment on a single linked ticket, or all linked tickets if you have multiple tickets linked to an issue. Commenting on all linked tickets can be performed in the sidebar or the Activity section of a Jira issue.
To add a comment to a linked ticket
- Navigate to the Jira issue, and in the Activity drop-down list,
select Zendesk Support.

- In the Ticket drop-down list, select the Support ticket.

- Enter your comment. Select the Make public reply checkbox to make a public comment.
- Click Add comment.
To add a comment to all linked tickets in the Activity section
- Navigate to the linked issue in Jira, and in the Activity drop-down list, select Zendesk Support.
- Enter your comment, select the Add for all tickets checkbox, and click Save.
To add a comment to all linked tickets in the sidebar
- In the sidebar under Zendesk Support, double-click on Linked Tickets. The linked ticket page opens.
- Click Add comments to linked tickets, which opens a page.
- Enter your comment and click Send.

To make all comments private
- In the Jira top nav bar, select More >Apps > Manage your apps.
- Click the Zendesk Support for Jira accordion, then click Configure.
- In the Settings > Other options section, select the Disable all public comments to Zendesk checkbox.
- Click Save.
Notifying Jira issue watchers when there are new comments on linked Zendesk tickets
Users watching a Jira issue with linked Zendesk tickets can receive a notification email from Jira when public comments are added to linked tickets.

To enable comment notifications
- In the Jira top navigation bar, select More > Apps > Manage your apps.
- Click the Zendesk Support for Jira accordion, then click Configure.
- In the Settings > Other options section, select the Send email notification to issue watchers when comments are added to linked tickets checkbox.
- Click Save.
Adding the reporter as a watcher when creating a new Jira issue
When creating a new Jira issue from a Support ticket, or when linking a ticket to an existing issue, you can add the reporter as a watcher to the newly-created issue.
Jira also allows you to watch an issue. When you watch an issue, you receive email notifications when certain updates are made. Depending on how your issue notifications are configured, you may receive an email when:
-
The story has been updated (such as the description)
-
The status changes (assigned, closed)
-
A comment is submitted
To add a reporter as a watcher
- When creating a Jira issue from a Zendesk Support ticket, select the Add
reporter as a watcher checkbox.

Adding the current agent as a watcher when linking Jira issues
When linking an existing issue to a ticket in Support, the current user is added as a watcher to that issue in Jira. Note that for this to be successful, the Jira user profile must contain the Zendesk agent's email or full name.
Displaying when the most recent comment was added
In the Zendesk Support panel in Jira, you can display how much time has elapsed since the last comment was added to the ticket in Zendesk.
To enable the last comment added display
- In the Jira top nav bar, select More > Apps > Manage your apps.
- Click the Zendesk Support for Jira accordion, then click Configure.
- In the Settings > Zendesk Support ticket fields section, select the Last Commented checkbox
- Click Save.