

The help center offers the option for end users to submit requests by default. End users who submit requests can also manage their support requests in the customer portal.
The help center may not offer the option to submit support requests depending on how it's set up. This article describes the default options for submitting and tracking requests in the customer portal without any customization.
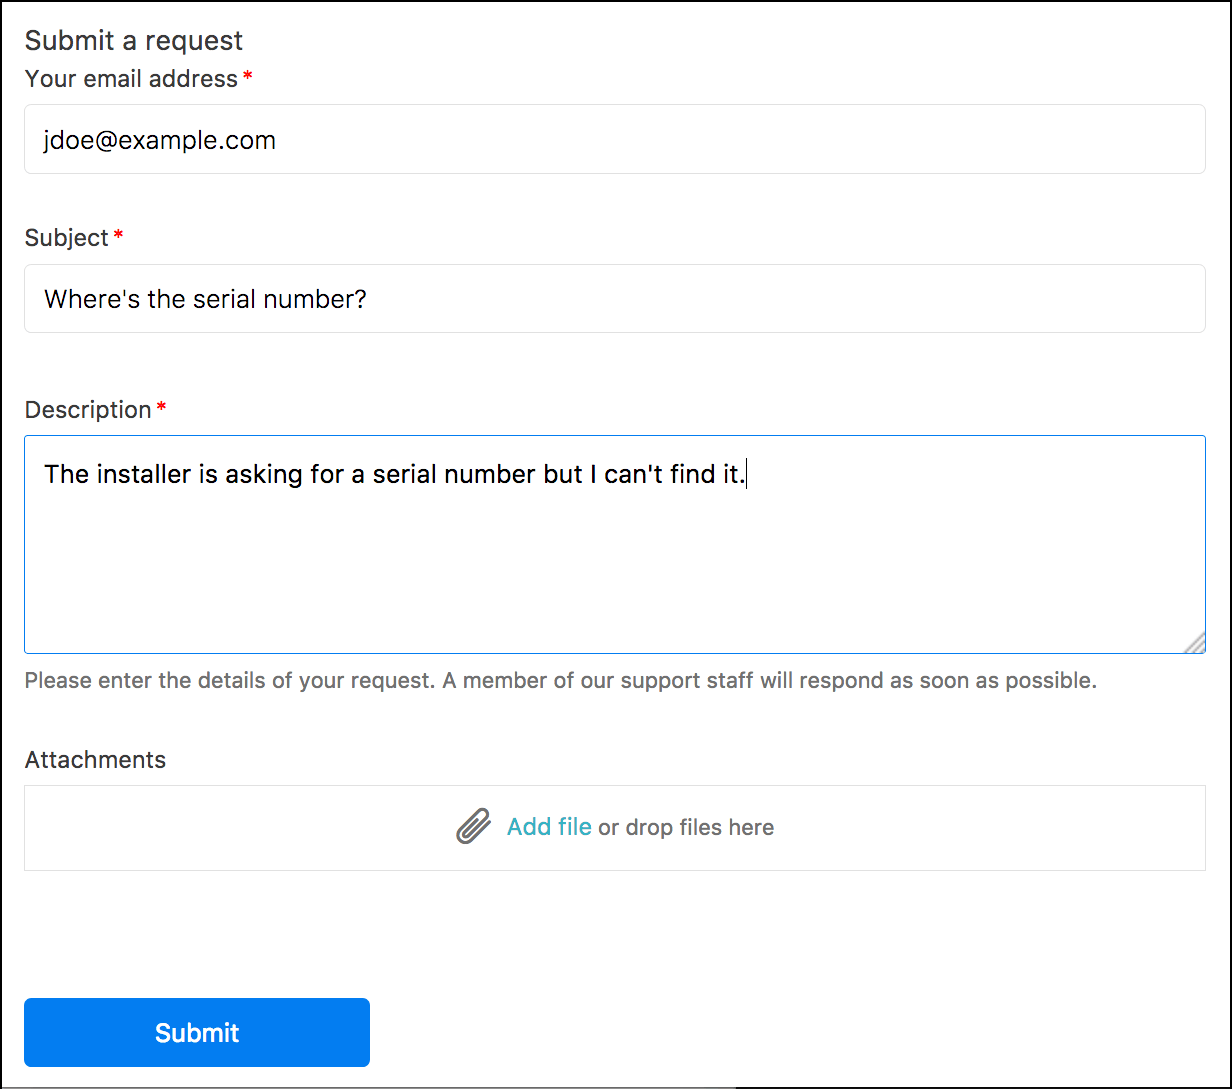
Submitting a support request
End users can submit requests using the support request form (or web form) on your help center. Depending on how your help center is set up, users may or may not be required to sign in to submit support requests in your help center.
The support request form may contain more fields than those described in this section. It depends on how the help center is set up. You can't remove any of the default fields on the submit request form; however, you can set up single sign-on (SSO), so users will automatically be signed-in to your help center and will not have to enter their email in the form. See Single sign-on options in Zendesk for more information on SSO.
To submit a support request in the help center
- In the help center, click Submit a request at the top of the page.
- If the CC option is enabled for the help center and you are signed in, you can add an email address to copy a user on the ticket.
To copy multiple users, use a comma to separate each email address.
- Enter a subject and description of the problem.
As you enter a subject, a list of suggested articles in the knowledge base appears. You can click one of the articles instead of submitting the request. Encouraging end users to look for answers in the knowledge base can deflect tickets.
- If you belong to multiple organizations, select the organization for this support request.
- Add any attachments.
The file size limits are 7 MB for Team plans and 20 MB for all other plans.
- Click Submit.
Updating a support request by email
End users can update an existing support request ticket with a comment by email.
Your email must reference an existing ticket ID, using the proper syntax, in plain text. You must have permission to update the ticket, either as the ticket requester, a CC on the ticket, or a member of a shared organization for the ticket.
- In your email client, create a new email message or forward an existing email.
The email is sent to the support team. The subject can be anything you want.
- At the top of body of the email, enter the ticket ID for an existing support request using the following syntax:
#id ticketnumberFor example:
#id 123456 - Leave one blank line after the ticket ID.
- Enter the comment you want to add to the ticket after the blank line.
Your email should look something like this:

- Send the email.
Updating a support request in Requests with a comment, CC, or organization
You can update any existing support request that is not closed with a comment.
You can also add CCs (if enabled in the help center) to an existing support request. If you belong to multiple organizations, you can also change the organization for a support request when you view it in the help center.
To update an existing support request
- Click your profile icon on the upper-right side of any help center page and then click Requests.
By default, the page displays all requests that you have submitted. Note: If you are using an older verison of the Copenhagen theme, this menu may look different.
 - Click the link for the request you want to update.
- Add a comment to update the request.
- (Optional) If the CC option is enabled for the help center and you are signed in, you can add an email address to copy a user on the ticket
When you add a CC to an existing ticket, you must also add a comment.
- (Optional) If you belong to multiple organizations, you can change the organization for the support request.
- Click Submit.
Tracking your support requests
You can use the help center to track your support requests.
If you belong to multiple organizations you can also change the organization for a support request when you view it in the help center.
To track your support requests
- Click your profile icon on the upper-right side of any help center page and then click Requests.
By default, the page displays all requests that you have submitted.
- To filter your requests by status, select a request status from the Status menu.
See What are the customer portal ticket statuses? to understand the statuses that appear.
- To search your requests, enter a search term in the Search Requests box.
You can optionally use ticket property keywords in your search.
- To see details about a request, click the request title.
If you belong to multiple organizations, you can change the organization for a support request when you view details for that request.
Tracking your organization's support requests
As an end user, you can be a member of one organization or multiple organizations. If you're a member of a shared organization, you can see tickets for all members of that organization.
To track your organization's support requests
- Click your profile icon on the upper-right side of any page and then click Requests.
- Click the Organization Requests link on the page to see all the requests in your organizations.

The link appears only if you're a member of a shared organization.
- To see details about a request, click the request title.
You can add comments to a request if an administrator has set it up. See Setting up a shared organization for end users.
- Click your profile icon on the upper-right side of any page and then click Requests.
- Click the Organization Requests link on the page to see all the requests in your organizations.
The link appears only if you're a member of a shared organization in Zendesk.
- Click Follow.
 Note: If the Follow button is not available, you may need to ask your administrator to add it to your help center theme (see Add Follow/Unfollow for users in a shared organization).
You will now receive notifications for new and updated request in your shared organization.
Marking a request as solved
You can withdraw a request by marking it as solved. The request must be assigned to an agent before you can mark it as solved.
To mark a request as solved
- Click your profile icon in the upper-right side of any page and then click Requests.
- Click the title of an open request to open it.
- Select the option on the lower side of the request to mark it as solved.
The request must be assigned to an agent. Otherwise, you do not have the option to mark it as solved.
- Enter any comment you want in the reply and click Add Reply.
Creating a follow-up to a solved request
You can reopen a solved request by creating a follow-up ticket.
To create a follow-up to a solved request
- Click your profile icon in the upper-right side of any page and then click Requests.
- Click All my requests in the sidebar.
- Click the title of a solved request to open it.
Tip: If you have a long list of requests, you can filter the view by selecting Solved from the Status menu.
- Click the link on the lower side of the request to create a follow-up request.
- Complete the follow-up request and click Submit.