Summary: ◀▼
You can control agent and end-user access to custom object records by setting role-based permissions and applying access rules. Permissions cover viewing, editing, adding, and deleting records, with options for full or limited access. Access rules refine these permissions further, including restrictions by brand or user association. Admins manage these settings to ensure appropriate visibility and interaction with custom objects across roles and plans.
When creating custom objects, you also need to understand how agents and end users (also called customers) can access the object and its records. On Enterprise plans, this is defined on the Roles page in Admin Center. On all other plans, access is pre-defined for each system role except customer.
- About object permissions
- Configuring object list and search permissions for agents
- Reviewing system role permissions for agents
- Defining Enterprise custom role permissions for agents
- Defining end-user permissions for custom objects
- Using access rules to refine role-based permissions for custom object records
- Viewing a custom object's permissions
Related article: Refining custom object permissions with access rules
About object permissions
- Role-based permissions to view, create, edit, and delete an object's records.
- Object-specific access rules further restrict user access to an object's records in addition to the role-based permissions.
- Visibility of an object's records to agents on the Custom object records page in Support.
- Object permissions determine access to that object's records.
- Object permissions are enforced in lookup relationship fields in the Agent Workspace. Lookup relationship fields will appear blank to agents without permission to view the target custom object.
- Object permissions aren't checked or enforced by placeholders. Agents with permissions to manage macros and triggers may inadvertently access information about custom objects this way.
- Object permissions aren't captured in reporting.
- Use caution if your custom object records contain sensitive data and you make them visible to end users. Filtering can help limit visibility of a custom object's records when accessed through the user interface, but filters don't apply to the Custom Objects API. Instead, you can use access rules to restrict access to a custom object's records in both the user interface and API.
Configuring object list and search permissions for agents
In addition to defining role-based access to a custom object's records, you can also control the visibility of individual custom objects and their records to agents within the Custom object records page in the Agent Workspace. The object list and search permission doesn't affect the accessibility of the custom object records within lookup relationship fields; rather, it only determines the content within the Custom object records page. The default value is All agents and admins.
- In Admin Center, click
 Objects and rules in the sidebar, then select Custom objects >
Objects.
Objects and rules in the sidebar, then select Custom objects >
Objects. - Click the name of the custom object for which you want to view the permissions, then click the Permissions tab.
- Under Object list and search, select either All agents and
admins or Only admins.

- Click Save.
Reviewing system role permissions for agents
| View | Edit | Add | Delete | |
|---|---|---|---|---|
| Admin | Yes | Yes | Yes | Yes |
| Agent | Yes | Yes | Yes | Yes |
| Light Agent | Yes | No | No | No |
| Contributor | Yes | No | No | No |
Defining Enterprise custom role permissions for agents
On Enterprise plans, access to each custom object is managed like any other custom role-based permissions. However, the permissions can be managed directly from the object as well as on the Roles page. When a new custom object is created, agents don't have access to it until permissions are added by an admin or agent in a custom role with permission to manage roles.
Custom object permissions are predefined for system roles and can't be changed.
Configuring custom role permissions for a single custom object
For the most granular control over agent access to a custom object's records, use the Objects page in Admin Center to edit the object's permissions directly. From this page, you can grant full or limited access using access rules.
- In Admin Center, click
Objects and rules in the sidebar, then select Custom objects >
Objects.
- Click the name of the custom object for which you want to view the permissions, then click the Permissions tab.
- Click the name of the custom role you want to grant access to your objects.
- In the panel on the right, select the permissions you want the role to
have for the custom object you're editing. For each type of
permission—View, Edit, Add, and Delete—you can select Full
access, Limited access, or No access.
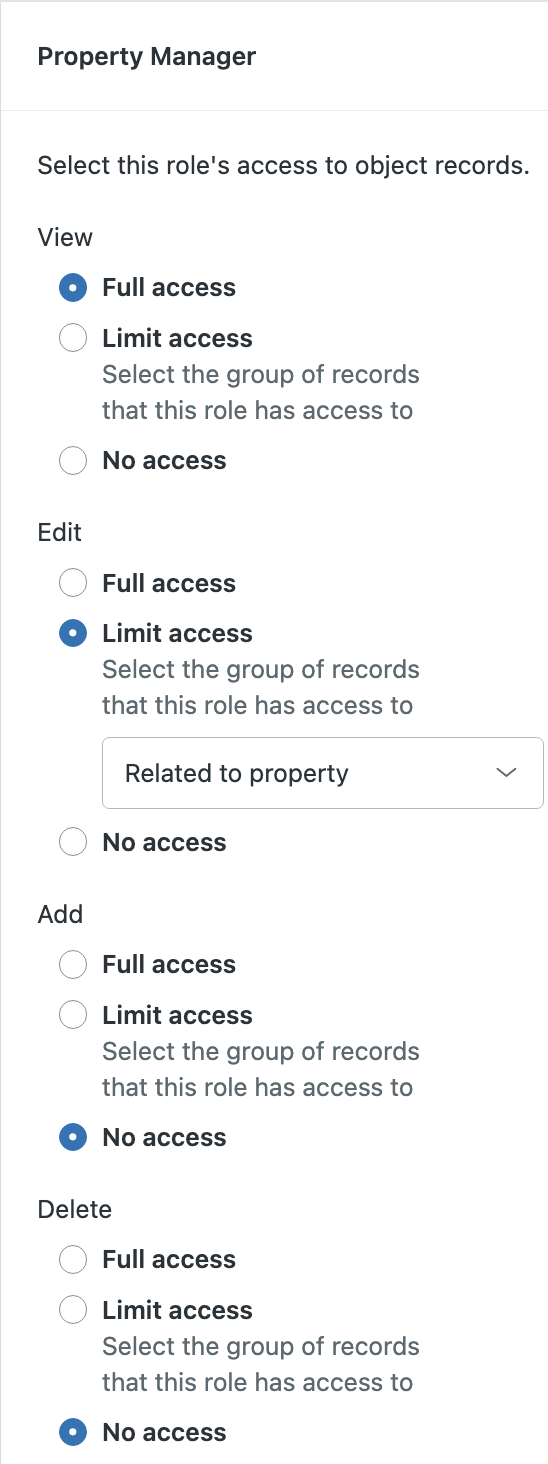
- If you select Limited access, use the drop-down field to select
an access rule.Note: Users must be able to view all records they have permission to add and modify. Be mindful of this if configuring different access rules for a role's view permission than the role's add, edit, or delete permissions.
- Click Save.
Configuring custom role permissions for all custom objects
To quickly grant custom roles access to the custom objects in your account, you can use the Roles page to edit each role. With this approach, any permission you select for an object is full access to all of that object's records.
-
In Admin Center, click
 People in the sidebar, then select Team > Roles.
Alternatively, from within a custom object's Permission tab, you can click Manage roles to open the Roles page.
- Click the name of the role for which you want to manage access to your objects.
- Under Custom objects, select the permissions you want the role to
have for each object: View, Edit, Add, and
Delete.

- (Optional) Refine a role's permissions for an object with access rules.
- Click Save.
Defining end-user permissions for custom objects
Customer permissions to view and interact with custom object records are configured at the object level.
You can further restrict access to records related to the end user with filters in the user interface. However, these filters don't restrict access to records through the Custom Objects API. Use caution when granting end users permission to view custom object records.
- In Admin Center, click
Objects and rules in the sidebar, then select Custom objects >
Objects.
- Click the name of the custom object for which you want to view the permissions, then click the Permissions tab.
- In the table, click Customer.
- In the panel on the right, select the permissions you want end users to have for the custom object you're editing. For each type of permission—View, Edit, Add, and Delete—you can select Full access, Limited access, or No access.
- If you select Limited access, use the drop-down field to select an access rule.
- Click Save.
Using access rules to refine role-based permissions for custom object records
Access rules are unique to a custom object and are used to refine access to the custom object's records for custom agent roles and end users.
To create and manage access rules, see Refining custom object permissions with access rules.
Viewing a custom object's permissions
When viewing a custom object, you can see a summary of the permissions by role on the Permissions tab.
- In Admin Center, click
Objects and rules in the sidebar, then select Custom objects >
Objects.
- Click the name of the custom object for which you want to view the permissions,
then click the Permissions tab.
Current permissions are reflected in the table. A check mark indicates the role has full access to an object's records for that permission, an X indicates the role doesn't have that permission, and a string indicates the role has the permission with an access rule applied to restrict access to the object's records.
