Summary: ◀▼
You can set automatic reassignment options for solved tickets when agents are deleted, downgraded, or removed. Choose to reassign tickets to an admin, the group, a random team member, or a specific agent. Configure reassignment at the account or group level to match your team's needs, ensuring solved tickets are properly managed without manual intervention.
Groups are collections of team members based on criteria that those team members have in common. When an agent is deleted, downgraded (to an end user, light agent, or contributor), or removed from a group, their assigned tickets, including solved tickets, should be reassigned.
Admins can turn on automatic reassignment options that determine how departing or downgraded agents' solved tickets are reassigned. For example, you might want their solved tickets to be reassigned randomly within a group or to a particular agent.
After turning on solved ticket reassignment options, you can set the default solved ticket reassignment behavior for all groups in your account. You can also allow reassignment behavior to be configured per group. Configuring options for each of your groups gives you the flexibility to choose the reassignment behavior that best suits your groups’ needs.
By setting automatic reassignment options, whether at the account-level or group-level, departing or downgraded agents' solved tickets are automatically reassigned based on your selections, and you don't have to manually reassign them.
Understanding solved ticket reassignment options
The original (legacy) behavior for reassigning solved tickets when an agent is deleted, downgraded to an end user, or removed, is to reassign their solved tickets to the admin removing them or the longest active team member in the group. On Enterprise plans, this could also be an agent in a custom role with permission to manage group membership.
The longest active team member is the team member with the lowest user ID. This is based on when their account was created in Zendesk; it is not based on when they were added to the group or alphabetically by first or last name.
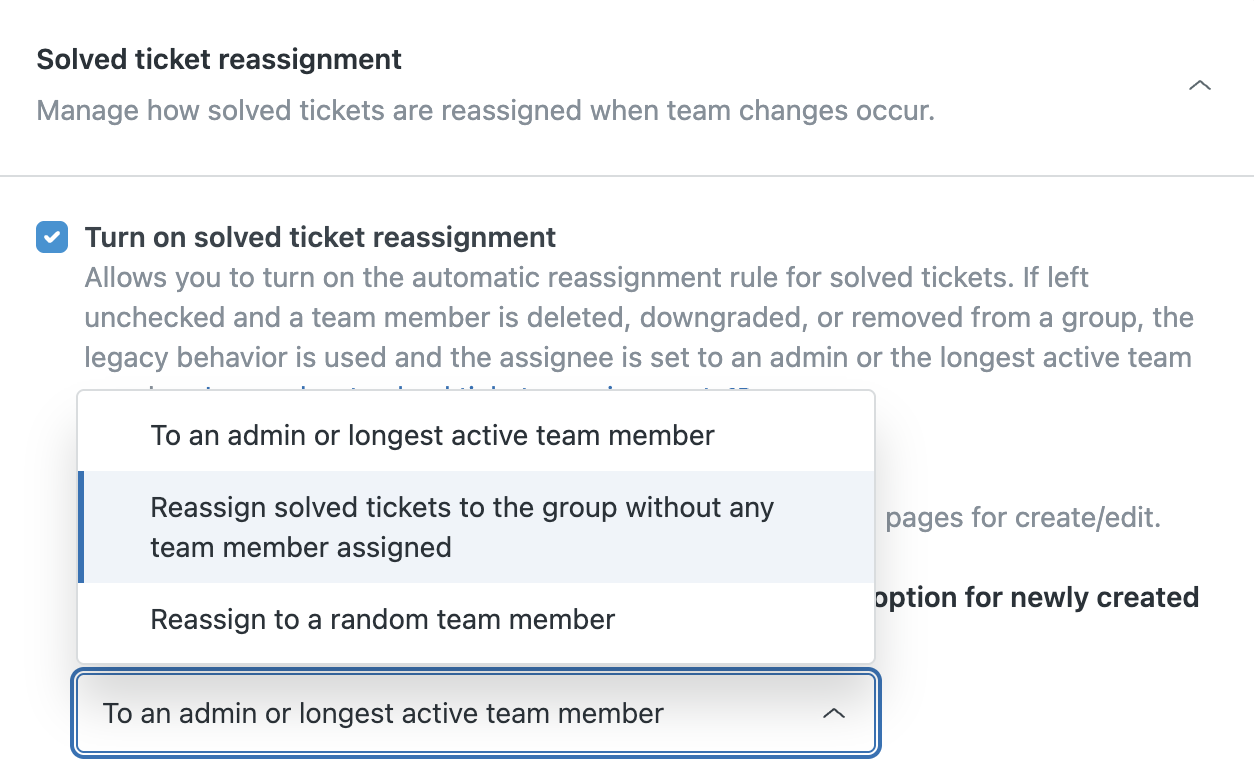
After turning on solved ticket reassignment, you can change how a departing agent’s solved tickets are reassigned with the following options:
| Reassignment option | Description |
|---|---|
| To an admin or longest active team member | Reassigns the departing or downgraded agent's solved tickets to the admin, removing them or the longest active team member in the group. On Enterprise plans, this could also be an agent in a custom role with permission to manage group membership. This option is the same as the original (legacy) behavior. |
| Reassign solved tickets to the group without any team member assigned | Reassigns the solved tickets to the group. No particular agent is assigned the solved tickets. |
| Reassign solved tickets to a random team member | Reassigns an agent’s solved tickets to a random agent within the group, distributing the attribution equally. |
| Reassign tickets to selected team member | Reassigns an agent’s solved tickets to a particular agent. This option appears only at the group level. |
| Reassign tickets to the account level setting | Reassigns an agent’s solved tickets based on your account’s default reassignment behavior. This option appears only at the group level. |
Turning on solved ticket reassignment
An admin or an agent in a custom role with permission to manage ticket settings must first turn on solve ticket reassignment before you can change your group reassignment options.
To turn on solved ticket reassignment
- In Admin Center, click
 Objects and rules in the sidebar, then select Tickets > Settings.
 - Click Solved ticket reassignment to expand it.
- Select Turn on solved ticket reassignment.
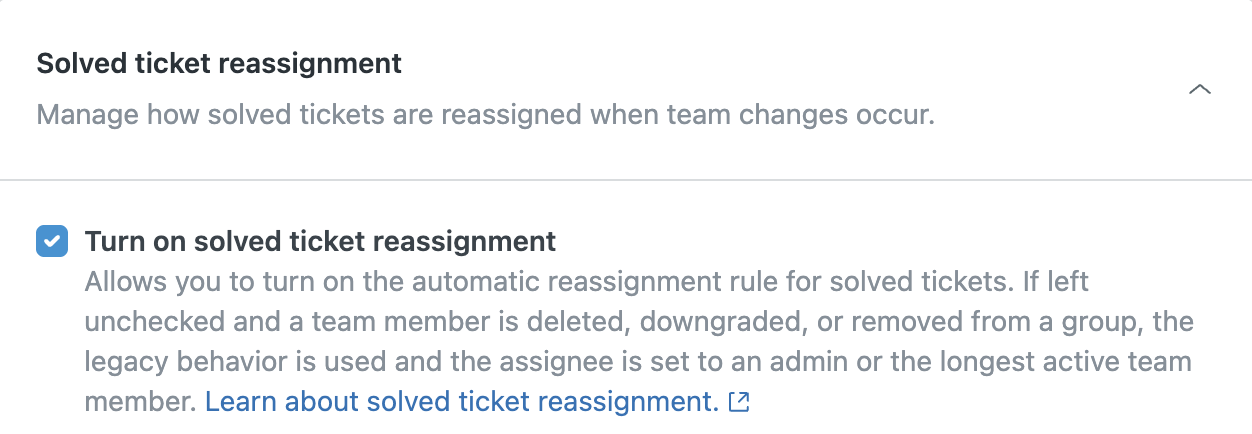
- Click Save.
You can now set the account-level reassignment behavior or turn on the option to configure reassignment options per group. Make sure you understand what each option does before making any changes.
If you turn off solved ticket reassignment after configuring reassignment options for your account or groups, the reassignment behavior for all your groups will revert back to the original (legacy) behavior. If you turn solved ticket reassignment back on, though, your previously configured options are saved and will reactivate.
Turning on group-level reassignment options
An admin or an agent in a custom role with permission to manage ticket settings must turn on the option to allow reassignment options be configured per group. When you turn on show solved ticket reassignment, the options appear on each groups’ admin page.
To turn on group-level reassignment options
- In Admin Center, click
Objects and rules in the sidebar, then select Tickets > Settings.
- Click Solved ticket reassignment to expand it.
- Make sure that Turn on solved ticket reassignment is selected.
- Select Show solved ticket reassignment.
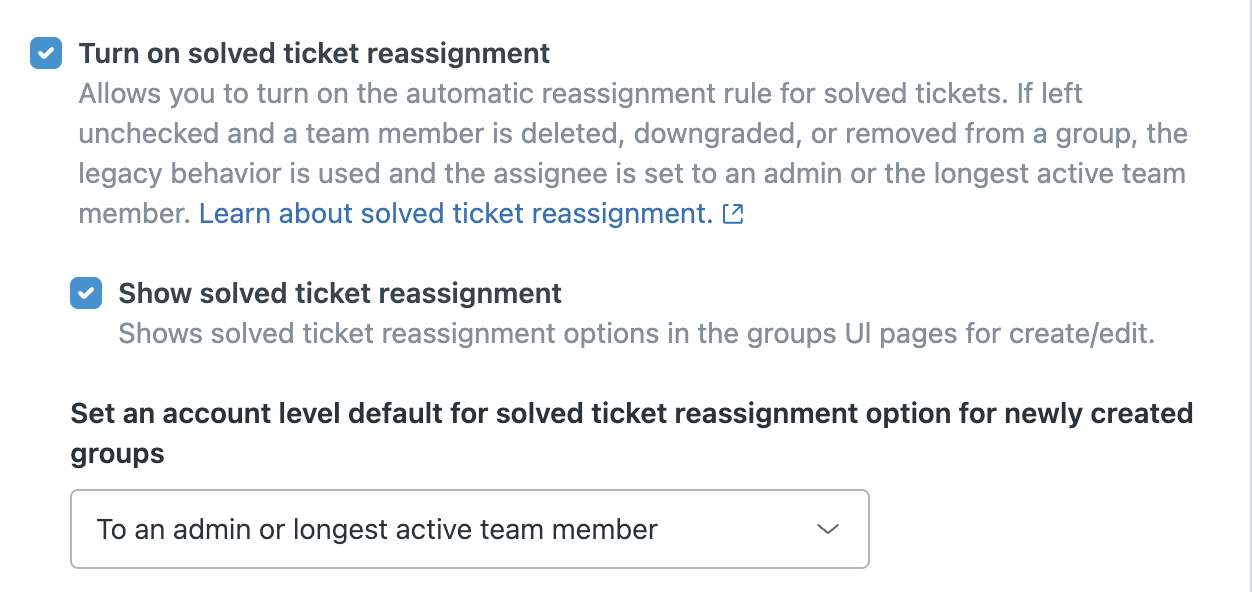
- Click Save.
The reassignment options now appear in each of your groups and can be configured. You might need to refresh the page for the options to appear when you navigate to a group's admin page for the first time after turning this on.
Setting account-level reassignment options
An admin or an agent in a custom role with permission to manage ticket settings can set a default reassignment option for your account. When you select an option for your account, any new groups you create will follow the set reassignment option. Your existing groups will continue to follow the original (legacy) reassignment behavior unless you reset all groups to the account-level option.
To set an account-level reassignment option
- In Admin Center, click
Objects and rules in the sidebar, then select Tickets > Settings.
- Click Solved ticket reassignment to expand it.
- Make sure that Turn on solved ticket reassignment is selected.
- Click the drop-down menu and select an option.
- Click Save.
Setting group-level reassignment options
If the show solved ticket reassignment option has been turned on, you can configure the reassignment behavior for each of your groups.
- In Admin Center, click
 People in the sidebar, then select Team > Groups.
 - Create a new group or select an existing group from the list to edit.
- In the Solved ticket reassignment behavior section, select one of the
options.

- Click Save.
Resetting all groups to the account-level option
An admin or an agent in a custom role with permission to manage ticket settings can reset all groups to your account's default reassignment behavior. Resetting all groups to the account-level reassignment behavior means that any individual group-level options will no longer apply.
- In Admin Center, click
Objects and rules in the sidebar, then select Tickets > Settings.
- Select Force all the groups to assume the account level default now.

- Click Save.
Your groups now follow your account's default reassignment behavior and the reassignment value for each of your groups is updated on the Groups page.
Viewing groups’ reassignment options
If the show solved ticket reassignment option has been turned on, you can view each of your groups’ reassignment behavior from the Groups page. You can still view this information even if the option for show solved ticket reassignment is later turned off.
To view your groups’ reassignment options
-
In Admin Center, click
People in the sidebar, then select Team > Groups.
The Reassignment Value column displays each group’s reassignment option.
