If your customer base speaks multiple languages, you can add languages to your AI agent so that it responds to your customers in the right language. You must add and activate a language to your AI agent before it can begin responding to customers in that language.
This article contains the following topics:
- Viewing all supported languages
- Adding a supported language to an AI agent
- Activating a supported language
- Deleting a supported language
Related articles:
Viewing all supported languages
You can view all the languages that an AI agent is currently capable of using during conversations with customers.
To view all supported languages
- In the AI agents workspace, select the AI agent you want to work with.
-
Click
 Settings in the sidebar, then select Languages.
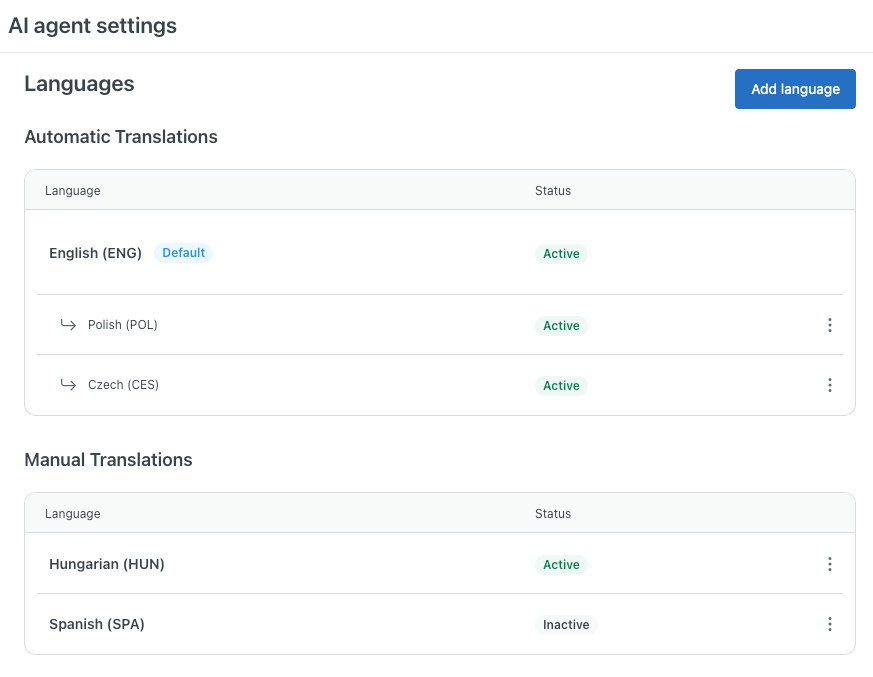
The Languages page shows you which languages the AI agent supports. The page is broken into two sections:
- Automatic translations: For these languages, the AI agent’s system replies and dialogues are automatically translated by AI. For a full list of available languages, see Languages supported by AI agents.
- Manual translations: For these languages, you must manually supply translations. See Translating replies for AI agents.
The Status column shows you whether a supported language is:
- Active, meaning it can be used in conversations. Once added, languages with automatic translations are always active.
- Inactive, meaning it can't yet be used in conversations. Languages that require manual translations must be manually activated.
Adding a supported language to an AI agent
When you created your AI agent, you selected its default language. You can't change its default language, but you can add more supported languages.
Adding a supported language to an AI agent means it can use that language (once activated) to respond to customers during conversations. For dialogue-based responses, an active reply must also exist for that language.
To add a supported language
- In the AI agents workspace, select the AI agent you want to work with.
-
Click
Settings in the sidebar, then select Languages.
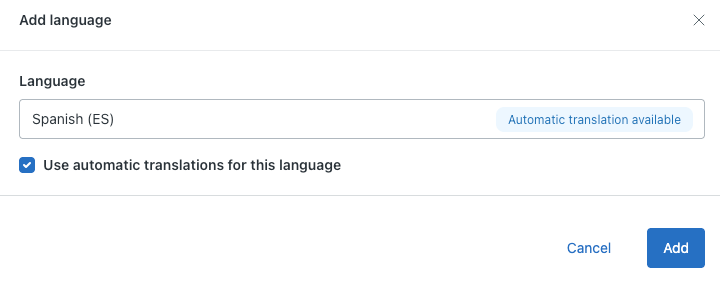
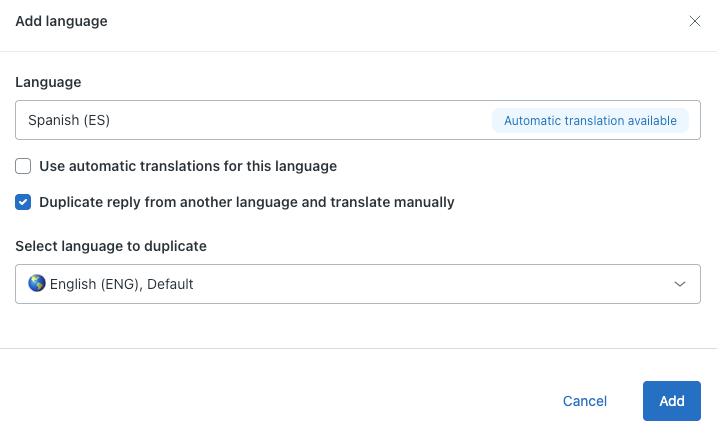
- Click Add language.
-
In Language, select the language
you want to add.
This list is split into two sections:
- Automatic translations available: For these languages, the AI agent’s system replies and dialogues are automatically translated by AI. For a full list of available languages, see Languages supported by AI agents.
- Manual translations only: For these languages, you must manually supply translations. See Translating replies for AI agents.
-
(Recommended) If you selected a language with automatic translations
available, select
Use automatic translations for this
language.
-
(Optional) If you selected a language for which automatic
translations
aren't available, or if you don't want to use automatic translations,
select
Duplicate replies from another language.
This option is useful for AI agents that already have well-built replies in another language that can be translated and reused in the language you’re adding.
For AI agents that don’t have reusable replies, such as brand-new AI agents, keep this option deselected.
-
In Select language to duplicate,
select the language you want
to copy replies from.
-
In Select language to duplicate,
select the language you want
to copy replies from.
-
Click Add.
Your language is added.
If you selected automatic translations, the language is automatically activated. You can view the translations for each dialogue from within the dialogue builder.
If you selected manual translations, you must activate the language before the AI agent can use it in conversations with customers.
Activating a supported language
If you added a supported language that requires manual translations, the language must be activated before an AI agent can use that language to respond to customers. Activating a language publishes all active replies for that language, so make sure those replies are ready to be seen by customers before you do this.
Languages with automatic translations can't be deactivated, only deleted.
To activate a language
- In the AI agents workspace, select the AI agent you want to work with.
-
Click
Settings in the sidebar, then select Languages.
-
Under Manual translations, find the language you want to
activate, click the
options menu (
 ),
and select Activate.
),
and select Activate.
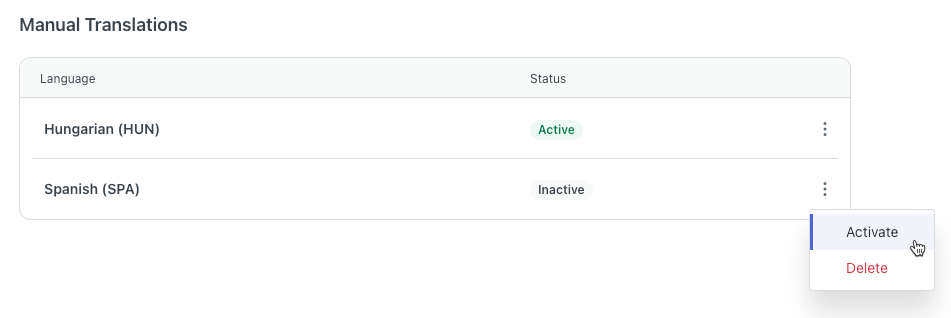
The language's status changes to Active.
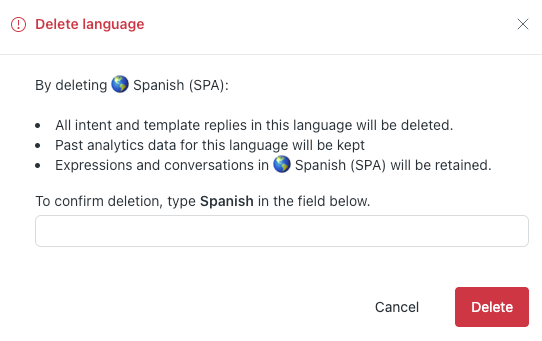
Deleting a supported language
You can delete a supported language if you no longer want your AI agent to be able to converse with customers in that language. When you delete a language, all replies and templates in that language are also deleted. However, historical data in the reporting dashboard and conversations logs are retained.
To delete a supported language
- In the AI agents workspace, select the AI agent you want to work with.
-
Click
Settings in the sidebar, then select Languages.
-
Find the language you want to delete, click the options menu
(),
and select Delete.
-
In the confirmation dialog, type the name of the language
and click
Delete.