AI agents interact with customers on messaging or email (including API and web form) channels to resolve issues without human intervention, freeing up your support team to spend more time on more complex issues.
Each AI agent can interact on only one type of channel. For example, a single AI agent can’t interact with customers on messaging and email channels. All newly created AI agents use agentic AI by default.
You must be a client admin in AI agents to create an AI agent.
This article contains the following topics:
Related articles:
Creating an AI agent for messaging
You can create an AI agent to interact with customers on messaging channels. Only one AI agent can be active on a given messaging channel at a time.
These instructions assume you've already created a messaging channel.
To create an AI agent for messaging
-
In the AI agents workspace, click
 Dashboard in the sidebar.
-
Click Create AI agent and select
for Messaging.
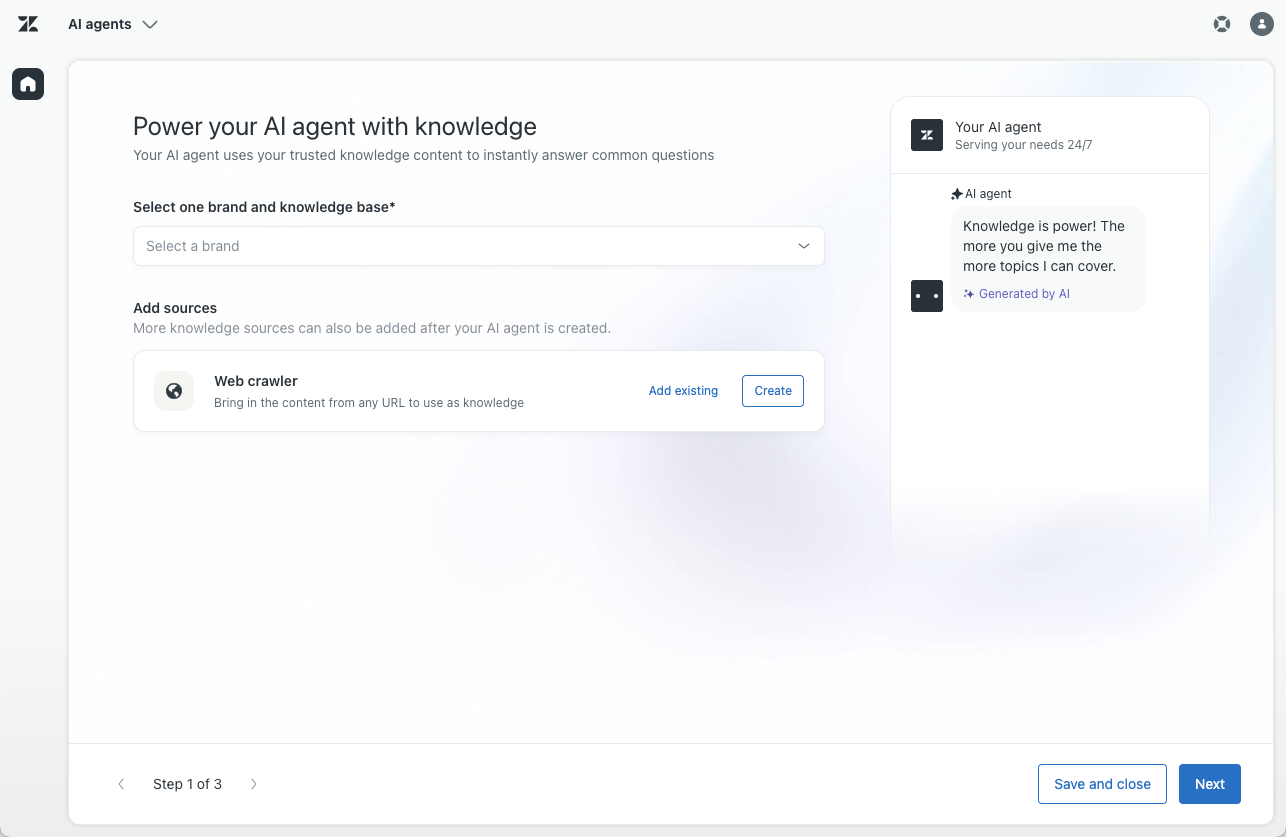
The Power your AI agent with knowledge page opens.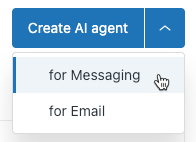
-
Under
Select one brand and knowledge base,
select the brand you want
the AI agent to use.
The knowledge base associated with the brand is automatically connected to the AI agent so that it can create AI-generated answers based on that content. If the brand’s knowledge base:
-
Hasn't been created yet, click
Add knowledge base
to
create one.

-
Hasn't been activated yet, click
Activate knowledge base
to
activate it.

-
Doesn't have authentication turned on, click
Learn about
authentication
to
turn on help center
authentication for messaging.

-
Hasn't been created yet, click
Add knowledge base
to
create one.
-
(Optional) Add content from external websites using a web
crawler by
clicking either of the following:
-
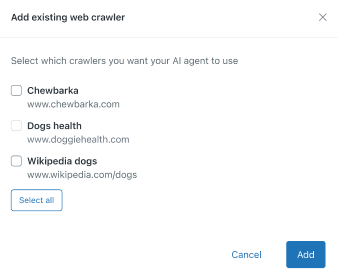
Add existing: Select
one or more existing web crawlers you
want your AI agent to use and click
Add.
-
Create:
Create a new web crawler
to index website content.
Note: You must have at least one connected knowledge source before continuing, whether that’s an active help center or a web crawler.
-
Add existing: Select
one or more existing web crawlers you
want your AI agent to use and click
Add.
-
Click Next.
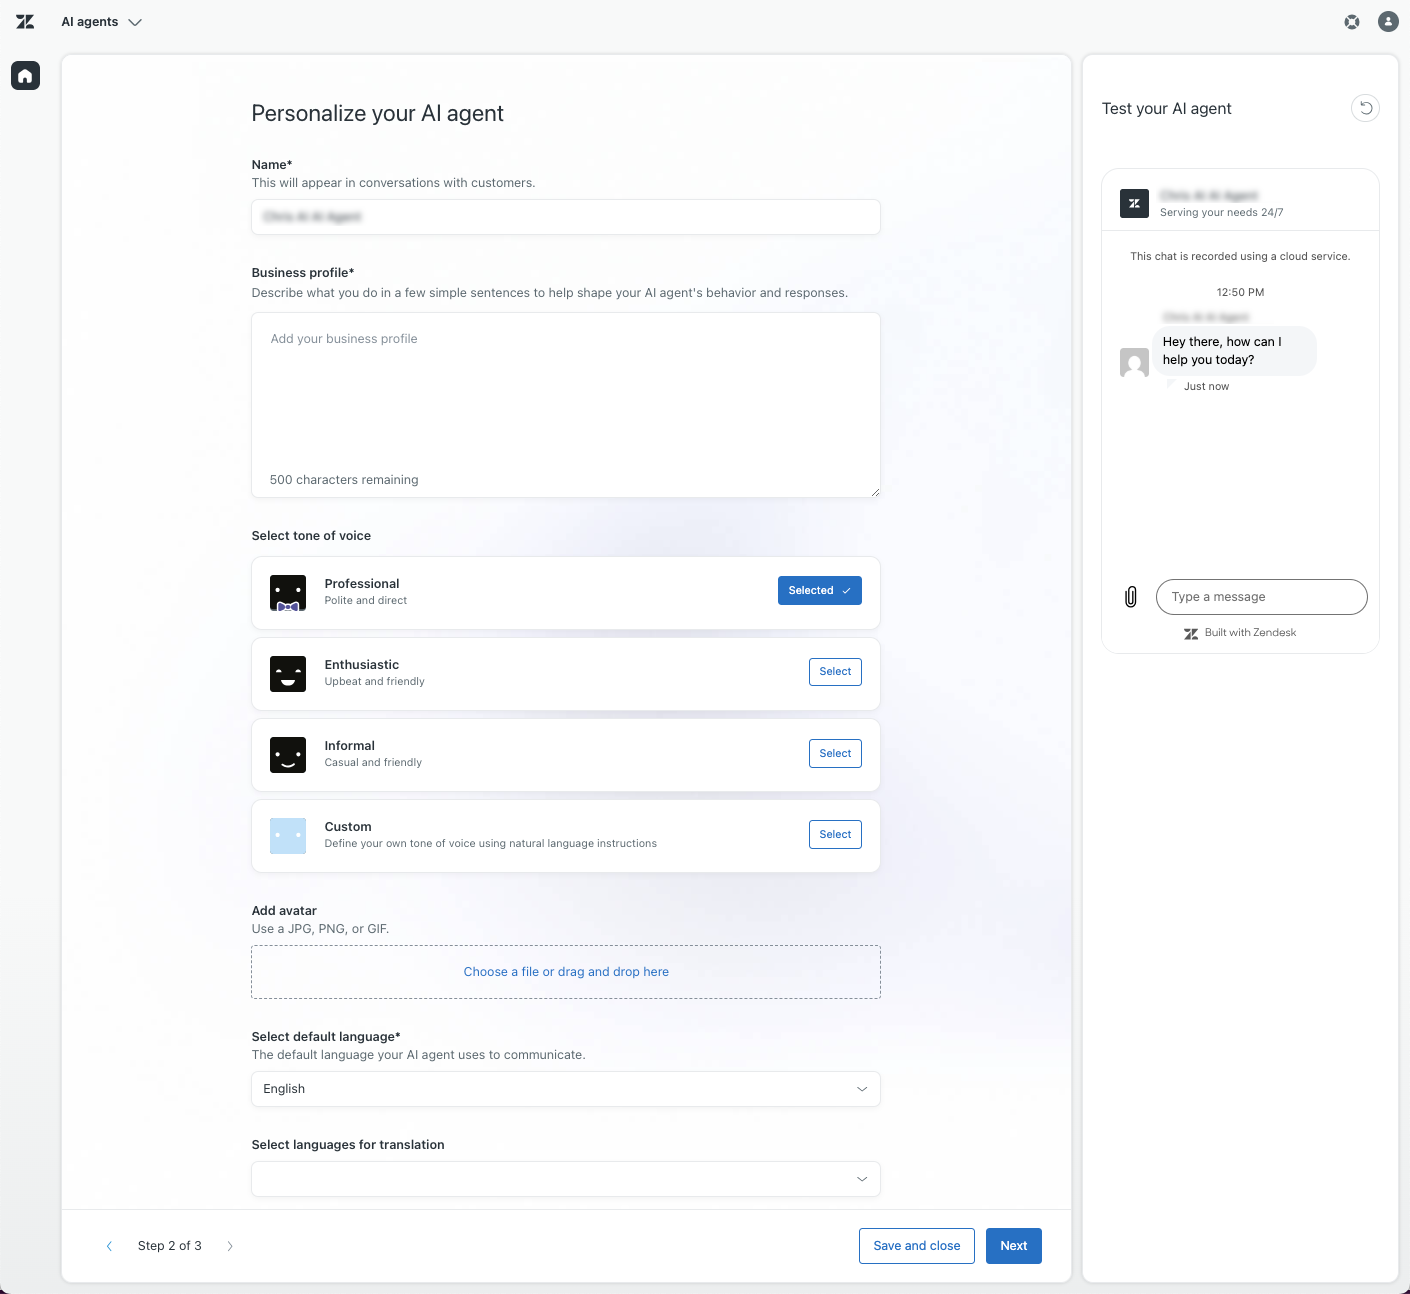
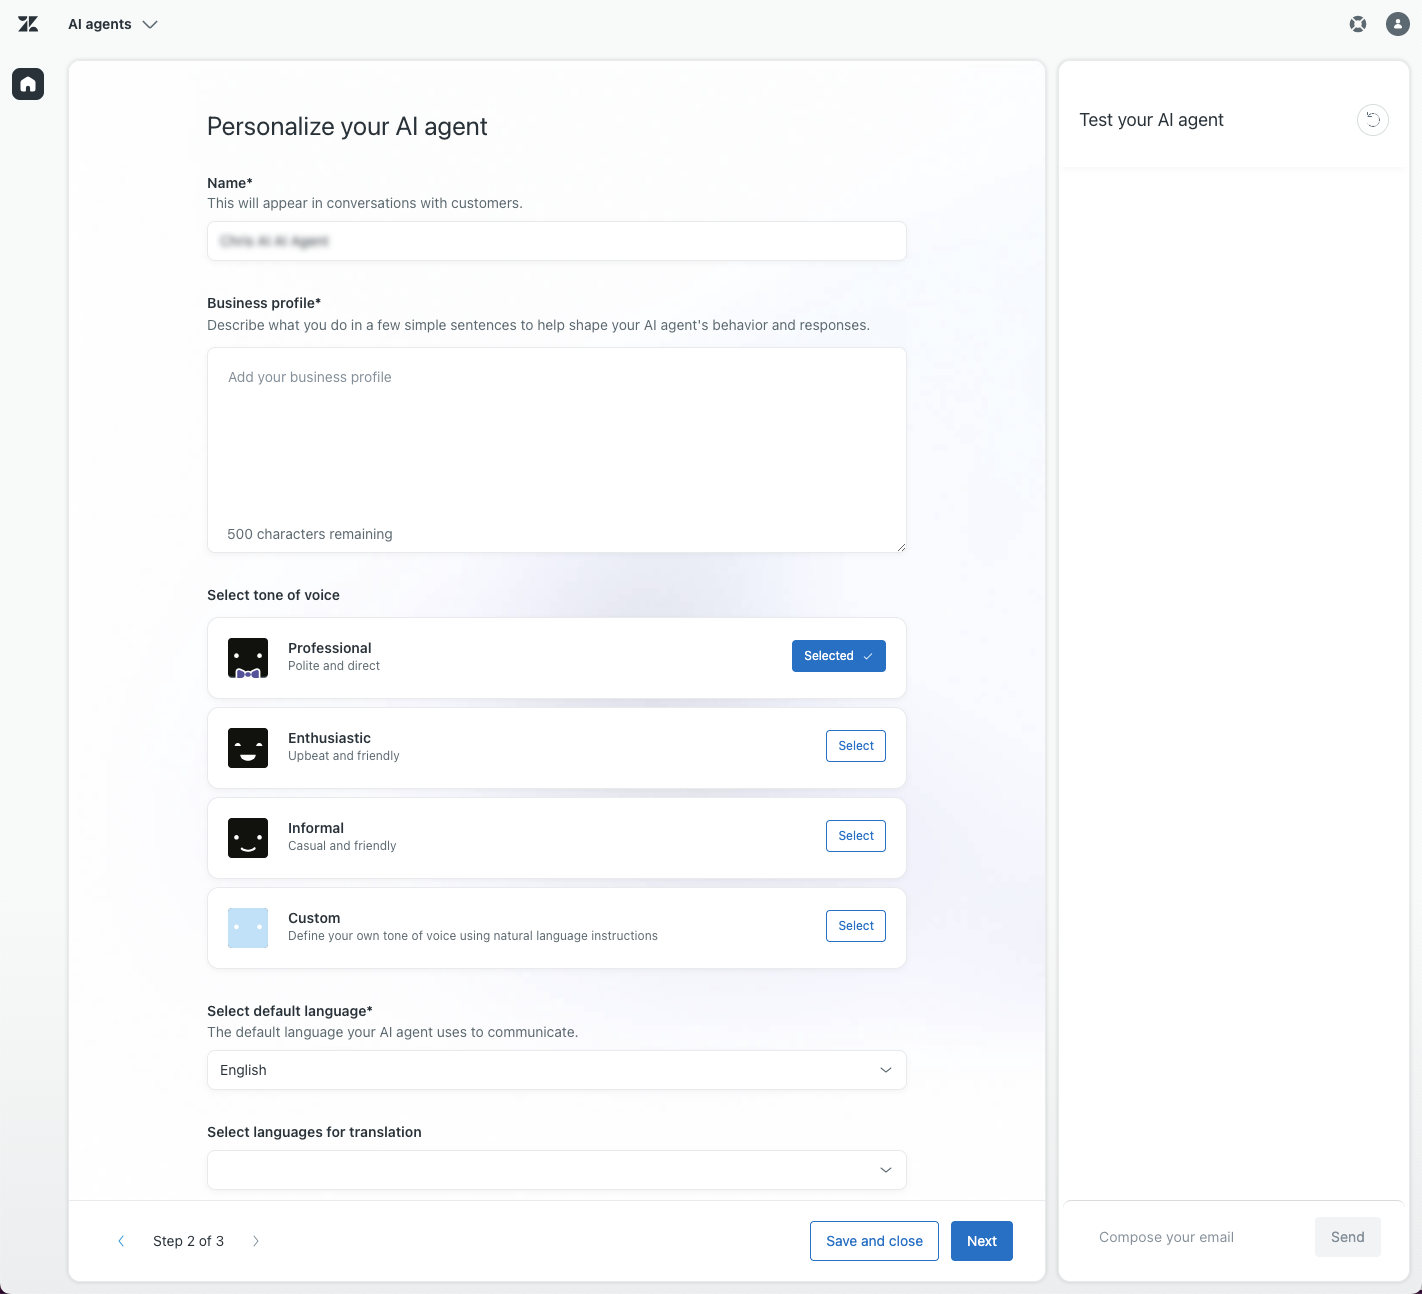
The Personalize your AI agent page opens.
-
In Name, adjust the name for
the AI agent if necessary.
By default, this name is <selected brand> AI agent. This name appears at the top of the Web Widget in messaging conversations.
-
In Business profile, enter
one or two short, factual sentences in
English that describe what your company does.
This information gives the AI agent context so that it can give the most appropriate responses. Keep this description focused on simple text about your company's business domain, rather than marketing-focused material that could potentially influence your AI agent's behavior. Make sure not to add instructions for the AI agent to the business profile, which might lead to unexpected errors.
-
Under Select tone of voice,
click Select on one of the
following options:
- Professional: (Default) A polite and direct tone.
- Enthusiastic: An upbeat and friendly tone.
- Informal: A casual and friendly tone.
-
Custom: A custom tone
created from scratch or an edited
version of one of the tones above.
If you select this option, write some short guidelines that tell the AI agent how to speak to users. For example, “You maintain a polite, approachable, and conversational tone throughout the conversation.”
-
Under Add avatar, drag-and-drop
or click to upload an image.
The image can be a JPG, PNG, or GIF file and it must be smaller than 100KB. An image size of 50x50 pixels gives the best results. Simple, clear images that represent your organization (such as a logo or mascot) are recommended.
-
In Select default language,
select the default language your AI agent
should use.
This is the language used when a customer’s locale is unknown.
-
In Select languages for translation,
select the additional languages
that the AI agent should be able to use to respond to customers.
This list is limited to languages for which automatic translation is available. With automatic translations, the AI agent’s system replies, like the greeting and escalation messages, and other dialogues are automatically translated to those languages. For more information, see Adding and managing supported languages for AI agents.
- (Optional) Test your AI agent to be sure it responds the way you expect.
-
Click Next.
The Set up your AI agent on messaging page appears.
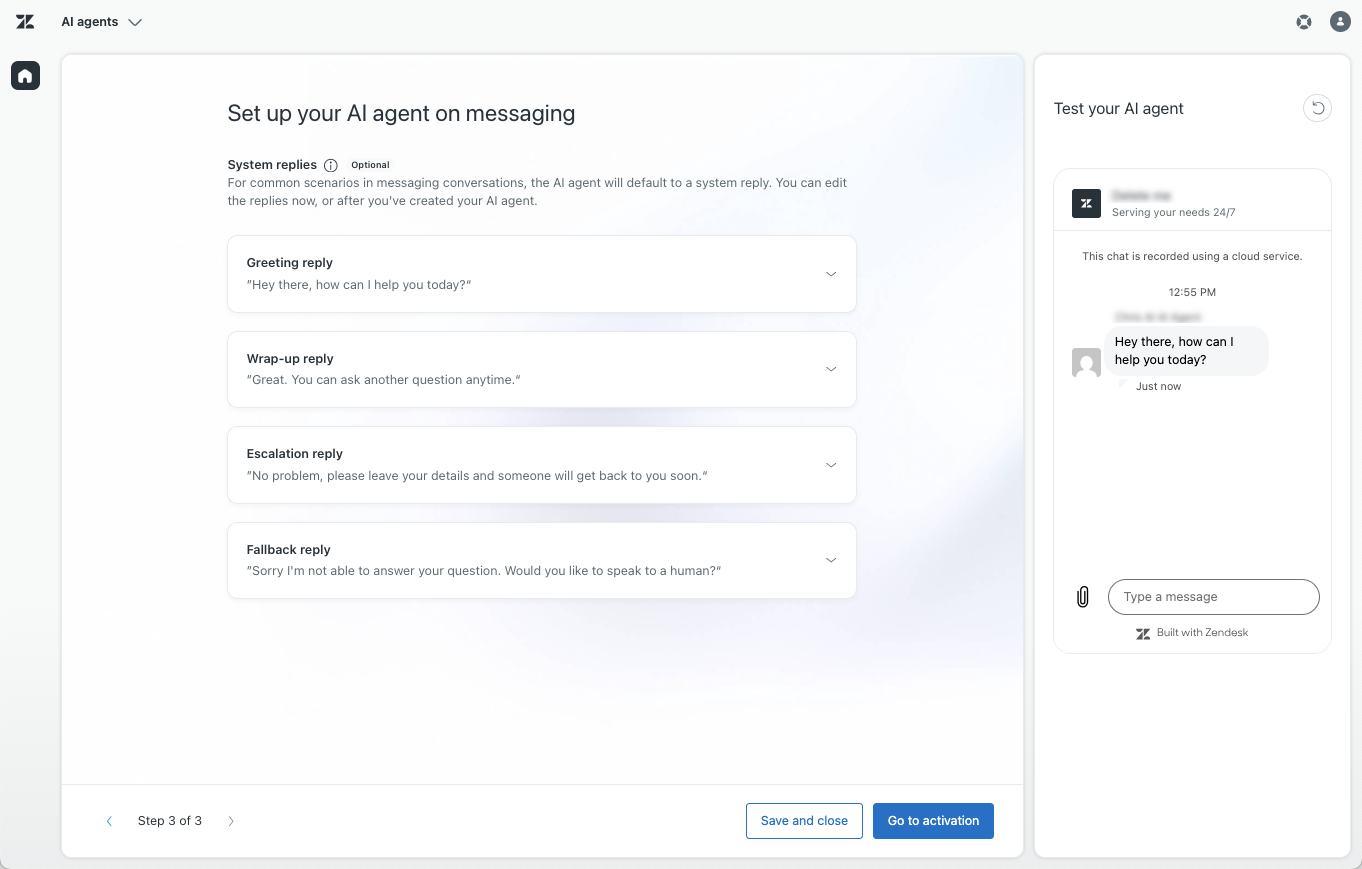
-
(Optional) Under System replies, expand each of the following
and customize
the messages as needed:
- Greeting reply: What the AI agent should say to greet the customer at the beginning of the conversation. This is part of the Welcome reply and can be edited later.
-
Wrap-up reply: What
the AI agent should say at the end of a
conversation when collecting feedback from a customer
about their
experience. This is part of the
Collect BSAT response
and
can be edited later. There are two versions of this
message, split
into separate tabs:
- Helpful: What the AI agent should say if the customer confirms the AI agent’s response was helpful.
- Unhelpful: What the AI agent should say if the customer says the AI agent wasn’t helpful. Select Add option to talk to a human and escalate to automatically add an Escalation block to the Collect BSAT response’s dialogue.
- Escalation reply: What the AI agent should say when escalating a conversation to a human agent. This is part of the Escalation reply and can be edited later. Select Collect name, email, and reason for contact if you want the AI agent to collect these details when escalating.
- Fallback reply: What the AI agent should say when no relevant use case is detected and a generative reply can't be produced. This is part of the Default reply and can be edited later. Select Add option to talk to a human and escalate to automatically add an Escalation block to the Default reply’s dialogue.
- (Optional) Test your AI agent to be sure it responds the way you expect.
-
Click one of the following options:
- Save and close: Save your configuration so far and exit the creation flow. You can continue configuring the AI agent’s settings before making it live for customers, but you can’t return to the creation flow for this AI agent. Instead, use the AI agents workspace to perform any additional configuration as needed and activate the AI agent later.
-
Go to activation: Make
the AI agent live so that it can begin
interacting with customers.
- Select the channels you want the AI agent to interact with customers on.
-
Click Activate on channels.
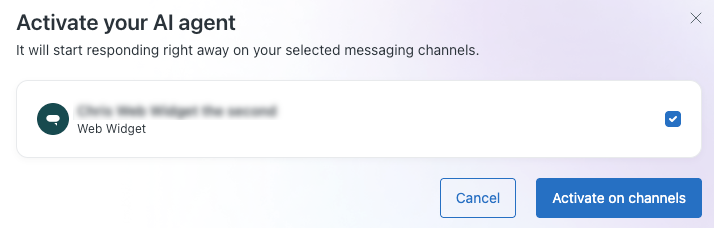
Your AI agent is now live on your selected channels. You can’t return to the creation flow for this AI agent, but you can use the AI agents workspace to perform any ongoing configuration as needed.
Creating an AI agent for email
You can create an AI agent to interact with customers on email (including API and web form) channels. Only one AI agent can be active for a given support email address or web form at a time.
These instructions assume you've already created an email, API, or web form channel.
To create an AI agent for email
-
In the AI agents workspace, click
Dashboard in the sidebar.
-
Click Create AI agent and select
for Email.
The Power your AI agent with knowledge page opens.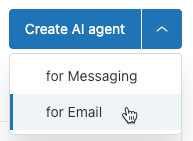
-
Under
Select one brand and knowledge base,
select the brand you want
the AI agent to use.
The knowledge base associated with the brand is automatically connected to the AI agent so that it can create AI-generated answers based on that content. If the brand’s knowledge base:
-
Hasn't been created yet, click
Add knowledge base
to
create one.
-
Hasn't been activated yet, click
Activate knowledge base
to
activate it.
-
Hasn't been created yet, click
Add knowledge base
to
create one.
-
(Optional) Add content from external websites using a web
crawler by
clicking either of the following:
-
Add existing: Select
one or more existing web crawlers you
want your AI agent to use and click
Add.
-
Create:
Create a new web crawler
to index website content.
Note: You must have at least one connected knowledge source before continuing, whether that’s an active help center or a web crawler.
-
Add existing: Select
one or more existing web crawlers you
want your AI agent to use and click
Add.
-
Click Next.
The Personalize your AI agent page opens.
-
In Name, adjust the name for
the AI agent if necessary.
By default, this name is <selected brand> AI agent. This name appears at the top of the Web Widget in messaging conversations.
-
In Business profile, enter
one or two short, factual sentences in
English that describe what your company does.
This information gives the AI agent context so that it can give the most appropriate responses. Keep this description focused on simple text about your company's business domain, rather than marketing-focused material that could potentially influence your AI agent's behavior. Make sure not to add instructions for the AI agent to the business profile, which might lead to unexpected errors.
-
Under Select tone of voice,
click Select on one of the
following options:
- Professional: (Default) A polite and direct tone.
- Enthusiastic: An upbeat and friendly tone.
- Informal: A casual and friendly tone.
-
Custom: A custom tone
created from scratch or an edited
version of one of the tones above.
If you select this option, write some short guidelines that tell the AI agent how to speak to users. For example, “You maintain a polite, approachable, and conversational tone throughout the conversation.”
-
In Select default language,
select the default language your AI agent
should use.
This is the language used when a customer’s locale is unknown.
-
In Select languages for translation,
select the additional languages
that the AI agent should be able to use to respond to customers.
This list is limited to languages for which automatic translation is available. With automatic translations, the AI agent’s system replies and dialogues are automatically translated to those languages. For more information, see Adding and managing supported languages for AI agents.
- (Optional) Test your AI agent to be sure it responds the way you expect.
-
Click Next.
The Set up your AI agent on email and web form page appears.
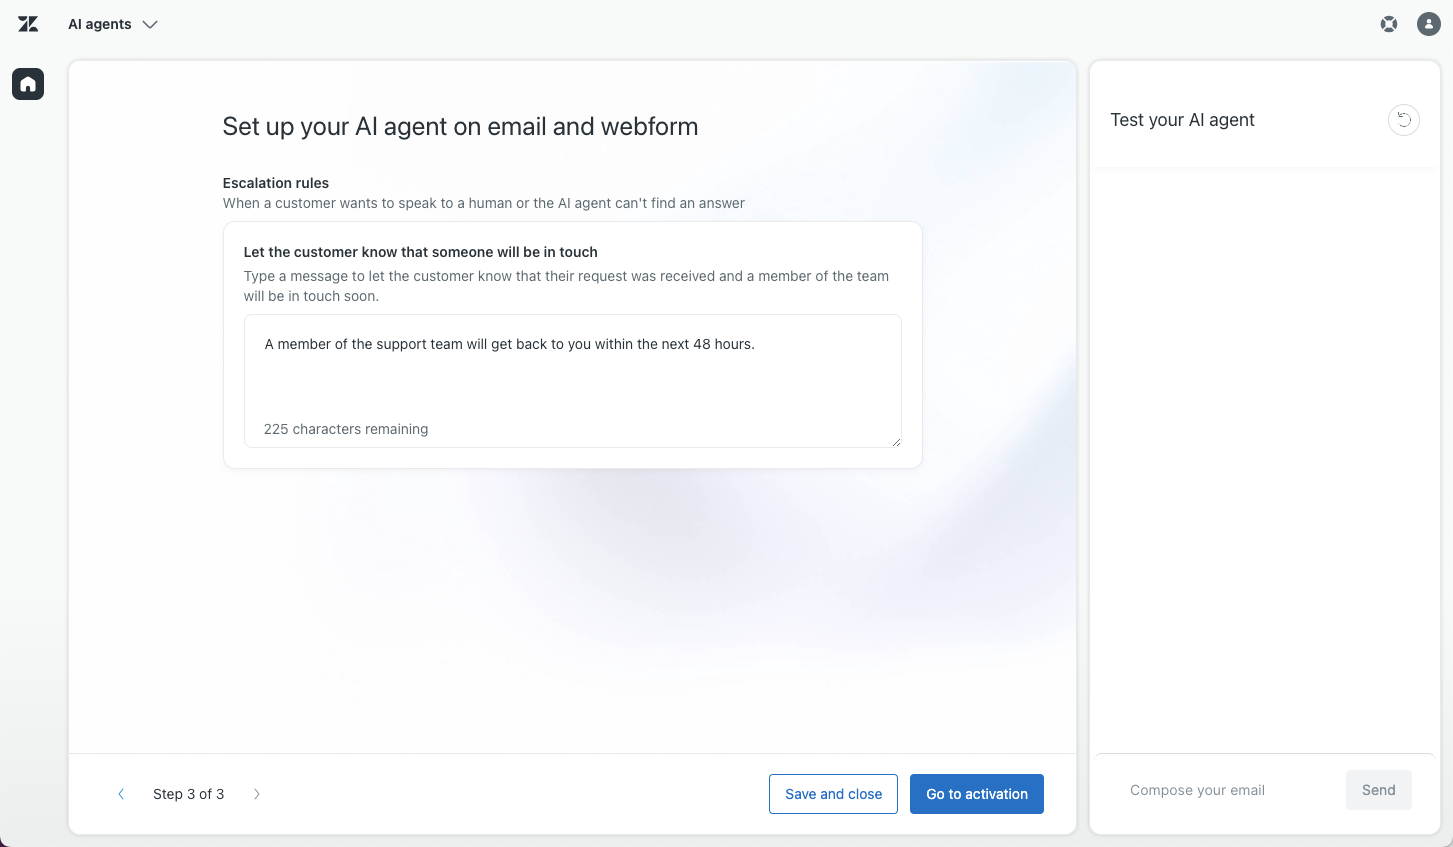
- In the Let the customer know that someone will be in touch text box, enter the message that the AI agent should send if the conversation needs to be escalated to a human agent.
- (Optional) Test your AI agent to be sure it responds the way you expect.
-
Click one of the following options:
- Save and close: Save your configuration so far and exit the creation flow. You can continue configuring the AI agent’s settings before making it live for customers, but you can’t return to the creation flow for this AI agent. Instead, use the AI agents workspace to perform any additional configuration as needed and activate the AI agent later.
-
Go to activation: Make
the AI agent live so that it can begin
interacting with customers.
- Select the channels you want the AI agent to interact with customers on.
-
Click Activate on channels.
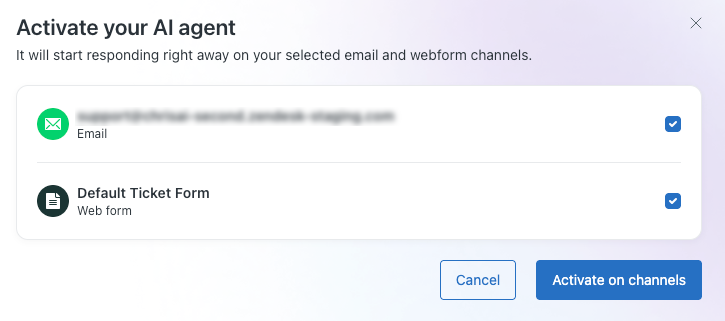
Your AI agent is now live on your selected channels. You can’t return to the creation flow for this AI agent, but you can use the AI agents workspace to perform any ongoing configuration as needed.