Summary: ◀▼
You can use a voice AI agent to automate phone support, answer routine questions, route calls, and hand off to a human with full ticket context, transcript, and summary. It creates or updates tickets for tracking and reporting, supports multilingual conversations, actions, and testing before launch, and helps reduce call volume, repeats, and after-call work.
Voice AI agents enable intelligent, conversational phone support by automating end-to-end customer voice interactions. This feature lets incoming calls start with an AI agent and, when needed, escalate to a human agent. Every call creates or updates a Zendesk ticket for tracking, reporting, and handoff context.
These AI agents are seamlessly integrated with Zendesk voice and are built on our agentic AI technology, meaning you can take advantage of procedures and actions you’ve already built. Voice AI agents can engage in natural-sounding conversations with customers, including making small talk, disambiguating between topics, providing AI-generated answers based on your existing policies and procedures, and even executing actions.
Before deploying a voice AI agent, you can test the call experience from the AI agents workspace. After a live test call, you can review the recording on the associated ticket.
This article contains the following topics:
- About voice AI agents
- Signing up for the voice AI agents EAP
- Creating a voice AI agent
- Configuring a voice AI agent
- Connecting an AI agent to Zendesk voice
- Testing a voice AI agent
- Monitoring the performance of a voice AI agent
- Best practices for deploying a voice AI agent
Related article:
About voice AI agents
Voice AI agents offer multilingual, end-to-end voice automation for one of your most important support channels. From greeting to issue resolution to conversation wrap-up, voice AI agents provide an always-available first line of support for your customers.
Voice AI agents are best suited for the following types of use cases:
- Account management
- Authentication
- Billing and payments
- Booking and reservations
- Call routing
- Troubleshooting
- FAQs
- Order management
If a customer needs to speak with a human, calls can be instantly routed to agents based on omnichannel routing, tags, or actions. If a human agent is available, the customer is transferred. If no human agent is available, the customer can leave a voicemail.
When escalating, voice AI agents provide a seamless handoff to human agents with full context and conversation history. Escalated calls can be sent to human agents in Agent Workspace with a full transcript, concise summary, and a detected intent, so agents always start informed.
Keep reading to learn more about voice AI agents, including:
Benefits
Voice AI agents let you:
- Offer 24/7 phone support without adding staff. Provide 24/7 coverage that automatically scales during peaks and off‑hours, without adding staff. Reduce overtime and telephony costs by automating routine calls.
- Resolve even complex calls and route right the first time. Replace IVR menus with natural conversations that capture intent, verify identity, and gauge urgency. Solve customer requests end to end, with knowledge‑grounded answers and policy-aware actions. Escalate to human agents only when needed, providing full‑context and reducing transfers and repeats. Route by intent and caller profile to the right queue or expert, cutting average handling time and after-call work.
- Unify AI and CX for faster, more complete resolutions. Voice AI agents are embedded in the Zendesk suite, so ticketing, knowledge, routing, actions and analytics work as one. Call summaries with full context and detected intent mean less work for human agents and lower average handling time, eliminating the need for customers to repeat themselves.
- Trust every resolution with full control and transparency. Add instructions to AI agent responses, ensuring every resolution aligns to your customer service needs. Stay in control with real-time visibility into your AI agent’s chain of thought. Let AI agents operate autonomously and add precision and control when needed.
How it works
When a caller dials your phone number, the voice AI agent answers and attempts to resolve the caller’s request. If the voice AI agent:
- Resolves the request, the call ends, and the ticket is updated. See Call flow: Caller to AI agent for details.
- Can’t resolve the request, the call is escalated to your phone queue, routing rules run, a human agent answers with full context, and finishes the call. See Call flow: Escalation to human agent for details.
Call flow: Caller to AI agent
All calls to the configured phone number first connect to the AI agent.
- The call connects to the AI agent.
- A ticket is immediately created to log the call.
- The AI agent engages the caller and works to resolve the issue based
on your configuration:
- The AI agent detects the appropriate use case based on what the caller says.
- Based on this use case, the AI agent chooses the best path
to solve the customer’s issue:
- Replying with small talk or a disambiguating question.
- Retrieving an AI-generated answer from your existing knowledge sources.
- Performing steps guided by a generative
procedure.Note: In cases where the AI requires a bit more time to process a caller’s query (for example, when calling APIs or retrieving answers from knowledge sources), the voice AI agent might use filler sentences similar to the following to avoid long silences:
- “Hm, I’m looking for an answer now.”
- “Give me a second.”
- “Almost there.”
- Any ticket fields configured to be updated during the conversation (including custom fields) are updated in real time on the ticket.
- If the caller’s request is resolved by the AI agent, the call ends
and the ticket is updated with:
- A full call transcript
- An AI-generated call summary
- A link to view the AI agent conversation in the conversation logs
- Any other ticket fields updated by the AI agent
Call flow: Escalation to human agent
If the AI agent can’t resolve the caller’s request, the call is escalated to a human agent.
- The AI agent updates the ticket before escalation by:
- Posting the call transcript and a summary to the ticket to prepare for handoff.
- Updating any other ticket fields you've configured to be updated through actions.
- The AI agent sends the call to your queue for a human agent to pick
up.
Standard phone number settings resume at this point.
- If you’ve configured an IVR greeting or custom greeting, the caller hears it now. If you prefer not to play additional greetings (to avoid double greetings after the AI agent handoff), configure a one-second silent greeting in the Available agents greeting.
- The call is routed based on your configuration:
- If you use voice routing: If the AI agent updated the Group ticket field during the conversation, that group is prioritized for routing. If no group was updated, the call routes to the group defined in the phone number’s routing settings.
- If you use omnichannel routing: Any ticket fields updated during the AI agent conversation (for example, Group or Skills) are used for routing. Your standard omnichannel routing configuration applies.
- The right agent is selected based on your routing configuration. The agent sees the AI-generated summary on the ticket to get instant context for a smooth handoff.
- The agent assists the caller and ends the call.
- A voice comment is posted to the ticket to capture the agent-caller interaction.
- The agent can complete post-call work.Tip: If you have Zendesk Copilot, it can assist the agent with after-call tasks. See Using generative AI to create call summaries and transcripts on tickets.
Limitations and pricing
Voice AI agents are not available with Talk Partner Edition (TPE).
Voice AI agents are not intended to be used to evaluate and classify emergency calls, or to dispatch or prioritize emergency first response services or emergency healthcare patient triage systems.
Usage of voice AI agents is billed based on:
- Minutes used: See Zendesk Talk number availability and pricing.
-
AI agent connection charges: An additional per-minute charge applies
when the AI agent is connected to a call. Charges accrue only for the time
the AI agent is active on the call. Current rates per minute:
- USD: $0.005
- GBP: £0.0033
- EURO: €0.0042
- BRL: R$0.036
-
Automated resolutions consumed: See About automated resolutions for AI
agents. For a voice AI agent, an automated resolution is consumed
for any call for which both of the following are true:
- Was not escalated to a human agent.
- Passed verification performed by our LLM. The verification process evaluates the content of the conversation immediately following the call to ensure that the customer’s request was actually satisfactorily resolved without human-agent intervention. Conversations that don’t pass this verification are not considered automated and do not consume an automated resolution.
The pricing and packaging for voice AI agents are subject to change following the conclusion of the EAP.
Signing up for the voice AI agents EAP
If you have a voice plan, you can sign up for the voice AI agents EAP by filling out this form. We’ll review your submission and, if approved, activate the EAP in your account within a few days.
Creating a voice AI agent
To create a voice AI agent
- In the AI agents workspace, click
 Dashboard in the sidebar.
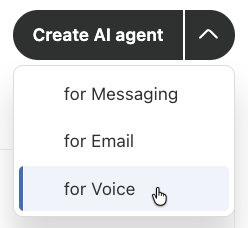
 - Click Create AI agent, then select for Voice.
The Power your AI agent with knowledge page opens.
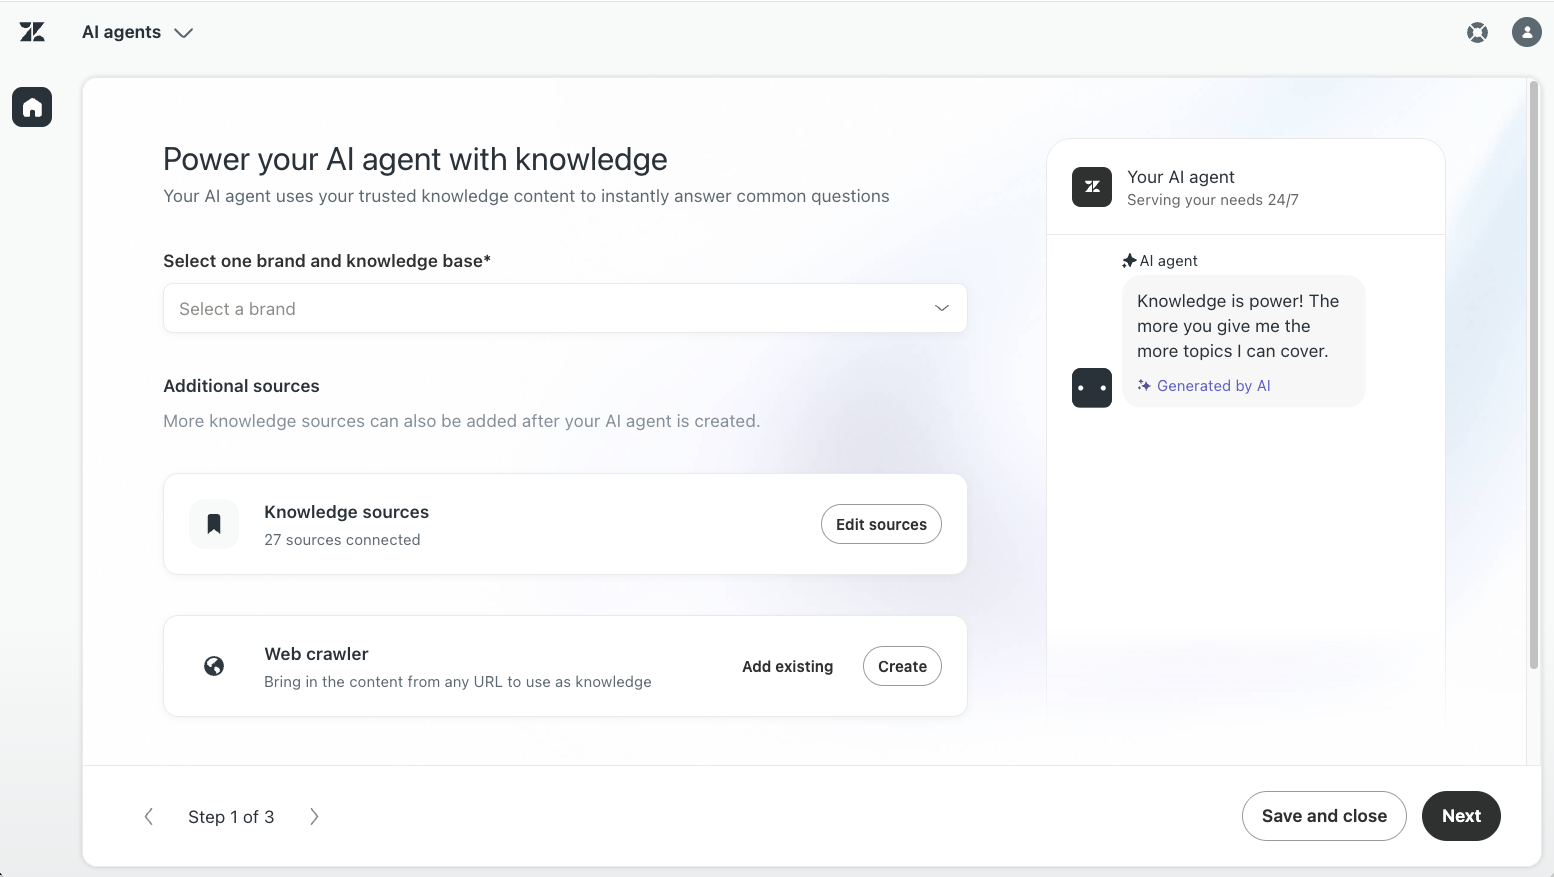
- Under Select one brand and knowledge base, select the brand you want
the AI agent to use.
The knowledge base associated with the brand is automatically connected to the AI agent so that it can create AI-generated answers based on that content. If the brand’s knowledge base:
- Hasn't been created yet, click Add knowledge base to create one.

- Hasn't been activated yet, click Activate knowledge base to
activate it.

- Doesn't have authentication turned on, click Learn about
authentication to turn on help center
authentication for messaging.

- Hasn't been created yet, click Add knowledge base to create one.
- (Optional) Add content from external websites using a web crawler by
clicking either of the following:
-
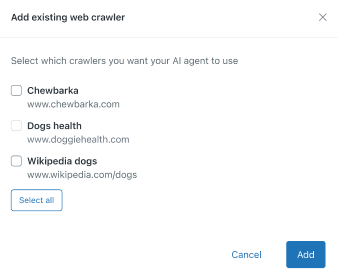
Add existing: Select one or more existing web crawlers you
want your AI agent to use and click Add.
-
Create: Create a new web crawler
to index website content.Note: You must have at least one connected knowledge source before continuing, whether that’s an active help center or a web crawler.
-
Add existing: Select one or more existing web crawlers you
want your AI agent to use and click Add.
- Click Next.
The Personalize your AI agent page opens.
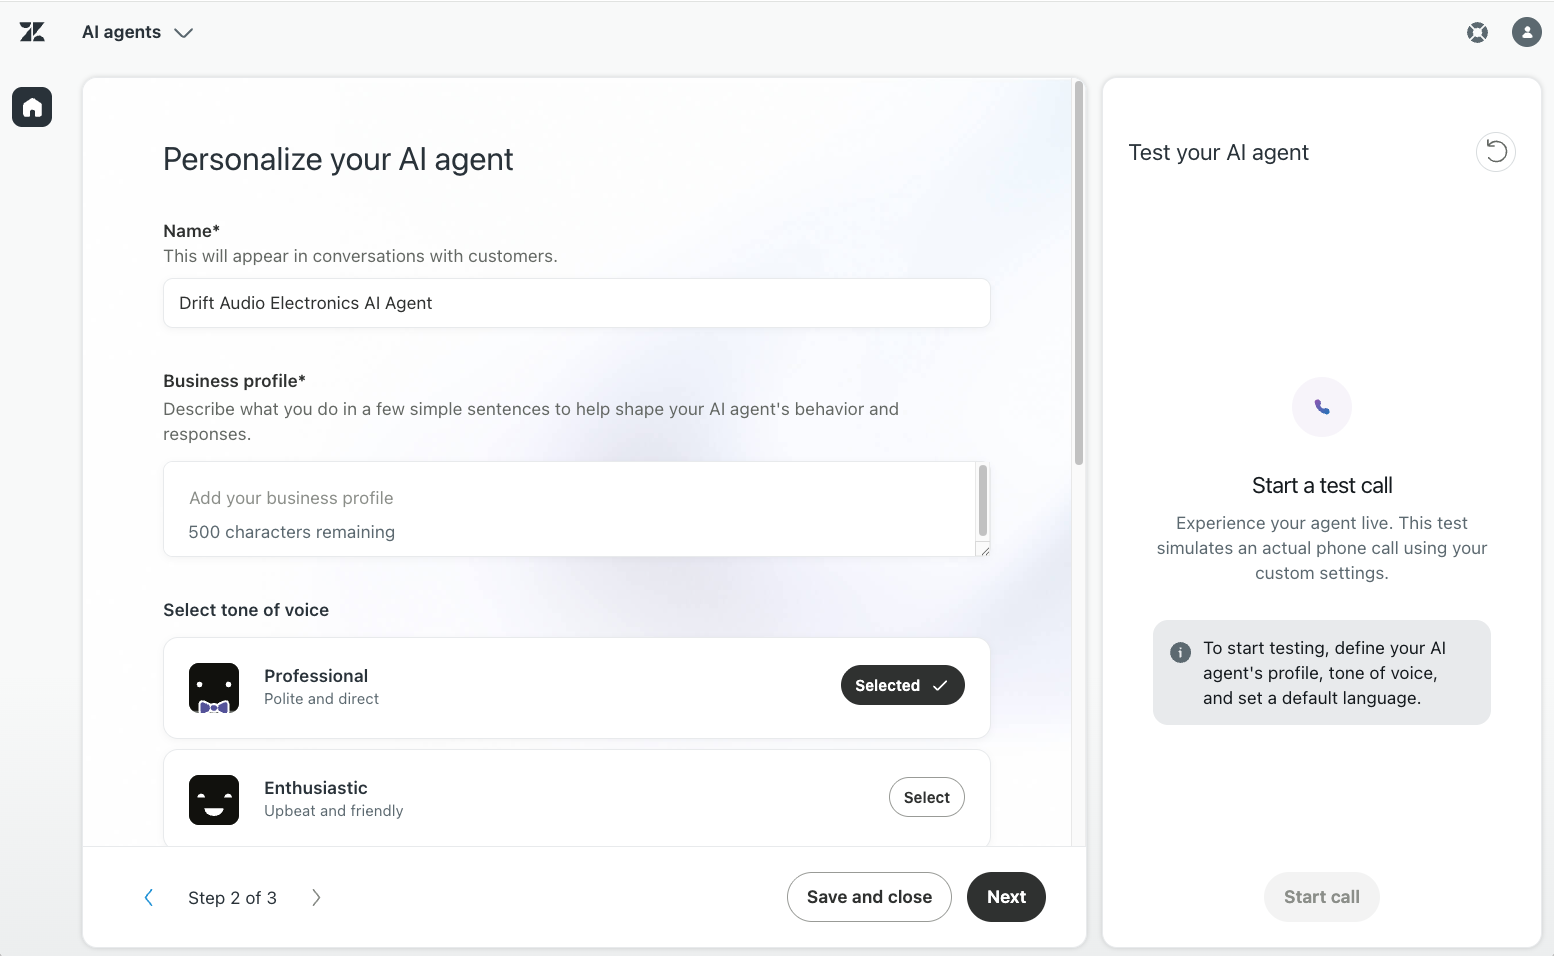
- In Name, adjust the name for the AI agent if necessary.
By default, this name is <selected brand> AI agent.
- In Business profile, enter one or two short, factual sentences in
English that describe what your company does.
This information gives the AI agent context so that it can give the most appropriate responses. Keep this description focused on simple text about your company's business domain, rather than marketing-focused material that could potentially influence your AI agent's behavior. Make sure not to add instructions for the AI agent to the business profile, which might lead to unexpected errors.
- Under Select tone of voice, click Select on one of the
following options:
- Professional: (Default) A polite and direct tone.
- Enthusiastic: An upbeat and friendly tone.
- Informal: A casual and friendly tone.
-
Custom: A custom tone created from scratch or an edited
version of one of the tones above.
If you select this option, write some short guidelines that tell the AI agent how to speak to users. For example, “You maintain a polite, approachable, and conversational tone throughout the conversation.”
- In Select default language, select the language your AI agent should
use.
You can add more supported languages later.
- In Select a locale for your default language, select a locale to
determine the AI agent’s vocabulary and accent.
For example, if you select French as the default language, you can choose a locale of France or Canada. The locale affects the AI agent’s phrasing, word choice, spelling conventions in transcripts, and spoken pronunciation during conversations.
- In Default Voice, select the voice the AI agent uses by default. You
can configure a different voice for individual languages later.
For more information about languages, locales, and voice settings, see Configuring multi-language support for voice AI agents.
- (Optional) Test your AI agent to be sure it responds the way you expect. For more information, see Testing a voice AI agent.
- Click Next.
The Set up your AI agent on voice page appears.
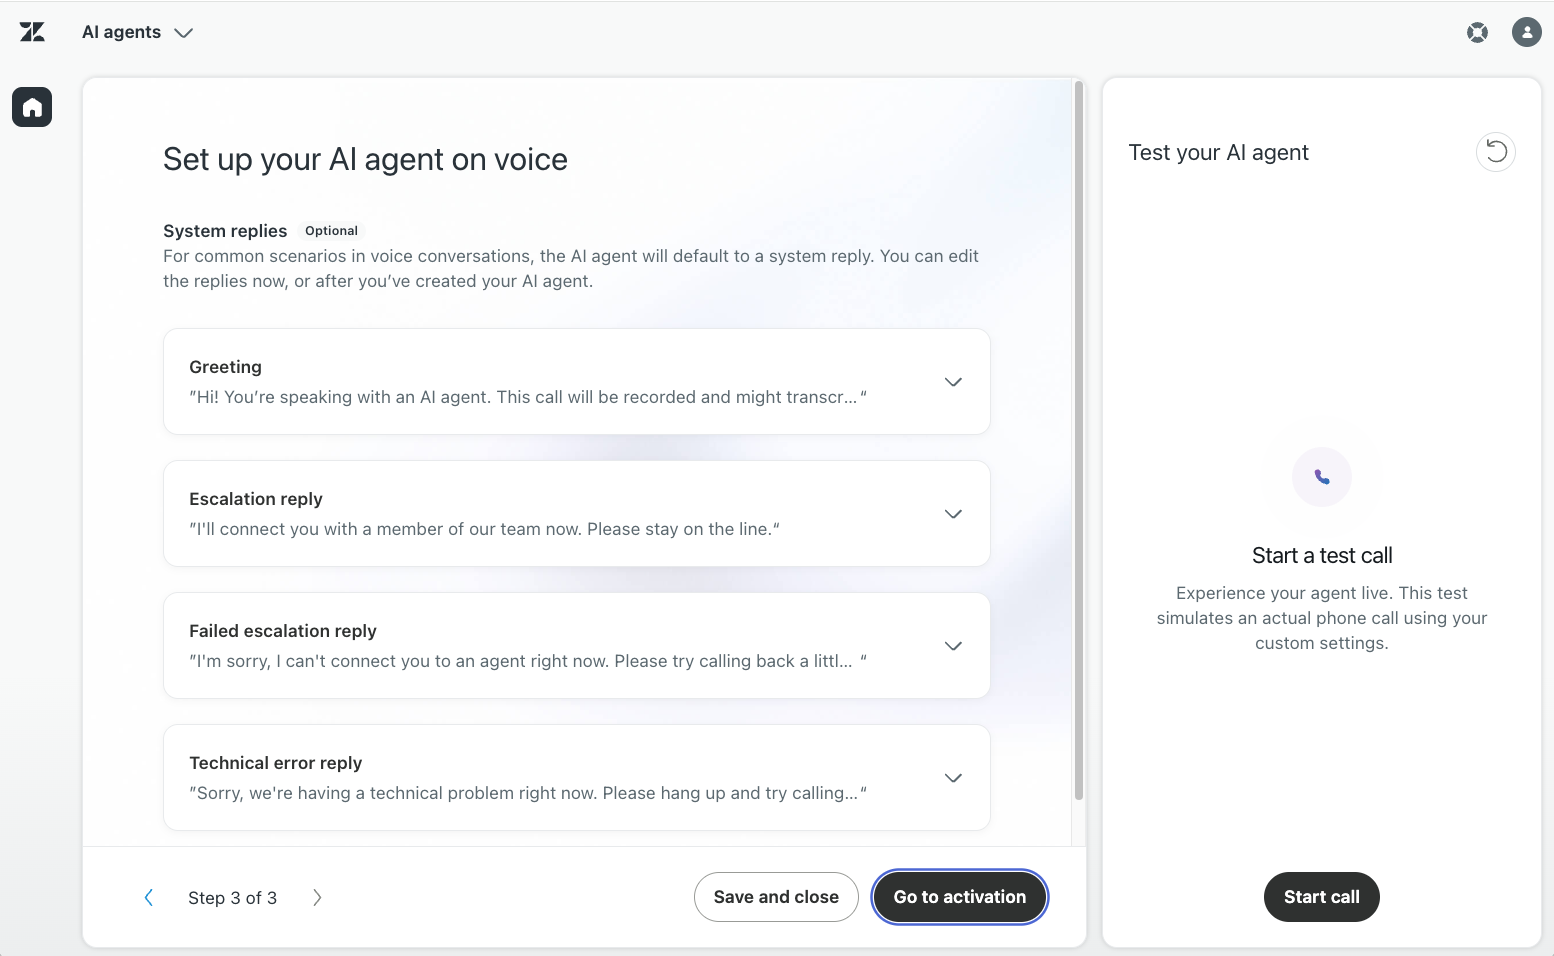
- (Optional) Under System replies, expand each and customize the messages as needed. For more information, see Viewing and editing system replies for AI agents.
-
Click one of the following options:
-
Save and close: Create the agent without activating it.
You can continue configuring the agent before making it live for customers, but you can’t return to the creation flow for this AI agent. Instead, use the AI agents workspace to perform any additional configuration as needed and activate the AI agent later.
-
Go to activation: Create and activate the agent so that it can begin interacting with customers:
-
Select the lines you want the AI agent to interact with customers on.
-
Click Activate on channels.
By default, Zendesk records AI agents' calls and you can monitor your usage charges. To not record these calls, select Stop AI agent call recording in your call recording configuration.
-
-
Your AI agent is now created. If you selected Go to activation, it is also active on the selected lines. You can’t return to the creation flow for this AI agent, but you can continue configuring it at any time from the AI agents workspace.
Configuring a voice AI agent
The guided setup lets you configure key settings for your voice AI agent, including its knowledge, identity, default language, voice, and system replies. You can activate the AI agent as part of the guided setup or save it without activating.
After creating the AI agent, use the AI agents workspace to review or update these settings and configure additional capabilities. You can perform these tasks before or after activating the AI agent:
- Configure the AI agent's identity
- Import a knowledge source to power AI-generated answers
- Create use cases to identify customer requests
- Create generative procedures or dialogues to control responses
- Add multi-language support (Optional)
- Create actions, entities, and API integrations to increase automation (Optional)
- Create instructions to influence AI agent responses (Optional)
- Configure additional AI agent settings to fine-tune behavior (Optional)
Configure the AI agent's identity
Identity refers to how an AI agent presents itself to your customers. An AI agent’s identity gives it a name as well as the context of who it’s working for (your company) and what your company does (your business profile). For voice AI agents, an agent’s identity also controls the AI agent’s voice, including whether it sounds male or female and what accent it uses.
Import a knowledge source to power AI-generated answers
For an AI agent to respond to customer questions with AI-generated answers, it must have access to at least one knowledge source. The knowledge source can be a help center, Confluence site or space, CSV file, or web-crawled website.
See Importing knowledge sources to power generative replies in AI agents.
Create use cases to identify customer requests
Next, create use cases that allow the AI agent to understand customer requests and follow the correct generative procedures or dialogues (see the next section). If you don’t create any use cases, the AI agent forms responses using only the content of your imported knowledge source.
Using use cases, you can create a sort of “conversational IVR,” meaning the AI agent can disambiguate and clarify customer requests and direct them to the right use case. From there, you can decide whether to solve the request using a procedure or simply triage directly to the appropriate team.
See Creating use cases for AI agents to identify what customers are asking about.
Create generative procedures or dialogues to control responses
The most powerful step in AI agent setup is to create generative procedures. These procedures should reflect your business policies so that the AI agent can resolve customer requests in line with your policies. For all use cases except the welcome and escalation system replies, you’ll create generative procedures.
See Creating generative procedures for AI agents with agentic AI.
However, for the welcome and escalation system replies, you’ll create dialogues that allow the AI agent to respond to customer requests according to scripted conversation flows.
See Creating conversation flows in the dialogue builder for AI agents.
Add multi-language support (Optional)
You can add and activate additional supported languages to your AI agent so that it can converse with your customers in the languages they prefer. You can also select a locale to determine the AI agent’s vocabulary and accent.
The AI agent initially answers calls in the language set as your default, but customers can ask the AI agent to change to a different supported language during the course of the conversation.
Create actions, entities, and API integrations to increase automation (Optional)
To leverage helpful details in either generative procedures or dialogues, you can create:
-
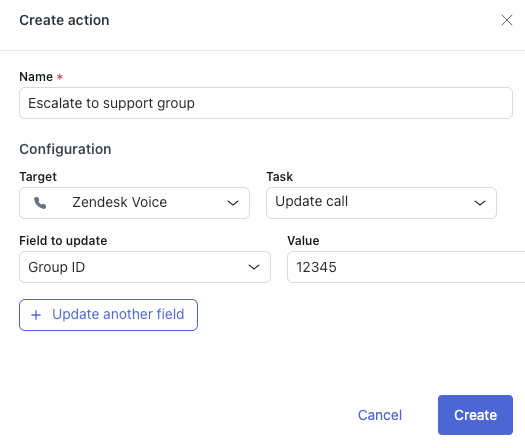
Actions that allow the AI agent to perform actions based on the
details of the session or your customer relationship management (CRM)
system. For example, you can enrich the ticket with tags, custom fields, or
group assignments that route tickets to the right agents when escalating.
See Creating and adding actions for AI
agents. These are the actions available for when you select
"Zendesk Voice" as the action target:
- Update call: Updates ticket fields.
- Update tags: Updates ticket tags.
- Hang up: Ends the call.
-
Send SMS: Sends a text message to the caller.
You must turn on text for the phone line, see Managing phone line settings. For more information, see Getting started with Text.
Note: International texting is turned off by default. To activate international texting contact Zendesk Customer Support.This action works in procedures, dialogues, and global events.
You can add dynamic data to the message using placeholders. The first text message generates a separate ticket.
-
Send public reply: Posts a public reply on the ticket and
emails it to the caller if their Zendesk profile has a verified
email address and the Notify requester and CCs of comment
update trigger is active (by default, the trigger is
active).
This action works in procedures, dialogues, and global events.
You can add dynamic data to the message using placeholders.
- Entities that hold pieces of information in customer messages that have specific meaning, such as the user’s email address. See Creating entities in conversation flows for AI agents.
-
API integrations that leverage information from other backend systems
you use during your workflows. To create these API integrations, you use the
integration builder. See About the integration builder for AI
agents.Note: For APIs to be used by an AI agent at the right time and in the right context, it’s extremely important to add a clear description to your APIs while building them in the integration builder.
Create instructions to influence AI agent responses (Optional)
Instructions let you tailor an AI agent’s responses in ways beyond customizing their persona, tone of voice, and pronoun formality. For example, you can create instructions that tell your AI agents to use or avoid specific terminology, or to respond in specified ways to particular customer messages.
Configure additional AI agent settings to fine-tune behavior (Optional)
At any point, you can always continue configuring the AI agent’s settings. See Accessing and viewing settings for AI agents.
Connecting an AI agent to Zendesk voice
If you created your AI agent without activating it, you must connect it to a Zendesk voice line before it can interact with customers. The instructions below assume you’ve already created a voice AI agent and added a phone line or digital line for voice.
To connect an AI agent to Zendesk voice
- In Admin Center, click
 Channels in the sidebar, then select Talk and email > Talk.
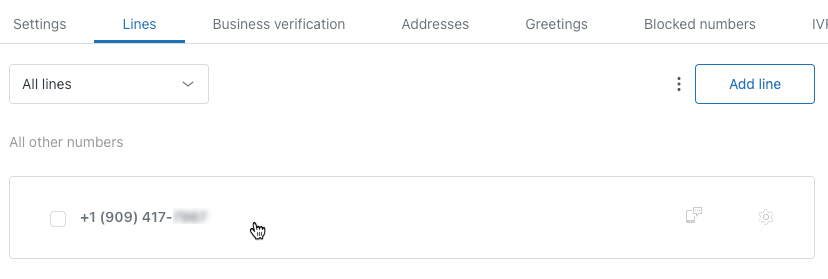
 - Select the Lines tab.
- Click your phone line.
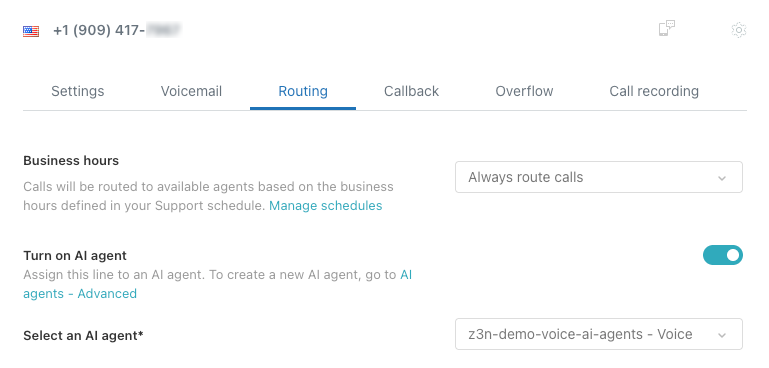
- Select the Routing tab.
- Select Turn on AI agent.
- In Select an AI agent, select the AI agent you created
above.
- Click Save changes.
Your voice AI agent is now the first responder on the selected voice line.
Testing a voice AI agent
You can test a voice AI agent in production or sandbox environments in two ways:
- Use the call console in Agent Workspace to place a test call to the voice line connected to the AI agent. This method tests the complete voice experience, including ticket creation and escalation to a human agent.
- Use the browser-based testing widget in the AI agents workspace to have a voice conversation directly with the AI agent. The testing widget doesn’t create a ticket or call recording, and it doesn’t support escalation to a human agent. The testing widget tests the AI agent as a whole; you can’t use it to test an individual procedure.
During testing, verify that the AI agent recognizes expected customer requests, follows the correct procedures, performs configured actions, and responds naturally. When testing with the call console, also verify that the AI agent escalates calls appropriately.
To test a voice AI agent using the call console
- Use the call console in Agent Workspace to call the line connected to the voice AI agent.
- Interact with the AI agent as a customer would.
- To test your escalation flow, use a second device or an incognito browser to receive handoffs.
- After the call, review the resulting ticket to verify the transcript, summary, any available recording, and any ticket field updates made by the AI agent.
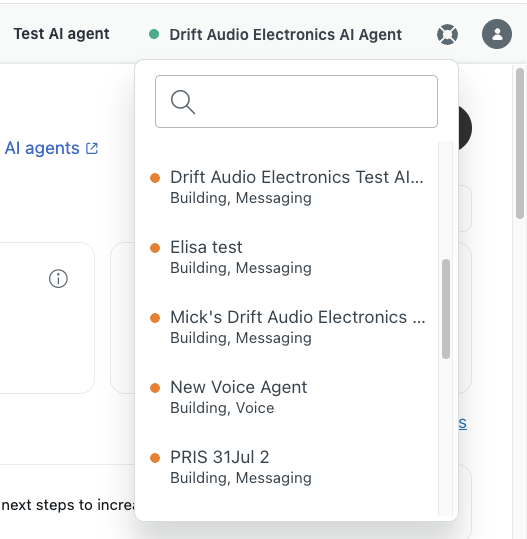
- In the AI agents workspace, click the
name of the agent in the top bar, then select the agent you want to
test.
Use the case-insensitive literal search to narrow the list of AI agents by name.
- Click Test AI agent in the top bar.
Test your AI agent opens.
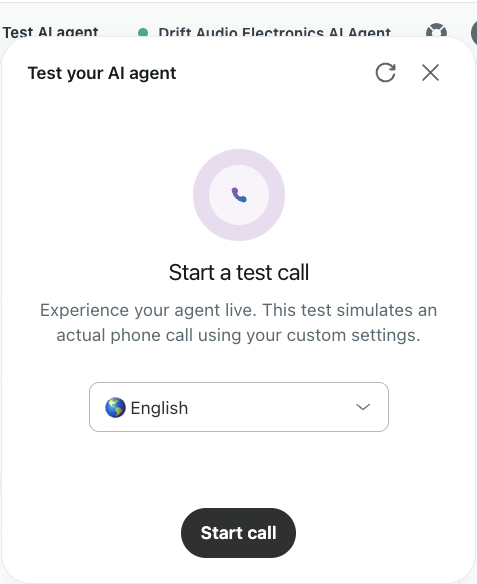
- (Optional) Select the language for the test from the language menu, if available.
- Click Start call.
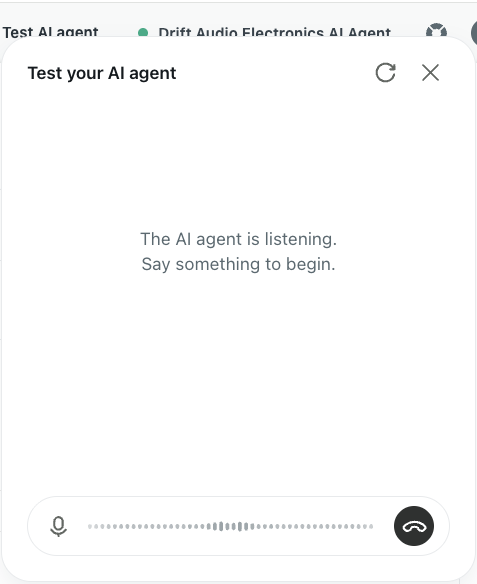
- Have a conversation with the agent by speaking into your microphone.
- (Optional) Click the Mute microphone icon (
 ) to stop the AI
agent from hearing you.
) to stop the AI
agent from hearing you. - (Optional) Click the Restart conversation icon (
 ) or the End call
icon (
) or the End call
icon ( ) to end the
call.
) to end the
call.You can start a new call for another test.
- Click the Close icon (
 ) to finish the
testing.
) to finish the
testing.
Monitoring the performance of a voice AI agent
The final and ongoing step in creating a voice AI agent is to monitor its performance and continue to improve its efficiency. The Reporting dashboard gives you insights into key automation metrics, reports on the value of AI agent outcomes, and helps you make data-driven decisions to improve future efficiency.
To monitor the performance of a voice AI agent
- In the AI agents workspace, click
 Reporting in the sidebar.
 - Select either the Overview or Contact reasons tab.
- Click the AI agent filter and select your voice AI agent.For more information about the reports, see Analyzing AI agent performance with the reporting dashboard.Tip: Alternatively, you can click the Channel filter and select Voice to filter the results in the KPIs on the Overview tab only.
Automated resolutions in the voice channel are also reflected in the Automated resolutions dashboard in Admin Center.
Additionally, every call creates or updates a Zendesk ticket. Call recordings, AI transcripts, summaries, and the link to the AI conversation are stored on the ticket. Admins can turn off AI agent call recording, but transcripts and summaries still post to the ticket. Tickets are reportable in Zendesk analytics, so you can view the Zendesk Voice dashboard or create custom reports to track volumes, outcomes, and handoffs.
To access your voice channel billing information, see Reviewing your voice usage charges.
Best practices for deploying a voice AI agent
When deploying a voice AI agent, keep the following best practices in mind:
- Experiment with different tone of voice settings to optimize for natural conversations.
- Use spoken, human-like phrasing in your dialogues and generative procedures. Always read welcome and escalation dialogues aloud to check for a natural-sounding flow. Avoid references to non-voice-friendly content, such as URLs.
- In your escalation dialogue, add an AI agent message such as "Just a moment!" to let the customer know the escalation is ongoing.
- Avoid duplicate greetings after escalating from the voice AI agent to a human agent. Add a short, silent greeting at the phone number level if your standard greeting isn’t desirable after an escalation.
- Use ticket field updates for smarter routing. Create actions that allow your AI agent to set Group and Skills ticket fields during the conversation to drive precise routing, which is especially powerful when used with omnichannel routing.
- Perform test calls that mimic real customer scenarios.
- Periodically monitor the performance of your voice AI agent, occasionally listening to its call recordings or reviewing the associated transcripts.