Support your customers via SMS with text. With text, you and your team can get creative about finding new ways to help customers with notifications, updates and proactive texts.
For general information about triggers and text, see Automating SMS support with text triggers.
This article contains the following topics:
Send automated text responses
When customers submit a request, set up this trigger to automatically notify them you've received it. For example, you might want customers to receive a text that says "We've received your message! We'll get back to you shortly."
For this procedure to work, the customer's number needs to be in E.164 format like +14155551212.
If an end user has more than one phone number associated with their profile and you send them a text message, the message is sent to the first phone number that was added to their user profile. If you want text messages to be sent to another phone number, you’ll need to remove all phone numbers from the profile and re-add them, ensuring that the first phone number you add is the one you want text messages sent to.
- In Admin Center, click
 Objects and rules in the sidebar, then select Business rules >
Triggers.
Objects and rules in the sidebar, then select Business rules >
Triggers. - Click Add trigger.
- Enter a title for your trigger, like “Auto response to inbound text.”
- Add the following conditions and actions for your trigger (see screenshot
below):
- Meets all of the following criteria:
- Ticket Channel Is SMS
- Ticket Is Created
- Perform these actions:
- Notifications: SMS User: requester
- From (select SMS number)
- Body (include text you'd like in your automated outbound SMS)
- Meets all of the following criteria:
- Click Create trigger.

Alert agents when a ticket needs attention
Help ensure your agents prioritize tickets appropriately by notifying them when tickets that meet certain criteria need attention. This can be helpful if you want to prioritize tickets from VIP customers or have Service Level Agreement (SLA) targets to meet.
- In Admin Center, click
Objects and rules in the sidebar, then select Business rules >
Triggers.
- Click Add trigger.
- Enter a title for your trigger, like “VIP customer text update.”
- Add the following conditions and actions for your trigger:
- Meets all of the following criteria:
-
- Ticket Is...Updated
- Organization Is: The organization of the VIP customer, in this example "Legal"
- Perform these actions:
- Notifications: Text Group
- From (select text number)
- Body (include text you'd like in your automated outbound SMS)
- Click Create trigger.

Start a text conversation with proactive outbound texts
Reach out to customers on a personal level with proactive outbound text. For this recipe to work, you need to set up a trigger and then create the proactive ticket yourself.
To create a trigger
- In Admin Center, click
Objects and rules in the sidebar, then select Business rules >
Triggers.
- Click Add trigger.
- Enter a title for your trigger.
- Add the following conditions and actions for your trigger:
- Meets all of the following criteria:
- Ticket > Is > Created
- Tags > Contains at least one of the following > [create a tag like proactive_text]
- Perform these actions:
- Notifications > Text user > (requester)
- From > (choose a text number)
- Body: {{ticket.latest_public_comment}}
- Status > Closed
- Remove tags: proactive_text (or whatever tag name you used)
If you want to use Explore to report on proactive outbound texts, add a unique tag (such as proactive_texts_sent) to the trigger actions. For help, see Reporting with tags.
- Meets all of the following criteria:
- Click Create trigger.
Create a proactive ticket
To create a proactive ticket
- Click +Add - New… Ticket
- Make the requester your text recipient. The recipient must be a current end-user in the account.
- Assign an agent.
- Subject - anything that helps your team (will not affect the text)
- Description - type your outbound text message
- Tag: include “proactive_text” tag.
- Submit as Solved.
For repeated outbound texts, create a macro that’ll automatically add your proactive text tag and populate the description with your message. Learn more about macros here.

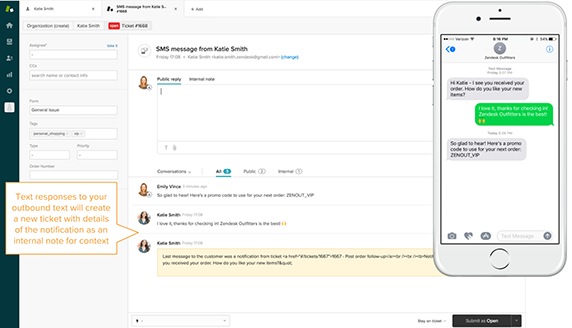
Respond to texts within a new ticket
If a customer responds to your outbound text, their reply text will create a new ticket. The text (or placeholder content) from the body of the trigger you created in the previous step will be added as an internal note in the newly created ticket. You can respond to that ticket as you would any other channel -- public responses will be sent as texts.