You can configure a number of appearance-related settings for the Web Widget from the Style tab of the Web Widget page.
This article includes the following topics:
Configuring the widget frame
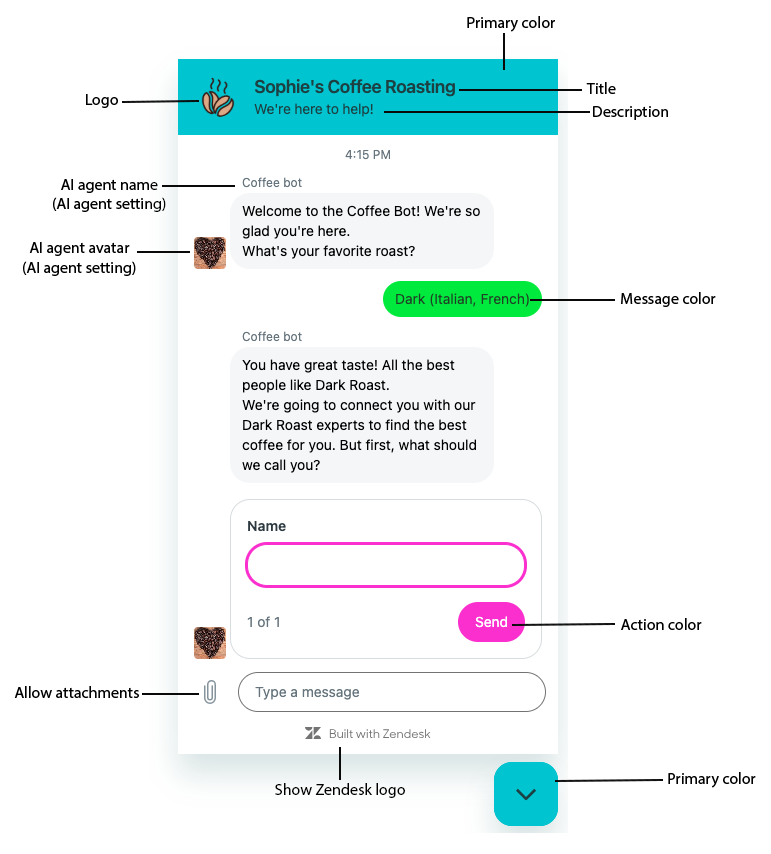
The Web Widget frame includes the structural elements of the window through which customers conduct messaging conversations with agents. You can define where on the page the frame is located, select colors for text and frame elements, upload a logo, and more.
To update the widget frame
- In Admin Center, click
 Channels in the sidebar, then select Messaging and social >
Messaging.
Channels in the sidebar, then select Messaging and social >
Messaging. - Click the name of the channel you want to edit. The widget’s edit page opens.
- Expand the Style section and configure the following settings:
- Position, the location of the widget and launcher on your website or help center. Select Bottom left or Bottom right, then enter the offset spacing from the bottom and side of the page. The default position is 16px from the selected option.
- Border, the border radius, or curve, of the outer edges of the widget. Use the slider to select a radius from Straight corners (0 px) to Curved corners (20 px).
- Primary color, the main color of the launcher button and widget header. Enter a hexadecimal number, or click the color swatch to open a color picker. If you're migrating from Web Widget (Classic), the color defaults to that brand's widget settings.
- Message color, the color of the bubble around customer messages. Enter a hexadecimal number, or click the color swatch to open a color picker.
- Action color, the color of any buttons or customer actions (such as a selected option). Enter a hexadecimal number, or click the color swatch to open a color picker.
- Logo (optional), a JPG or PNG to appear at the top of the frame. The logo is the visual identity of the conversation flow. Click Upload image, then browse to the image you want to add.
- Title, the name that appears at the top of the frame. This might be a call to action ("Contact us") or your business name.
- Description (optional), a short piece of text under the title. This can be information you want to share, or a tagline, for example. Enter the description in the text box.
- Allow customers to upload attachments, selecting this checkbox allows customers to add attachments to messaging conversations. Deselect to prevent customers from adding attachments. Attachments are allowed by default.
- Show Zendesk logo, which switches on and off the Zendesk logo on a web widget or mobile channel. Available for Suite Enterprise accounts.
- Sound notifications (Web Widget only), which activates audio alerts for your customers when they receive a response from a live or AI agent in an inactive Web Widget messaging conversation. When activated, customers can choose to disable sound notifications on their end of the conversation.
- Click Save settings.
Configuring the widget launcher
The Web Widget launcher is the button the customer clicks to open the widget. You can define where it appears on the web or help center page, its shape, text, and more.
You can also use the Web Widget API to create a custom Web Widget launcher and define how it behaves. See Web Widget API for more information.
To update the launcher
- In Admin Center, click
Channels in the sidebar, then select Messaging and social >
Messaging.
- Click the name of the channel you want to edit. The widget’s edit page opens.
- Click the Style tab.
- Update the Position in browser window, where the launcher button appears in your browser window. Use the radio buttons to choose either Bottom right or Bottom left.
- Update Shape (Web Widget only), the shape of the launcher button.
Choose one of the following:
- Square: Use the slider to adjust the curve of the outer edges of the square launcher button.
- Circle
-
Custom launcher Note: Selecting Custom launcher removes the launcher from your website or help center. You can then add the launcher to your web or help center pages using the open, close, and unread messages APIs. See Web Widget API.
- Text (optional), text that appears next to the launcher button
- Show on mobile, select to display the text in a mobile SDK.
- Click Save settings.
Positioning the Web Widget with embedded mode
With embedded mode, you can display the Web Widget within any HTML element on your page, instead of using the default floating overlay. The widget automatically adjusts to match the size of its assigned container, allowing you to choose its placement and dimensions.
Embedded mode requires you to use a JavaScript embed API call to specify both the mode and the target container for the widget. For more information, see Embedding the Web Widget.