This article discusses the following step types:
- Send message
- Present options
- Show help center articles
- Add carousel
- Ask for details
- Ask if question resolved
- Make API call
- Transfer to agent
- Branch by condition
- Add business hours condition
- Link to another answer
- Set variable
After getting to know the elements here, you can create an AI agent for messaging and begin building it using answers.
Overview of answer step types
You can use any of the following step types in your AI agent answer:
- Send message: Displays a piece of text to the customer during a conversation.
- Present options: Displays up to 10 preconfigured quick replies the customer can interact with during a conversation.
- Show help center articles: Presents up to six help center articles to the customer during a conversation.
- Add carousel: Displays up to 10 informational panels the customer can scroll through, each with a link to an external URL.
- Ask for details: Collects information from an end user during the conversation.
- Ask if question resolved: Asks your end users whether an answer resolves their support issue and offers response options they can choose from.
- Make API call: Presents external data in your conversation or pushes data to an external endpoint.
- Transfer to agent: Escalates the conversation to an agent.
- Branch by condition: Adds conditional logic to an answer flow. You can use the logic to personalize a conversation based on an end user's data.
- Add business hours condition: Lets you use your schedule to branch the conversation.
- Link to another answer: Links one answer in a custom-built answer flow to another.
- Set variable: Used to set the value of an existing variable or of a new variable created within the step.
Send message
The Send message step inserts a predefined piece of text into the conversation. It can be a greeting, useful information about your business, or an automated direct reply in response to end users' free-text messages and quick reply option selections.
Configuration rules
Send message steps can be added anywhere in your answer. After they're displayed, they move the conversation immediately to the next step in the answer's flow.
You can add the following content elements to the AI agent message in this step:
| Bot builder view | Customer view |
|---|---|
 |
 |
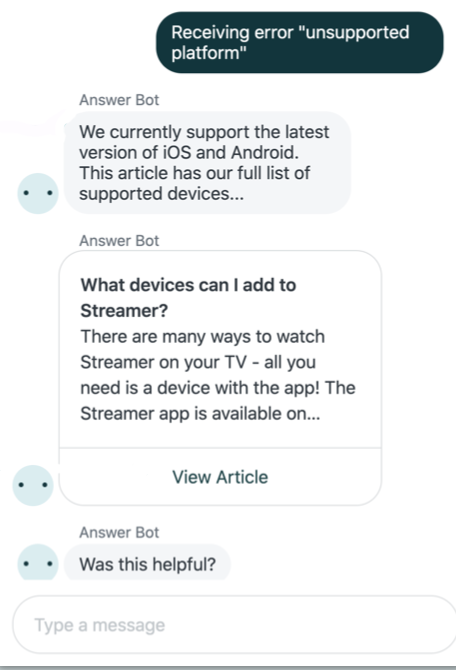
Example
In the example below, the customer entered “Receiving error ‘unsupported platform’” which triggered the automated reply about supported platforms. That reply was configured in the bot builder as a Send message step; the AI agent assessed the customer's free-text entry, identified that preconfigured message as the most likely to address the customer's needs, and moved the conversation to that step:
Present options
There are two ways to use the Present options step to provide quick reply options to your end users in a conversation:
- Manual: Create each option yourself.
- Dynamic: Use API data saved in a Make API call step to automatically create options.

To add options to your answer in bot builder, click Present options and select Manual or Dynamic.
This step displays up to 10 preconfigured quick reply options that can be offered to your customers during a conversation, allowing them to select a likely response rather than typing it in.
These options can be used to represent commonly-asked questions, branch the conversation, or help your customers navigate through a conversation with your AI agent. You can drag-and-drop options in the Configuration panel to reorder them.
Configuration rules
You cannot end an answer flow with a Present options step. It must be followed by one of the other step types, which must also be configured before you can publish and move on to another step. In the example below, three options are followed by a Show help center article step, and one by a Transfer to agent step.
You can add the following content elements to the AI agent message in this step:
Variables can be used in button links and to insert images in this step.
Manual:
| Bot builder view | Customer view |
|---|---|
 |
 |
Dynamic:
| Bot builder view | Customer view |
|---|---|
 |
 |
Example
In the following manual Present options step example, a customer is contacting a scooter sales and rental company. Because the company knows that most customers want information on buying, selling, or renting a scooter, after the initial greeting they immediately offer those three options.

Note that as a result of conversational shortcuts, typing the message “I want to buy a scooter” in the example above will have the same effect as clicking the quick reply.
Show help center articles
The Show help center articles step presents up to six help center articles to the customer during a conversation. If you have public and restricted articles (articles requiring end users to sign in), you can configure which articles to show anonymous (unauthenticated) end users and which to show for authenticated end users. See Suggesting restricted help center articles in an AI agent answer (Legacy) for more information.
This differs from the automated article suggestions, which search for relevant articles in your help center based on customer’s free-text entries.
Configuration rules


Example
In the example below, the customer selected a quick reply option, "I want to buy a scooter", and received a specific article recommendation in response, which also included the text responses prior to the recommendation:

Add carousel
The Add carousel step inserts an array of up to 10 panels into an answer step the customer can scroll through, each with a link to an external URL. Each panel displays configurable text and an interactive link. After the carousel is displayed, it moves the conversation immediately to the next step in the answer. The customer interacts with the carousel using the right and left arrow icons to scroll through the panel array. They can interact with the carousel at any time during the messaging conversation, after the step is reached.
Configuration rules
Carousels can be added anywhere in an answer flow.
A carousel must a minimum of 2 and a maximum of 10 panels.
Each panel must include:
- A title
- A complete URL
- Text for the button link
You can add the following rich content elements to the AI agent message in this step:
| Bot builder view | Customer view |
|---|---|
 |
 |
Using array variables in carousels
Dynamic carousels support arrays, allowing for a flexible data structure where you can fetch data from an external system. We iterate through the array of up to 10 items and dynamically generate a template, mapping each item and its value to a carousel form field. For example, you can retrieve the list of recent orders, including details such as the date ordered, order number, and so forth.
For an example of using array variables in carousels, see Using the Make API call step.
Saving customer responses in carousels
You can capture a customer’s selection in a variable and use that variable downstream in bot builder. For example, using a carousel you display a customer’s most recent orders. If the customer selects the second card or item, you can then reference that second card’s variable in a later step in bot builder. Saving customer responses can be used in (static) carousels, dynamic carousels, and branch by condition steps.
A carousel panel can include a maximum of three buttons. These buttons can be used to open links or save a response. However, you can have only one button to save a response. When a customer clicks a button that opens a link, the predefined URL opens in a separate tab. A button that saves a response passes a variable and its value to bot builder when a customer clicks it. See Adding rich content to answers in your AI agents for messaging (Legacy) for more information.
When presenting a carousel with a button to save a response, the conversation is paused until the customer responds to the button. If the customer types in the text box instead of clicking the button to save a response, the conversation continues with the text box flow. If no button to save a response is configured, the conversation continues to the next step in the flow.
This feature has the following limitations:
- Saving customer responses in carousels is not supported on Unity channels.
- You can't save customer responses in the Add carousel step.
- Only the first 280 characters of a variable's value are saved.
Ask for details
The Ask for details step requests information from an end user during the conversation and adds that information to the generated ticket. You can use default or custom text and drop-down ticket fields to define the information you want to collect. Customer responses are automatically saved as variables. See the example below for how you can configure order tracking using this step.
If a conversation field is configured through client APIs, then the custom value used here will be pre-filled. End users have the option to overwrite the pre-filled values while interacting with the AI agent. See Using conversation metadata with the Zendesk Web Widget and SDKs.
Configuration rules
Ask for details can be added anywhere in your answer. The step must include:
- A name to identify the step. This won’t be visible to your customer but will help your team to identify the step.
- Custom text and drop-down ticket fields to capture customer data
such as name, email, and any other information that can be helpful to
collect to power the rest of the conversation.
- Custom ticket fields must be created in Admin Center before you can add them to the step.
- Permissions for ticket fields must be set to Editable for end users. When a field is included in an Ask for details step, end users are required to submit a response, regardless of the requirement configuration on the permissions page.
- Nested drop-down fields are not supported.
- The name specified in the ticket field's Title shown to customers is included in a drop-down field. The ticket field's Display name doesn't appear in the drop-down field, and won't appear in ticket search results. See Creating custom ticket fields.
You can add up to 8 ticket fields in a step.
| Bot builder view | Customer view |
|---|---|
 |
 |
Example
In the following example, the AI agent captures order information for the customer and displays the shipment status of the order.

Ask if question resolved
The step type inserts a piece of text into the conversation, followed by two quick response-style options, which are each followed by a message or additional step.
Configuration rules
This step cannot be the first step in an answer, and cannot be added after a Transfer to agent step.
By default, when you insert this step into an answer the following text appears in each element:
- “Was this helpful?” (Question resolved AI agent message)
- “Yes, problem solved” (Resolved response)
- “No, I still need help” (Unresolved response)
- “Great. Knowledge is power. You can ask me another question at any time.” (Follow-up message to resolved response)
- ”Got it. Try rephrasing your question.” (follow-up message to unresolved response)
These elements must be present in the step for the answer to be published successfully.
The text above can be customized as needed. Additionally, the follow-up messages can be deleted and replaced by other step types.
While the text in the Question resolved and response messages is customizable, the resolution status by end user’s responses is fixed. That is, when the end user selects the first/left hand option (“Yes, problem solved”) it is considered a positive, or resolved response. The second/right hand option is captured as a negative, or unresolved response (for example, “No, I still need help”).
| Bot builder view | Customer view |
|---|---|
 |
 |
Make API call
The Make API call step can be used to push conversation details out to your CRM, pull product information into your AI agent messages, and more.
This step can be used to do two things: retrieve and present data from an external system in a response or send data from the conversation to an external endpoint such as Amazon Event Bridge or Google Analytics. It's especially useful when a customer requests information that is updated frequently or is particular to them, such as order status or current wait time for assistance. You can also use the Make API call step to send events to analytic and tracking services, such as Google Analytics or Pendo.
Configuration rules
API call steps can be added anywhere in your answer flow. Adding this step splits the flow into two branches:
- If success: Appears when the external source is queried and supported information is returned.
- If failed: Appears when the API call fails, due to a client or server error, or if the response is not supported by the bot builder.
Information returned from the queried source must be in JSON format, and be less than 2MB.
Admins must include the following information in the step configuration:
-
Supported HTTP request method. Supported HTTP request
methods are GET, POST, PUT, PATCH, DELETE
- POST, PATCH and PUT must include a Body field sent with request
- GET and DELETE operations do not have a Body field.
- Endpoint URL, the URL of the external source.
Admins must add step type after each branch before publishing the flow.
Admins can create variables during the configuration of this step that can be used when creating AI agent messages subsequent to this step. Only the first 280 characters of a variable's value are saved.
The Add an API call step has a number of configuration options that may require assistance from a developer on your team. See Using the Make API call step for more information.
Example
Let's say the customer selects the quick reply option “Zendesk office location” which triggers the Make API call step. The API call is configured to get the information from Google’s Places API.
If the external system returns a response, the Success branch is triggered, and the information is inserted into the response framework created by the admin, and presented to the end user.
If a response is not returned, or the response is not supported by the bot builder, the Failed path is taken, and fallback behavior defined by the admin is presented to the end user.
For an example answer using the Make API call step, see Messaging recipe: Getting external data with an AI agent for messaging (Legacy).
Transfer to agent
The Transfer to agent step escalates the conversation to an agent.
Configuration rules
In this step, you can configure:
- A final message to send before transferring a customer to an agent.
- Tags that are added to the ticket that is created when the conversation is
transferred. These tags can be used in ticket routing and other business rules.
See About tags.
- You can add up to 10 tags to each Transfer to agent step in an answer.
- Each tag can be up to 80 characters.
- Spaces and special characters such as #, @, and ! aren't allowed in tags.
- Custom ticket fields that can be used to collect information from end users
then added to tickets to provide better context for admins.
- Text and drop-down custom fields are currently supported.
- The field values set on here will overwrite values set previously, including those from the Ask for details step and Messaging metadata API.
- Custom ticket fields must be created before you can add them to the step.
- Permissions for custom fields must be set to Editable for end users. If the end user’s response is over 255 characters for the Email or Name field, it will be left blank.
- Up to 20 custom fields can be set per step.
You can add the following content elements to the AI agent message in the Transfer to agent step:
Transfer to an agent is an end step, which means it is the last step in the conversation, and you cannot add any more steps after it. As part of this step – unseen by the customer – a ticket is created, which includes their conversation history to help the agent address the issue.
| Bot builder view | Customer view |
|---|---|
Example
The customer has chosen a quick reply option that indicates they need assistance with upgrading their plan, which requires agent involvement.

Branch by condition
The Branch by condition step consists of two or more branches. A conversation's variables are compared to each branch's conditions. When a conversation meets a branch's conditions, it follows the branch's next steps.
Configuration rules
You can add a Branch by condition step anywhere in an answer flow.
-
If this: If the branch's conditions are met, the conversation follows the branch's steps
- Else: If the conversation doesn't match the conditions of any other branch, the conversation follows this branch's steps. You can't remove this branch.
You can add up to four additional branches, to a maximum of six branches.
Each condition includes a variable, an operator, and a value. You can also nest conditions to create more complex conditional logic.
Admins can’t create or update variables in a Branch by condition step.
Branches are checked in the order they're included in the step. If conditions for more than one branch are met, the answer flow follows the first matching branch.
For more information, see Understanding the Branch by condition step in bot builder (Legacy).
Example use cases
- You can use an Ask for details step to collect data from an end user as variables. You can then check this data against conditions in a Branch by condition step. The Branch by condition step determines whether the user is sent to a Transfer to agent step or a Show help center articles step.
- You can use a Make API call step to get a package's delivery status from an external API. You can then use the Branch by condition step to display different messages based on the status.
- You can use the Branch by condition step to send different responses based on an end user's VIP or membership status.
Saving customer responses
Similar to saving customer responses in carousels, you can use Branch by condition to test against a variable to make the appropriate response. Each condition includes a variable, an operator, and a value. For variable, select the variable you defined previously in bot builder. Then select an operator and value to test against.
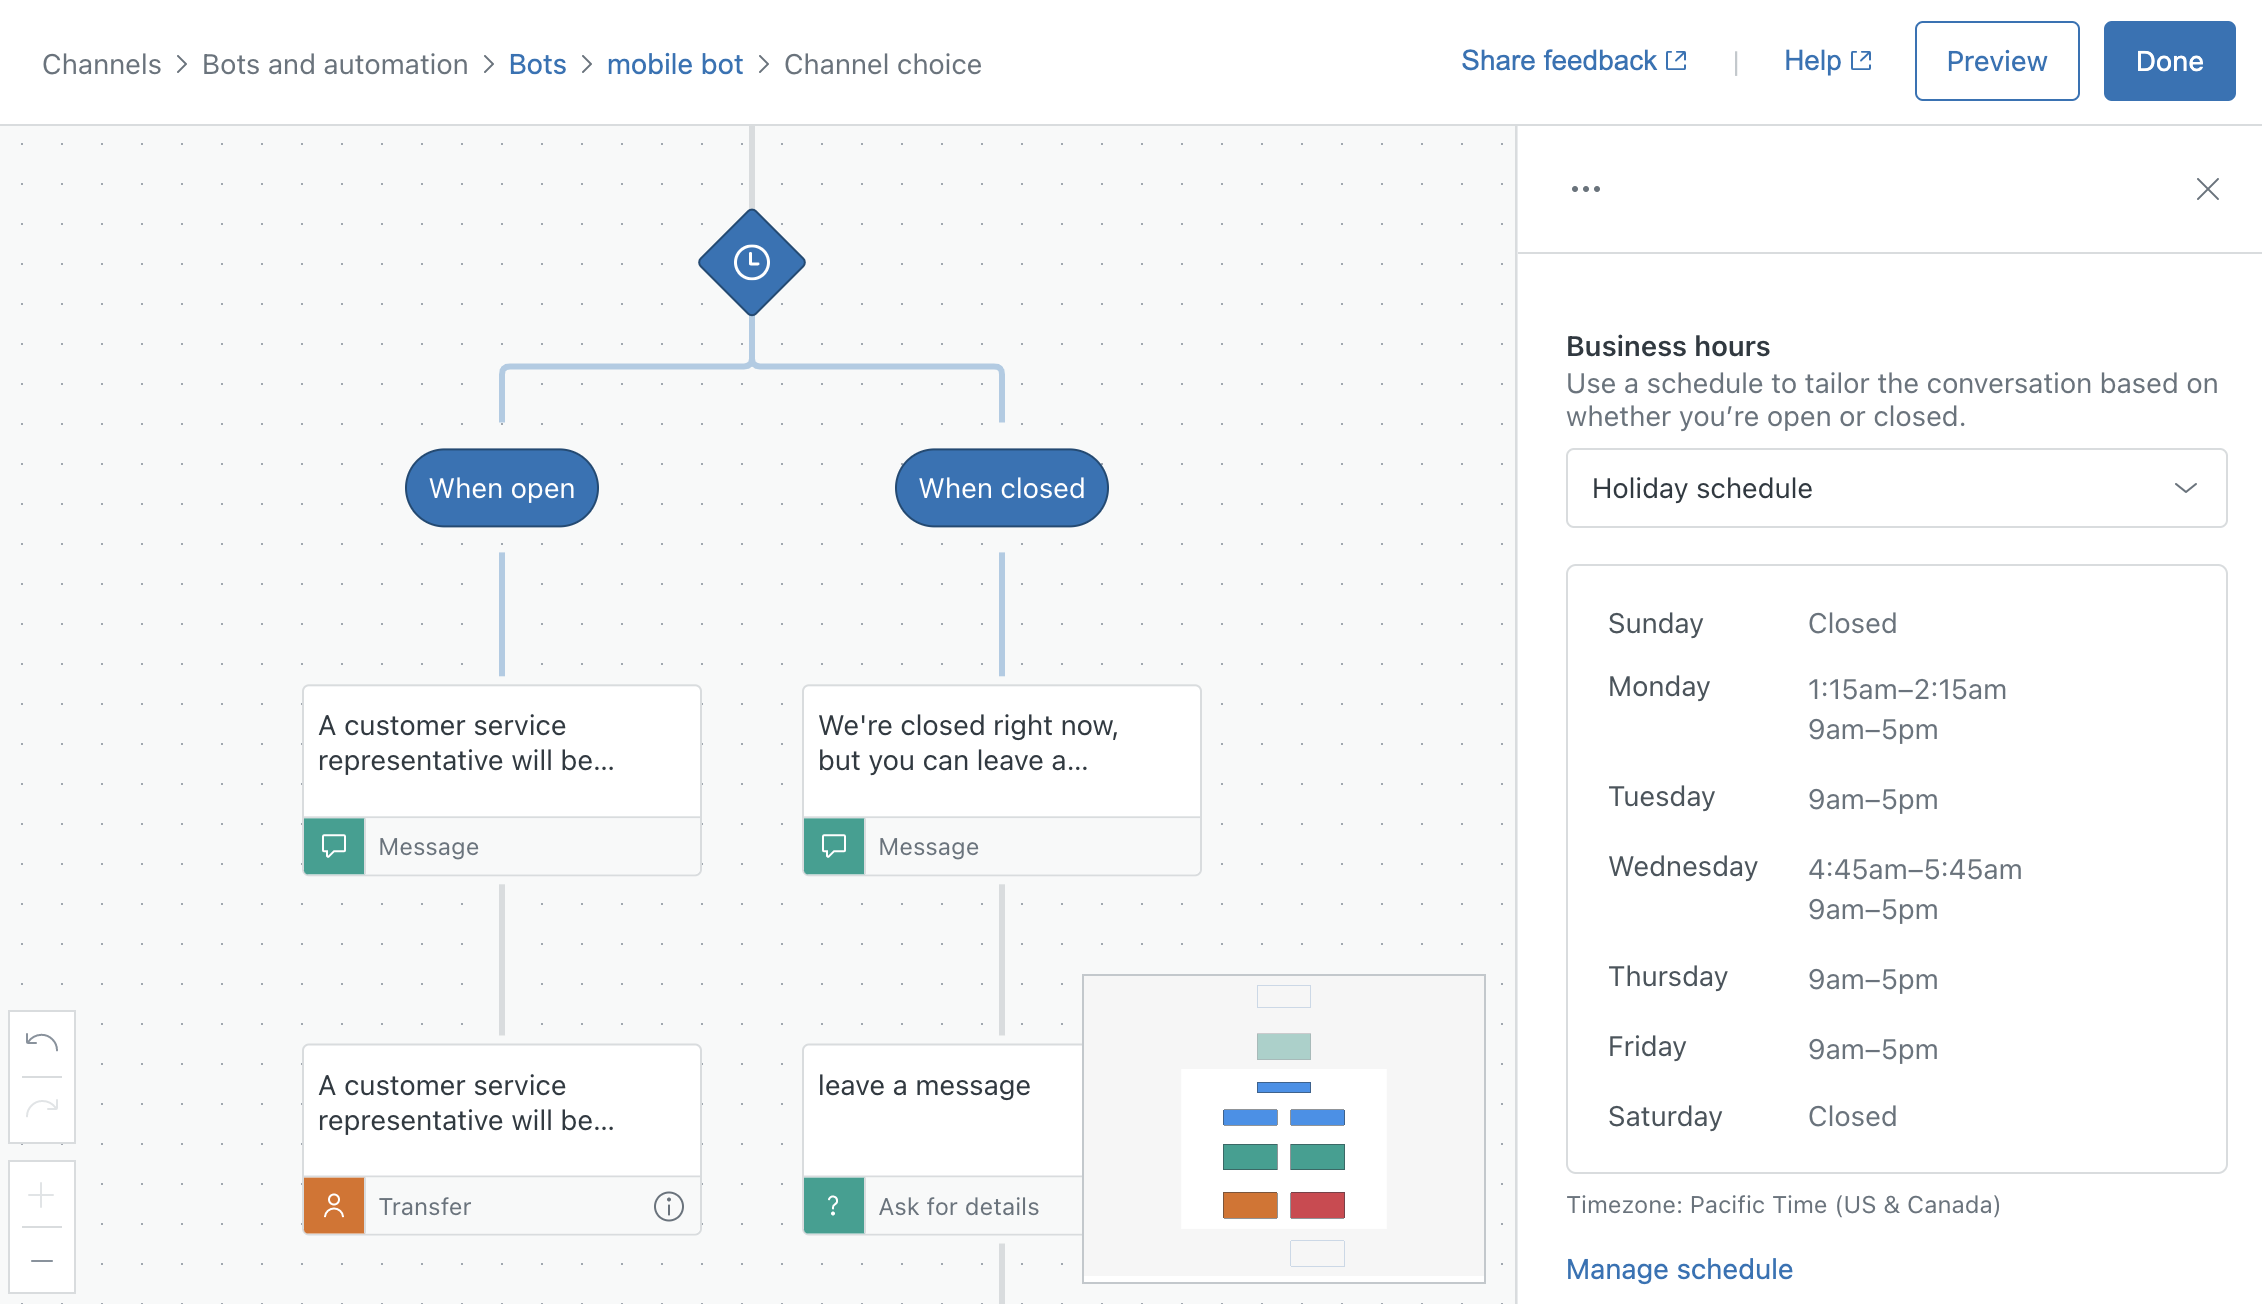
Add business hours condition
The Add business hours condition step is used to configure the AI agent to respond differently based on your availability.
Adding this step splits the answer flow into two branches:
- When open: Appears to the end user during scheduled business hours
- When closed: Appears to the end user outside of scheduled business hours
Deleting the business hours condition step removes both subsequent branches from your answer. Therefore, it's a good idea to design your answer with this in mind, and put it towards the end of the flow.
This step only affects the flow of the conversation with an AI agent. It doesn't impact the business hours set in your messaging response or service level agreements applied to the resulting ticket.
Configuration rules
- To include a business hours condition step, you must set a schedule.
- When you have a schedule, a preview of your business hours in the configuration panel is displayed, indicating the times of day customers are sent down the open and closed branches. Note that holidays aren't shown in the preview, but are respected by the condition.
- (Enterprise only) If you have defined multiple schedules, you must select the appropriate schedule from the drop-down in the configuration panel.
- Answer flows can't end on a business hours condition step. It must be followed by at least one step of a different type.
In the example below, the business hours condition step is followed by a Transfer to agent step in both the open and closed branches, each with a unique message describing the transfer experience.
| Bot builder view | Customer view (When open) | Customer view (When closed) |
|---|---|---|
 |
 |
 |
Example
In this example, the agent transfer step is configured with different messages to use for the open and closed branches, which explain what happens next in each context:
| The end user's experience during business hours | The end user's experience outside of business hours |
|---|---|
|
|
Link to another answer
The Link to another answer step offers a way to link one answer in a custom built answer flow to another. When adding the step to the end of an answer branch, you’re prompted to select from a list of existing answers.
This step allows you to:
- Reuse existing answers rather than duplicating steps throughout your AI agent configuration, which can reduce the number of steps in your AI agent.
- Let your end users start a conversation over so they can easily return to a main menu of options and continue to self-serve via AI agent conversation.
- You can allow your end users to return the welcome message during a conversation.
- Offer related answers at the end of an answer branch so end users can continue to self-serve without needing to guess at the right terms to enter.
- Pass variables captured in an earlier answer, so they can be used in the linked answer and in downstream actions.
Actions that link to another flow do not increase the automated resolution count.
Configuration rules
- The Link to another answer step must be the final step in an answer branch. No subsequent steps can be added after it.
- The Link to another answer step can’t be added after a Transfer to agent step.
| Bot builder view | Customer view (When open) |
|---|---|
 |
 |
Example
In the following example, the end user engaged with the AI agent, and the admin wants to know whether they need further assistance.
The admin creates a new answer, named "Question resolved?," which starts with the Ask if question resolved step:

The Yes, problem solved branch directs the AI agent to respond with the default “Great. Knowledge is power. You can ask me another question at any time.”
The No, I still need help branch directs the AI agent to present two options, using the Present options step:
- Start of the conversation: Use the Link to another answer step to display the Start of the conversation in the standard response.
- Talk to a human: Use the Link to another answer step to display the previously created answer, "Talk to a human."
Set variable
The Set variable is used to set the value of an existing variable or for a new variable created within the step. Variables can be used to manage data in your AI agent and power end-to-end workflows.
Configuration rules
- Up to 12 variables can be added in a step.
- Each AI agent can include a maximum of 50 unique variables across all answers. However, each unique variable can be used in an answer flow as many times as needed.
- Variables are “global” – that is, once captured in an answer, they can be used anywhere in the same AI agent’s conversation.
- Only the first 280 characters of a variable's value are saved.
See Using variables in AI agents for messaging (Legacy).
| Bot builder view | Customer view (When open) |
|---|---|
 |
 |
Example
In the following example, the AI agent welcomes visitors with the Present options step, which asks end users, “What’s your favorite roast?” and presents three options: Light, Medium, and Dark.

Branches for all three options end with a Link to another answer step, pointing to the same answer, “Good taste.”
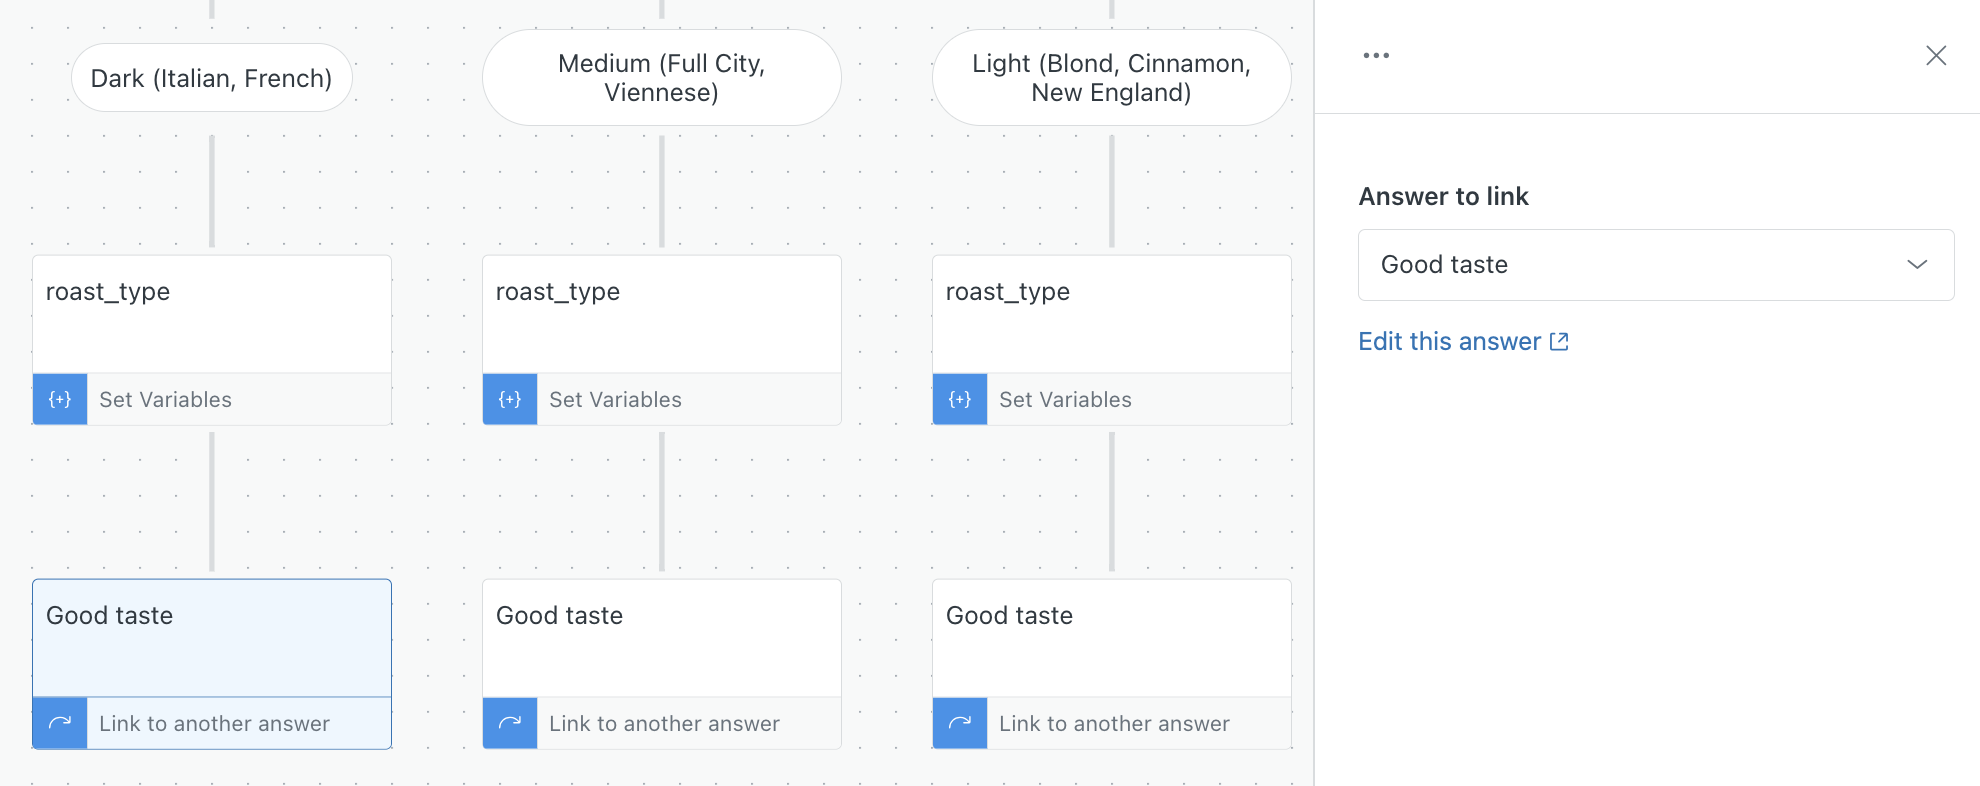
The variable set in the AI agent's welcome answer, "Good taste," is used to customize a Send message step for the end user, as well as in the message of the Transfer to agent step.

The final conversation looks something like this: