Verified AI summary ◀▼
Enable auto assist to empower agents with AI-driven suggestions for resolving tickets. Configure access and specify channels using ticket triggers with the agent_copilot_enabled tag. Ensure tickets meet conditions for auto assist to activate. Create procedures and actions to guide agents effectively. This setup helps streamline support and improve response times across messaging and email channels.
Auto assist is an AI-powered assistant for your agents. Using large language model (LLM) technology, auto assist understands the contents of submitted tickets and makes suggestions to your agents on how to solve them.
Before auto assist can help guide agents in solving tickets, you must turn it on, specify which agents can use auto assist, and configure which channels auto assist works with.
This article contains the following topics:
- Turning auto assist on
- Configuring auto assist on messaging or email channels using tags added by ticket triggers
- Next steps: Creating auto assist procedures and actions
Turning auto assist on
You can turn on auto assist and configure who has access in Admin Center.
To turn on and configure access to auto assist
- In Admin Center, click
 AI in the sidebar, then select Agent copilot > Auto assist.
 - Select Show auto assist replies and actions in the agent composer.
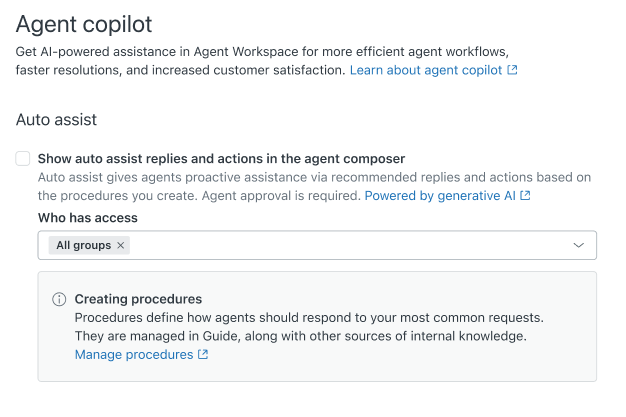
- In the Who has access field, search for and select the groups that should be able to use the suggested replies feature. By default, all groups have access.
- Click Save.
To configure which channels and tickets auto assist can work on, add a tag using a ticket trigger. With this setup, auto assist is available to an agent when the conditions specified within your trigger are met.
Note: If you drafted or published an AI agent before February 2, 2025, you can configure auto assist to work on messaging tickets that originate from an AI agent. See Configuring auto assist to work with messaging tickets originated from AI agents (Legacy).
Configuring auto assist on messaging or email channels using tags added by ticket triggers
Configure auto assist on messaging or email channels by using tags that are added by ticket triggers. This configuration method works by setting the agent_copilot_enabled tag on tickets based on specified conditions.
Auto assist can't be configured on the chat or voice channels.
Tickets must have the agent_copilot_enabled tag for auto assist suggestions to appear in the Agent Workspace.
For example, you could create a trigger that adds the auto assist tag to tickets that have a specific intent predicted by intelligent triage. Assuming you create a procedure that describes how agents should solve issues related to that intent, auto assist will be able to guide the agent in solving the customer’s issue.
To create a trigger that adds the auto assist tag to tickets
- In Admin Center, click
 Objects and rules in the sidebar, then select Business rules >
Triggers.
Objects and rules in the sidebar, then select Business rules >
Triggers. - Click Add trigger.
- In Trigger name, enter a descriptive name for your trigger.
- (Optional) Enter a Description for your trigger.
- (Optional) Select a Category for your trigger.
- In the Conditions pane, under Meet ALL of the following
conditions, add the following conditions:
- Ticket > Ticket status | Is | New
-
Ticket > Tags | Contains none of the following |
agent_copilot_enabled
This condition ensures that your trigger will run only once on each ticket. The trigger will add the tag the first time it runs, and after that, the presence of the tag prevents the trigger from running again.
- Under Meet ANY of the following conditions, add the following conditions:
- (Optional) Ticket > Channel | Is | <select the channel
you want the trigger to work on>
Repeat the condition above for additional channels. These conditions ensure that auto assist works only on tickets created through certain channels. For example, you might not want auto assist to apply to email tickets.
- (Optional) Ticket > Intent | Is | <select an intent you
have created a procedure for>
Repeat the condition above for additional intents. You don’t need to create separate triggers for each intent. Auto assist will be able to tell which procedure to use based on the contents of the customer’s request as well as the procedure title. Alternatively, add other conditions that fit your organization’s workflows.
- (Optional) Ticket > Channel | Is | <select the channel
you want the trigger to work on>
- In the Actions pane, add the following action:
- Ticket > Add tags | agent_copilot_enabled
- (Optional) Add another tag to identify which procedure you’ve created for auto assist to follow in this situation (for example, copilot_order_cancellation). Later, you can create an Explore report that uses this tag to identify tickets where a specific procedure was followed on a ticket.
- Click Create.
For more help with triggers, see Creating ticket triggers for automatic ticket updates and notifications.
Next steps: Creating auto assist procedures and actions
Before auto assist is fully functional for your agents, you need to create procedures and actions that tell auto assist how to properly guide agents in solving tickets. See the following articles for instructions: