Verified AI summary ◀▼
With AI prompt-based rating categories, you can create custom prompts to automatically score customer conversations and detect risks. Use the AI prompt library or craft your own prompts to focus on specific behaviors. Ensure both AutoQA settings are enabled, and manage up to 10 active categories. Add categories to scorecards to start evaluating conversations based on your criteria.
Zendesk QA prompt-based AI insights leverage the latest AI models, allowing you to customize AI-powered prompts for quality autoscoring and risk detection.
In addition to the system categories, manual categories, and exact text-match categories, admins and account managers can create AI prompt-based rating categories.
All rating categories allow you to effectively assess customer conversations. However, by using AI prompt-based categories, you can ask targeted questions about conversations using natural language and automatically score them based on your criteria.
This article describes how to use AI prompt-based rating categories from our ready-to-use AI prompt library and how to create your own custom AI prompt-based categories.
Related articles
- About AI insights in Zendesk QA
- Best practices for creating AI insights prompts in Zendesk QA
- Creating AI prompt-based spotlight insights
Admins and account managers can have up to 10 active AI prompt-based rating categories and AI prompt-based spotlight insights per account. When you reach this limit, you must either mark one as inactive or delete it before you can create or activate more.
To create a custom AI prompt-based rating category
- In Quality Assurance, click your profile icon in the top-right corner.
- Click Settings (
 ).
). - In the sidebar (
 ) under Account, click
AI.
) under Account, click
AI. - Click Create AI insight.
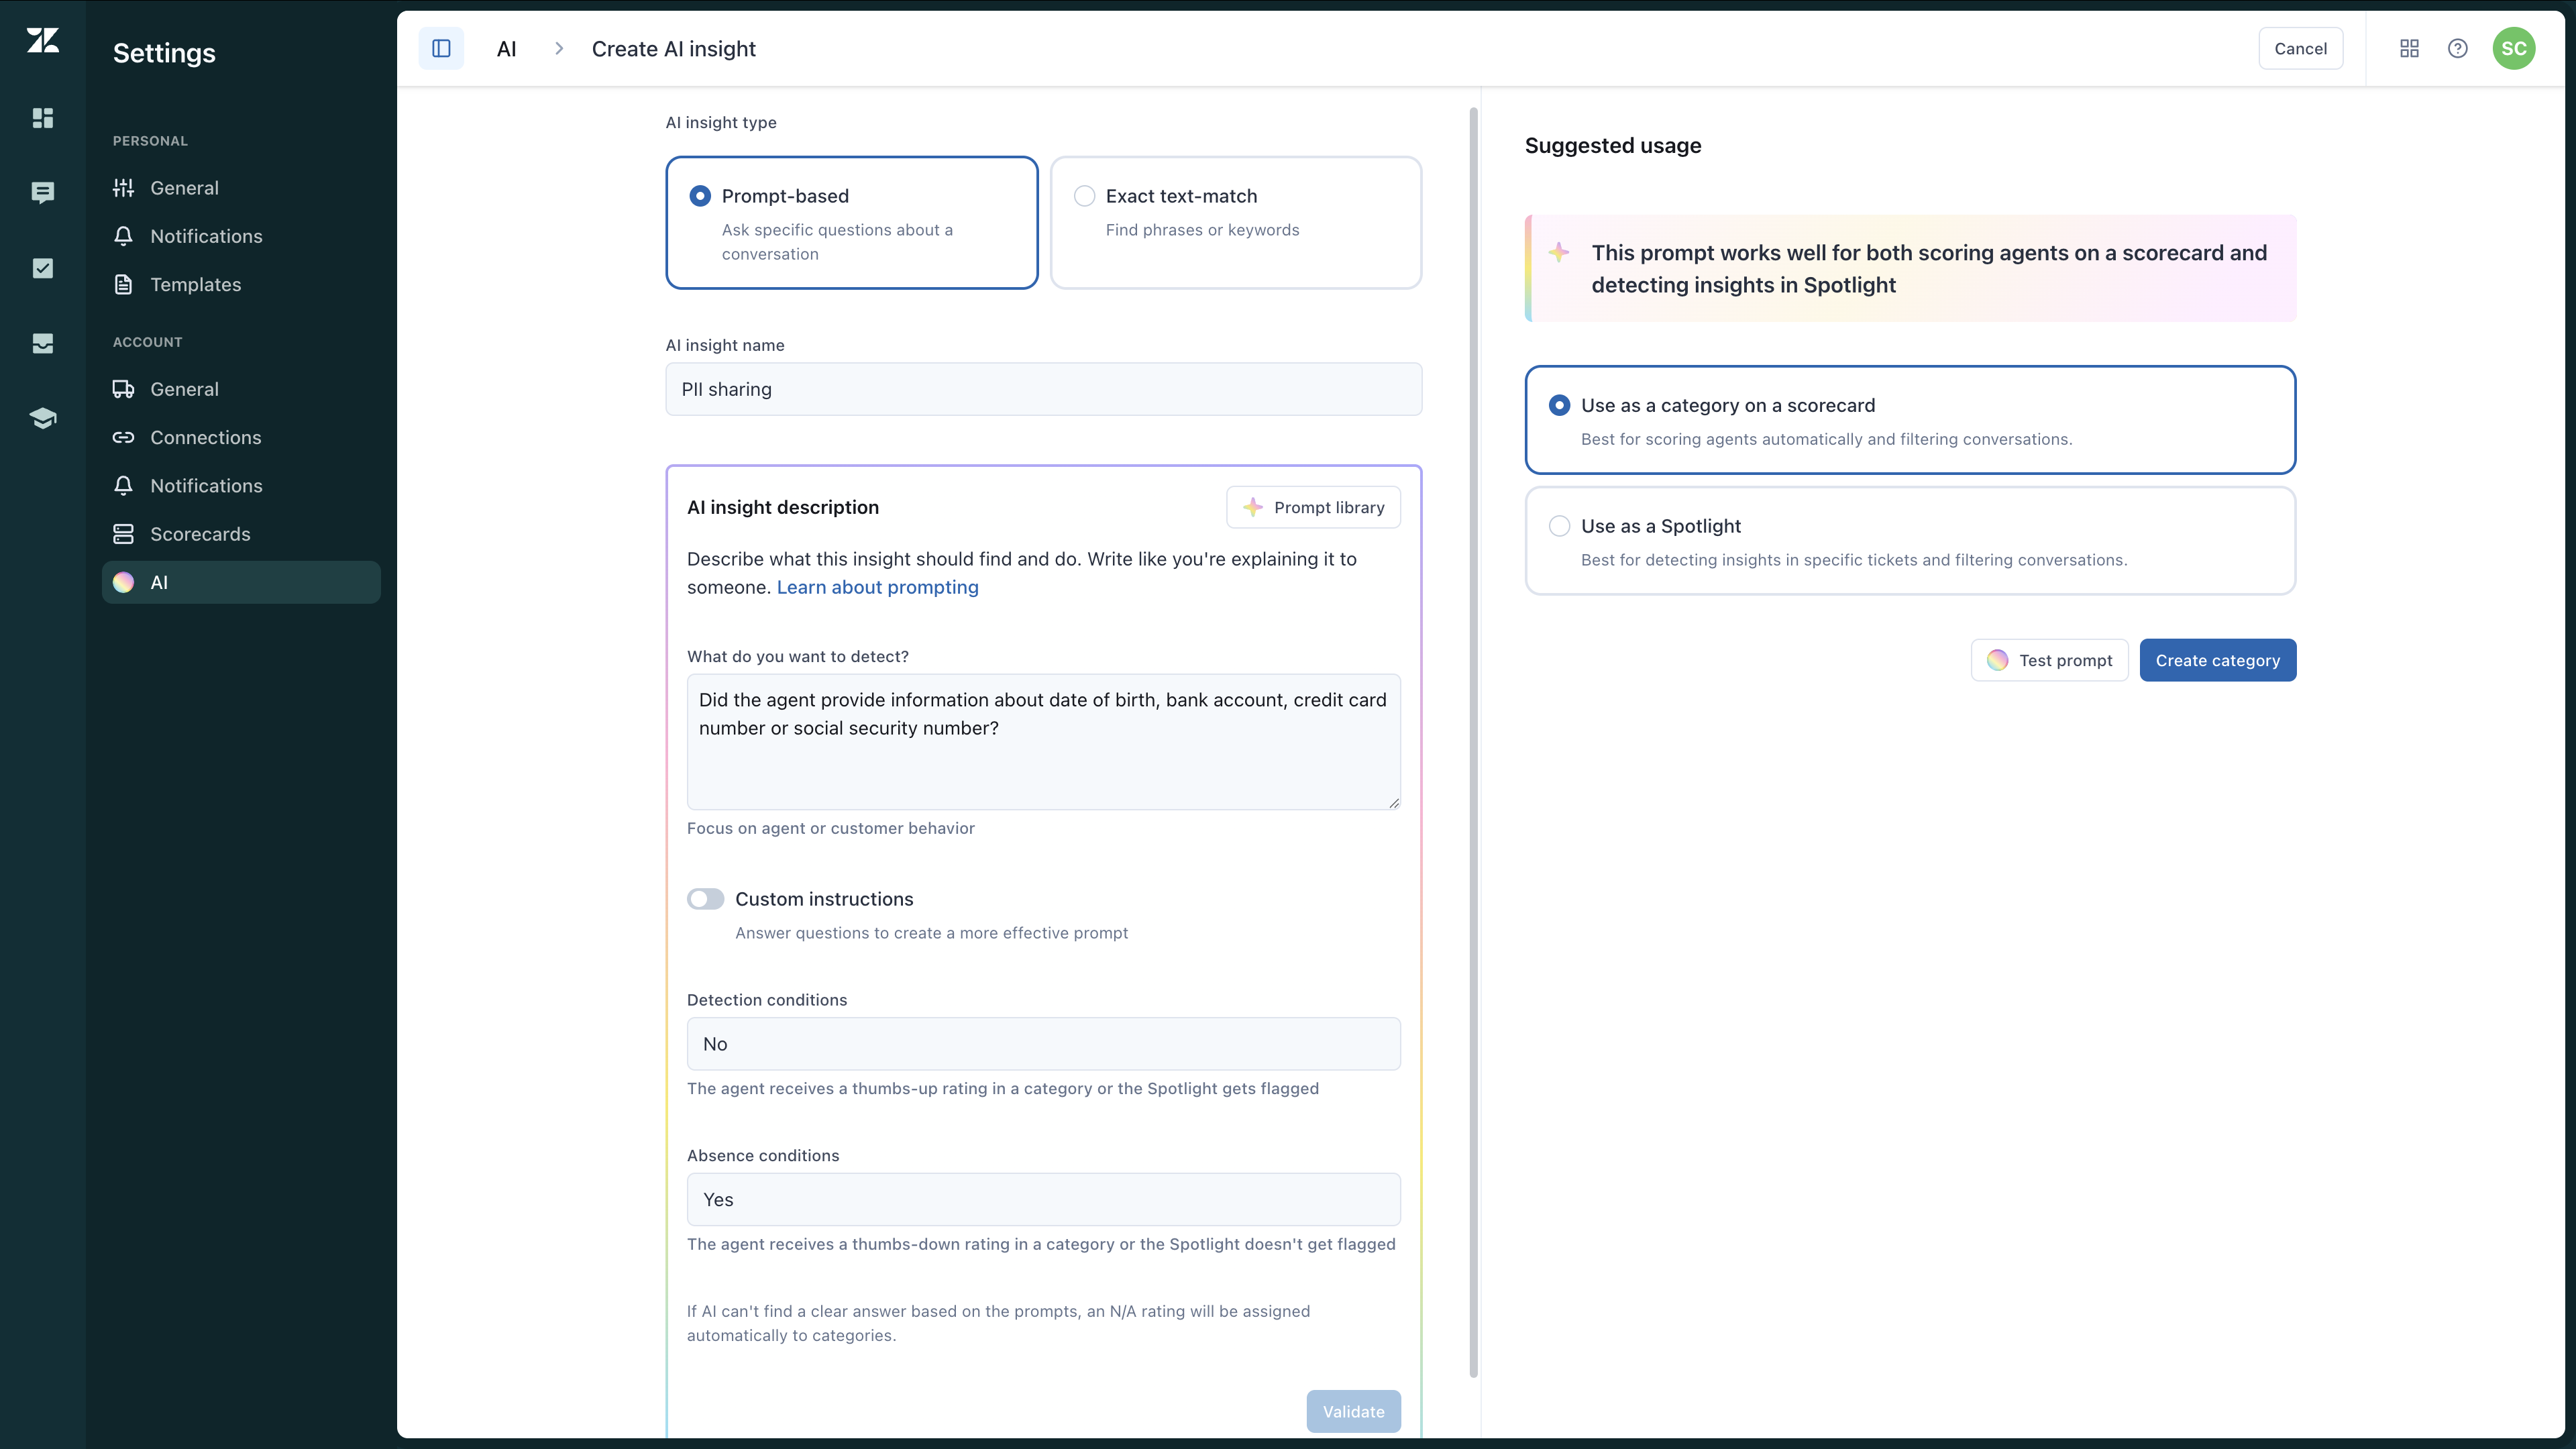
- Select the Prompt-based AI insight type.
- Enter an AI insight name.
- Under AI insight description click Prompt library to select a prompt from
our ready-to-use AI prompt library. Click Use prompt.
You can also customize any prompt to fit your specific needs or create a new prompt from scratch:
- In What do you want to detect?, clearly describe what this insight
should identify and accomplish.
Specify whether the focus is on the behavior of agents or customers, and use objective, measurable language. You can enter up to 2,000 characters.
Be sure to follow our best practices for writing prompts for AI insights to ensure your insights are accurate and actionable.
- (Optional) Turn on Custom instructions to answer the following four
additional questions that can help you create a more effective prompt. You can enter
up to 500 characters for each question:
- How do you define the thing you want to detect? For example, “Did the agent use clear and concise language to address the customer’s questions and provide next steps?”
- What doesn't count as the thing you want to detect? For example, "This prompt does not evaluate tone, politeness, or empathy; it strictly focuses on the clarity and coherence of communication."
- Enter a positive example (optional). Provide a sample message or scenario that meets the prompt’s criteria, illustrating expected outcomes. For example, “I have reviewed your issue and here are the next steps you should follow: first, reset your password, then try logging in again.”
- Enter a negative example (optional). Show a sample message or scenario that fails to meet the criteria, helping AI distinguish errors or irrelevant cases. For example, “Regarding the issue you reported, try checking this article and if that doesn’t work, contact us.”
- In Detection conditions, enter an additional scoring prompt, up to 128
characters, that describes what the agent must do to receive a thumbs-up (
 ) rating in a category. Be sure to follow our
scoring prompt-based AI insights best
practices to ensure accurate evaluations.
) rating in a category. Be sure to follow our
scoring prompt-based AI insights best
practices to ensure accurate evaluations. - In Absence conditions, enter an additional scoring prompt, up to 128
characters, that describes things that should cause the agent to receive a thumbs-down
(
 ) negative rating score for this category. For
example, if the agent did not offer a demo, and the text does not include “let’s
schedule a demo”, the agent receives a negative rating score for this
category.Note: If AI can't find a clear answer based on the prompts, the category is automatically rated as N/A.
) negative rating score for this category. For
example, if the agent did not offer a demo, and the text does not include “let’s
schedule a demo”, the agent receives a negative rating score for this
category.Note: If AI can't find a clear answer based on the prompts, the category is automatically rated as N/A.
- In What do you want to detect?, clearly describe what this insight
should identify and accomplish.
- Click Validate to receive feedback and tips on how to improve your prompt.
- Under Suggested usage, select Use as a category on a scorecard.
- (Optional) Click Test prompt to confirm that your prompt works correctly and
meets the specified criteria.
A conversation filter view shows the total number of conversations found based on the prompted insights.

To keep the pool of conversations for testing specific, the filter displays a list of closed conversations created in the last seven days that have more than four replies, by default, with a limit of 100 conversations.
- (Optional) Click Select for testing. The conversations found using this prompt
are listed in the right-side panel, displayed 10 at a time.
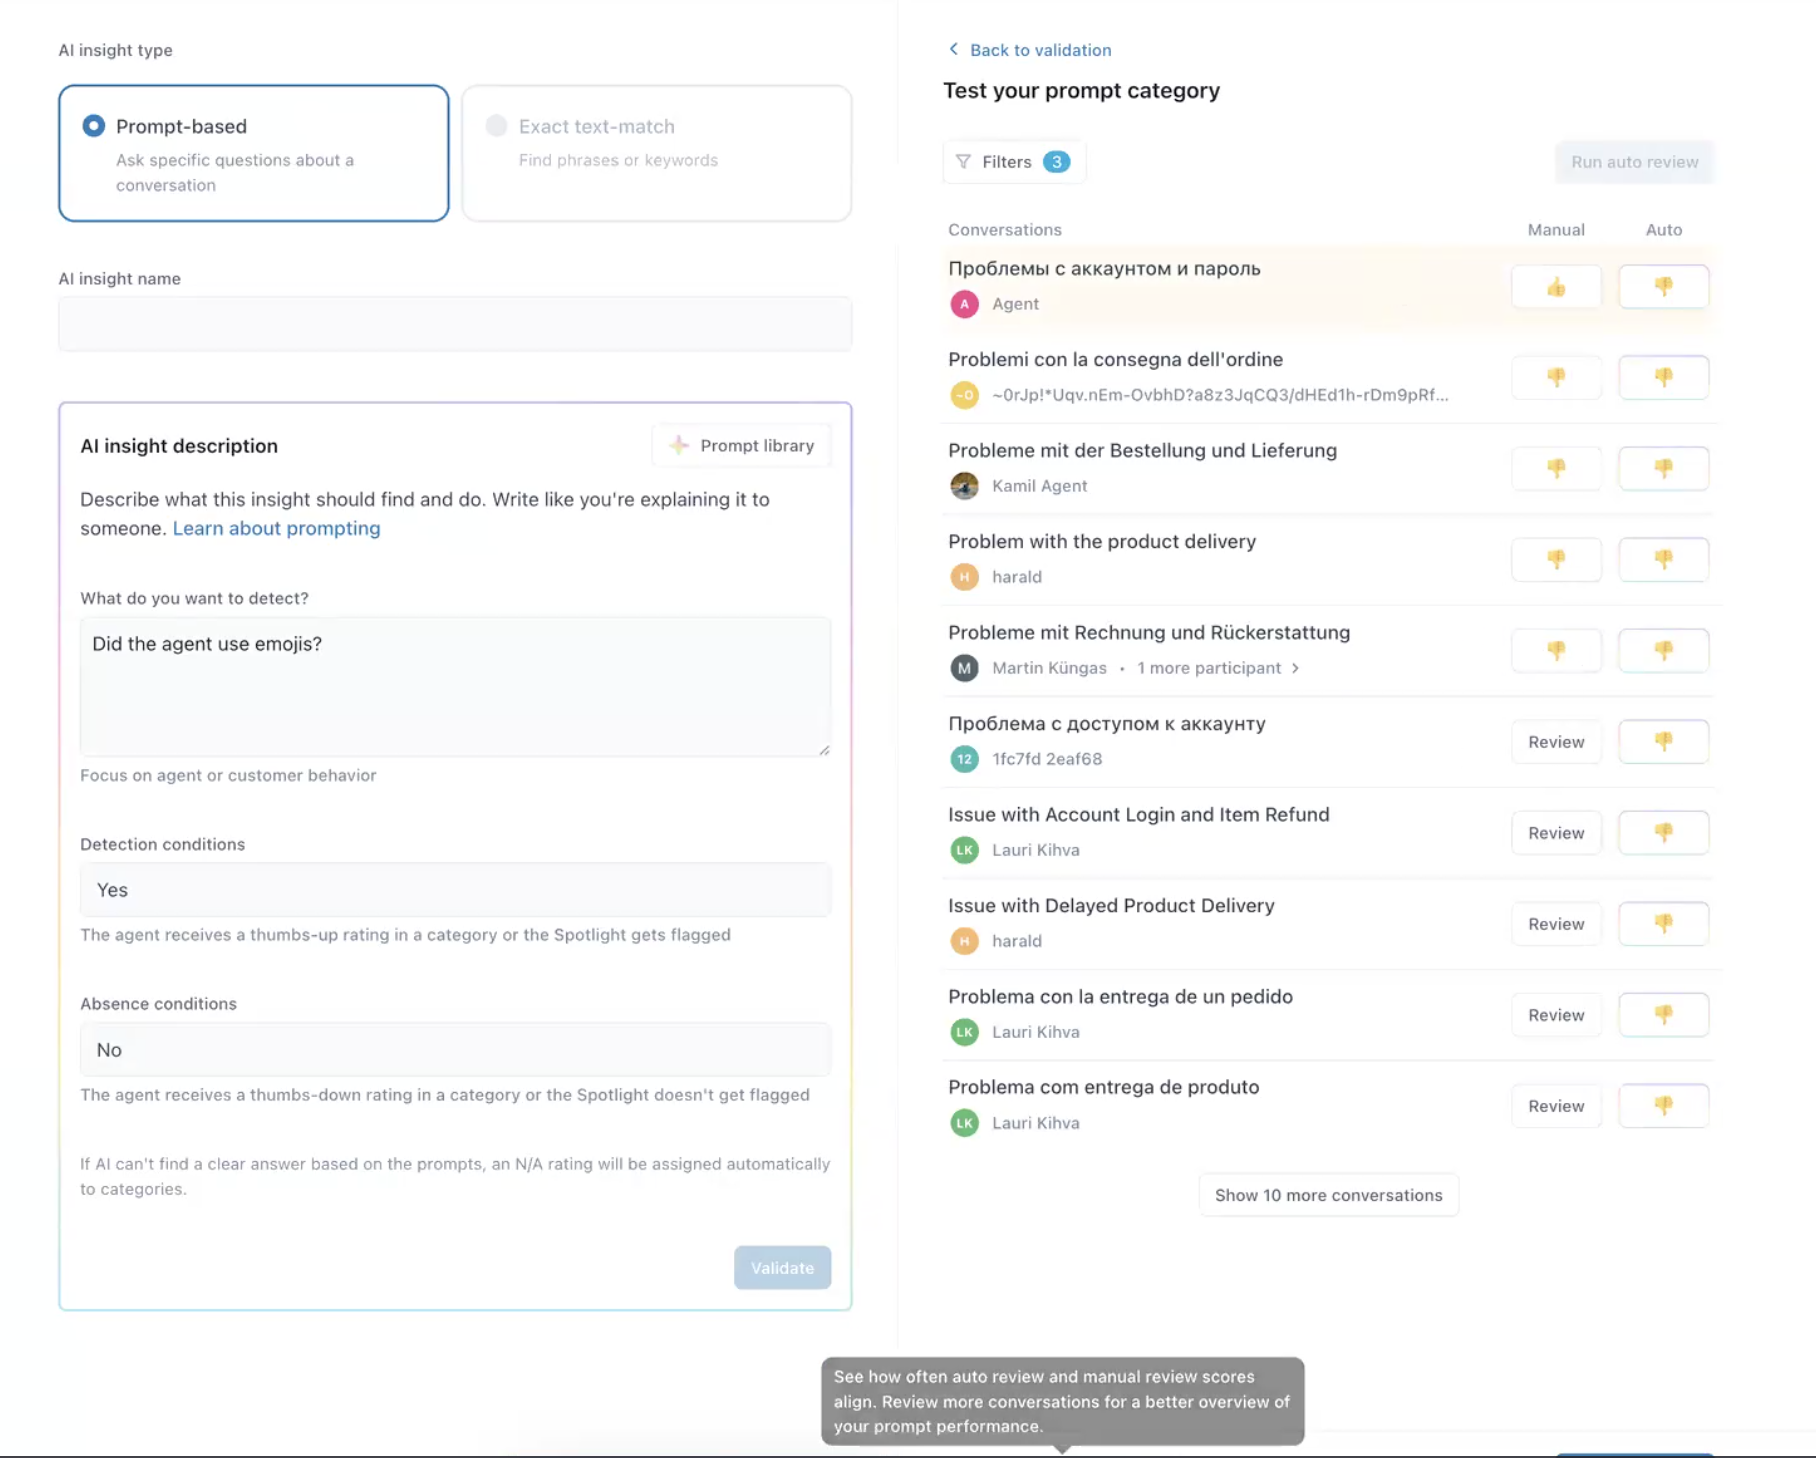
- (Optional) Test your results:
- (Optional) Click Review next to each conversation and manually score them based on the prompt you are creating so you can compare the results and see how often auto review and manual review scores align.
- Click Run auto review to see the results of your prompt conditions
automatically applied to all listed conversations under Auto.
If you see many conversations highlighted in yellow, this likely indicates a misalignment between how you want to score conversations and how AI is scoring them. You should consider rephrasing your prompt.
When rephrasing what you want to detect with your prompt, if your changes are minor, you can click Run auto review again. However, if your changes are more significant, such as modifying it to evaluate the customer instead of the agent, the prompt type might change from category to spotlight. In this case, you'll need to return to step 10 and click Test prompt again.
- Click Create category.
- After creating it, you must add the category to your scorecards to start using it.