Verified AI summary ◀▼
Admins can set up a ticket view for Jira to enhance collaboration between support and product teams. This integration allows you to access ticket data directly in Jira, helping prioritize and address issues. You can configure ticket fields, comment types, and email notifications. Note that this integration isn't supported for Jira Data Center and Jira Server.
Admins can set up Zendesk ticket view for Jira to help improve collaboration between support and product teams. This app provides users working in Jira with real-time access to Zendesk ticket data, allowing teams to prioritize and address issues more effectively.
Related topics:
Understanding where Zendesk ticket data appears in Jira
After ticket view is installed and turned on, users working in Jira can access Zendesk ticket data in the Jira sidebar and activity bar.
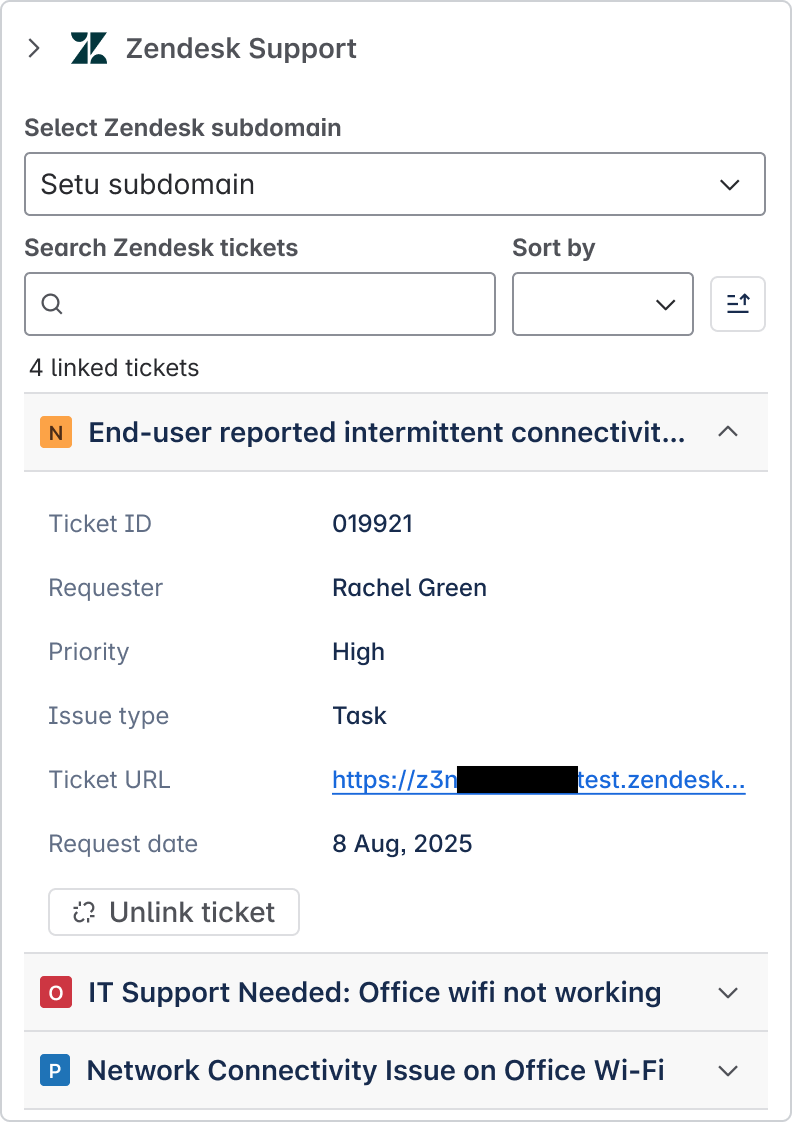
The Zendesk Support app in the Jira sidebar shows ticket data when you view a Jira issue. You can see all Zendesk tickets linked to the issue, unlink tickets, and view ticket fields based on your configuration. If there are multiple linked tickets, you can find the right one using search or sort features. You can also switch between different Zendesk accounts if needed.
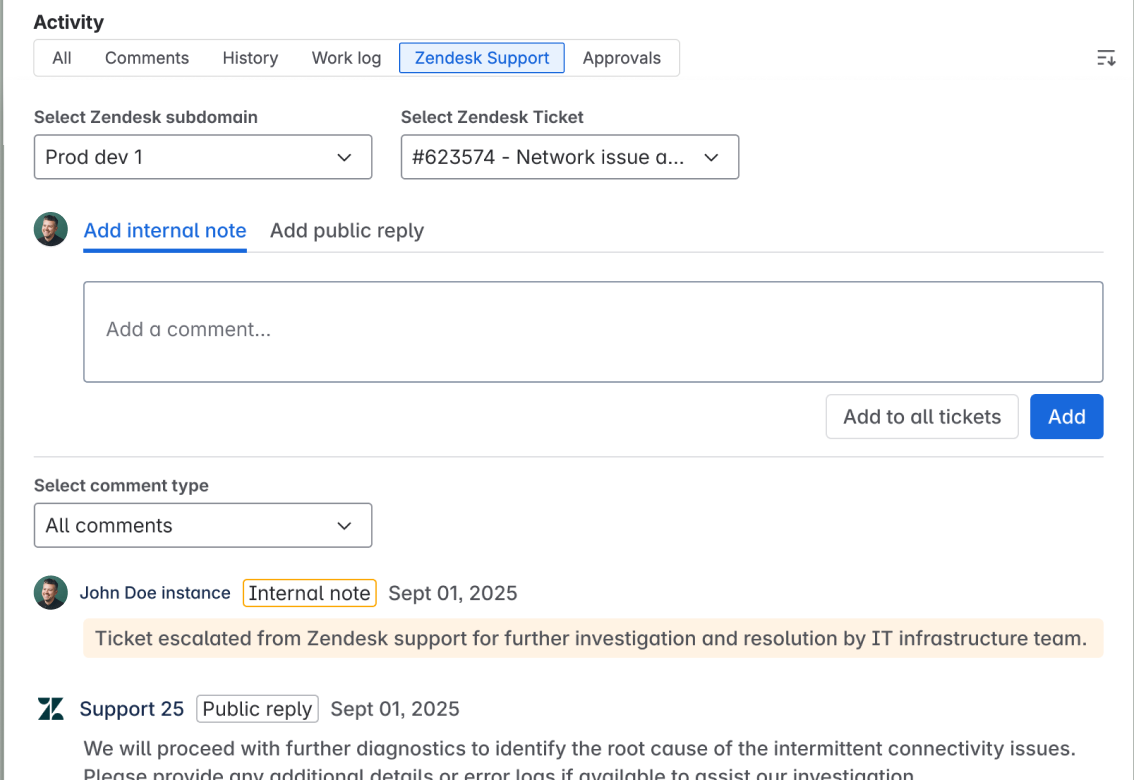
The activity bar at the bottom of a Jira issue includes a Zendesk Support tab, which displays comments from the linked Zendesk tickets. Depending on your configuration, you can add internal or public comments, which are also added to the Zendesk ticket. If you've configured the integration to send notifications, issue followers are sent an email notification when comments are added to linked tickets.
Installation requirements
The user installing Zendesk ticket view must have admin permissions in both Jira and Zendesk Support. Additionally, the user must be a member of the jira-administrators and jira-software-users groups in Jira.
Installing and turning on Zendesk ticket view
Follow the procedures outlined in this section if you're installing the Zendesk app in Jira for the first time or re-installing it.
Connecting your Zendesk Support instance to Jira
Before installing the Zendesk app in Jira, you must first connect your Zendesk and Jira accounts. You must be an admin in both Zendesk and Jira to complete this task.
For details, see Connecting your Jira instance to Zendesk.
Installing the Zendesk app
After connecting your Zendesk and Jira accounts, install the Zendesk Support app in Jira.
To install and configure the Zendesk app
- In Jira, click Apps in the top navigation bar, then select Explore more apps.
- On the Marketplace apps page, search for Zendesk.
- Locate and click the Zendesk Support for Jira v2.0 entry in the search results.
- Click Get app.

- Click Get it now.
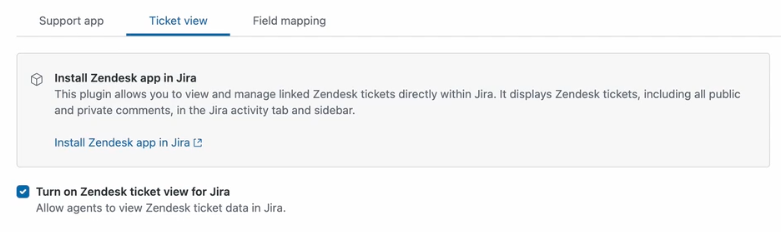
Turning on Zendesk ticket view
Turning on Zendesk ticket view makes Zendesk ticket data visible to Jira users. If you haven't yet configured the app, return to this step when you're ready. You can also turn off the app if you need to hide it temporarily.
To turn on Zendesk ticket view
- In Admin Center, click
 Apps and integrations in the sidebar, then select Integrations >
Integrations.
Apps and integrations in the sidebar, then select Integrations >
Integrations. - Click the Jira link.
- If you have multiple connections, click the name of the connection you are setting up.
- Click the Ticket view tab.
- Select Turn on Zendesk ticket view for Jira to make it visible to
agents. Deselect this option to hide the app from agents.
- Click Save.
Configuring Zendesk ticket view
You can configure Zendesk ticket view to update the list of Zendesk ticket fields that appear in Jira, change the type of comments users can view or add (internal or public), and turn on or off email notifications for comments.
To configure Zendesk ticket view
- In Admin Center, click
Apps and integrations in the sidebar, then select Integrations >
Integrations.
- Click the Jira link.
- If you have multiple connections, click the name of the connection you are setting up.
- Click the Ticket view tab.
Configuration options appear in the center of the Ticket view tab.
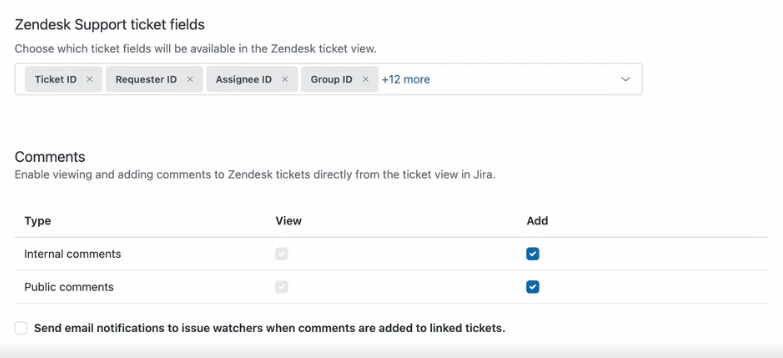
- The Zendesk Support ticket fields section displays the preselected default Zendesk fields to display in the Jira sidebar. To add fields, begin typing in the field to open a drop-down list of available fields to select, or click "x" next to a field to remove it.
- In the Comments section, select whether to allow users to view or add comments
from the Activity tab of a Jira issue.
- Select View to display comments with that type (internal or public) within the Activity tab of a Jira issue.
- Select Add to allow users to add comments with that type (internal or public) within the Activity tab of a Jira issue.
- Select Send an email notification to issue watchers when comments are added to linked tickets to turn on this email notification.
- Click Save.