Verified AI summary ◀▼
Connect your Jira instance to manage and track issues directly from your support platform. This integration lets agents view, link, and create Jira issues while handling tickets, and allows product teams to access customer-reported issues. Ensure you're an admin to set up the connection, and remember that the integration doesn't support Jira Data Center or Server. Configure features like ticket view and field sync as needed.
The Jira integration for Zendesk offers a powerful solution that connects your product and support teams. To use the integration, first connect your Jira instance to Zendesk, as described in this article. Then, configure the integration according to your desired usage.
Information will be available soon for customers who have already installed and configured the legacy integration, including details on migrating to the new integration.
Understanding the different ways to use the integration
After you’ve connected your Jira instance to Zendesk, the integration may require additional configuration, depending on how you plan to use it.
Allow support agents to view, link, and create Jira issues in Zendesk
Enable your customer service agents to manage Jira issues directly from Zendesk while they handle tickets. Consider setting up the following features:
- The Jira app for Zendesk allows agents to view and interact with linked Jira issues from the Zendesk ticket sidebar, facilitating direct collaboration with your product team. For example, if a customer reports a bug through a Zendesk ticket, the agent can immediately log the bug in Jira. After the issue is resolved, a developer can comment on the ticket from Jira, notifying followers and displaying updates in the Zendesk ticket sidebar.
- Field sync allows real-time data updates between Zendesk and Jira. For example, syncing a priority field ensures that both support and product teams are informed about the current progress and priority of issues.
Give Jira users visibility to customer-reported issues in Zendesk
Allow product teams to view Zendesk tickets directly in Jira, enabling them to investigate customer-reported issues more thoroughly. Consider setting up the following features:
- Zendesk ticket view for Jira provides product teams with real-time access to Zendesk tickets directly within Jira, allowing Jira users to view Zendesk ticket data in the Jira sidebar for issue context. Additionally, ticket view allows Jira users to add comments to linked Zendesk tickets in an issue's Activity tab.
- Field sync ensures that both systems have consistent and up-to-date information.
Considerations
- You must be a Zendesk Support admin and a Jira admin to set up your integration.
- If the Zendesk admin who connected the integration has their role downgraded, the integration will cease to function. It will require the integration to be disconnected, then reconnected in Admin Center by another Zendesk admin.
Connecting your Jira instance
Set up and configure your integration in Admin Center. You should test the integration with your Zendesk and Jira sandbox environments first.
Multiple connections are supported. Repeat these steps for each instance you’d like to connect to Zendesk.
To connect Jira to Zendesk
-
In Admin Center, click
 Apps and integrations in the sidebar, then select Integrations >
Integrations.
- On the Integrations page, click Jira.
- If you already have connections set up, they display in the connections list. To add another connection, click Add connection.
-
Select the type of Jira instance you'd like to connect:
Atlassian
Cloud
or Atlassian Government Cloud (AGC).

-
Enter your Jira account URL
in the text field.
You must be an administrator of this account to connect the integration.
-
Select the checkbox to agree to the
Built by Zendesk Terms of Use,
then click Connect Jira.
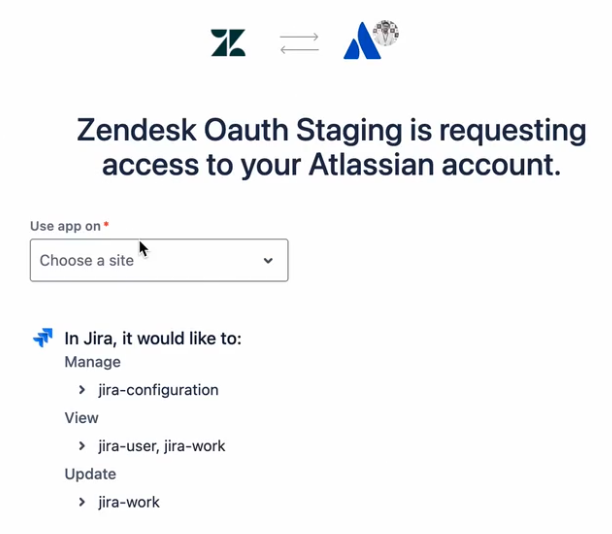
You are directed to an authorization page.
-
In the Use app on menu, select
the Jira account for which you entered
the URL on the previous page.
This step grants Zendesk access to data in your Atlassian account.

-
Click Accept.
You are directed back to Admin Center. The new connection displays in the Jira connections list. The Jira app for Zendesk is now connected, but ticket view and field mapping are inactive.
Next, click the options menu icon (![]() )
next to the Jira instance and click
Configure
to set up the integration, depending on how you plan to use it. See
Understanding the different ways to use
the integration.
)
next to the Jira instance and click
Configure
to set up the integration, depending on how you plan to use it. See
Understanding the different ways to use
the integration.
Viewing and editing your connections
Use the Integrations page in Admin Center to view and edit your Jira connections with Zendesk.
To view or edit your Jira connections
-
In Admin Center, click
 Apps and integrations in the sidebar, then select Integrations >
Integrations.
-
On the Integrations page, click Jira.
The connections appear in a list. Each connection displays which features are active: Support app, Ticket view, and Field mapping.
- To edit the connection name or view details, click the name of a connection.
- Make changes as needed, then click Save.
Disconnecting your Jira instance
You can disconnect your Jira instance from Zendesk in Admin Center. After it's disconnected, your configuration settings are still retained if you decide to connect to the same instance.
-
In Admin Center, click
 Apps and integrations in the sidebar, then select Integrations >
Integrations.
- On the Integrations page, click Jira.
-
Click the options menu icon (
 )
next to the Jira instance you want to
disconnect, then click Disconnect.