Recent searches
No recent searches
Expanding images in Help Center articles

Posted Sep 23, 2018
Unfortunately the ZenDesk Help Center does not natively allow you to have images that expand in size and show in a lightbox pop-up. However, this functionality is not difficult to provide with a small amount of work.
Fancybox is a JavaScript tool that allows you to show images in a lightbox pop-up. The process of using this tool is easier than ever, because starting with version 3, you can just link to the hosted file. This makes using it in ZenDesk as simple as four steps:
1. Go to the code editor for your theme. To do this, go to Settings, hover over your theme and click View Theme, click on the "..." next to Live, click Edit Code, then select the file you need to edit in the left column.
2. Add the links to the fancybox code in your document_head.hbs (the bottom of that file is fine):
<link rel="stylesheet" href="https://cdnjs.cloudflare.com/ajax/libs/fancybox/3.2.5/jquery.fancybox.min.css" />
<script src="https://cdnjs.cloudflare.com/ajax/libs/fancybox/3.2.5/jquery.fancybox.min.js"></script>
3. Add the following to your script.js file, right above the closing "});". You can change the ".fancybox" in the first line to use a different class name if you like, or remove the ".fancybox" altogether to make all of your images show in the pop-up when clicked.
$('.article-body img.fancybox').on('click', function() {
$.fancybox.open([
{
src : $(this).attr("src"),
opts : {},
},
]);
});
The placement of this code is important. Be sure to include it before the closing bracket and parenthesis so that it can be loaded properly.
4. In the article, add the image using the image loader or by pasting it in.
5. Click on the Source Code button in the menu bar to open the HTML view pop-up.

6. Add class="fancybox" (or the class name you chose) in the HTML code on any image you like.
7. Close the HTML view pop-up and save the page.
Important: Be sure the images you want show in the FancyBox are all large enough to make the pop-up useful. I find this makes the most sense for application screenshots.
-----------------------
Update 4/3/20: As mentioned by Robert Holm below, if you are having trouble with the method for using fancybox described here, you might want to check out the detailed instructions here.
2
66 comments
Joshua Tallent
Yeah, unfortunately ZenDesk does not do a lot of updates to Guide…
0
Simeon Drage
is this not standard functionality yet? the original article is from 2018!
0
Jakub
if somebody wants to add the class automatically without doing it manually here is the code:
place in document_head.hbs under the fancybox scripts.
<script>
$(document).ready(function() {
// Add fancybox class to all images
$('img').addClass('fancybox');
// Attach click event listener to images with fancybox class
$('.article-body img.fancybox').on('click', function() {
$.fancybox.open([
{
src: $(this).attr("src"),
opts: {},
},
]);
});
});
</script>
0
Kyle Kowalsky
I love this! I'm using Joshua's instructions from the 2nd page of the comments. I'm trying to figure out how to add a little "Click to expand" line below pictures before clicking, ideally without messing up the existing formatting of pages.
0
Aaron Rosenthal
Can't believe this isn't standard functionality with THE LEADER in knowledgebase software. Did Zendesk just forget to improve their WYSYWIG for the last 3 years?
2
Joshua Barnard
Hi 1267343204870,
Can you please provide a link to a public article for me to review? I can check for JavaScript changes in the source code.
Thanks,
Josh
0
Everett Cavazos
1265164964090 I reversed all changes, tried following your steps again and still not working. I also made sure "Display unsafe content" was checked, as I saw someone post in an earlier comment, although I don't know if that's required.
Do you have any other suggestions?
0
Everett Cavazos
1265164964090 I tried your solution as well and it did not work.
0
Joshua Barnard
Hi 1267343204870,
Please try the solution I presented and see if that works for you.
Thanks,
Josh
0
Everett Cavazos
I have followed these instructions and it's not working for me either. I'm using the Mink theme.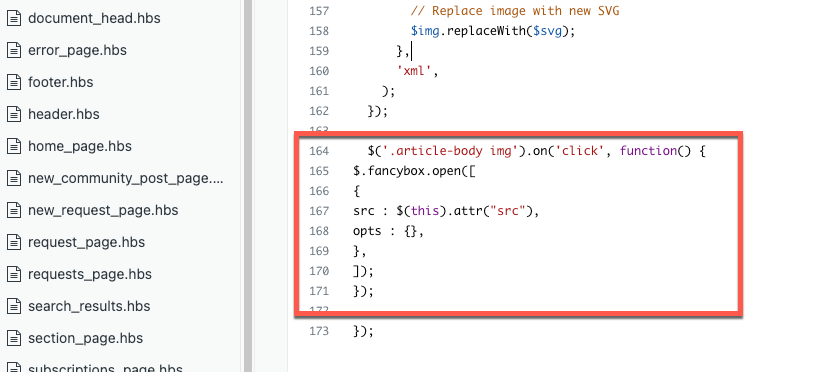

0
Sign in to leave a comment.