Summary: ◀▼
You can create an employee service catalog to let employees request items like laptops through the help center. Add catalog items with descriptions, customize request forms with fields like justification, and set triggers to assign requests to the right team. Publish items for employee access and track requests. Extend the catalog with categories or custom implementations using the Service Catalog Items API.
The service catalog is a built-in feature of the Zendesk help center that lets employees submit service requests to internal teams like HR and IT.
Here's an overview of how the service catalog works:
- Zendesk admins populate the service catalog with services and assets that employees commonly request, such as company laptops or leaves of absence.
- Employees access and browse the catalog items in the help center.
- If an employee wants to request a catalog item, they click it, complete a custom request form, and submit the request.
- The request becomes a ticket that can be assigned to the appropriate internal team to fulfill.
This worfklow recipe shows you how to create a simple service catalog for employees.
Topics covered in this article:
- Workflow goal
- Who can use the service catalog?
- Turning on the service catalog in your account
- Adding items to the service catalog
- Adding a custom ticket field to the laptop request forms
- Assigning laptop requests to the IT team
- Publishing the catalog items
- Testing the employee experience
- Extending the service catalog
Disclaimer: Zendesk provides this workflow article for instructional and testing purposes only. It is not meant as an authoritive guide for creating a production-ready service catalog.
Workflow goal
As an IT manager in a software development company, you are tasked with creating a service catalog for employees for requesting work laptops.
The IT department stocks three types of laptops: a standard MacBook Air laptop for most employees, an engineering-spec MacBook Pro for software developers, and a Dell XPS laptop for Windows-specific use cases.
The service catalog should let employees request a new laptop using the help center:
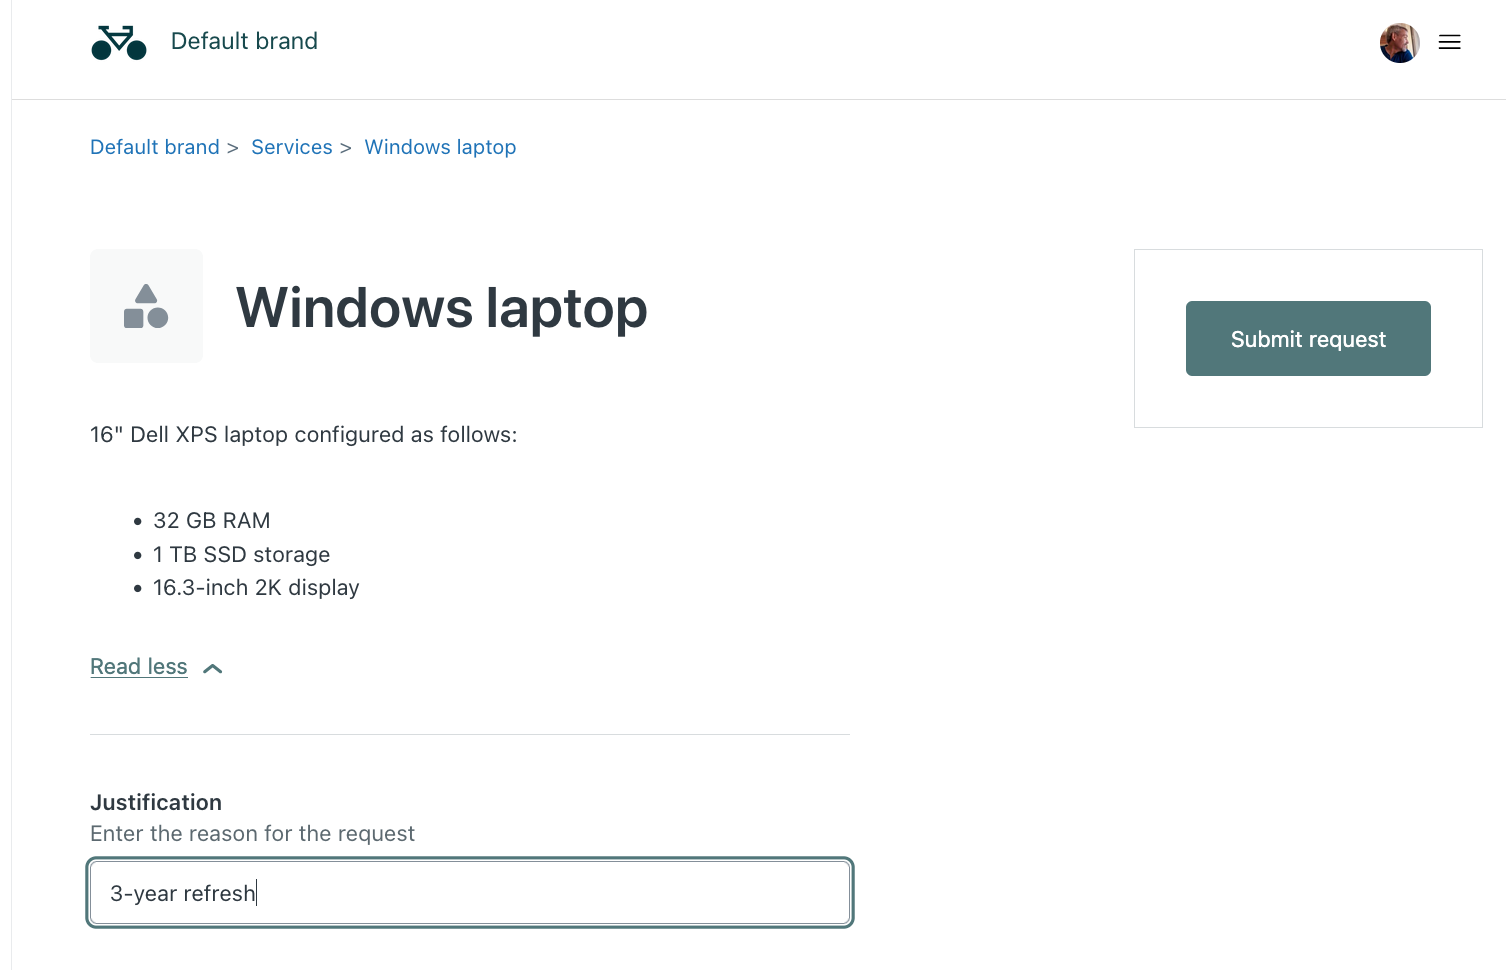
After selecting an item, the employee must provide a justification for the request, such as "New hire", "3-year refresh", or "Replacement for stolen or damaged":
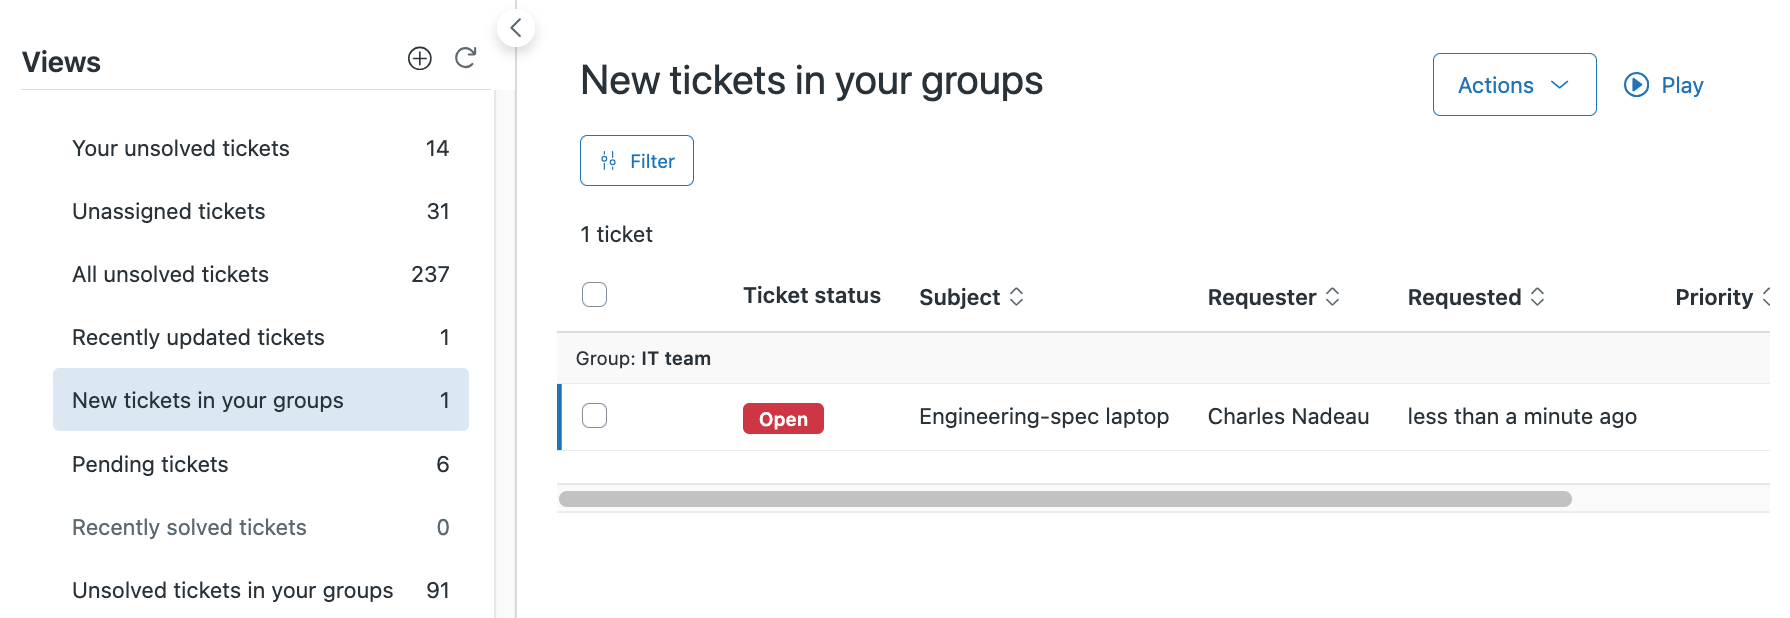
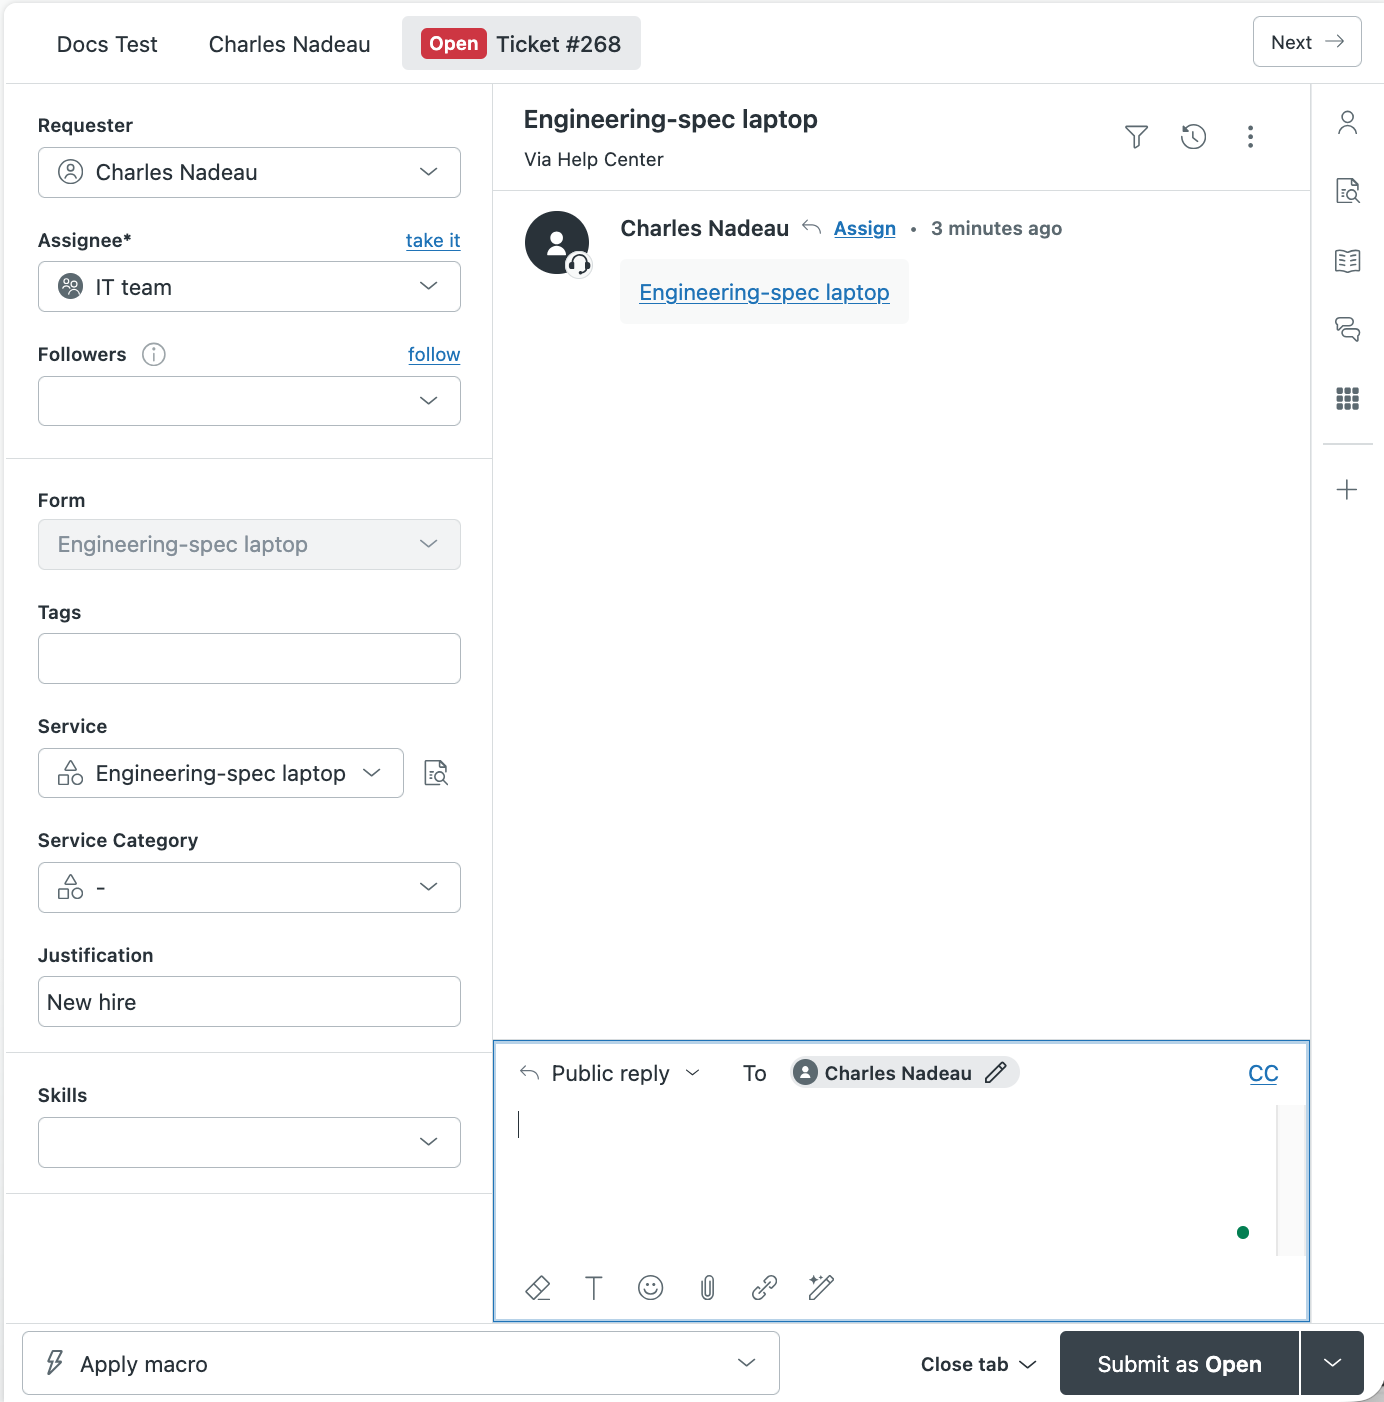
After the employee submits the request, the ticket should be assigned to the IT team for approval and fulfilment:
Who can use the service catalog?
The service catalog is available in all Zendesk plans except the Team plan. In addition, your help center theme must support the service catalog. The service catalog is supported in standard help center themes and themes that were customized after July 31, 2025. If your help center uses a custom theme that was customized before July 31, 2025, you can update your custom theme to support the service catalog.
For more information, see Considerations for using the service catalog.
Turning on the service catalog in your account
By default, the service catalog is not activated in Zendesk accounts. Zendesk admins must turn it on.
The service catalog becomes visible in the help center the moment your turn it on. This could be a problem if there's a long delay between turning it on and adding your first catalog items. You might want to prepare to add your first items after turning on the catalog by gathering all the approvals, item information, and knowledge you need.
To turn on the service catalog
- In Knowledge admin, click Settings (
 ) in the sidebar.
 - Under Service catalog, select Turn on service catalog.

- Click Update.
After turning on the service catalog, the service catalog icon is added to the Knowledge
admin sidebar (![]() ). You can click this icon to create and manage service
catalog items.
). You can click this icon to create and manage service
catalog items.
For more information, see Turning the service catalog on and off.
Adding items to the service catalog
After turning on your service catalog, you can start adding items to it. For this workflow recipe, you'll add three work laptops for employees.
- In Knowledge admin, click Service catalog
(
 ) in the sidebar.
 - Click Create Service.
- Add the following title and description for the first item:
Title:
Description:Standard laptopThis is the title and description of the item that employees see in the service catalog. You can use the editor toolbar to add bullets and format the text.13" MacBook Air configured as follows: - 16GB unified memory - 512GB SSD storage - 13.6-inch Liquid Retina display - Click Save draft.
The item won't be visible to employees until you click Publish from the Save draft menu.
Repeat the process to add two other laptops, as follows.
- Click the Service catalog icon () in the sidebar to go back to the start and create
a second catalog item with the following title and description:
Title:
Description:Engineering-spec laptop16" MacBook Pro configured as follows: - 32GB unified memory - 1 TB SSD storage - 16-inch Liquid Retina XDR display - Click the Service catalog icon () in the sidebar and create a third catalog item
with the following title and description:
Title:
Description:Windows laptop16" Dell XPS laptop configured as follows: - 32 GB RAM - 1 TB SSD storage - 16.3-inch 2K display
Adding a custom ticket field to the laptop request forms
Creating a service catalog item automatically creates a ticket form to go with the item. You can add custom ticket fields to the ticket form so that employees can provide more details in the ticket about their request.
For laptop requests, the fields could include Need by date and Justification. For simplicity, this recipe only includes the justification field that employees use to specify the reason for the laptop request, such as replacing a laptop that was damaged or stolen.
Because each type of laptop is added as a separate item in the catalog, separate ticket forms are also created for each laptop. However, you can add the "Justification" ticket field to all the laptop ticket forms. This is designed to give you maximum flexibility. For example, your IT catalog might also include other hardware like keyboards and external monitors. These items might not need a justification field, or the keyboard item might need an ergonomic option field while the external monitor would not.
To add a justification field to the laptops, start by creating the ticket field, then add the field to the laptop request forms in the service catalog.
Creating the justification custom ticket field
To create the justification custom ticket field
- In Admin Center, click
 Objects and rules in the sidebar, then select Tickets > Fields.
 - Click Add field.
- On the Add field page, select the Text field.
For simplicity, add a text field instead of a dropdown menu.
- Under Name and Display name, enter Justification.
- For Description, enter Reason for the request.
- Under Permissions, select Customers can edit.
- Then configure the following customer-facing properties for the field:
- Set the Title shown to customers to Justification.
- Set the Description shown to customers to Enter the reason for the request.
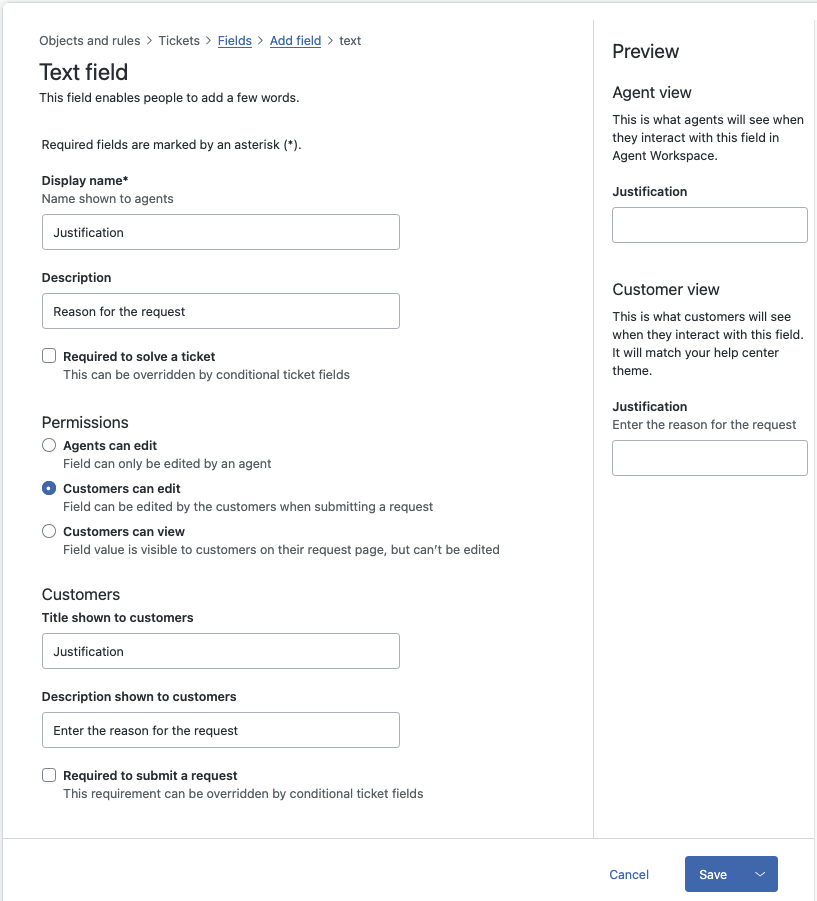
- Click Save.
For more information, see Adding custom ticket fields to your tickets and forms.
Adding the justification custom ticket field to the laptop request forms
After creating the justification field, you can add it to the three laptop ticket forms.
- In Knowledge admin, click Service catalog
() in the sidebar.
- Click the name of the Standard laptop item to edit it.
- At the bottom of the page, click Add field and select Fields.
A list of your ticket fields appears in the sidebar.
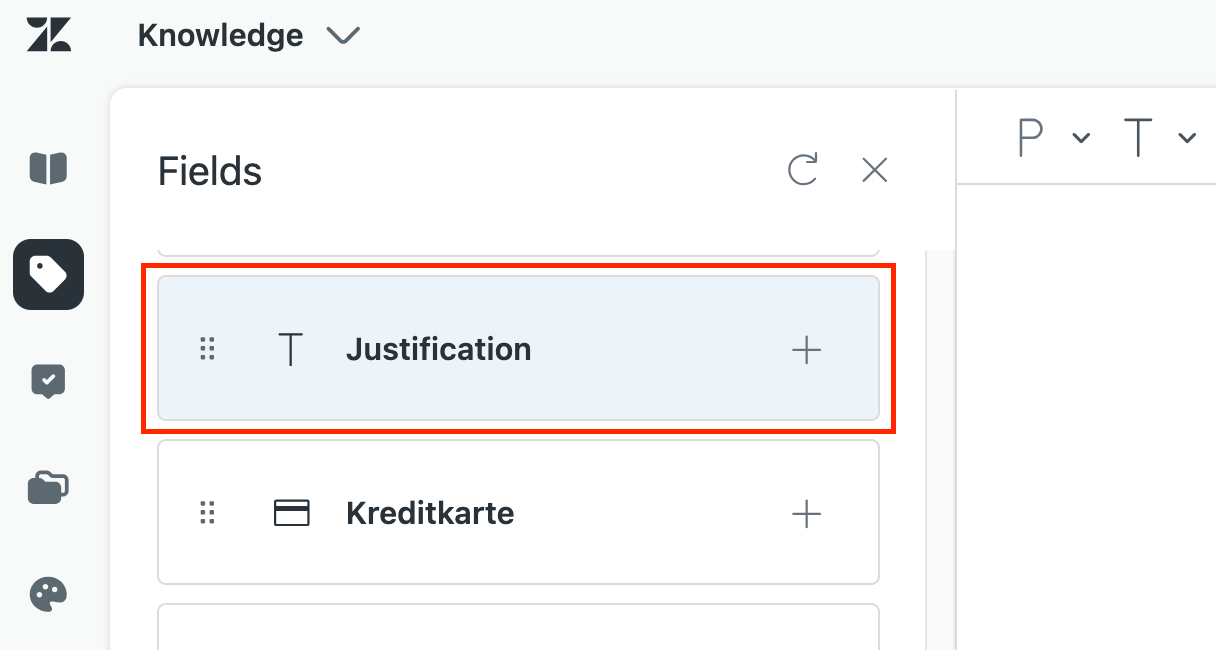
- Next to the Justification field, click the add icon (+) to add the field to the standard laptop's service request form.
- Repeat the procedure to add the justification field to the other laptops in your service catalog.
Assigning laptop requests to the IT team
When an employee submits a request from the service catalog, the ticket should be assigned automatically to the IT team. You can set up this automatic workflow with a ticket trigger that routes tickets created with any of the laptop ticket forms to the IT group. To do this, your IT team members must be agents in Zendesk and members of a group.
Creating a Zendesk group to handle service catalog requests
Create a Zendesk group consisting of IT team members who can review and fulfill the requests.
To create an IT group
- In Admin Center, click
 People in the sidebar, then select Team > Groups.
 - Click Add Group.
- For the Group name, enter IT team.
- For the Description, enter Review and fulfill hardware requests.
- Use the Team members panel to add your IT team members to the group.
- Click Save.
For more information, see Creating groups.
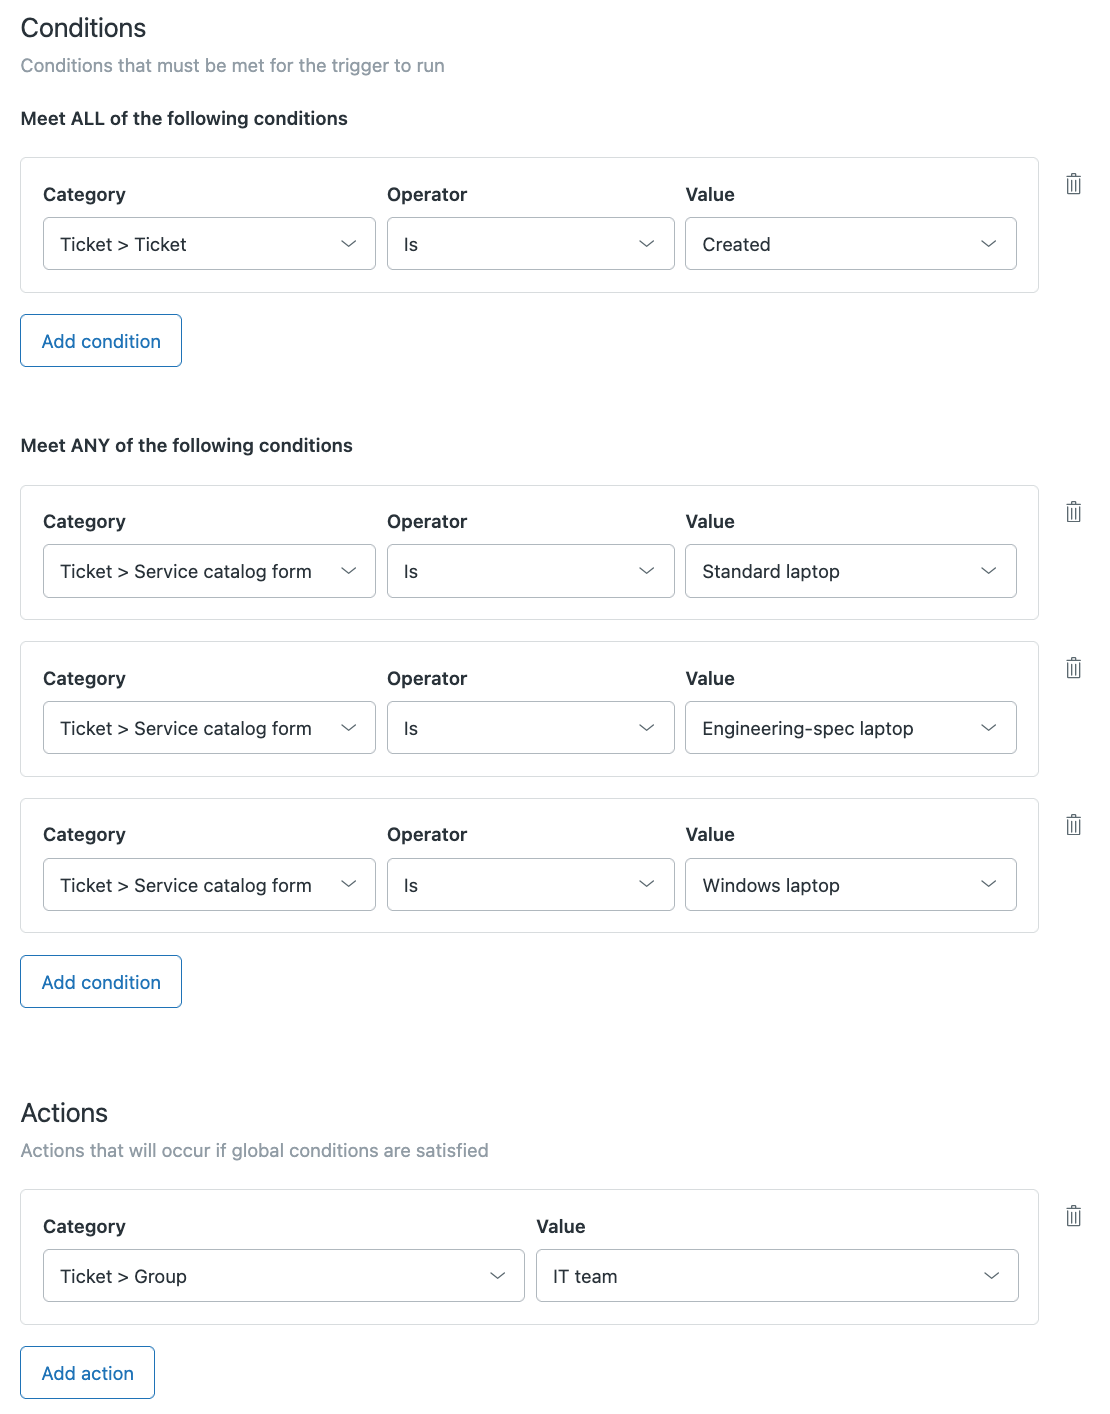
Creating a trigger to assign laptop requests to the IT team group
Next, create a ticket trigger that automatically assigns tickets created with any laptop ticket form to the IT team group.
A trigger consists of one or more conditions that cause the trigger to fire, and one or more actions the trigger will perform when it fires. To assign laptop requests to the IT team group, the behavior of the new trigger should be as follows:
- The trigger should fire when a ticket is created with any one of the three laptop service catalog forms.
-
The trigger's action should be to assign the ticket to the IT group.
To create the trigger
- In Admin Center, click
Objects and rules in the sidebar, then select Business rules >
Triggers.
- Click Create trigger.
- Set the Name to Service catalog tickets.
- Under Description, enter Assign service catalog ticket to the IT team.
- Under Conditions > Meet ALL of the following conditions, add the
following condition:
- Ticket > Ticket | Is | Created
- Under Meet ANY of the following conditions, add the following conditions:
- Ticket > Service catalog form | Is | Standard laptop
- Ticket > Service catalog form | Is | Engineering-spec laptop
- Ticket > Service catalog form | Is | Windows laptop
- Under Actions, define the following action:
- Ticket > Group | IT team
- Click Create trigger.
The conditions and action of your trigger should look as follows:
For more information, see Creating ticket triggers for automatic ticket updates and notifications.
Publishing the catalog items
When adding items to catalog, employees can't see them in the help center yet because their status is set to Draft by default:
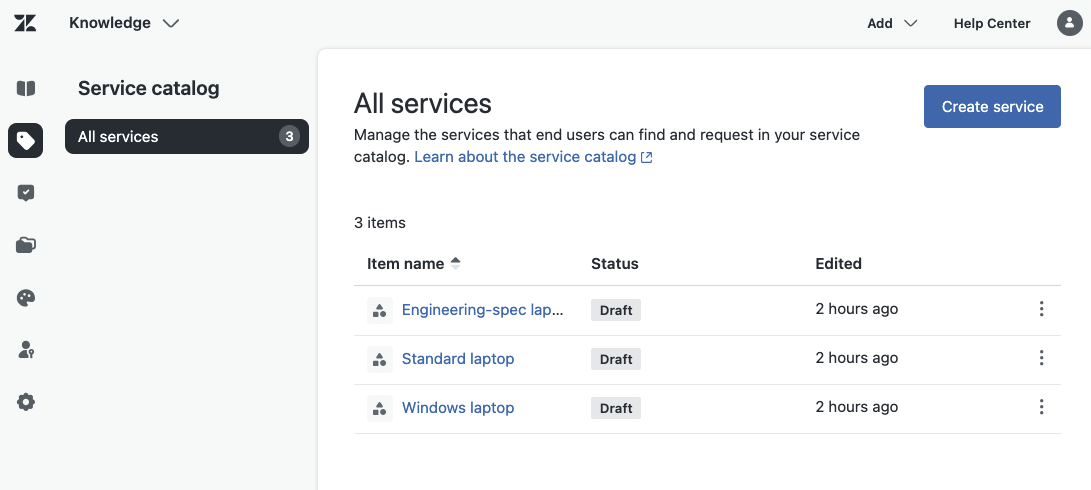
When you're satisfied with your workflow setup and with the items in your catalog, you can publish the items so employees can start using the service catalog to request laptops from the IT department.
- In Knowledge admin, click Service catalog
() in the sidebar.
- For each laptop in the list, click the item name to open the service item.
- At the bottom of the page, click the arrow next to Save draft and select Publish.
The items are now visible in the service catalog in your help center. Employees can browse them and submit requests.
Testing the employee experience
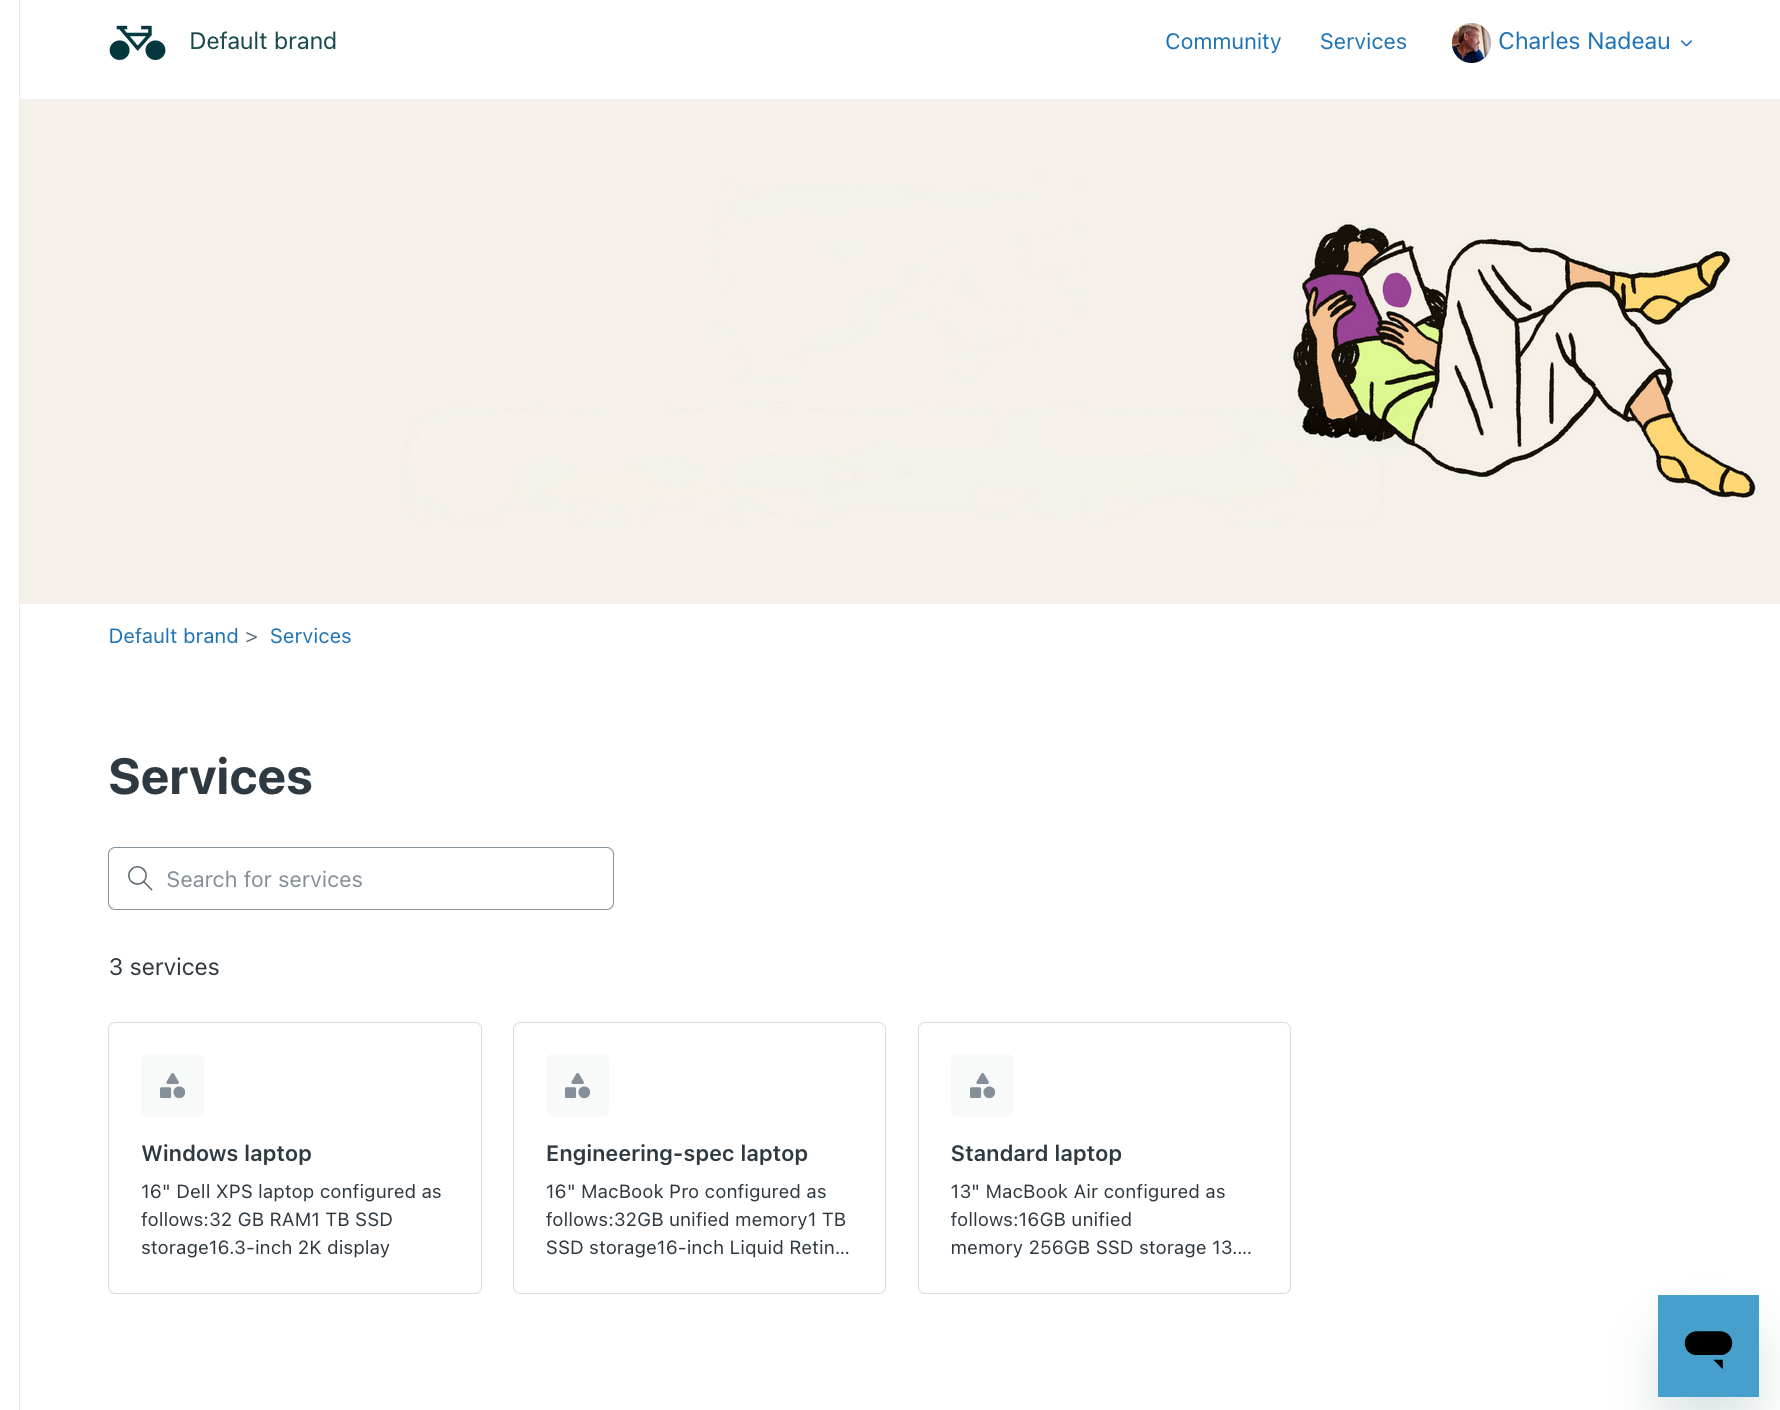
Go to your help center and click the Services link in the top toolbar.
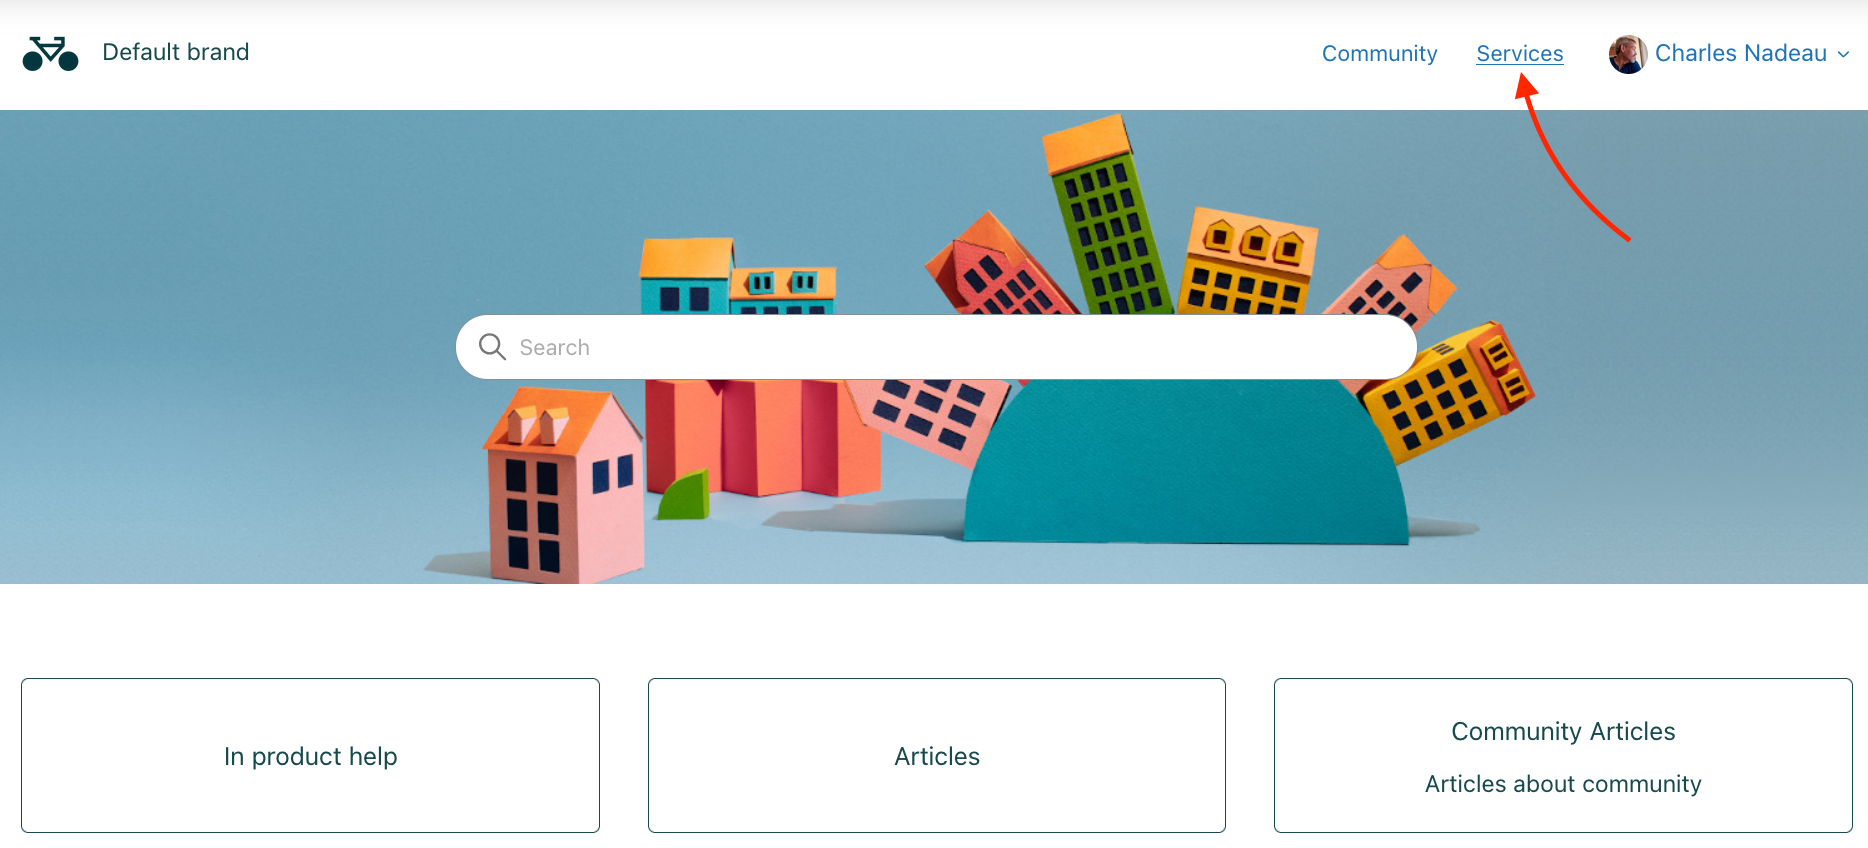
The service catalog appears:
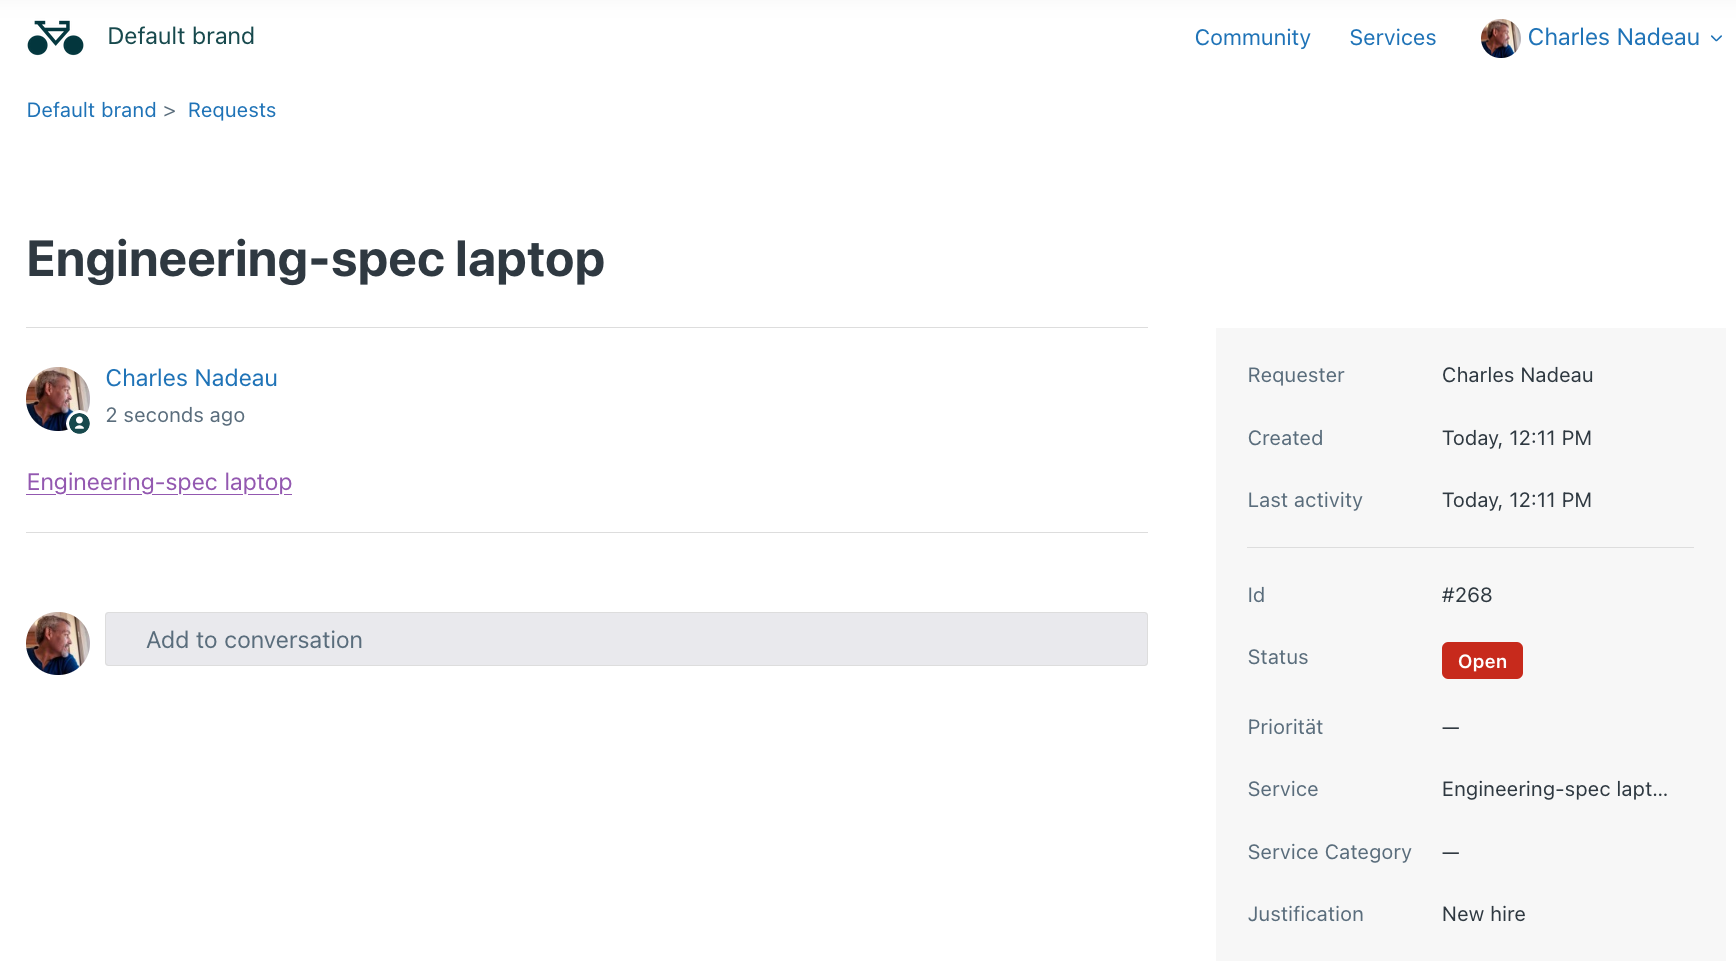
Click one of the laptops, enter a justification for the request, and click the Submit request button to submit the request.
After entering a justification and submitting the request, a ticket is created and assigned to the IT team group.
A member of the group can open the ticket to review and fulfill it.
You can track the status of your request on your Requests page in the help center:
Extending the service catalog
Here are ideas for extending your service catalog:
- Use categories to expand your catalog. For example, you could create an IT category and an HR category. The HR category might contain leave-of-absence requests (maternity/paternity, sabbatical, and medical) and other categories of requests. Categories can be nested up to 5 layers deep. For more information, see Creating and managing categories for your service catalog.
- By default, employees can browse and request items from the service catalog in the help center. You could also build your own custom implementation using the Service Catalog Items API. Building a custom service catalog is useful if you want to host the catalog on an internal website such as your company's IT site. For a hands-on tutorial, see Building a custom employee service catalog with Zendesk in the developer docs.
- Bookmark and share the docs with other internal teams interested in learning about and using
the service catalog:
- Turning the service catalog on and off
- Adding services to your service catalog
- Accessing the service catalog
- Submitting a service request
- Editing and managing services in your service catalog
- Creating and managing categories for your service catalog
- Building a custom employee service catalog in the developer documentation
- Service Catalog Items API in the developer documentation