In this recipe, you'll write a report that shows ticket creation events with additional details and relevant data. Two common examples are detailed ticket channel information and finding tickets created by agents.
This article contains the following topics:
What you'll need
Skill level: Beginner
Time required: 10 mins
- Zendesk Explore Professional or Enterprise
- Editor or Admin permissions (see Giving agents access to Explore)
- Ticket data in Zendesk Support
Creating the report
-
In Zendesk Explore, click the reports (
 ) icon.
- In the Reports library, click New report.
- On the Select a dataset page, click Support > Support - Updates history, then click Start report. The report builder opens.
- In the Metrics panel, click Add.
- From the list of metrics, choose Tickets > Tickets created, then click Apply.
- In the Rows panel, click Add.
-
From the list of attributes, choose the following:
- Ticket > Ticket ID
- Submitter > Submitter name
- Submitter > Submitter role
- Time - Ticket update > Update - Date
-
Ticket update > Update channel,
When you're finished, click Apply. The current report setup will match the following:
-
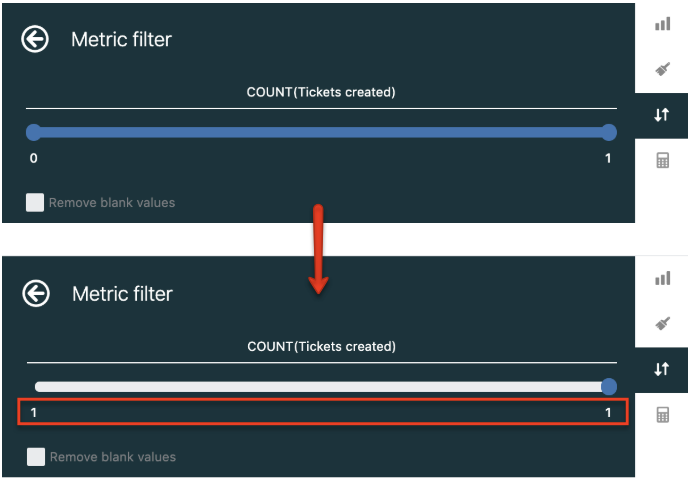
Click Result manipulation (
 ), then Metric filter. Set the minimum and maximum range as 1 to 1. This will filter out any non-creation events from the report.
And you’re done! The screenshot below shows an example of the finished result with the creation event for each ticket as well as the relevant details for each event.

Enhancing your report
You can also filter on a specific attribute (Submitter name, Update channel, etc.) to narrow down the report results. See below for an example.
- Click Submitter name, then select the specific name values you want to filter.

-
Click Update channel, select the specific channels you want to filter.

The result will now contain only the filtered values you selected:
