Verified AI summary ◀▼
Auto assist is an AI tool that helps agents by suggesting solutions based on ticket content. To create effective procedures, write clear, step-by-step instructions as if guiding a new agent. Test procedures to ensure they provide accurate suggestions. Follow best practices like using consistent terminology, including feedback steps, and integrating actions or macros for improved assistance.
Auto assist is an AI-powered assistant that understands the contents of submitted tickets and makes suggestions to your agents on how to solve them.
Procedures are the sets of written steps that auto assist should follow when making suggestions. You can think of defining procedures as similar to explaining to a new agent how a specific problem should be solved within your company.
This article describes how to write procedures for auto assist so that it makes the right suggestions to agents in a ticket. You can write procedures in all Zendesk Support languages.
This article contains the following topics:
- Creating a procedure
- Testing a procedure
- Best practices for creating effective procedures
- Example procedure
Related articles:
Creating a procedure
Procedures should be written as though you’re telling an agent how to perform an internal process. Format your procedure as a simple step-by-step breakdown of how to solve the customer’s request. Be specific and use consistent terminology throughout your procedure. To learn more, see Understanding procedures for auto assist.
Alternatively, you can write a procedure as though you’re engineering a prompt to be used with a large language model (LLM) chatbot, such as ChatGPT. See OpenAI’s best practices on prompt engineering.
To create a new procedure
- In Knowledge admin, click Manage articles
(
 ) in the sidebar, then select Procedures.
 - Click Create procedure.
Alternatively, click the drop-down arrow next to Create procedure and select Use example. This populates the procedure Name and content fields with text that you can update as needed.
- In the Name field, enter a descriptive name for the procedure.
This name is used by auto assist to help connect the customer’s conversation to the right procedure. The procedure name appears only in Knowledge admin, not in the Agent Workspace for the agent.
- To associate the procedure with specific brands, open the right-hand
Settings panel, click Selected brands, then choose the brands
you want to associate the procedure with.

By default, your procedure is automatically associated with all of your brands.
- Click below the name field and enter the content for your procedure. You can do the following:
- To add specific custom actions or action flows to your procedure,
click Insert action (
 ) in the toolbar.
Alternatively, enter a forward slash (/).
In the menu, select a standard action, a custom action, or an action flow.
If you insert a standard action, you must specify the value you want auto assist to update the ticket or field to. See Standard actions for auto assist to learn more.
If no actions or action flows exist, click Manage actions to create an action or action flow.
The action or action flow is inserted into the procedure. You can hover to view what tasks it will perform.

- To add a macro to your procedure, type a forward slash (/)
and select Macros from the menu.
Click a macro to insert it into the procedure. Macros must be active and available to all agents to be inserted into a procedure.
If no active macros exist, you can click Manage macros to create or update a macro.
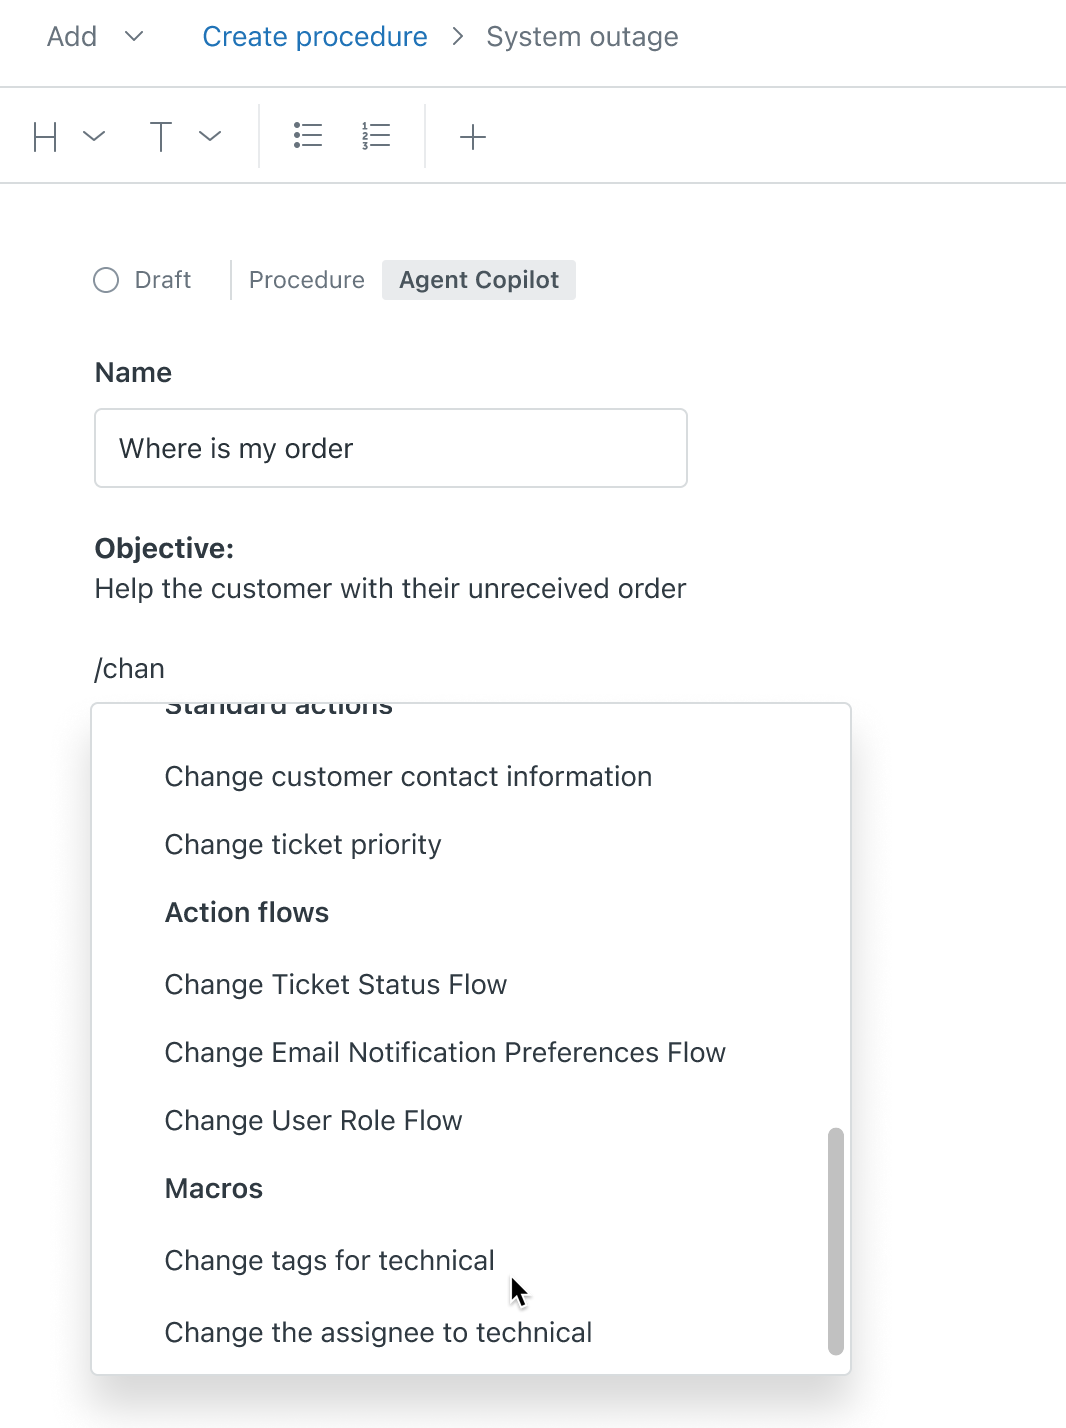
The macro is inserted into the procedure. You can hover over it to preview it.
- To add steps for agents to follow manually, click the Insert
agent instructions (
 ) icon.
In the Instructions for agent text block, enter the steps the agent should follow.
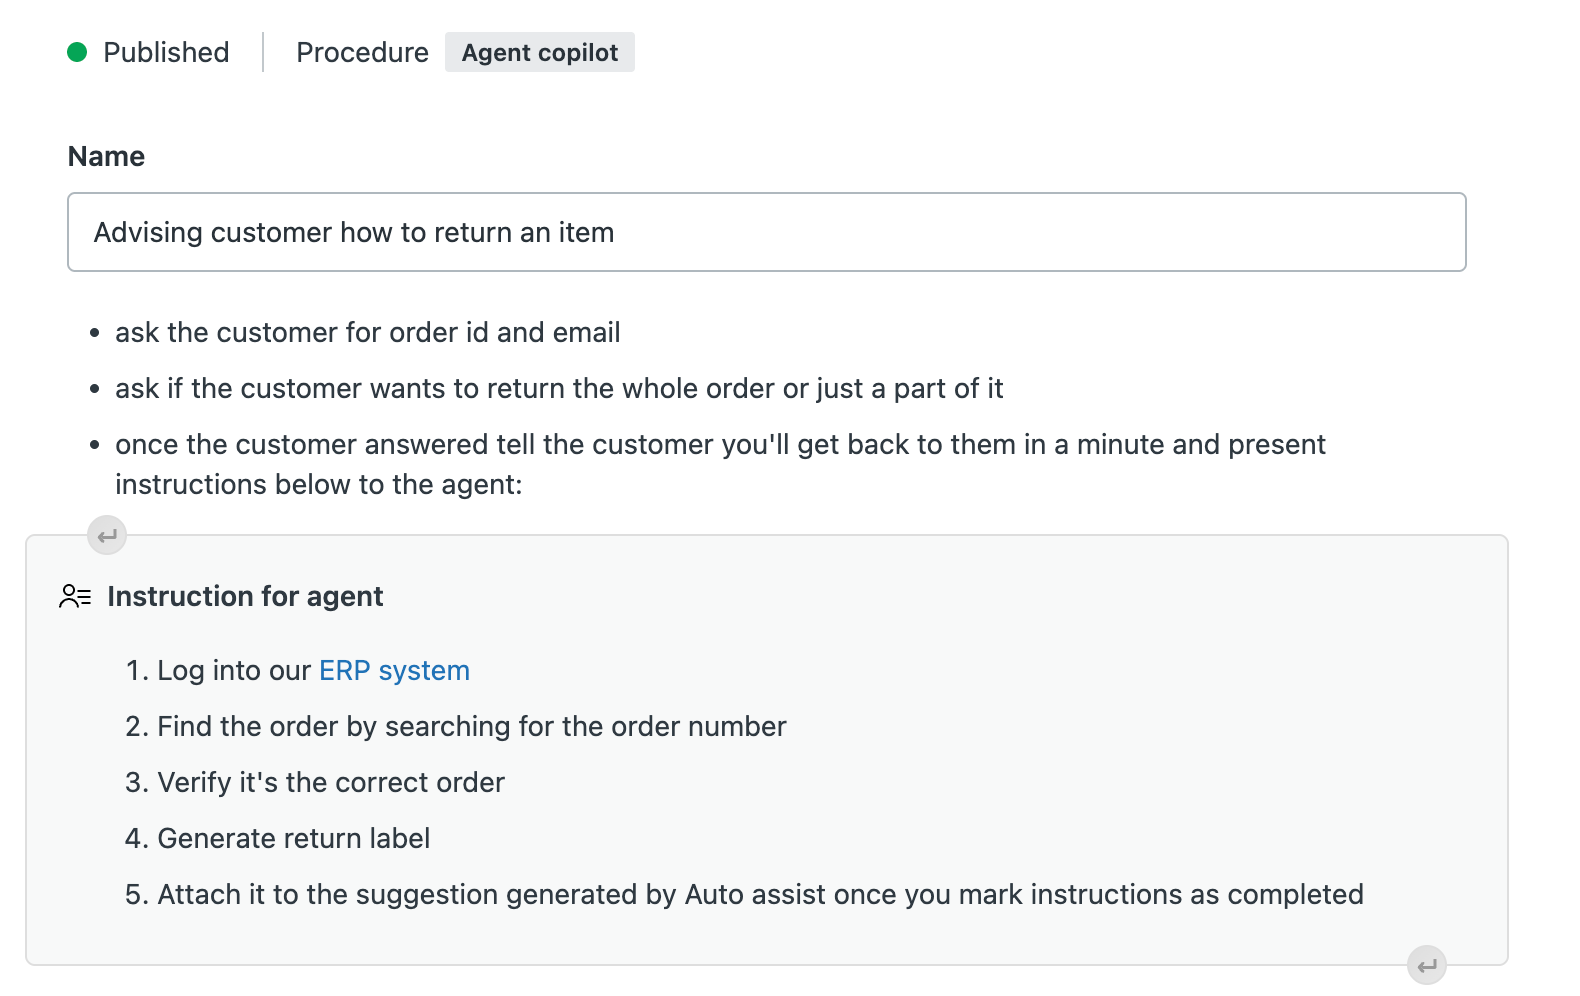
See Creating instructions for agents in auto assist procedures.
- To add a help center article or another procedure, type a forward
slash (/) and select Help center content from the
menu.
Select an article from the Published articles list, or click the Published procedures tab and select a procedure.

Click Insert to add the published procedure or article.
- To add specific custom actions or action flows to your procedure,
click Insert action (
- (Optional) Use the editing toolbar at the top of the page to add headings, bold and italic text, and bulleted and numbered lists. Currently, you can’t include images in procedures.
- To publish your procedure, click the drop-down arrow next to Save draft and select Publish.
- In the window that appears, click Publish.
Published procedures are automatically available for auto assist to use.
Testing a procedure
You should always test your procedure before letting auto assist suggest replies or actions in a real-world setting.
To test a procedure
- Limit the agents who can interact with auto assist to only those groups or agents who are performing the testing.
- Create a messaging or email ticket with the agent_copilot_enabled tag. Email tickets must be created from an email that's not associated with any agents in your Zendesk account, as auto assist doesn't respond to agent comments.
-
Try to solve the ticket with auto assist’s
help.
- If you’re testing an integration between auto assist and Shopify, you can place test orders on your Shopify store.
- If auto assist isn’t offering the suggestions you want, update the procedure to be clearer and more concrete.
- Repeat steps 1–4 as needed until auto assist is offering the suggestions you want. Creating good procedures is an iterative process and might take a few rewrites.
Best practices for creating effective procedures
When creating procedures, follow these best practices:
- Write short, easy-to-follow steps. Phrase your steps as straightforward commands that an agent would take. For example: "Ask the customer to watch this video: <link>" Avoid prompts such as "Find the item the customer asked for and share the link with the customer" (auto assist can’t autonomously search your help center or website).
- Address the agent perspective. Procedures should be written as if you’re talking to an agent. If you copy existing content from customer-facing help center articles, update them to reflect agent-focused considerations and actions.
- Include feedback steps. Help auto assist gather necessary customer input to move on to the next step. For example: "Ask the customer if <an action> worked."
- Include actions where possible. Add a standard or custom action that auto assist can execute if the agent approves. For example: "Add book to cart."
- Include existing macros. Add macros that are available to all agents so that auto assist can suggest macros. You can add one macro per procedure step. Avoid adding other actions in the same step as a macro.
- Be consistent with terminology. Always use the same terms for your products and services. That is, avoid using different words to refer to a single product or service.
- Include conditions if necessary. If you have different procedures based on some condition (for example, subscribers vs. non-subscribers), include that information in the procedure. For example: “Greet the customer, ask if they’re a subscriber, and wait for their answer before proceeding.”
- Test and learn. If auto assist isn’t offering the suggestions you want, update the procedure to be clearer and more concrete. See Testing a procedure.
Example procedure
The example procedure below tells agent copilot how to help a customer select the right car for them.
Title
Advising customer how to select a car
Content
Step 1: Understand the customer's needs
Begin by asking questions to understand the customer's requirements:
- What is the primary use for the car (commuting, family vehicle, off-roading, etc.)?
- What is their budget for purchasing a car?
- Do they have any brand or model preferences?
Step 2: Present suitable options from the list below
Based on the information gathered, present a selection of cars that match their criteria and are on the list below. If the desired car is not here, you don’t have it. Never list cars that are not on the list below.
For commuters:
- Commuter car A: Known for its reliability, fuel efficiency, and advanced safety features. <Include real pricing, fuel efficiency, insurance costs, engine type, and any other important details.>
- Commuter car B: Celebrated for its great fuel economy, comfortable interior, and durability. <Include real pricing, fuel efficiency, insurance costs, engine type, and any other important details.>
- Commuter car C: Offers a balance of comfort, efficiency, and technology features. <Include real pricing, fuel efficiency, insurance costs, engine type, and any other important details.>
For families:
- Family car A: A family favorite due to its spacious interior, high safety ratings, and good fuel economy. <Include real pricing, fuel efficiency, insurance costs, engine type, and any other important details.>
- Family car B: Known for its third-row seating, robust safety features, and comfortable ride. <Include real pricing, fuel efficiency, insurance costs, engine type, and any other important details.>
- Family car C: A larger SUV that offers ample space, towing capacity, and advanced tech options. <Include real pricing, fuel efficiency, insurance costs, engine type, and any other important details.>
For off-road enthusiasts:
- Off-road car A: Renowned for its off-road capabilities and ruggedness. <Include real pricing, fuel efficiency, insurance costs, engine type, and any other important details.>
- Off-road car B: A reliable pickup with strong off-road credentials. <Include real pricing, fuel efficiency, insurance costs, engine type, and any other important details.>
- Off-road car C: Versatile and powerful, suitable for both work and play. <Include real pricing, fuel efficiency, insurance costs, engine type, and any other important details.>
For luxury seekers:
- Luxury car A: Combines luxury with performance and advanced technology. <Include real pricing, fuel efficiency, insurance costs, engine type, and any other important details.>
- Luxury car B: Offers a plush interior, smooth ride, and cutting-edge features. <Include real pricing, fuel efficiency, insurance costs, engine type, and any other important details.>
- Luxury car C: Known for its elegant design, all-wheel-drive system, and high-quality cabin. <Include real pricing, fuel efficiency, insurance costs, engine type, and any other important details.>
Step 3: Discuss financing options
After the customer has selected a car, ask the customer if they would rather pay in cash or credit.
Step 4: Close the deal or offer a test drive
If the customer is ready to close the deal:
- Thank them, ask for their name and phone number, and inform them that they will be contacted by another agent in 2 hours.
If the customer is not ready to make a choice:
- Encourage the customer to take a test drive in the cars they are most interested in. If they agree, ask them for their name and phone number. Then tell them that someone will reach out within 1 hour to confirm whether the timing they suggested is available.
Extra information that you know of:
Our dealership offers a 7-day return policy, flexible financing options (pay in monthly or semesterly installments), and a complimentary loaner vehicle during service appointments. For every other question regarding financing or promotions, you cannot help.