Summary: ◀▼
You can create custom AI prompt-based spotlight insights to identify specific behaviors or keywords in conversations and voice transcripts. These insights help flag tickets for further review by detecting agent or customer actions, using AI prompt templates or custom prompts. You can test, validate, and enhance prompts to improve accuracy, with limits on active insights per account. This supports targeted quality assurance and analysis.
In Zendesk QA, rating categories grade agents, while spotlight insights flag tickets.
Spotlight insights work with both text-based conversations and voice transcripts. Various out-of-the-box insights help you identify specific keywords or phrases in newly closed and synced conversations that indicate the need for further analysis.
In addition to customizing some of these out-of-the-box spotlight insights, you can create new ones. You can create both text-match AI spotlights that find exact phrases or keywords, and prompt-based AI spotlights that ask specific questions about a conversation.
Zendesk QA prompt-based AI insights leverage the latest AI models, letting you create custom AI spotlights from scratch or choose from our ready-to-use AI prompt templates.
AI Prompt category criteria define agent behavior, while Spotlight criteria are more flexible and can apply to either agent or customer behavior. For example, if you want to highlight cases where either the agent or the customer mentions a direct competitor, you can create a spotlight insight named "Competitor" and provide a list of competitor names, product names, and features.
Related articles
Admins and account managers can have up to 10 active AI prompt-based rating categories and AI prompt-based spotlight insights per account. When you reach this limit, you must either mark one as inactive or delete it before you can create or activate more.
To create a custom AI prompt-based spotlight insight
- In Quality assurance, click your profile icon in the top-right corner.
- Click Settings.
- In the sidebar under Account, click AI.
- Click Create AI insight.
- Select the Prompt-based AI insight type.
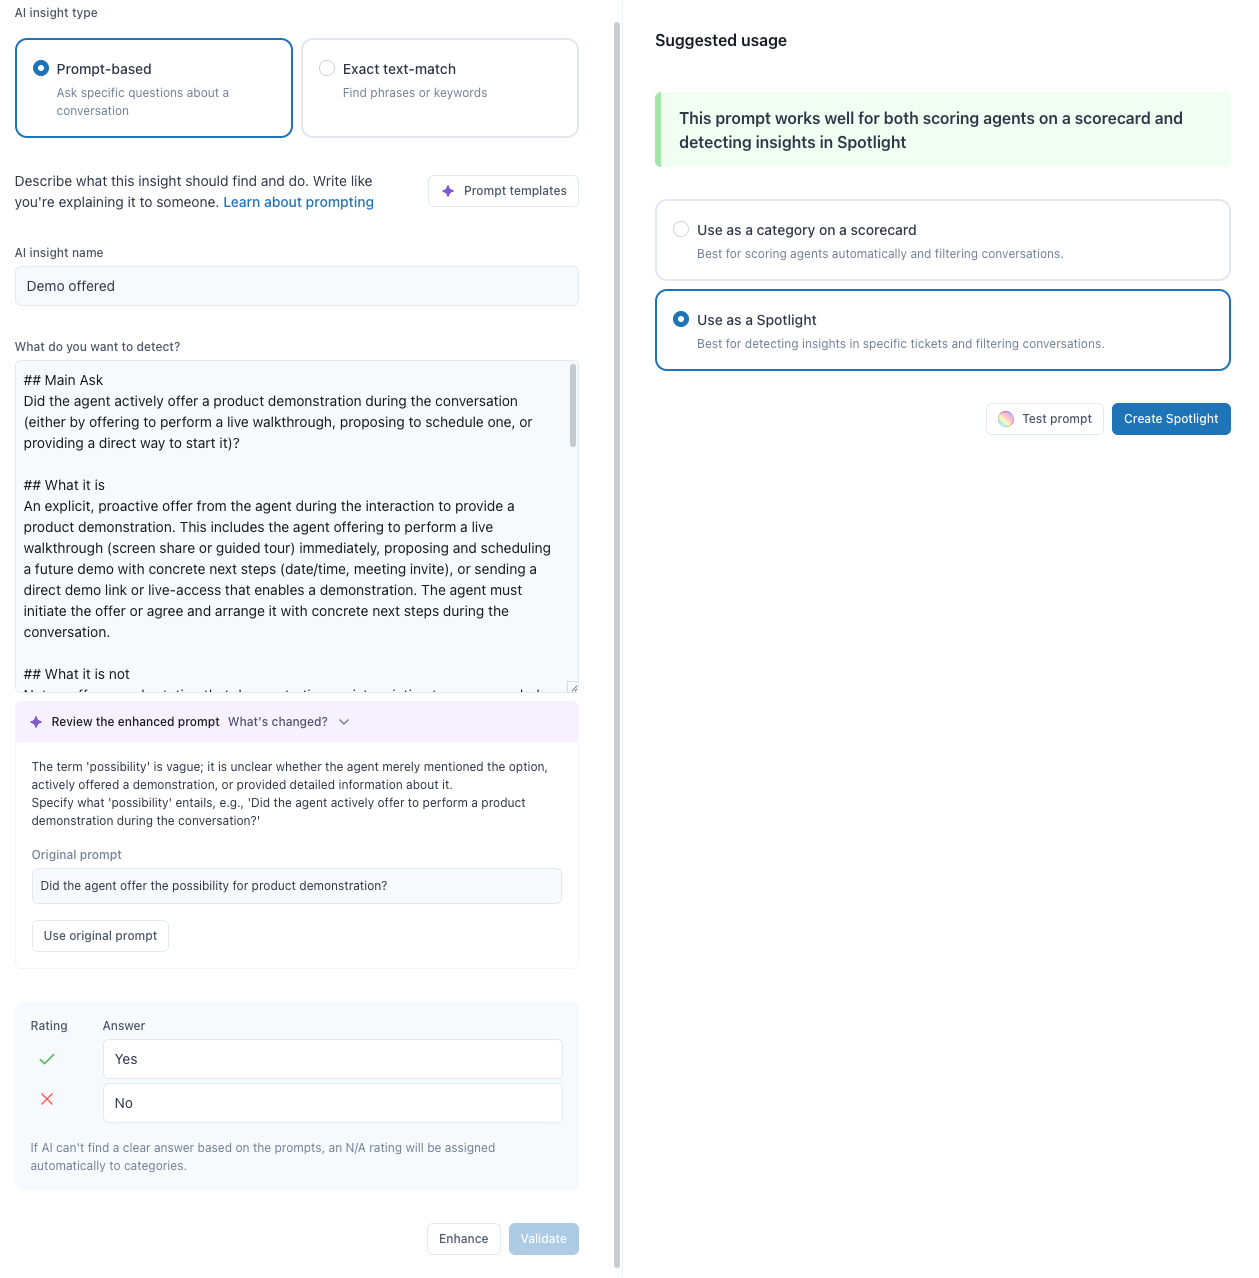
- Enter an AI insight name.
- (Optional) Click Prompt templates to select a template from our ready-to-use AI prompt templates, then click Use template.
- Customize any template to fit your specific needs or create a new prompt from
scratch:
- In What do you want to detect?, clearly describe what this insight
should identify and accomplish.
Specify whether the focus is on the behavior of agents or customers, and use objective, measurable language. You can enter up to 2,000 characters.
Be sure to follow our best practices for writing prompts for AI insights to ensure your insights are accurate and actionable.
- Enter an additional scoring prompt, up to 128 characters, to flag the Spotlight positively when an answer is rated. Be sure to follow our scoring prompt-based AI insights best practices to ensure accurate evaluations.
- Enter an additional scoring prompt of up to 128 characters so the Spotlight gets flagged negatively.
Note: If AI can't find a clear answer based on the prompts, the category is automatically rated as N/A. - In What do you want to detect?, clearly describe what this insight
should identify and accomplish.
- (Optional) If the AI suggestions toggle is turned on in your account
settings, click Enhance. The system analyzes your prompt to resolve
ambiguity, vagueness, or poor formatting. It also refines your core intent by adding the
following details:
- The main ask of your prompt
- What it is
- What it is not
- You prompt answer description
- An example of a negative prompt score
- An example of a positive prompt score
- What needs clarifying
- Your prompt answer options
Tip: Evaluation typically uses conversation data only. However, when metadata elements appear in the prompt, such as response time, tags, channel, and internal notes, they’re also taken into account during prompt evaluation. See Writing prompts with metadata. - (Optional) Click Review the enhanced prompt to see what changed from your original prompt and access detailed suggestions.
- (Optional) Click Use original prompt to revert to your original prompt.
- (Optional) If the AI suggestions toggle is turned off in your account settings, click Validate to receive feedback and tips on how to improve your prompt without changing it.
- Under Suggested usage, select Use as a spotlight.
- (Optional) Click Test prompt to confirm that your prompt works correctly and
meets the specified criteria.
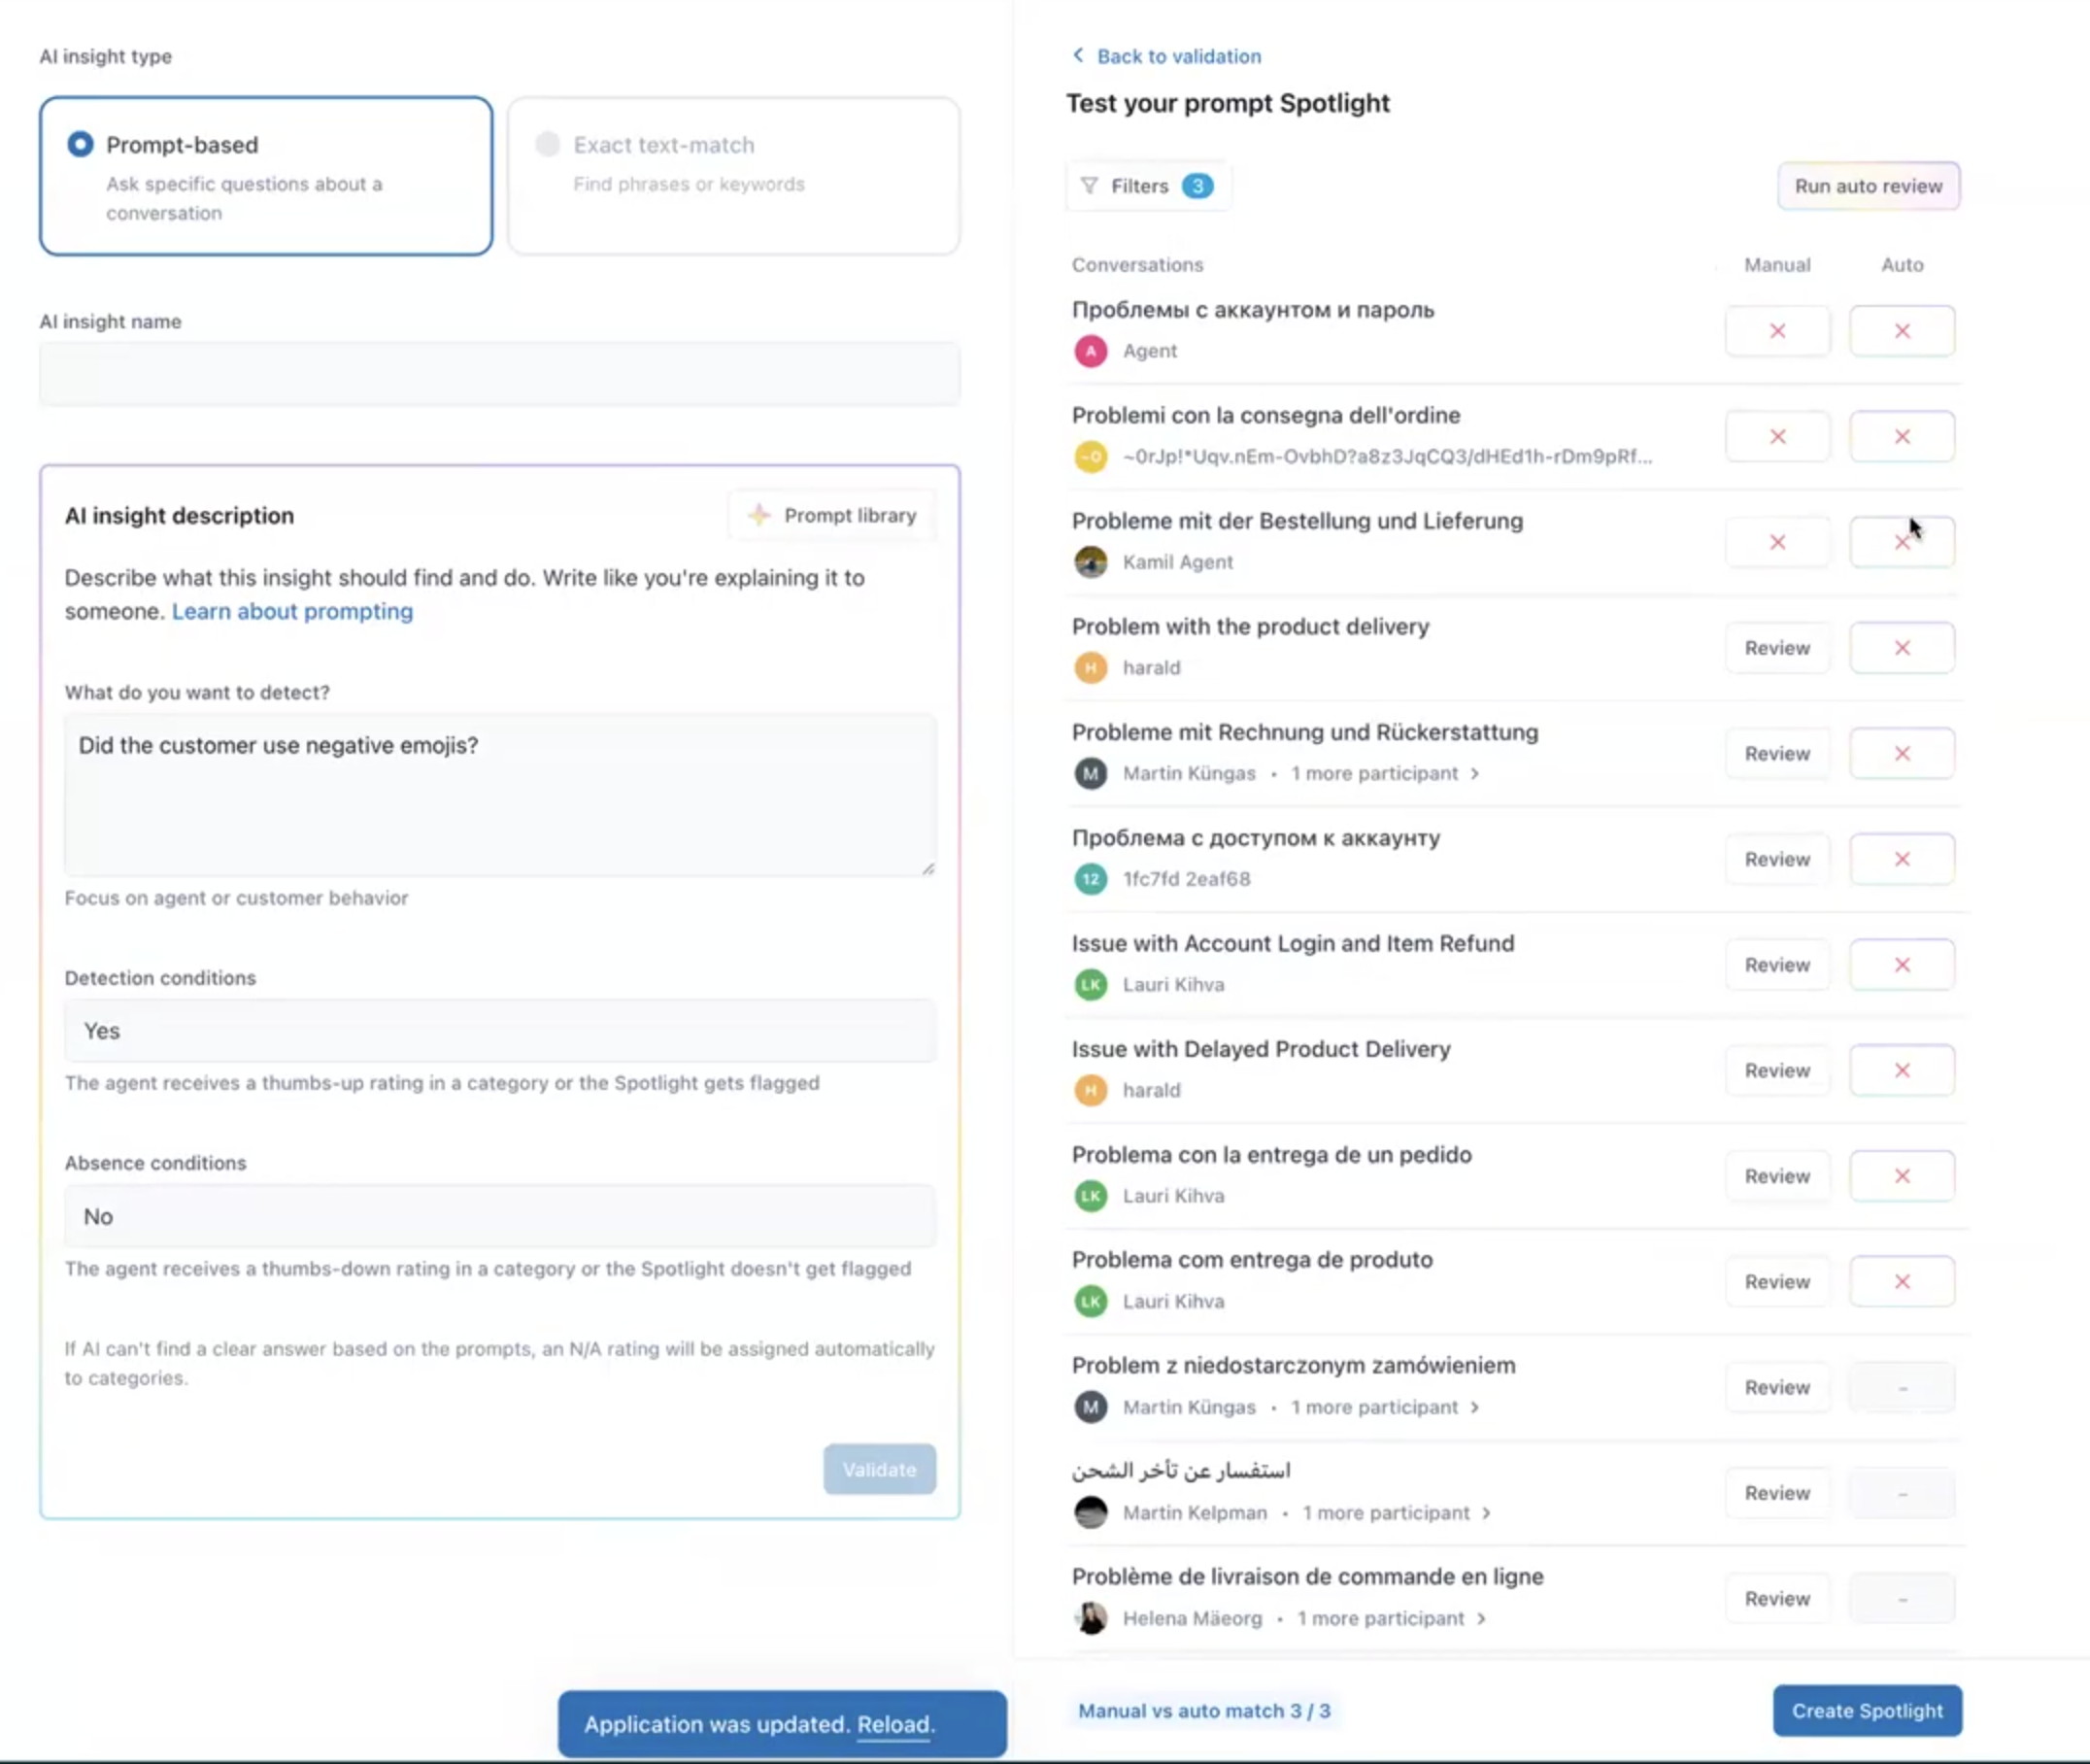
A conversation filter view shows the total number of conversations found based on the prompted insight.

To keep the pool of conversations for testing specific, the filter displays a list of closed conversations created in the last seven days that have more than four replies, by default, with a limit of 100 conversations.
- (Optional) Click Select for testing. The conversations found using this prompt
are listed in the right-side panel, displayed 10 at a time.
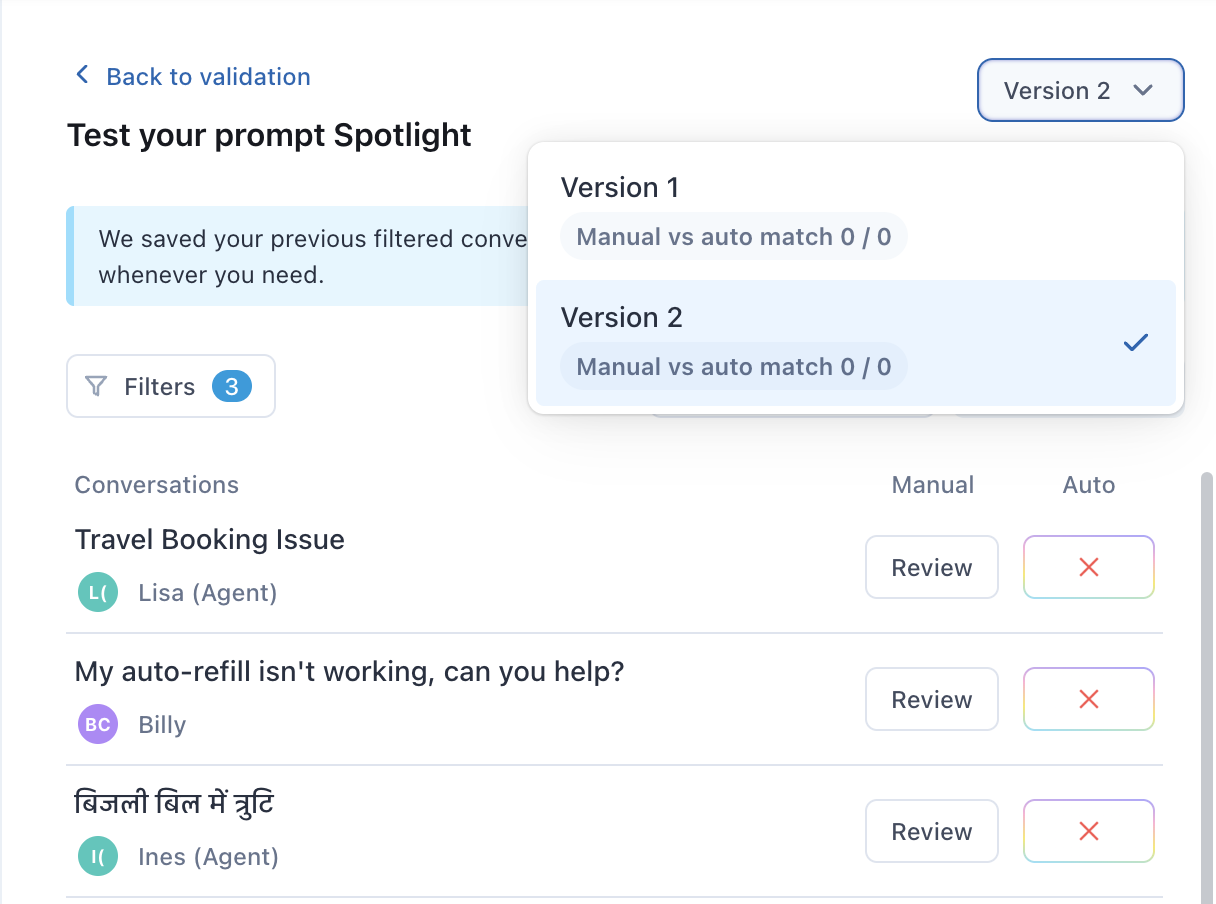
- (Optional) If you’ve validated and tested this prompt, then edited it and are testing it
again, a prompt history is displayed. This lets you view earlier versions of the prompt
and the match rate, which indicates the results evaluated based on that version. Check how
often auto review and manual review scores align to get a clearer overview of your prompt
performance. You can use this history to select the most suitable prompt version before
moving on to its final creation.
- Test your results:
- (Optional) Click Review next to each conversation and manually score them based on the prompt you are creating, so you can compare the results and see how often auto review and manual review scores align.
- Click Run auto review to see the results of your prompt conditions
automatically applied to all listed conversations under Auto.
If you see many conversations highlighted in yellow, this likely indicates a misalignment between how you want to score conversations and how AI is scoring them. You should consider rephrasing your prompt.
When rephrasing what you want to detect with your prompt, if your changes are minor, you can click Run auto review again. However, if your changes are more significant, such as modifying it to evaluate the agent instead of the customer, the prompt type might change from spotlight to category. In this case, you'll need to return to step 14 and click Test prompt again.
- Click Create Spotlight.