Admins can block all end users from a specified IP address from conducting messaging conversations with your AI or human agents. Messaging channel bans can be applied to IP addresses in Admin Center, or from messaging conversations in Agent Workspace.
This article includes the following topics:
Related articles:
Understanding what happens when an IP address is banned from messaging channels
Banning an IP address from accessing your messaging channels:
- Prevents any users with the banned IP address from connecting with your Web Widget, iOS SDK, and Android SDK channels.
- Adds it to the Banned IP addresses page.
- Adds the action to the audit log.
Banning an IP address does not notify the end user that their IP address has been banned. End users, however, do experience a change in behavior in the Web Widget or Mobile SDK channels. See About banning IP addresses from messaging channels.
Banning IP addresses in Admin Center
Admins and agents with the right permissions can ban IP addresses from the Banned IP addresses page.
To ban an IP address from the Banned IP addresses page
- In Admin Center, click
 People in the sidebar, then select Restrictions > Banned IP
addresses.
People in the sidebar, then select Restrictions > Banned IP
addresses. - Click Ban IP address.
- On the Add a banned IP page, add the following
information:
- IP address (required): Enter the IP address or range you want to ban. Use valid IPv4 formatting for individual IP addresses. See Specifying a range of IP addresses for adding a multiple addresses.
- Reason (required): Use the drop-down to select a reason for banning the address.
- Additional comments: Enter a comment (up to 500 characters) with relevant information about the IP address or the ban.
- Click Ban. The IP address is added to the banned IP list.
Specifying a range of IP addresses
You can specify ranges of IP addresses. Use valid IPv4 addresses, along with the methods below, to specify a range:
- Use asterisk (*) wildcards. An IP address consists of four numbers separated by periods, such as 192.168.0.1. You can substitute a single asterisk character (*) for any number group to let Zendesk know that it should accept any value in that space. For example, 192.*.*.* allows any IP address whose first number is 192.
- Use IP subnet mask syntax. For example, 192.168.1.0/25 specifies all the IP addresses between 192.168.1.0 and 192.168.1.127.
Banning IP addresses in a messaging conversation in Agent Workspace
If device metadata is displayed in Agent Workspace, you can ban IP addresses from the ticket interface. The option to ban an IP address appears in the Device information section of the Customer context panel.
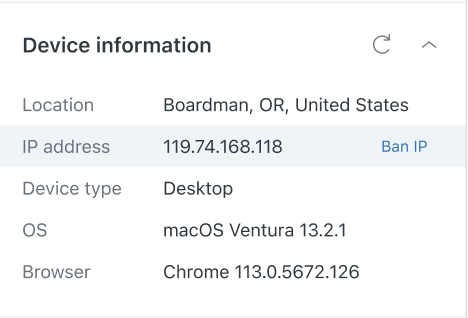
To ban an IP address in Agent Workspace
- In Agent Workspace, click the User icon (
 ) on the side of the ticket. This opens
customer context in the context panel.
) on the side of the ticket. This opens
customer context in the context panel. - Expand the Device information section.
- Click Ban IP.