Verified AI summary ◀▼
Integrate Workday with your Workforce Management to automatically import approved time off data, streamlining leave management. Syncs occur hourly, mapping users by email. Set up involves creating an OAuth client in Workday, configuring integration settings, and mapping time off reasons. Partial day requests need manual approval. You can edit or disconnect the integration anytime, ensuring flexibility in managing time off data.
As an admin, you can integrate Workday with your Zendesk Workforce management (WFM) account to automatically import approved time off data from Workday into WFM.
This article contains the following topics:
About the Workday integration with Workforce management
After connecting Workday with WFM, Zendesk admins and team members in a custom role with permission can configure the integration to automatically import time off data from Workday.
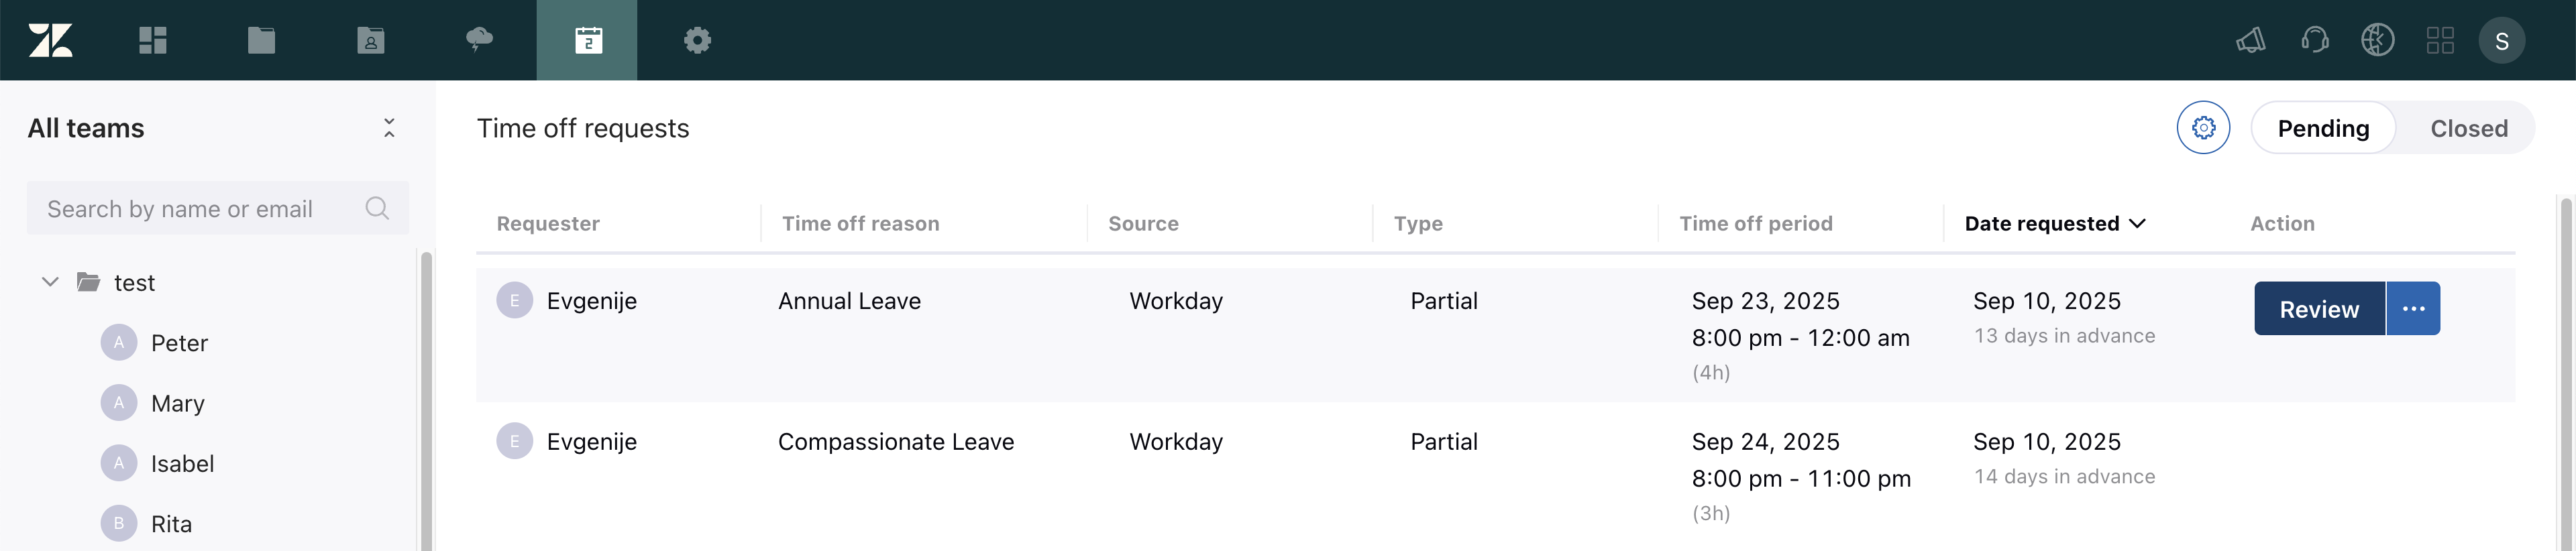
When using this integration, approved time off requests in Workday are visible on the WFM Time off management page. Within the list, these requests can be identified by having Workday as their source. Full day time off requests appear under the Closed tab, while partial time off requests display under the Pending tab and must undergo manual review and approval by an admin.
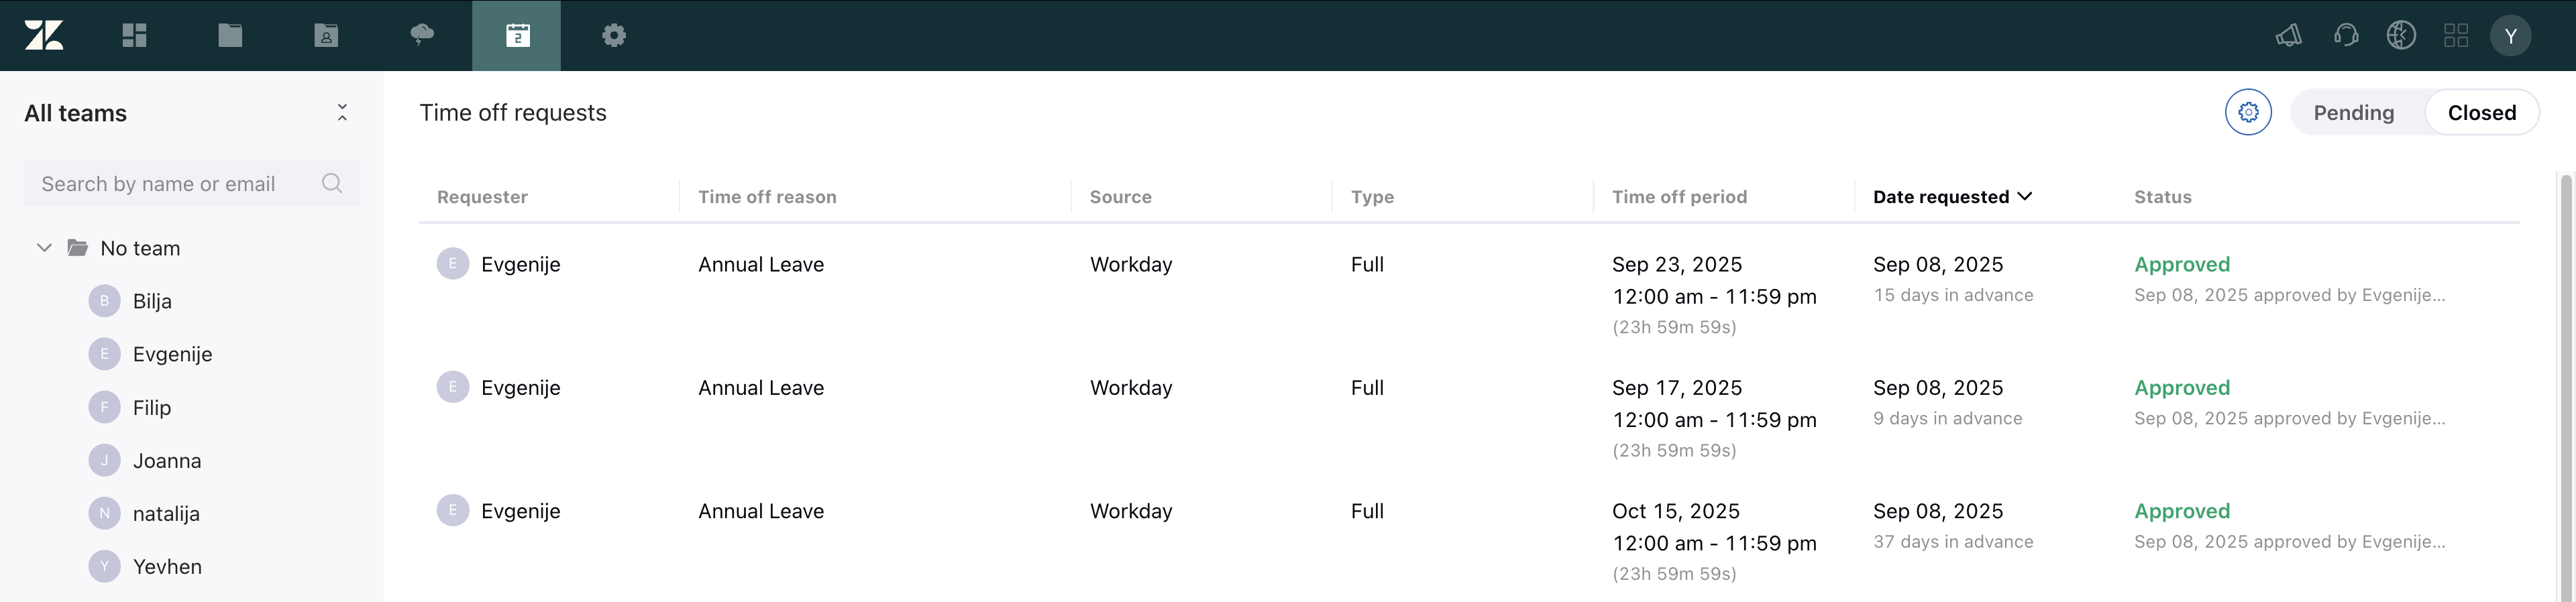
Time off in Workday also syncs to WFM and displays in the Schedule page.
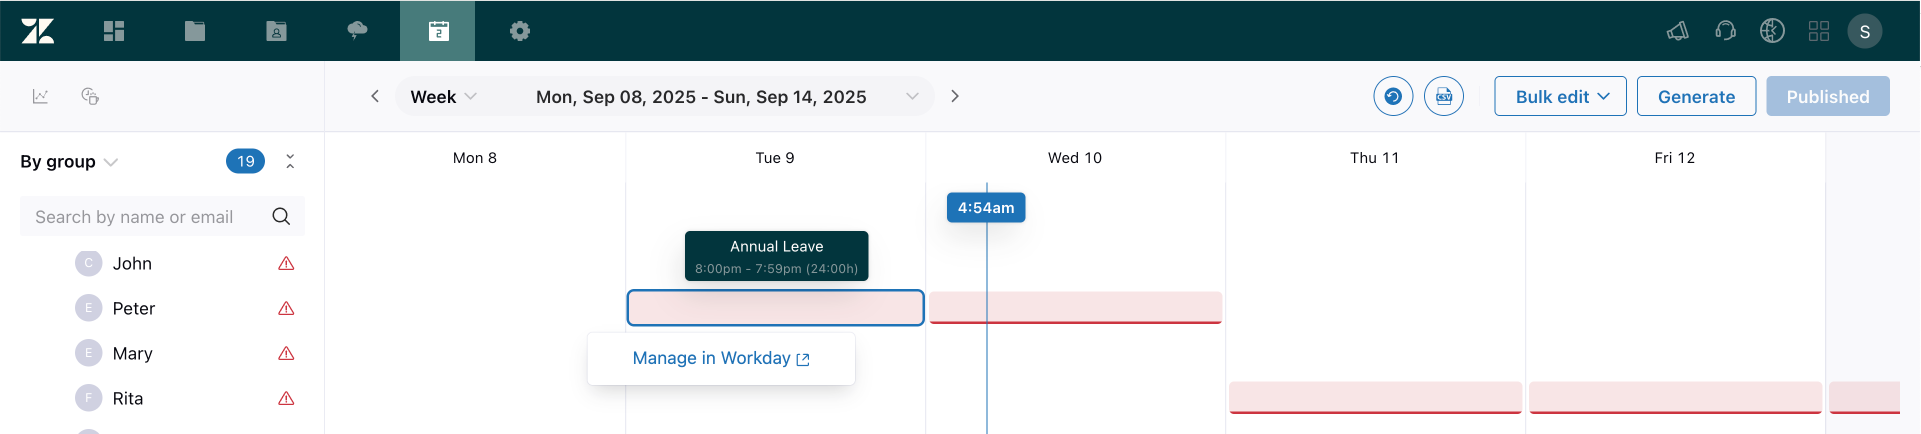
Published Workday time off is displayed to agents on their agent schedule page.
Connecting the Workday integration with Zendesk WFM
When you use the Workday integration for WFM, data from Workday, including time off and leave, syncs to WFM every hour.
Workday users are mapped to WFM users by email. Time off data is synced only for mapped users. Users who have the same email address assigned to multiple users in Workday can't be synced.
One Workday instance can be connected to multiple Zendesk instances. For the integration to work properly, separate OAuth clients have to be created in Workday and provided in the integration setup.
To connect the Workday integration with Zendesk WFM
Step 1: Creating an OAuth client in Workday
Workday uses OAuth 2.0 for authorization. A Workday administrator must set up an OAuth 2.0 client in Workday to provide Zendesk secure access to your data in Workday.
When you set up an OAuth client in Workday, make sure you create it without an expiration date.
After you save the OAuth configuration, Workday generates a Client ID and Client Secret. Save these securely. Both values are needed when configuring the Workday integration for WFM in Admin Center.
- Sign into your Workday account as an administrator.
- In the Workday search bar, type Edit Tenant Setup - Security, then select the matching option from the search results list.
- Scroll down to the OAuth 2.0 Settings section and turn on the OAuth 2.0 configuration.
- Configure the API client:
- Search: Select Register API Client.
- Client Name: Enter a meaningful name for your client, such as Zendesk connection.
- Client Grant Type: Choose Authorization Code. See OAuth 2.0 Security Best Current Practice for more information about grant types.
-
Client Redirect URL: Enter
https://zis.zendesk.com/api/services/zis/connections/oauth/callback
- Use the API scopes field to specify the following permissions for the app to access Workday data:
SystemStaffingTime off and leave-
Home Contact Information -
Work Contact Information
- Click Save.
- After saving, securely save the following generated values that appear in Workday. These are required for connection, authentication, and token generation.
- Client ID
- Client SecretNote: The Client Secret displays only once. Copy and save it in a secure location, such as a password manager.
- Token Endpoint URL
- Authorization Endpoint URL
- Workday REST API URL
Step 2: Configuring the Workday integration for WFM in Admin Center
You can set up a connection with multiple Workday instances. Approved time off data from these instances syncs to WFM.
To configure a Workday integration for WFM in Admin Center
- In Admin Center, click
 Apps and integrations in the sidebar, then select Integrations >
Integrations.
Apps and integrations in the sidebar, then select Integrations >
Integrations. - Click Workday in the list.
- Click Create connection and select Workforce management.
- This opens the Workday Client configuration page.
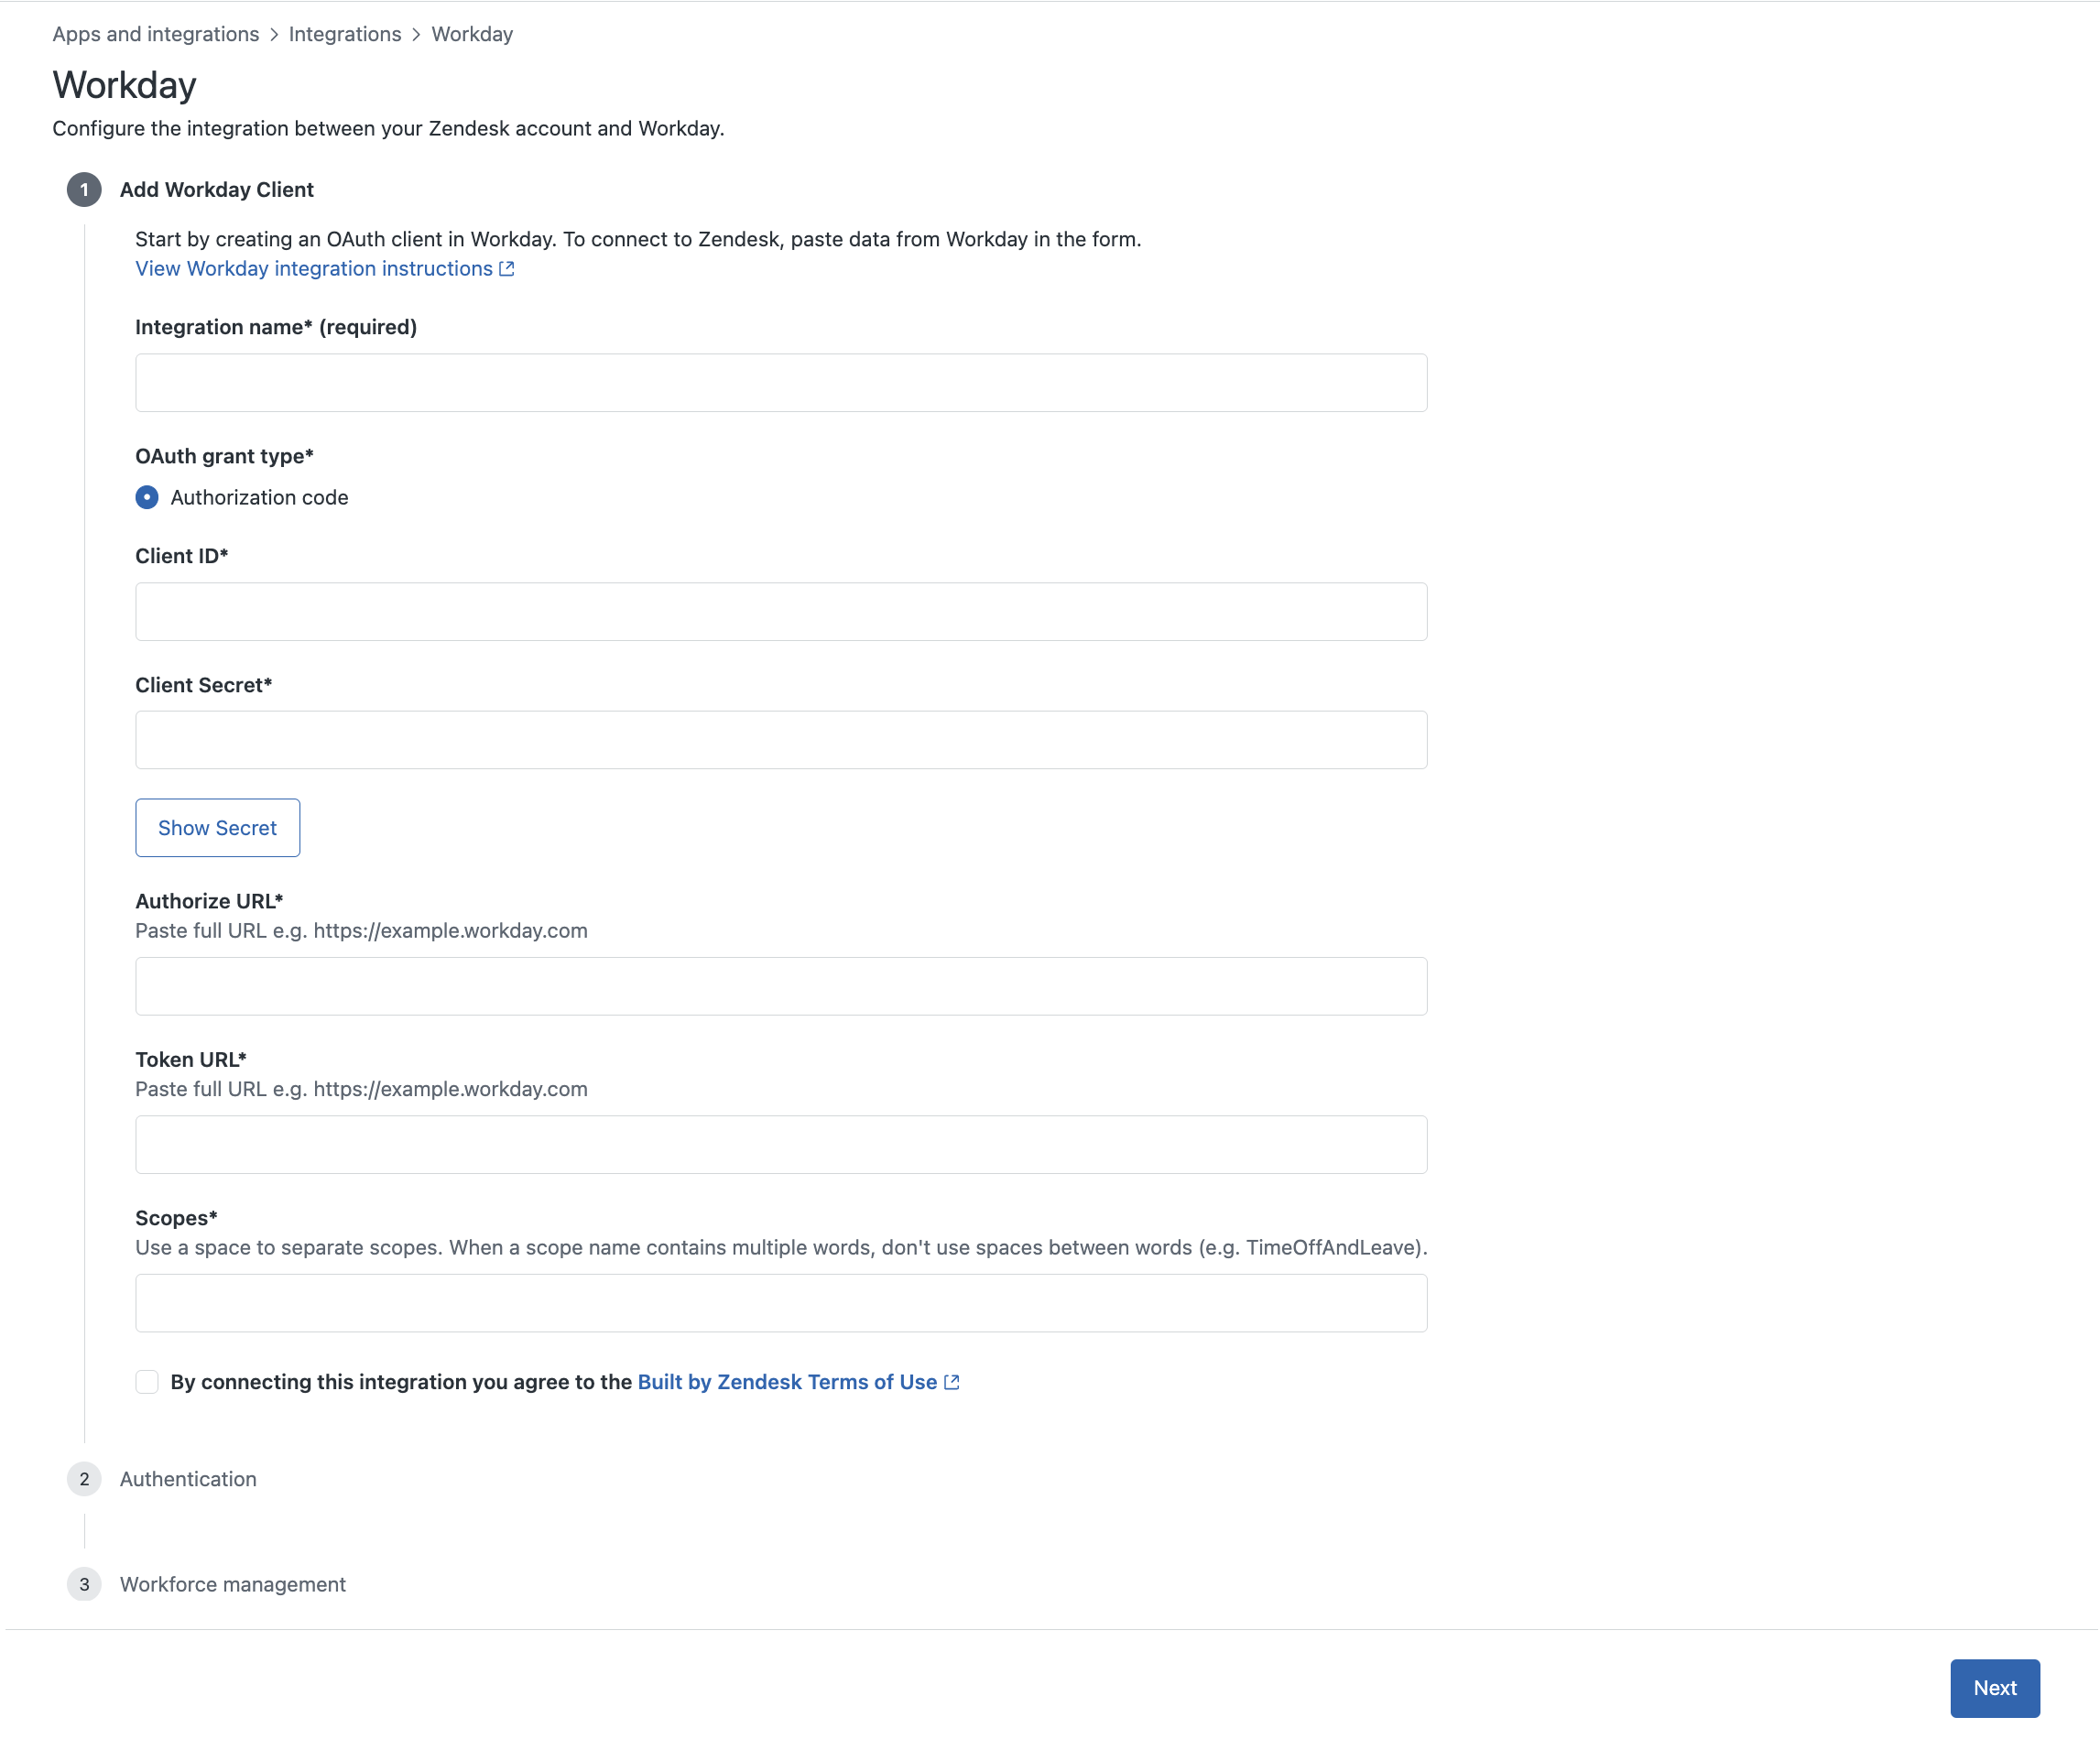
- Enter an Integration name. If you're setting up multiple connections, give the integration a unique and identifiable name, such as the company or brand name to which the connection applies.
- Enter the values provided in Workday when you created the OAuth client in Step 1:
- Enter the Client ID value generated by Workday when you created the OAuth client.
- Enter the Client Secret value generated by Workday when you created the OAuth client.
- Enter the Authorize URL value generated by Workday when you created the OAuth client.
- Enter the Token URL value generated by Workday when you created the OAuth client.
- Enter the Scopes you specified for the Workday OAuth client. Use spaces
to separate scopes, but don’t include spaces between words within a scope name.
The value should be:
system staffing timeoffandleave
- Select Built by Zendesk Terms of Use to confirm you agree to the terms of this integration.
- Click Next.
- Under Authentication, click Connect and sign in to your Workday
account.
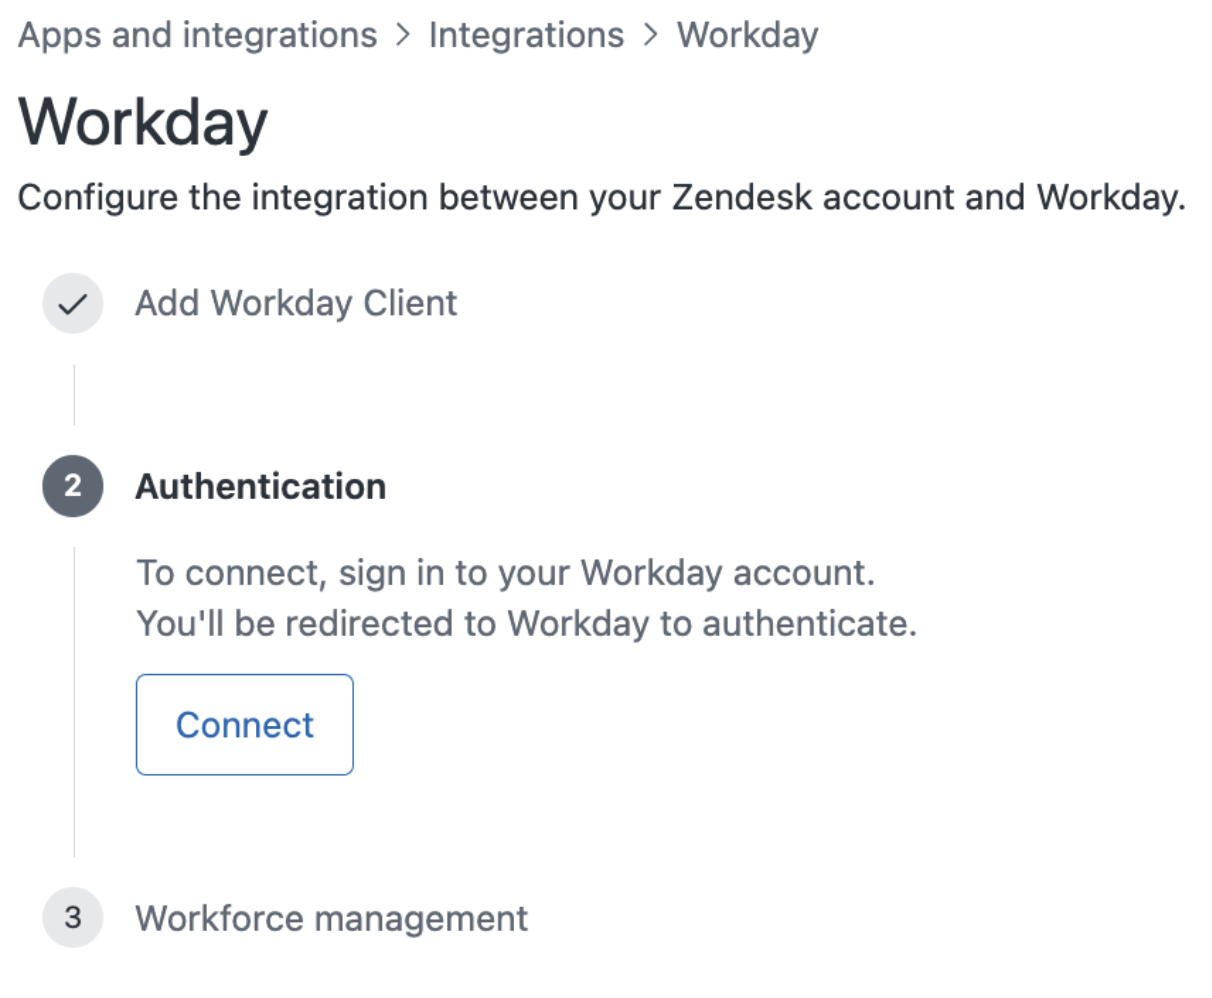
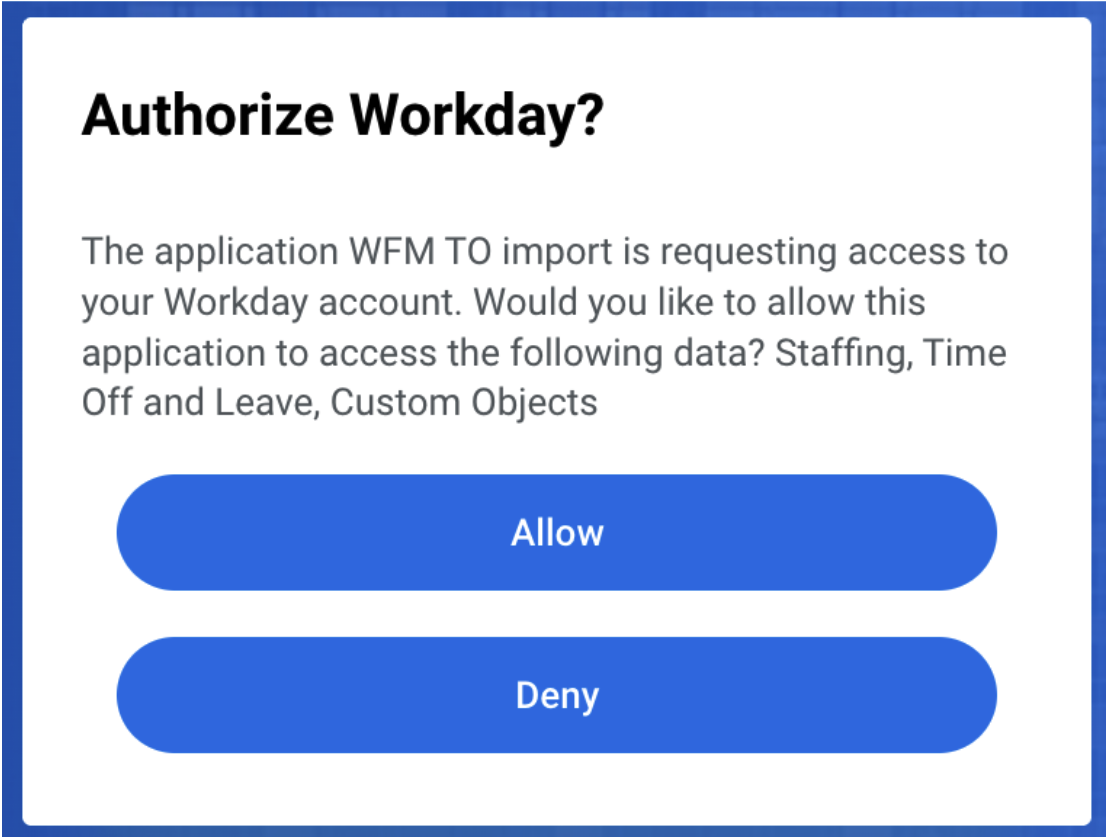
- After signing in successfully, click Allow to authorize WFM to access your
Workday account.
 If an internal server error occurs during the authorization process for WFM to access your Workday account, sign into your Workday account first and then set up the connection again.
Step 3: Configuring the Workday with Zendesk WFM integration settings
Configure how you want Zendesk WFM to import time off data from Workday.
To configure the Workday with Zendesk WFM integration settings
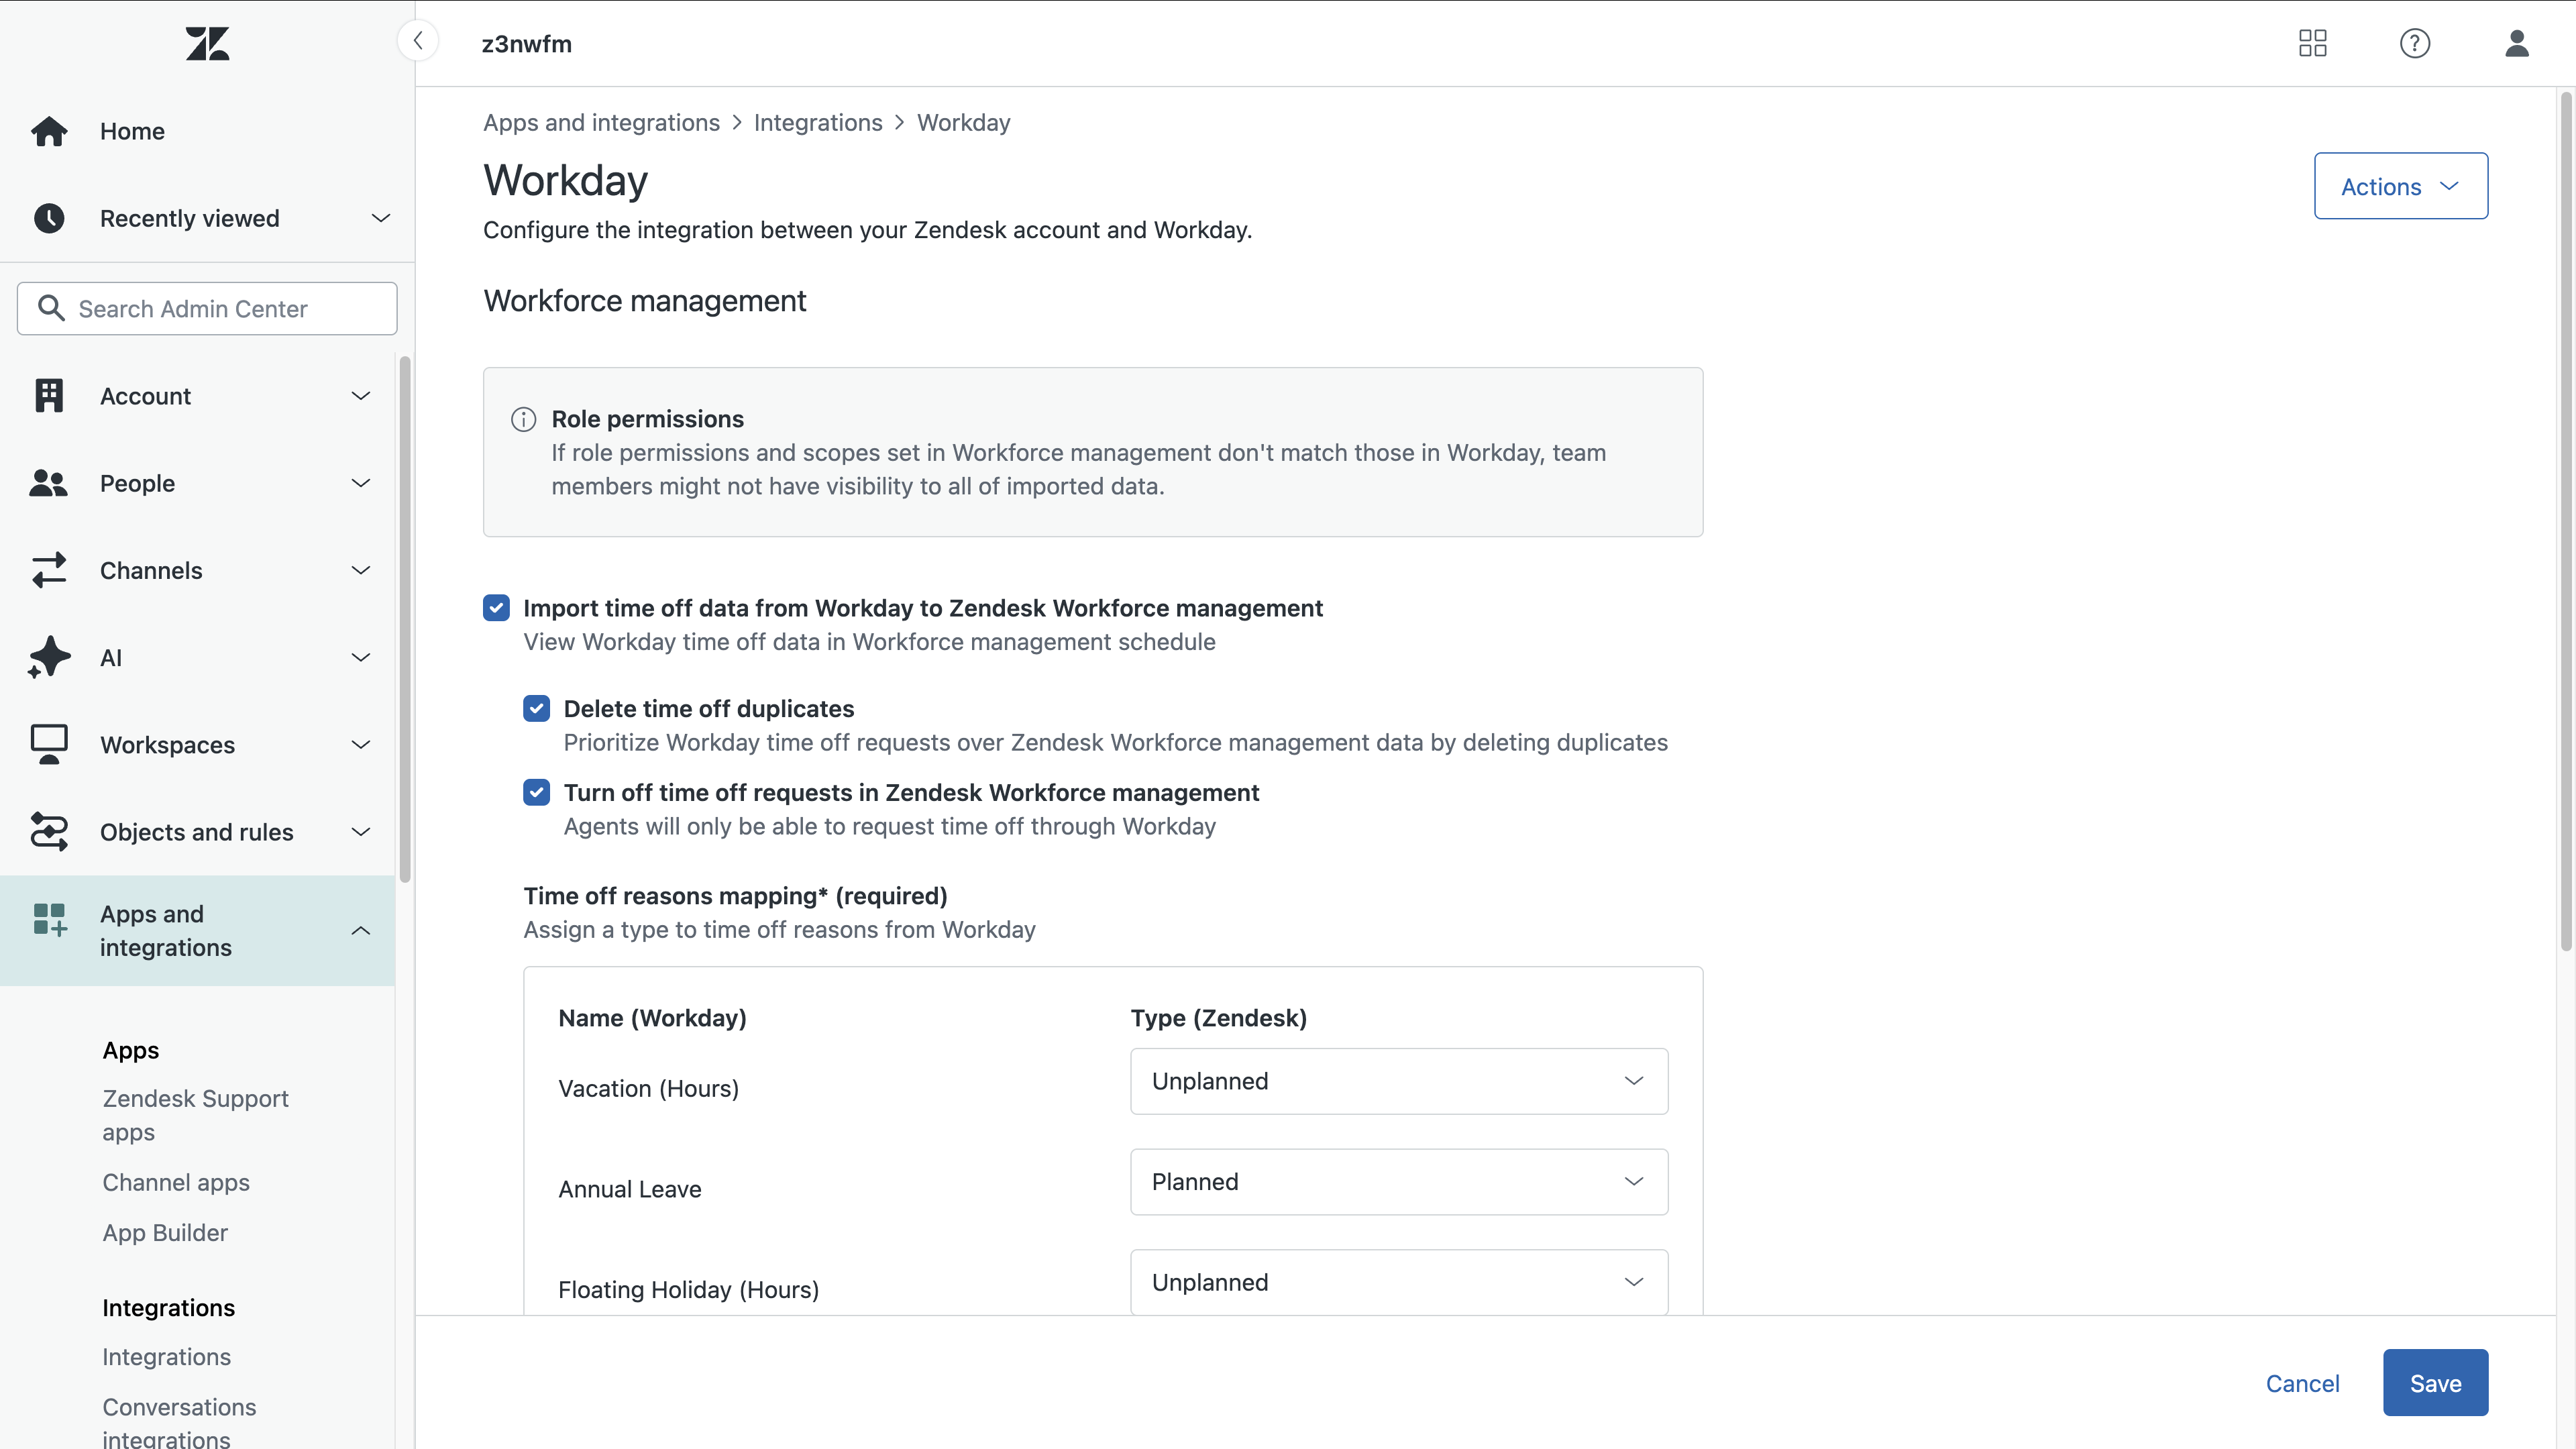
- Select Import time off data from Workday to Zendesk Workforce management to
view your Workday time off data in WFM schedule.Note: If you later edit the integration and deselect this option, the connection remains active but no more time off data is synced from Workday to WFM.
- (Optional) Select Delete time off duplicates to prioritize Workday time off requests over Zendesk WFM requests and remove any duplicates.
- (Optional) Select Turn off time off requests in Zendesk Workforce management to ensure that agents cannot request time off from the agent schedule app within Zendesk, but only from Workday.
- Under Time off reasons mapping assign a Zendesk type (planned or unplanned) to each Workday time off
reason.
 If you see the message “No time off reasons in sight,” it might indicate a disruption in the API connection that prevented the time off reasons from syncing. In this case, save and enter the connection configuration again.
You can later edit the time off reason types on the Time off reasons page in WFM and they will automatically sync in Admin Center.
- Click Save.
This connection between Workday and WFM is now set up and data is syncing.
Each time new Workday time off reasons are detected, you'll receive an email indicating that an update to the Workday integration is required to use the new time off reasons in WFM.
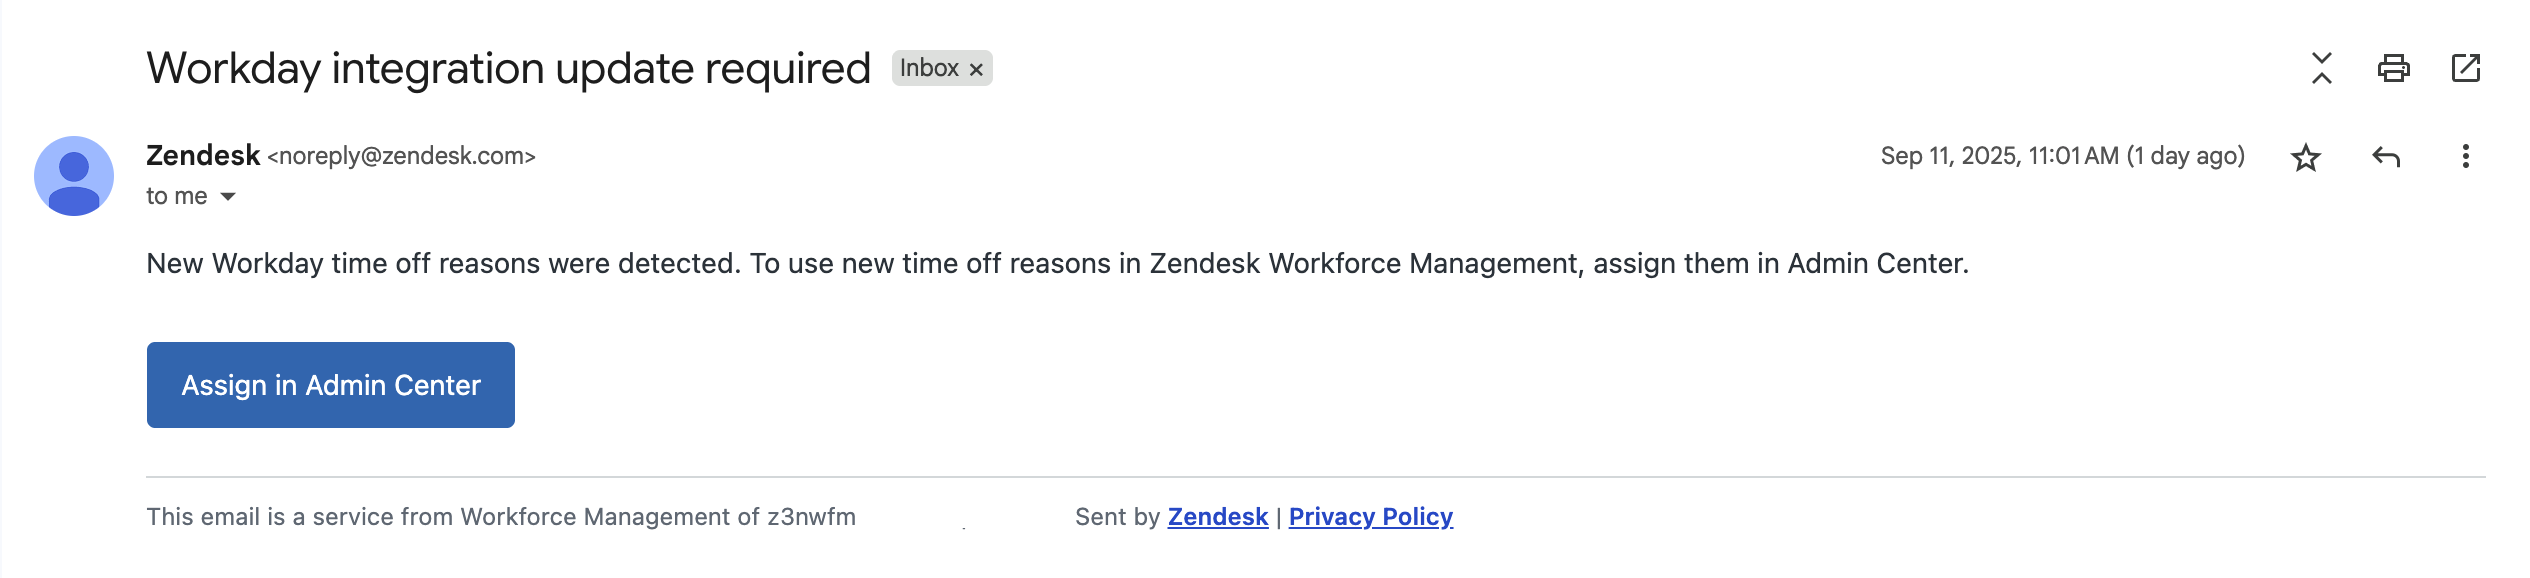
Clicking the "Assign in Admin Center" button automatically takes you to the connection settings page, where you can assign them under "Time off reasons mapping".
The message “Update required” is also displayed under the connection Status.
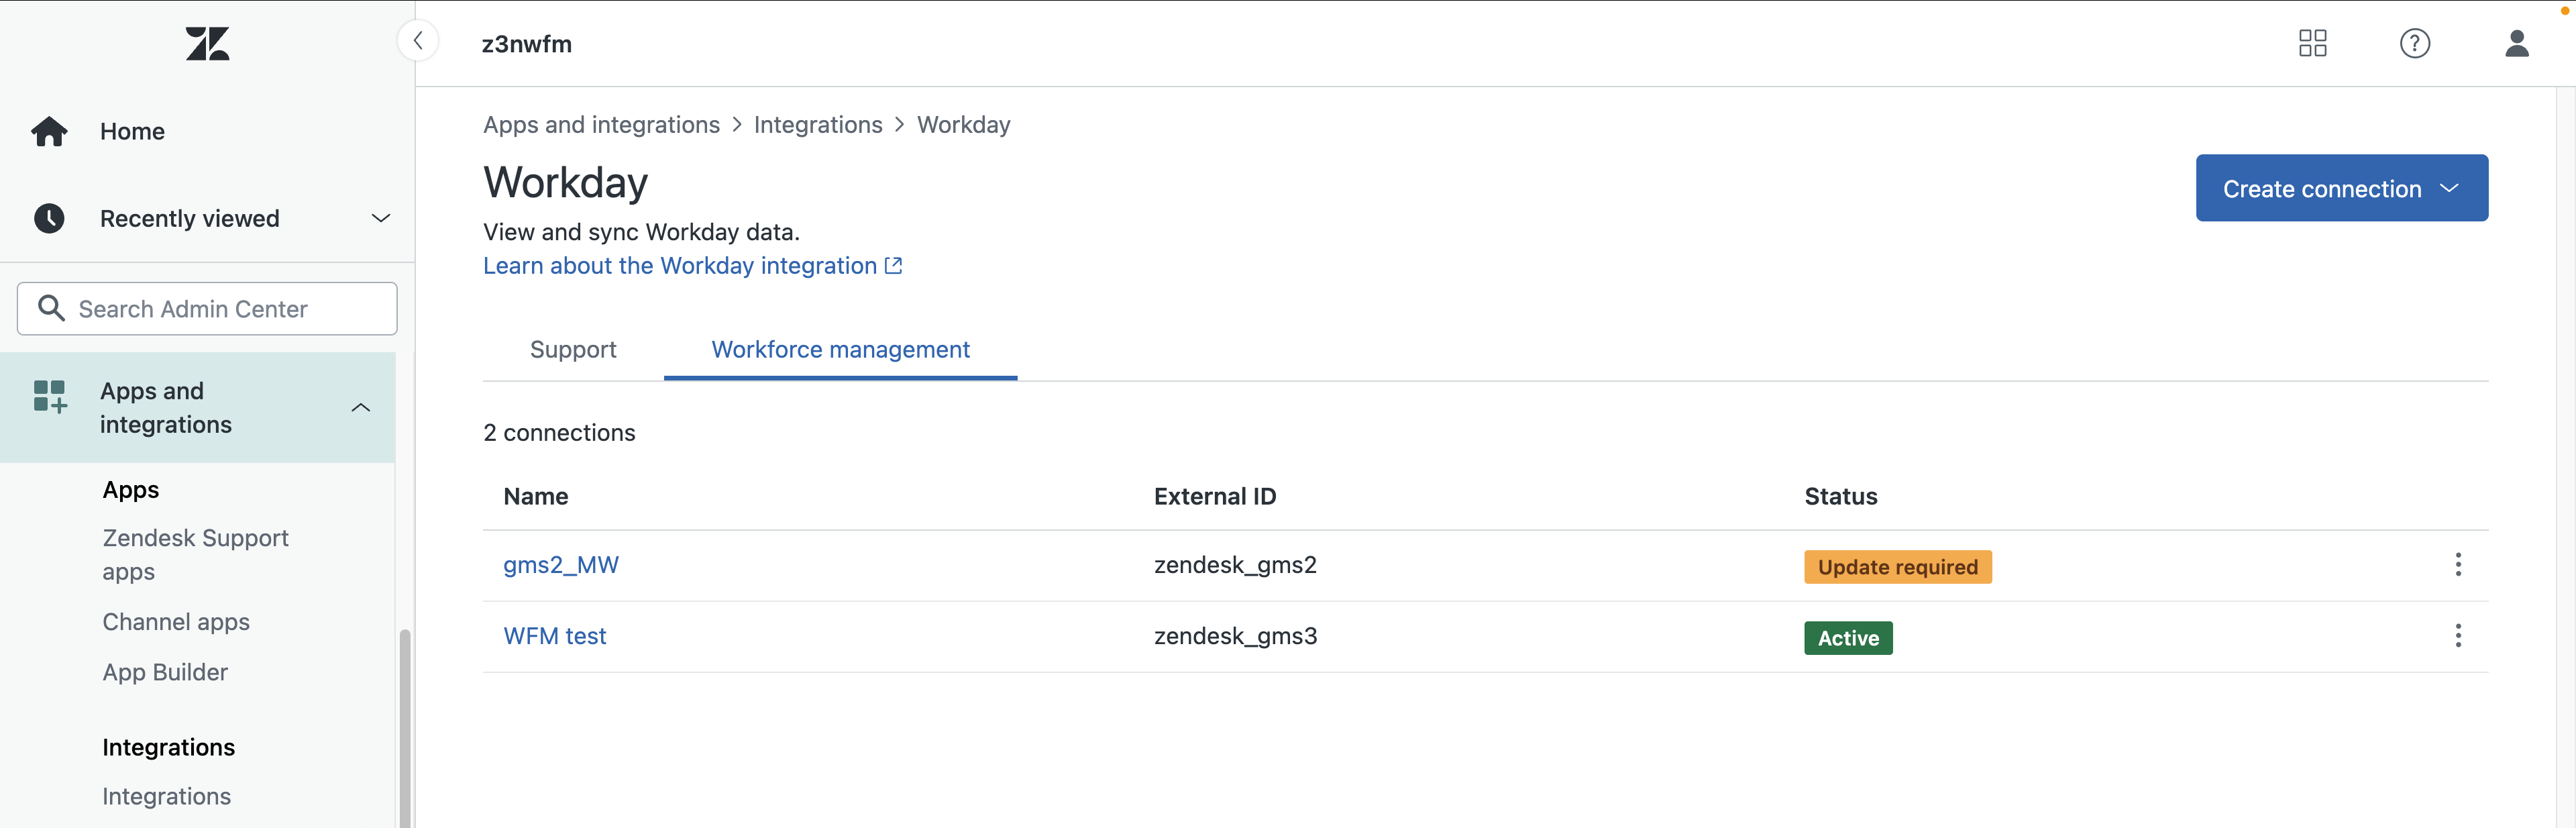
Edit the connection to assign the new Workday time off reason to a Zendesk type.
Reviewing Workday partial time off requests
Partial day time off requests in Workday must undergo manual review and approval by an admin before they display on the WFM Schedule page.
To review Workday partial day time off requests
-
By default, pending time off requests are displayed. You can view pending time off requests by team or individual agent. See Viewing time off requests.
- Hover over the request you want to review. In the Action column, click
Review.
- To allocate this time off request in the schedule, add its start time.
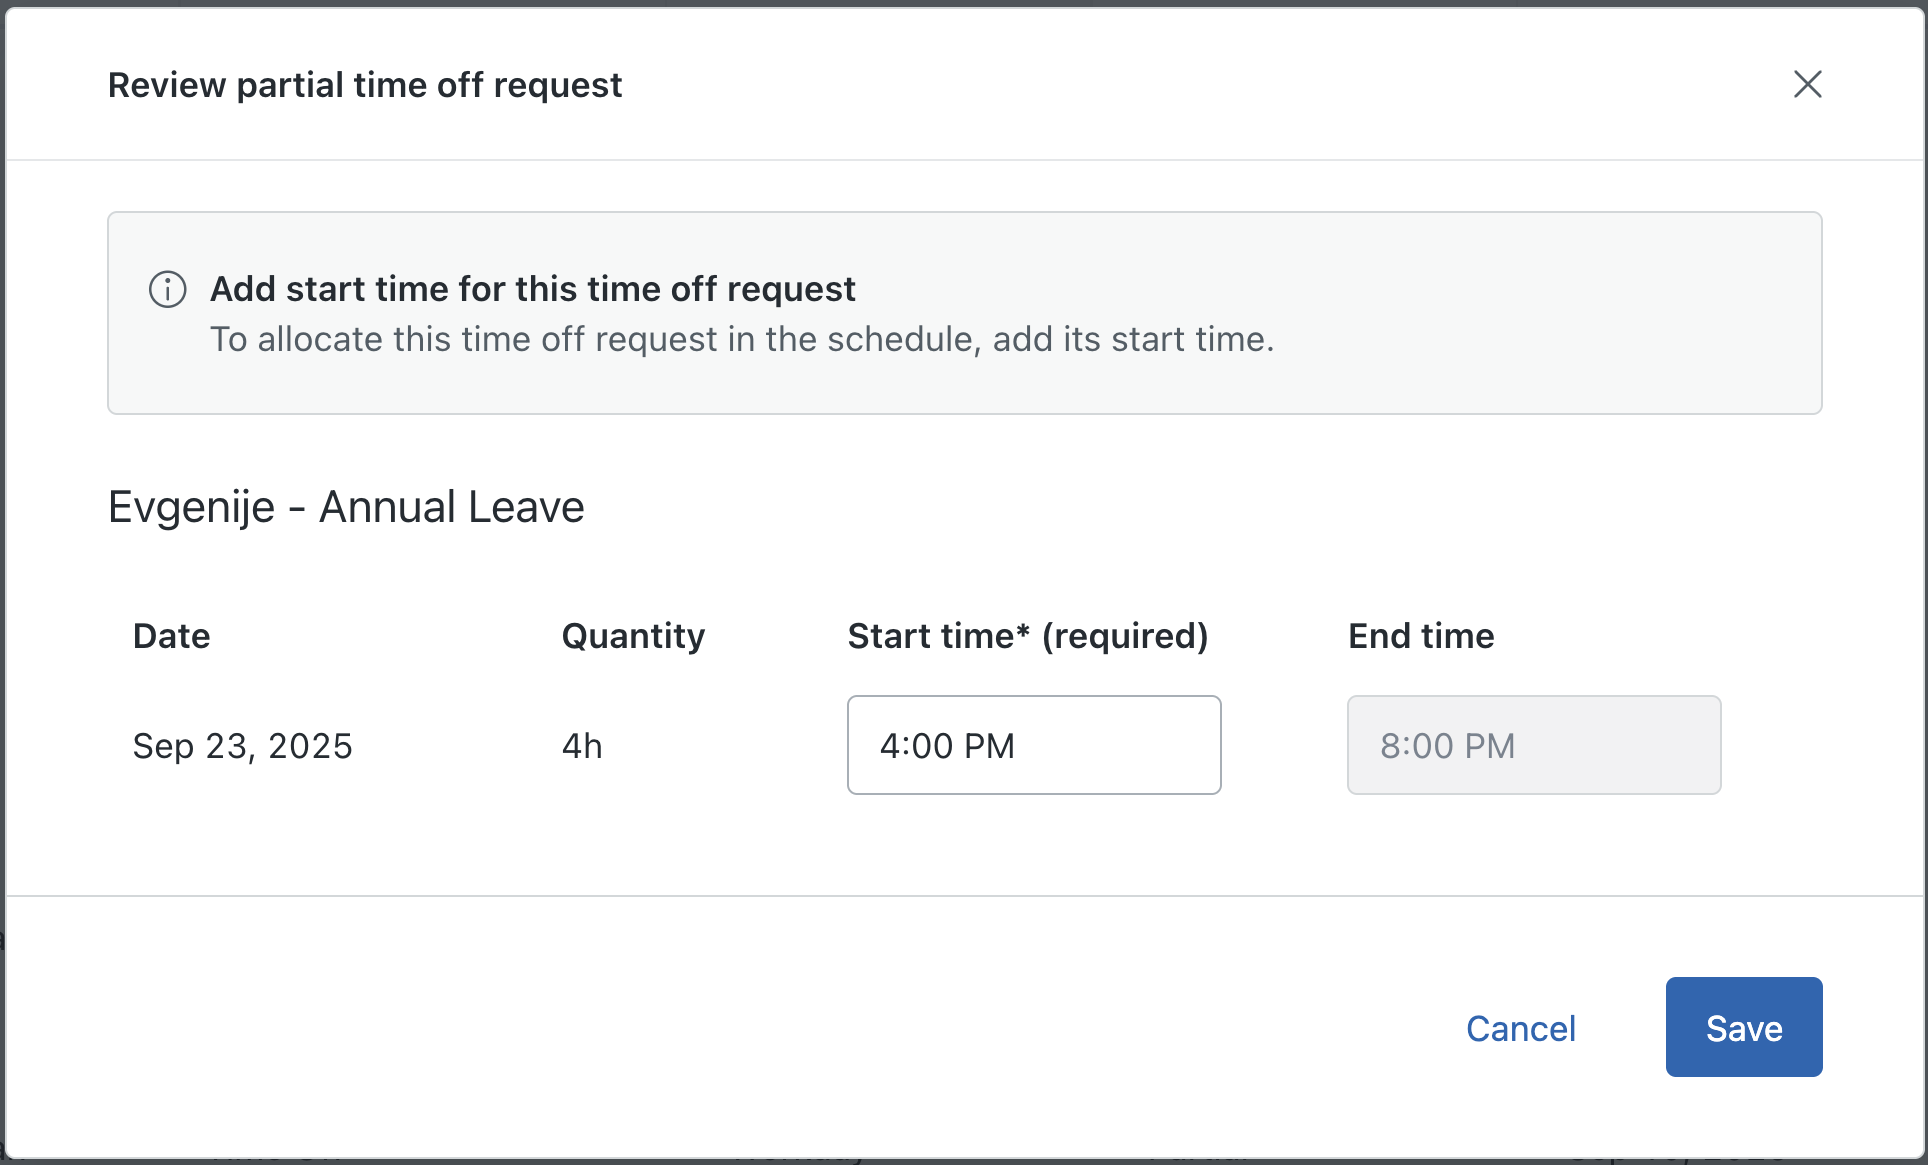
- Click Save.
The time off is automatically approved.
Editing the Workday with Zendesk WFM integration settings
After you’ve successfully connected the Workday integration with Zendesk WFM, you can update and edit its settings at any time.
To edit the Workday integration with Zendesk WFM settings
- In Admin Center, click
Apps and integrations in the sidebar, then select Integrations >
Integrations.
- Click Workday in the list.
- Select the Workforce management tab.
- Click the name of the connection you want to edit.
- Update the integration settings.
- Click Save.
Disconnecting the Workday integration with Zendesk WFM
If you disconnect the Workday integration with Zendesk WFM, data stops syncing from Workday into WFM. All imported time off entries that showed Workday as the source that have already occurred will continue to display Workday as the source on the WFM Time off management page and the time off reasons page. All imported time off entries that showed Workday as the source but are still to occur are changed to show WFM as the source.
Each time you disconnect and reconnect the integration, a new time off reason is created.
To disconnect the Workday integration with Zendesk WFM
- In Admin Center, click
Apps and integrations in the sidebar, then select Integrations >
Integrations.
- Click Workday.
- Select the Workforce management tab.
- Click the name of the connection you want to edit.
- Click Actions and select Disconnect.
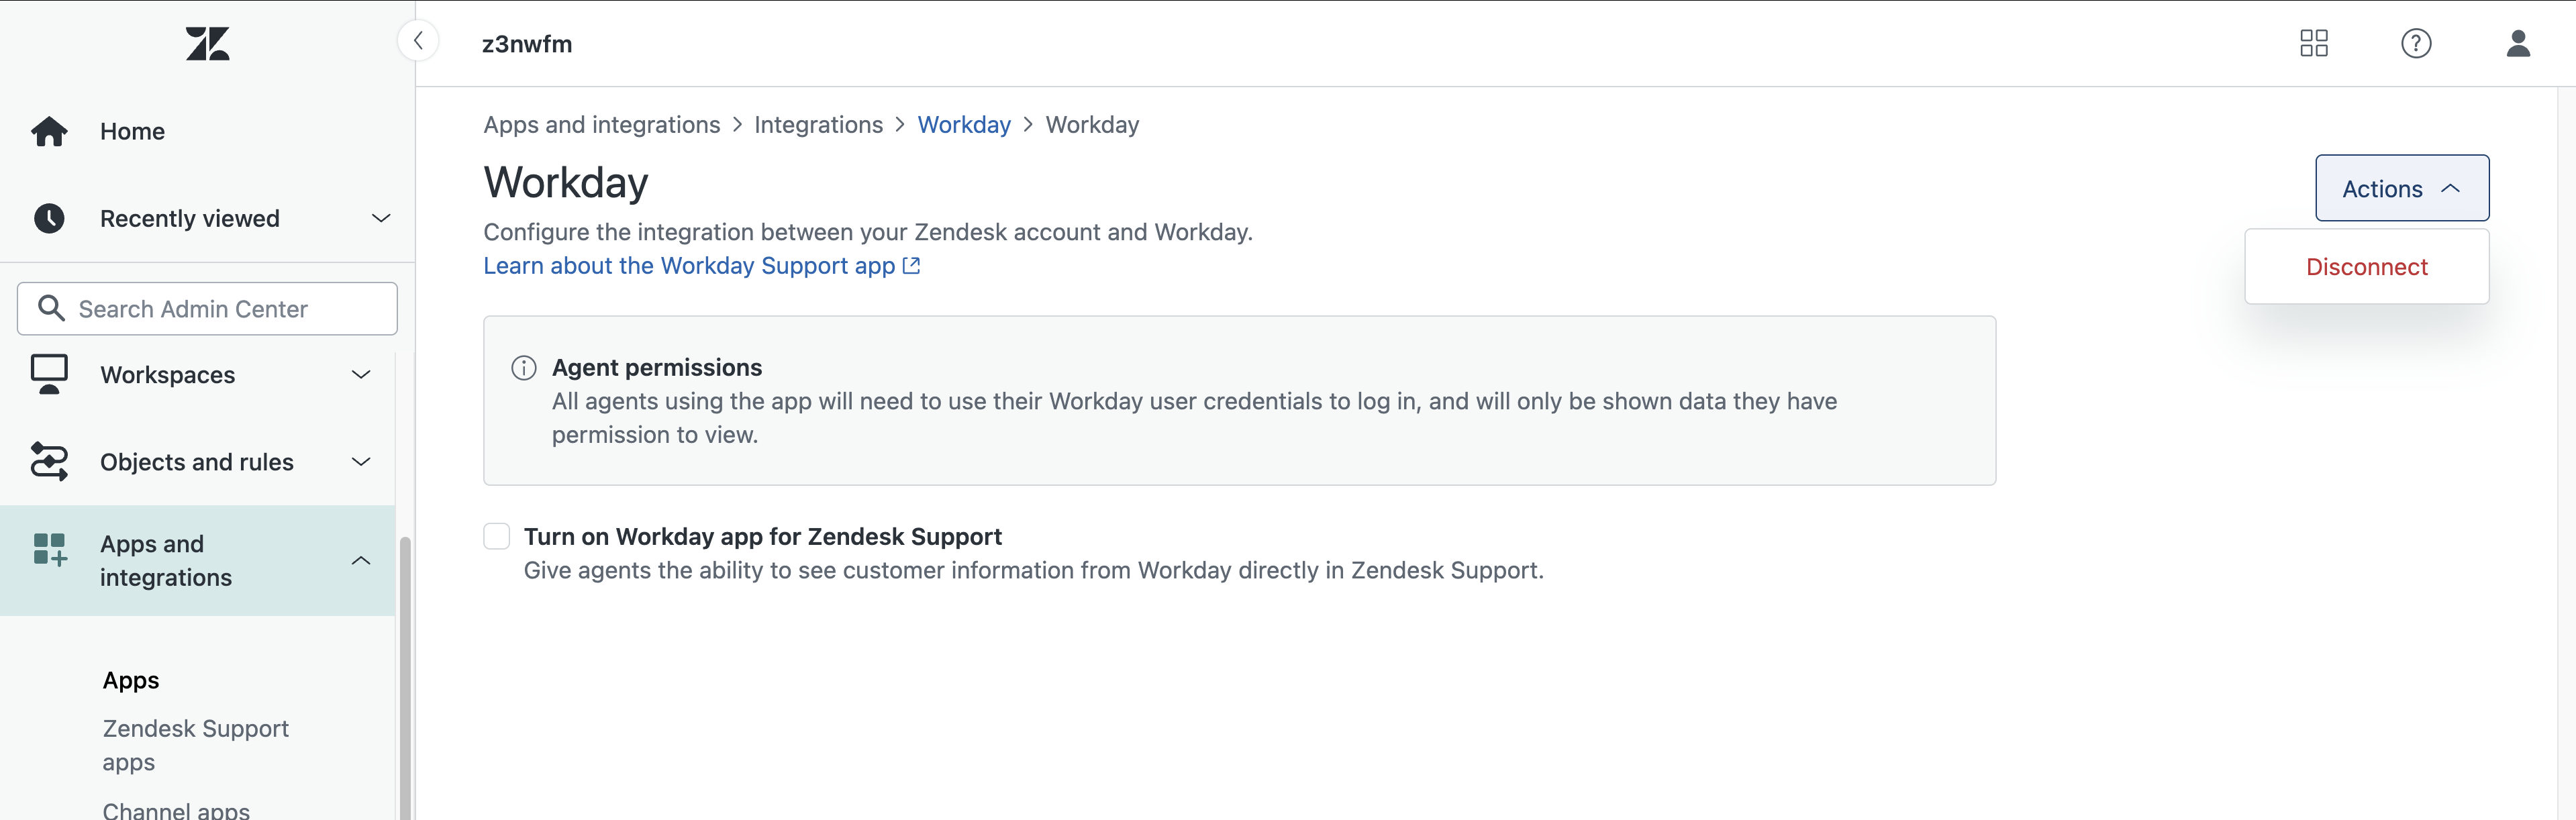
- Click Disconnect to confirm.