After you create an AI agent for email, you can manage settings that affect how it behaves on email (including API and web form) channels.
This article contains the following topics:
Configuring the sender of AI agent email responses
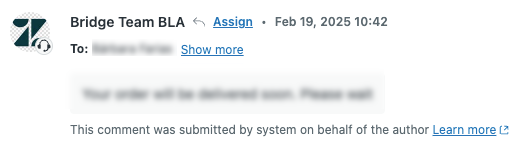
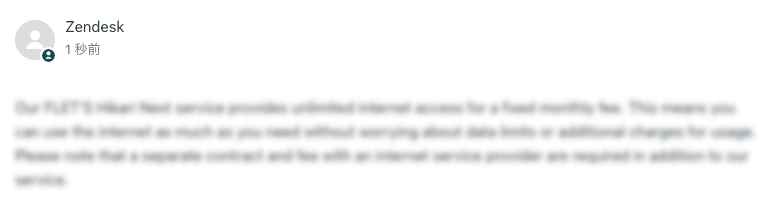
Email responses sent by an AI agent can be viewed in two places:
- As actual emails that arrive in the customer’s inbox
- As public comments in the associated ticket in the Agent Workspace
The user listed as the sender of the AI agent’s email responses is different depending on which channel the ticket was created through and which place you’re viewing.
In tickets created through the email channel:
- In the email in the customer’s inbox, the sender is the brand name and support address you’ve selected in Admin Center.
- In the ticket in the Agent Workspace, the sender is the system user by
default, but this sender can be configured.
- If you use the default system user:
- The AI agent’s response is shown as coming from the system
user.

- No agent seat is consumed in your account.
- The AI agent’s response is shown as coming from the system
user.
- If you select a different user:
- The AI agent’s response is shown as coming from the selected
user, including their name, email, and signature (if configured).
- An agent seat is consumed in your account by the selected user.
- The AI agent’s response is shown as coming from the selected
user, including their name, email, and signature (if configured).
- If you use the default system user:
In tickets created through the web form and API channels:
- If you use the default system user:
- The AI agent’s response is shown as coming from the Zendesk user in both
the customer’s inbox as well as in tickets in the Agent
Workspace.
- No agent seat is consumed in your account.
- The AI agent’s response is shown as coming from the Zendesk user in both
the customer’s inbox as well as in tickets in the Agent
Workspace.
- If you select a different user:
- The AI agent’s response is shown as coming from the selected user, including their name, email, and signature (if configured).
- An agent seat is consumed.
Whether you should use the system user or a different user depends on your setup and goals:
- Use the system user if you:
- Don’t use the web form or API channels for customer support.
- Want to free up an agent seat.
- Use a different user if you:
- Use the web form or API channels in addition to the email channel for customer support.
- Want increased branding and customization for the AI agent’s responses as seen in tickets in the Agent Workspace.
If you use a different user as the sender of AI agent email responses, it’s recommended to create a dedicated user that’s used only for this purpose. You shouldn’t reuse a human agent’s account as the sender of the AI agent’s email response. Doing so can cause confusion about whether the human agent or AI agent sent the response.
To create and configure the sender of agent email responses
- (Recommended) Create a unique company email address for your AI agent.
-
Add the AI agent as a user with
the following roles:
- Support: Admin
- AI agents: Client admin
-
Create a group and add only the AI
agent user to that group.
Don't add the AI agent user to any other groups.
- Give the AI agent user API access for ticketing.
- In the AI agents workspace, select the AI agent you want to work with.
- Click
 Settings in the sidebar, then select General.
 - Under Sender, click the drop-down field and select the user you
created above.
This user appears in tickets as the sender of the AI agent response.
- Click Save.
- Edit the AI agent's email automation trigger to update its conditions as necessary to account for the selected user.
Managing an AI agent's email automation trigger
When you create an AI agent, a trigger is automatically created to control how the AI agent responds to customer requests on the email channel. You can manage this trigger at any time in Admin Center.
This section contains the following topics:
About the email automation trigger
By default, an AI agent’s email automation trigger is named Ultimate.ai Multitouch Ticket Automation: <AI agent ID> and has the following default configuration:
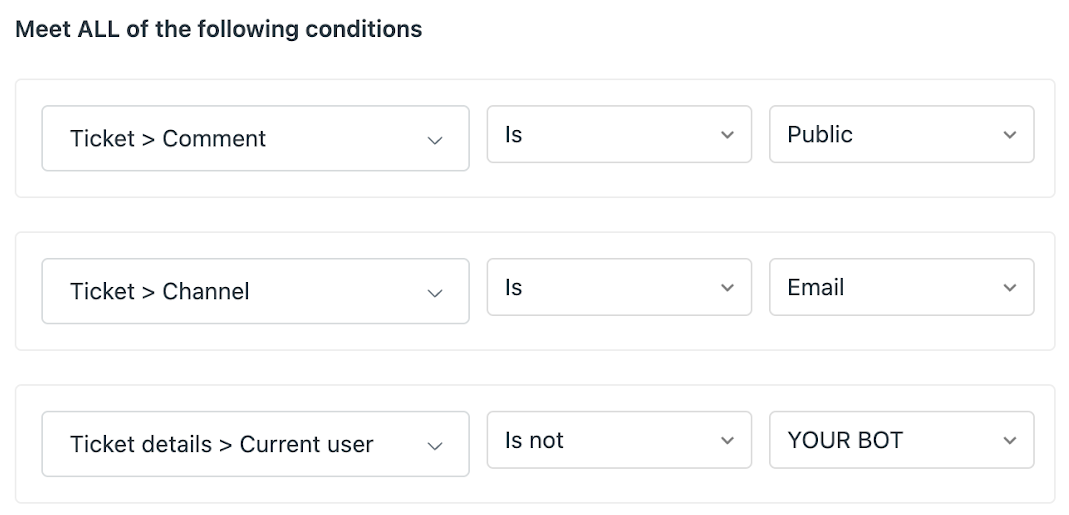
-
Meet ALL of the following conditions:
-
Ticket > Comment | Is | Public
This condition ensures that the AI agent is notified of each customer, agent, or AI agent reply.
-
Ticket > Channel | Is | Email
This condition ensures that the AI agent is notified for comments on the email channel only.
-
-
Ticket > Comment | Is | Public
-
Meet ANY of the following conditions:
-
Ticket > Ticket | Is | Created
This condition ensures the AI agent responds to the first comment in a ticket.
-
Ticket > Ticket | Is | Updated
This condition ensures the AI agent responds to subsequent comments in a ticket.
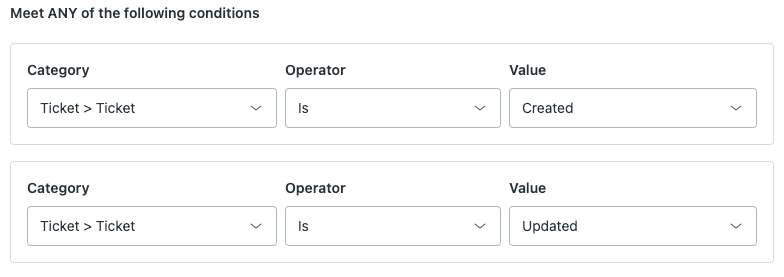
-
Ticket > Ticket | Is | Created
-
Actions
- Category: Notify by > Active webhook
- Value: Ultimate.ai Automation Webhook: <your AI agent ID>
- Endpoint: https://zendesk-support-automation.us.ultimate.ai/v1/webhook
- Method: POST
- JSON
body:
{"botId": "YOUR_AI_AGENT_ID",
"message": "**{{ticket.title}}** \n\n
{{ticket.latest_comment_rich}}",
"conversationId": "{{ticket.id}}",
"type": "message",
"tags": "{{ticket.tags}}",
"channel": "{{ticket.via}}",
"requester": "{{ticket.requester.id}}",
"currentUser": "{{current_user.id}}",
"submitterRole": "{{ticket.submitter.role}}",
"authorRole": "{{ticket.comments.first.author.role}}",
The JSON body includes details that allow the AI agent to ignore agent replies (though you can allow this if you want) and to not reply to tickets older than three days. The type is also changed for analytical purposes.Note: If your workflow involves using a trigger to send an internal note upon ticket creation, you should adjust the default "authorRole" value in the AI agent email automation trigger. When "authorRole" is set to "{{ticket.comments.first.author.role}}", a configuration issue can arise if an internal note is sent at the same time as the webhook fires. In this scenario, the webhook might send the user's role as agent instead of an end user, which prevents the AI agent from replying to the conversation. As a workaround, replace the "authorRole" value with "{{ticket.comments.last.author.role}}" instead.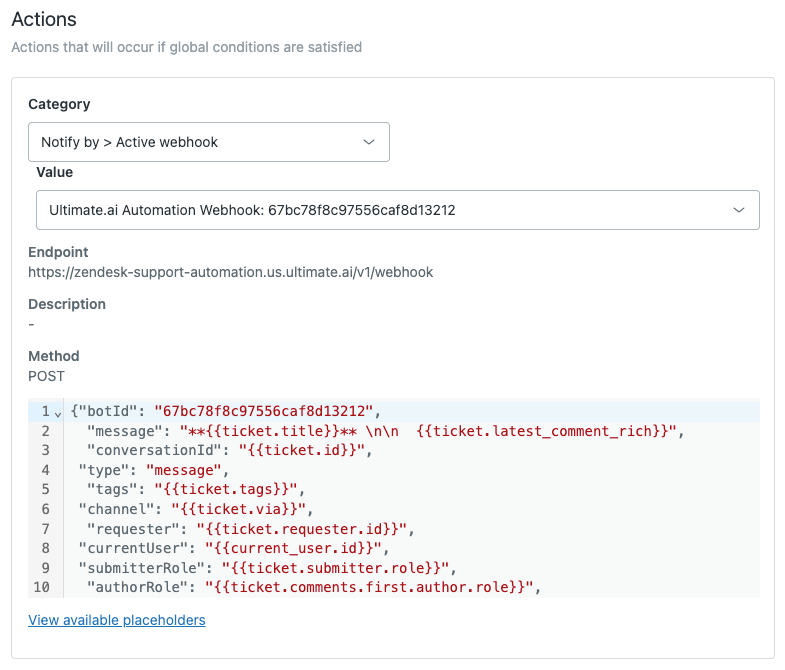
Reordering the email automation trigger
You can reorder your list of AI agent ticket triggers to designate the order they're fired in. For instructions and more information on the overall impact this can have on your workflows, see Reordering and sorting your list of ticket triggers.
Editing the email automation trigger
You can edit the email automation trigger as needed. Some examples of edits you might want to make include:
- Responding to agent-submitted tickets
- Supporting the web form channel
- Supporting the API channel
- Removing the authorized user condition
To edit the email automation trigger
- In the AI agents workspace, select the AI agent you want to work with.
- Click
Settings in the sidebar, then select General.
- Under Channels, click Go to triggers.
The trigger’s configuration page opens in Admin Center.
- Edit the trigger as necessary.
- Click Save.
Responding to agent-submitted tickets
By default, the email automation trigger is configured so that the AI agent doesn’t respond to tickets submitted by agents. However, you might want to allow this, especially during testing.
To allow the AI agent to respond to agent-submitted tickets
- Edit the email automation trigger.
- Remove the following lines from the JSON
body:
"submitterRole": "{{ticket.submitter.role}}", "authorRole": "{{ticket.comments.first.author.role}}", - Click Save.
Supporting the web form channel
By default, the email automation trigger is configured to work only on the email channel. However, you can add web form as a supported channel for your AI agent.
To add the web form channel as a supported channel
- Edit the email automation trigger.
- Under Meet ALL of the following conditions, delete the
following condition:
- Ticket > Channel | Is | Email
- Under Meet ANY of the following conditions, add the following
conditions:
- Ticket > Channel | Is | Email
- Ticket > Channel | Is | Web form
- Click Save.
Supporting the API channel
By default, the email automation trigger is configured to work only on the email channel. However, you can add API as a supported channel for your AI agent.
When using the Zendesk API, tickets are always created with the authentication token’s owner’s ID as the currentUser. Because of this, the AI agent interprets these created tickets as being agent-submitted, which it’s configured to ignore. However, you can support the API channel by cloning the email automation trigger and using the copy in addition to the default trigger.
When a conversation is created through the API, only the first message’s source is marked as API, while the rest of the messages go through email. Because of that, the trigger needs to cover only the Created event for these conversations. Furthermore, the two triggers won’t overlap because the default trigger doesn’t include API as a channel condition, while the copy does.
The JSON body provided below overwrites the currentUser field with this trigger to contain the requester, making it look like it was submitted by a customer. So both the requester and currentUser will be equal to {{ticket.requester.id}}.
To clone the trigger and configure it to support the API channel
- In the AI agents workspace, select the AI agent you want to work with.
- Click
Settings in the sidebar, then select CRM integration.
- Select the Integration tab.
- Click Edit automation trigger.
The trigger’s configuration page opens in Admin Center.
- Click Actions in the upper-right and select Clone.
A copy of the automation trigger is created.
- Under Meet ALL of the following conditions, delete the
existing conditions and add the following conditions instead:
- Ticket > Channel | Is | Web service (API)
- Ticket > Ticket | Is | Created
- Under Meet ANY of the following conditions, delete the existing conditions.
- Under Actions, replace the existing JSON body with the
following:
{ "botId": "<YOUR_AI_AGENT_ID>", "message": "**{{ticket.title}}** \n\n {{ticket.latest_comment_rich}}", "conversationId": "{{ticket.id}}", "type": "message", "tags": "{{ticket.tags}}", "channel": "{{ticket.via}}", "requester": "{{ticket.requester.id}}", "currentUser": "{{ticket.requester.id}}", "submitterRole": "{{ticket.submitter.role}}", "createdAt": "{{ticket.created_at_with_timestamp}}", "updatedAt": "{{ticket.updated_at_with_timestamp}}" } - Click Create trigger.
Removing the authorized user condition
If you created the email automation trigger before February 11, 2026, the trigger configuration might include a condition for an authorized user. After this date, an authorized user is no longer involved in the connection between an AI agent and the email channel. As a result, your email AI agent may not function correctly if you still have this condition as part of your trigger. This condition should be removed.
To remove the authorized user condition
- Edit the email automation trigger.
- Remove the following condition:
Ticket details > Current user | Is | (agent)
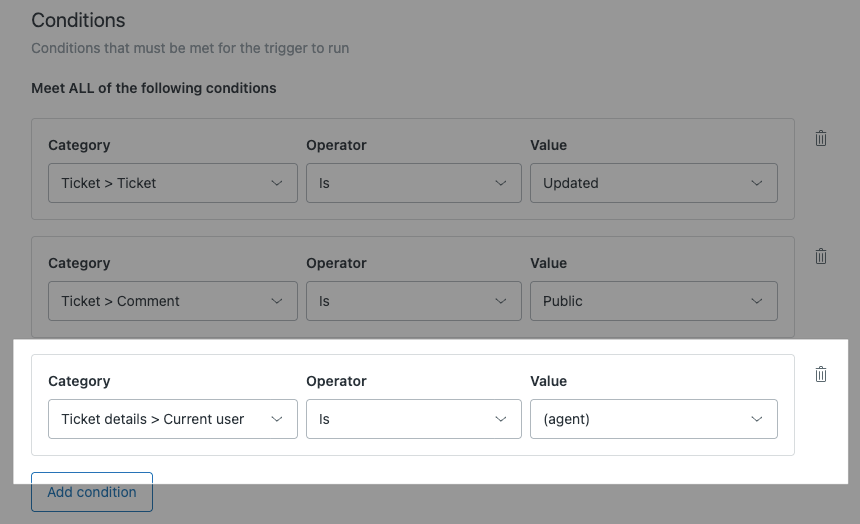
- Click Save.